1800/12 V # Güde GmbH & Co. KG - Birkichstrasse 6 - D Wolpertshausen - Deutschland. Deutsch D 4 Originalbetriebsanweisung ELEKTROSEILWINDE
|
|
|
- Anežka Moravcová
- před 8 lety
- Počet zobrazení:
Transkript
1 1800/12 V #55128 Deutsch D 4 Originalbetriebsanweisung ELEKTROSEILWINDE English GB 9 Translation of original operating instructions ELECTRIC CABLE WINCH Français F 14 Traduction du mode d emploi d origine TREUI L À CÂBLE ÉLECTRIQUE Čeština CZ 19 Překlad originálního návodu k provozu ELEKTRICKÝ LANOVÝ NAVIJÁK Slovenčina SK 24 Preklad originálneho návodu na obsluhu ELEKTRICKÝ LANOVÝ NAVIJAK Nederlands NL 29 Vertaling van de originele gebruiksaanwijzing ELEKTRISCHE KABELLIER Italiano I 34 Traduzione del Manuale d Uso originale VERRICELLO ELETTRICO Magyar H 39 Eredeti használati utasítás fordítása ELEKTROMOS DRÓTKÖTELES EMELŐ Güde GmbH & Co. KG - Birkichstrasse 6 - D Wolpertshausen - Deutschland

2 A B C D E

3 F G H I J K 10 a M L 11 12
4 Einleitung Damit Sie an Ihrem neuen Gerät möglichst lange Freude haben, bitten wir Sie, die Betriebsanweisung und die beiliegenden Sicherheitshinweise vor Ingebrauchnahme sorgfältig durchzulesen. Ferner wird empfohlen, die Gebrauchsanweisung für den Fall aufzubewahren, dass Sie sich die Funktionen des Artikels später nochmals ins Gedächtnis rufen möchten. Im Rahmen ständiger Produktweiterentwicklung behalten wir uns vor zur Verbesserung technische Änderungen umzusetzen. Bei diesem Dokument handelt es sich um die Originalbetriebsanweisung. Gewährleistung Die Gewährleistung erstreckt sich ausschließlich auf Mängel, die auf Material- oder Herstellungsfehler zurückzuführen sind. Bei Geltendmachung eines Mangels im Sinne der Gewährleistung ist der original Kaufbeleg mit Verkaufdatum beizufügen. Von der Gewährleistung ausgeschlossen sind unsachgemäße Anwendungen, wie z. B. Überlastung des Gerätes, Gewaltanwendung, Beschädigungen durch Fremdeinwirkung oder durch Fremdkörper. Nichtbeachtung der Gebrauchs- und Aufbauanleitung und normaler Verschleiß sind ebenfalls von der Gewährleistung ausgeschlossen. Kennzeichnungen Produktsicherheit: Gebote: Vor Gebrauch Bedienungsanleitung lesen Sicherheitsschuhe benutzen Umweltschutz: Abfall nicht in die Umwelt sondern fachgerecht entsorgen. Schadhafte und/oder zu entsorgende elektrische oder elektronische Geräte müssen an den dafür vorgesehen Recycling-Stellen abgegeben werden. Verpackung: Vor Nässe schützen Handschutz benutzen Verpackungsmaterial aus Pappe kann an den dafür vorgesehen Recycling- Stellen abgegeben werden. Packungsorientierung Oben Produkt ist mit den einschlägigen Normen der Europäischen Gemeinschaft konform Schutzklasse 3 Interseroh-Recycling Verbote: Technische Daten: Am Netzstecker ziehen verboten! Vor Regen und Feuchtigkeit schützen! Anschluss Gewicht Hineinfassen verboten Bedienung mit Krawatte verboten Seillänge Ø Seilstärke IP54 Bedienung mit Halskette verboten Bedienung mit langen Haaren verboten Max. Zugkraft Schutzart Warnung: Technische Daten Warnung/Achtung Umstehende Personen ausreichend Abstand einhalten Einzugsgefahr Achtung Stolpergefahr Typ / Modell: 1800/12 VOLT Max. Zugkraft: 1800 kg Max. Zugkraft mit Umlenkrolle: 3600 kg Max. Zugkraft schwimmende Gegenstände: 3200 kg Max. Zugkraft rollende Gegenstände: 4100 kg Schutzart: IP 54 Schutzklasse: 3 Anschluss: 12 Volt Seillänge: 9 m Seilstärke Ø: 5,5 mm 4

5 Zuggeschwindigkeit: Hakenöffnung Tropfenform: Befestigungsplatte (Anhängerkupplung): Fernbedienungskabel: Stromkabel: Gewicht: Lieferumfang 1,8 m/min. 95 x mm 230 x 125 mm 3 m 4,5 m 15 kg Nehmen Sie das Gerät aus der Transportverpackung und prüfen Sie die Vollständigkeit und das Vorhandensein folgender Teile: Bedienkabel Netzanschlusskabel 9 m Zugseil mit Haken Adapterplatte für Anhängerkupplung Handkurbel Umlenkrolle Originalbetriebsanweisung Sollten Teile des Lieferumfangs fehlen oder beschädigt sein, wenden Sie sich bitte an Ihren Händler. Gerätebeschreibung (Abb. A) 1. Handkurbel 2. Seilwindengehäuse 3. Bedienkabel 4. Betriebsschalter - Vorwärts / Rückwärts / Stop 5. Anschlussstecker Bedienkabel 6. Lasthaken mit Tropfenöffnung 7. Umlenkrolle mit Lasthaken 8. Netzanschlusskabel 9. Befestigungsplatte (Anhängerkupplung) 10. Sternschraube für Freilauf der Winde 11. Anschlussbuchse Bedienkabel 12. Anschlussbuchse Netzanschlusskabel 13. Ösen für 12-V-Batterieanschluss 14. Anschlussstecker Netzanschlusskabel Bestimmungsgemäße Verwendung Die Elektroseilwinde ist nur zum Ziehen von den, in den technischen Daten angegebenen Lasten geeignet. Die Elektroseilwinde muss gut befestigt sein und darf nur an Einer für diese Arbeit geeignete 12 V-Batterie betrieben werden. Die Elektroseilwinde ist nicht zum Heben von Lasten geeignet. Es dürfen mit dieser Maschine keine anderen Arbeiten verrichtet werden, als die Arbeiten für die die Maschine gebaut ist und die in der Bedienungsanleitung beschrieben werden. Jeder darüber hinausgehende Gebrauch gilt als nicht bestimmungsgemäß. Für daraus resultierende Schäden oder Verletzungen haftet der Hersteller nicht Bitte beachten Sie, dass dieses Gerät bestimmungsgemäß nicht für den gewerblichen Einsatz konstruiert ist. Allgemeine Sicherheitshinweise & Vorsichtsmassnahmen WARNUNG Lesen Sie alle Sicherheitshinweise und Anweisungen. Versäumnisse bei der Einhaltung der Sicherheitshinweise und Anweisungen können elektrischen Schlag, Brand und/oder schwere Verletzungen verursachen. Bewahren Sie alle Sicherheitshinweise und Anweisungen für die Zukunft auf. Dieses Gerät ist nicht dafür bestimmt, durch Personen (einschließlich Kinder) mit eingeschränkten physischen, sensorischen oder geistigen Fähigkeiten oder mangels Erfahrung und/oder mangels Wissen benutzt zu werden, es sei denn, sie werden durch eine für ihre Sicherheit zuständige Person beaufsichtigt oder erhielten von ihr Anweisungen, wie das Gerät zu benutzen ist. Kinder sollten beaufsichtigt werden, um sicherzustellen, dass sie nicht mit dem Gerät spielen. MACHEN SIE SICH MIT ALLEN ANWEISUNGEN GRÜNDLICH VERTRAUT, BEVOR SIE DIESES WERK- ZEUG BENUTZEN! DEN ARBEITSBEREICH SAUBERHALTEN. Unordnung am Arbeitsplatz führt schneller zu Unfällen. AUF ORDNUNGSGEMÄSSE BEDINGUNGEN AM ARBEITSORT ACHTEN. Werkzeuge nicht an feuchten, nassen oder schlecht beleuchteten Stellen verwenden. Nicht dem Regen aussetzen. Arbeitsbereich gut beleuchten. Keine elektrisch betriebenen Werkzeuge in der Nähe brennbarer Gase oder Flüssigkeiten benutzen. NICHT BENUTZTE AUSRÜSTUNGEN LAGERN. Wenn sie nicht benutzt werden, müssen Werkzeuge an einem trockenen, verschließbaren Ort aufbewahrt werden, um Rostbildung zu vermeiden. Geräte immer an abschließbarer Stelle aufbewahren, so dass Kinder keinen Zugang dazu haben. WERKZEUG NICHT ÜBERLASTEN. Das Werkzeug funktioniert am besten und sichersten bei der Leistung, für die es ausgelegt worden ist. Es ist untersagt, zu versuchen, mit Hilfe ungeeigneter Anbauten die Leistungsfähigkeit des Werkzeuges zu verbessern. DAS RICHTIGE WERKZEUG FÜR DIE ZU LÖSEN- DE AUFGABE EINSETZEN. Ein Werkzeug darf nicht für einen Zweck verwendet werden, für den es nicht gedacht ist. DIE RICHTIGE KLEIDUNG TRAGEN. Keine losen Kleidungsstücke oder Schmucksachen tragen, da die Gefahr besteht, dass diese in sich bewegende Teile geraten. Es wird empfohlen, rutschfestes Schuhwerk zu tragen. Langes Haar sollte mit einer geeigneten Kopfbedeckung zusammengehalten werden. Es ist immer eine geeignete Arbeitskleidung zu tragen. AUGEN-, GEHÖR- UND ATEMSCHUTZMITTEL VERWENDEN. Bei Arbeiten, bei denen Metallspäne oder Holzspäne erzeugt werden, ist immer eine die gesetzlichen Forderungen erfüllende Schutzbrille zu tragen. Bei Arbeiten, bei denen Metallstaub, Holzstaub und chemische Stäube und Nebel erzeugt werden, ist eine die gesetzlichen Forderungen erfüllende Staubmaske oder ein Atemschutzgerät zu tragen. Bei Arbeiten in einer lauten Umgebung ist ein geeigneter Gehörschutz zu tragen. STROMKABEL NICHT MISSBRÄUCHLICH VER- WENDEN. Das Stromkabel ist vor Beschädigung durch mechanische Einwirkungen, Zug oder korrosive Stoffe zu schützen. Netzstecker nicht durch Ziehen am Stromkabel aus der Steckdose ziehen. NICHT ÜBER DIE MASCHINE GREIFEN. Immer darauf achten, dass man sicher steht und nicht eine Stellung einnimmt, in der das Gleichgewicht gefährdet ist. Nicht über eine laufende Maschine greifen. WERKZEUGE SORGFÄLTIG WARTEN. Damit Werkzeuge immer gut und sicher funktionieren, müssen sie ständig sauber gehalten werden. Schmieranweisungen und Anweisungen zum Austausch von Zubehörteilen sind zu befolgen. Das Stromkabel regelmäßig überprüfen und von einem qualifizierten Fachmann reparieren lassen, wenn es beschädigt ist. Alle sich bewegenden Teile und Befestigungsschrauben vor der Benutzung überprüfen. Schaltgriff und Stromschalter immer sauber, trocken und frei von Öl und Fett halten. VERSTELLSCHLÜSSEL WEGRÄUMEN. Es ist sicherzustellen, dass Schlüssel und Verstellschlüssel vom Werkzeug oder der Arbeitsfläche der Maschine entfernt werden, bevor mit der Arbeit begonnen wird. UNBEABSICHTIGTES EINSCHALTEN VERMEI- DEN. Erst dann den Einschalter betätigen, wenn alle Vorbereitungen für die Arbeitsaufnahme beendet worden sind. NICHT IN DER AUFMERKSAMKEIT NACHLASSEN. Immer darauf achten, was man tut. Benutzen Sie diese Maschine nicht, wenn Sie müde sind. 5
 1. Handkurbel 2. Seilwindengehäuse 3. Bedienkabel 4. Betriebsschalter - Vorwärts / Rückwärts / Stop 5. Anschlussstecker Bedienkabel 6.")
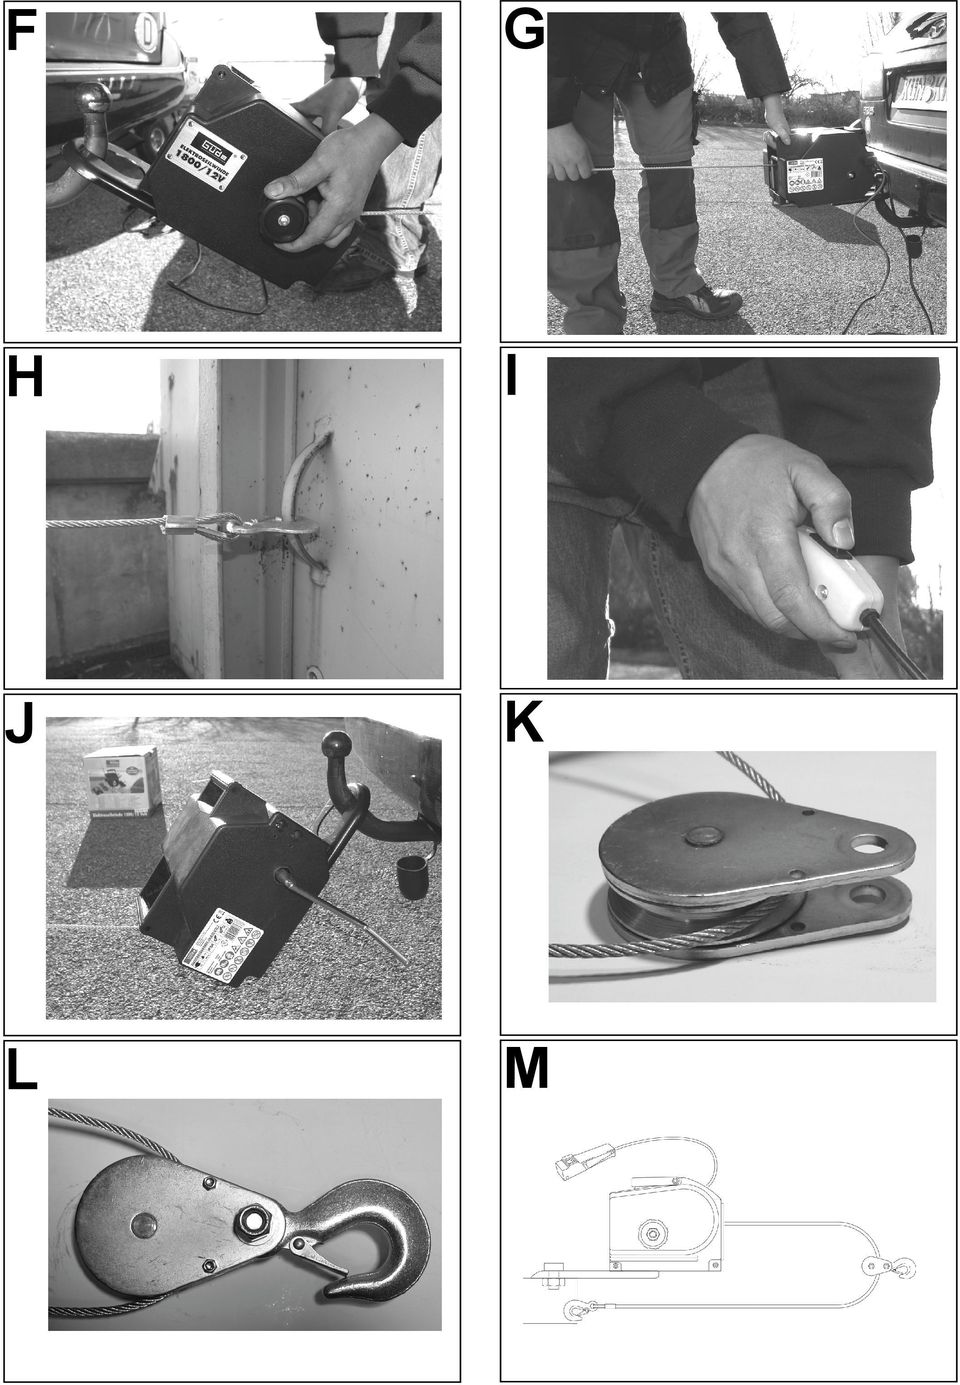
6 DIESE MASCHINE NICHT UNTER EINFLUSS VON ALKOHOL, DROGEN ODER VERSCHREIBUNGS- PFLICHTIGEN MEDIKAMENTEN BETREIBEN. AUF BESCHÄDIGTE TEILE HIN ÜBERPRÜFEN. Bevor ein Werkzeug verwendet wird, sind alle Teile, die so aussehen, als wären sie beschädigt, gründlich zu überprüfen, um festzustellen ob sie ordnungsgemäß funktionieren und ihren beabsichtigten Zweck erfüllen. Außerdem ist zu überprüfen, ob die sich bewegenden Teile richtig eingestellt und befestigt sind, ob Teile oder Befestigungen gebrochen sind, und ob sonstige Zustände vorliegen, die das ordnungsgemäße Funktionieren beeinträchtigen könnten. Beschädigte Teile sind sachgemäß von einem qualifizierten Techniker zu reparieren oder auszutauschen. Das Werkzeug darf nicht benutzt werden, wenn ein Schalter nicht richtig ein- und ausschaltet. ERSATZTEILE UND ZUBEHÖR. Bei Wartungsarbeiten dürfen nur Originalersatzteile verwendet werden. Bei Benutzung anderer Teile erlischt die Garantie. Es sind nur Teile und Zubehörteile zu verwenden, die für eine Verwendung mit diesem Werkzeug gedacht sind. Die entsprechenden Teile können von der Firma Güde GmbH & Co. KG bezogen werden. Gerätespezifische Sicherheitshinweise Die Benutzung dieses Gerätes kann zu gerätespezifischen Gefahrensituationen führen. Die Benutzung erfordert besondere Vorsicht im Interesse der eigenen Sicherheit und der Sicherheit anderer Personen. Das Seil Prüfen Sie das Stahlseil regelmäßig auf guten Zustand und ordnungsgemäße Befestigung. Nehmen Sie die Elektroseilwinde niemals in Betrieb wenn das Stahlseil durchgescheuert oder in irgendeiner Form Beschädigungen aufweist. Tauschen Sie das Seil niemals gegen ein weniger festes Stahlseil aus. Die Batterie: Prüfen Sie, dass die Batterie in gutem Zustand ist. Kontakt mit Batteriesäure oder anderen Schadstoffen vermeiden. Bei Arbeiten an der Batterie immer ordnungsgemäße Augenschutzmittel tragen. Den Motor während der Benutzung der Winde laufen lassen, um zu vermeiden, dass sich die Batterie entlädt. Abstand halten: Nicht in die Seilzugrichtung stellen. Falls das Seil abrutscht oder reißt, wird es in dieser Richtung zurückschnellen. Während die Winde in Betrieb ist, nicht mit den Händen, der Kleidung, dem Haar und Schmuckstücken in ihre Nähe kommen. Eine zweite Person hinzuziehen, die mit überprüft, ob die Winde sicher betrieben werden kann. Sicherstellen, dass diese Person ausreichend Abstand zum Fahrzeug und zum Seil hält, bevor die Winde eingeschaltet wird. Leistungsgrenzen: Nicht versuchen, die Grenzwerte für die Zugkraft dieser Winde zu überschreiten. Niemals die Handkurbeln zur Unterstützung der Winde verwenden. Dies führt zur Beschädigung der Winde und kann Verletzungen verursachen. Sichern Sie die gezogene Last bevor Sie das Seil an der Winde entlasten. Installation (Abb. E) Verkabelung der Elektrowinde Die Winde kann zeitweise verkabelt werden: 1. Die Gummidichtung anheben, und die Buchse des Kabels an den Stecker auf der rechten Seite des Windenkörpers anstecken. Das Kabel von der Winde zur Batterie verlegen und dabei darauf achten, dass es nicht in sich bewegende Teile gerät oder eine Stolpergefahr darstellt. 2. Das schwarze Kabel an den Rahmen des Fahrzeuges anklemmen, um eine Verbindung zur Masse herzustellen. Das rote Kabel an den Pluspol (+ / rot) der Batterie anklemmen. Hinweis: Sicherstellen, dass die verwendete Batterie eine 12-V-Autobatterie oder eine gleichwertige Batterie ist, die sich in gutem Zustand befindet. Achtung, das Gerät kann nicht an den Zigarettenanzünder eines Fahrzeuges angeschlossen werden. 3. Die Gummidichtung auf der linken Seite des Windenkörpers anheben. Die Fernbedienung nehmen und die Buchse am Ende des Kabels an den Anschluss an der linken Seite des Windenkörpers anstecken. 4. Die Fernsteuerung an eine sichere Stelle legen, bis die Winde betriebsbereit ist. ACHTUNG! 1. Immer rot mit rot (positiv mit positiv) und schwarz mit dem Rahmen - als Verbindung zur Masse - verbinden, wenn die Batterie des eigenen Fahrzeuges als Stromquelle genutzt wird. 2. Nie die Winde oder anderes Zubehör so lange benutzen, dass die Batterie völlig entladen wird. 3. Falls man den Motor während des Betriebs der Winde laufen lässt, um die Batterie ständig wieder aufzuladen, ist äußerste Vorsicht bei allen Arbeiten am und um das Fahrzeug herum erforderlich. 4. Schmutzige, korrodierte oder undichte Batterien dürfen nicht verwendet werden, da die Gefahr einer Verletzung durch austretende Säure besteht. 5. Bei allen Arbeiten an oder mit einer Batterie ist eine Schutzbrille zu tragen, die die geltenden Anforderungen an für derartige Arbeiten erforderliche Schutzbrillen erfüllt. Montage der Winde (Abb. B, C, D) Die Winde ist dafür ausgelegt, zeitweise unter Nutzung der Befestigungsvorrichtung für die Anhängerkupplung montiert zu werden. 1. Adapterplatte mittels der drei Stiftschrauben in die Bodenplatte der Winde einhaken. 2. Die aus Winde und Adapterplatte bestehende Baugruppe an der Anhängerkupplung befestigen, indem der Anhängekugelkopf durch das dafür vorgesehene Loch in der Adapterplatte gesteckt wird. Benutzung der Winde (Abb. F, G, H, I) 1. Das Getriebe des Fahrzeuges in die Leerlaufstellung schalten (die Winde niemals betreiben, wenn ein Gang oder die Parksperre eingelegt ist, da sonst das Fahrzeuggetriebe beschädigt werden kann). Die Handbremse anziehen. Die Räder mit geeigneten Radkeilen so sichern, dass das Fahrzeug nicht wegrollen kann. 2. Um das Seil herauszuziehen, den entsprechenden Schalter an der Fernbedienung betätigen und mit leichter Spannung von der Spule ziehen. Immer mindestens drei Seilwindungen auf der Spule lassen, um zu verhindern, dass das Seil aus der Winde gezogen wird. Sie können das Seil alternativ auch über die Freilauffunktion von der Spule ziehen. Drehen Sie hierfür den Kupplungsknopf (Abb. 1/10) im Urzeigersinn und lösen Sie Ihn. Ziehen Sie das Seil auf die gewünschte Länge heraus. Lassen Sie mindestens drei Seilwindungen auf der Spule. 3. Seil über ein Zugseil, eine Kette oder auf andere geeignete Weise am zu ziehenden Gegenstand einhaken. Nie das Seil um den Gegenstand legen und 6

7 dann direkt am Seil einhaken, da dadurch der zu ziehende Gegenstand beschädigt und das Seil knicken oder ausfransen kann. 4. Befestigen Sie den Kupplungsknopf wieder. 5. Zurücktreten bis an eine sichere Stelle, und dort den Schalter an der Fernsteuerung bedienen, um das Seil einzuziehen und den Gegenstand auf die gewünschte Weise mit der Winde zu ziehen. 6. Beim Ablassen der Last den entsprechenden Schalter der Fernsteuerung betätigen und langsam nachlassen. VORSICHT! 1. Während die Winde in Betrieb ist, nicht mit den Händen, der Kleidung, dem Haar oder Schmuck in die Nähe der Trommel und des Seiles kommen. 2. Die Winde nie benutzen, wenn das Seil ausgefranst, geknickt oder beschädigt ist. 3. Nie zulassen, dass jemand in der Nähe des Seiles steht oder hinter der Winde in einer Linie mit dem Seil, solange die Zugkraft noch auf das Seil wirkt. Wenn das Seil abrutscht oder reißt, kann es plötzlich zurückschnellen und alle in der Nähe befindlichen Personen gefährden. Während die Winde in Betrieb ist, müssen sich alle Personen in einem ausreichenden Abstand seitlich der Winde aufhalten. Betrieb mit Umlenkrolle (Abb. K, L, M) Zugkraft 1. Diese Winde hat eine Zugkraft von 1800 kg ohne Umlenkrolle und 3600 kg mit Umlenkrolle. Damit ist die Winde in der Lage, in der Praxis für folgende Dinge eingesetzt zu werden. a. Eine Last von bis zu 1800 kg auf einer ebenen Fläche aus dem Stillstand heraus in Bewegung zu setzen. b. Ein Wasserfahrzeug mit einer Masse von bis zu 3200 kg zu ziehen. c. Ein Fahrzeug mit Rädern mit einer Masse von bis zu 4100 kg in Bewegung zu halten. Einsatz der Handkurbel (Abb. J) Warnhinweis: Die Kurbel nicht zur Unterstützung der in Betrieb befindlichen Winde benutzen. Es besteht Verletzungsgefahr, und die Winde kann beschädigt werden. 1. Handkurbel auf das Gewinde drehen. 2. Die Handkurbel im Uhrzeigersinn drehen, um das Seil zu straffen. Dann weiter drehen, bis das Seil vollständig eingezogen ist. (Nur bei relativ geringen Massen mit Kurbel arbeiten. DIE HANDKURBEL VOR BENUTZUNG DER WIN- DE UNBEDINGT WIEDER DEMONTIEREN! Wartung Bevor Sie Wartungs- / Reinigungs- oder sonstige Arbeiten am Gerät durch führen, ist dieses immer vom Stromnetz zu trennen. Lassen Sie das Gerät vor dementsprechenden Arbeiten sowie einem Transport abkühlen. 1. Das Seil von Zeit zu Zeit mit Leichtöl schmieren. 2. Das Getriebe alle 6 Monate abschmieren. Dazu das linke und rechte Gehäuse abnehmen. Zum Schmieren darf nur ein qualitativ hochwertiges wasserfestes Fett verwendet werden. Vor jedem Gebrauch ist das Stahlseil auf Beschädigungen zu prüfen! In regelmäßigen Abständen ist der Lasthaken und die Umlenkrolle auf Beschädigungen zu prüfen. Restgefahren und Schutzmaßnahmen Mechanische Restgefahren Gefährdung Beschreibung Schutzmaßnahme(n) Erfassen, Aufwickeln Seil reißt Schnittverletzungen Weite Kleidung oder Schmuck kann von den beweglichen Teilen erfasst werden. Das Seil kann reißen und durch Rückschlag schwere Verletzungen verursachen. Aufspleissungen am Seil können zu Verletzungen führen. Tragen Sie stets eng anliegende Kleidung und keinen Schmuck der erfasst werden kann. Zuglast nicht überschreiten. Seil kontrollieren! Schutzhandschuhe tragen! Vernachlässigung ergonomischer Grundsätze Gefährdung Beschreibung Schutzmaßnahme(n) Nachlässiger Gebrauch persönlicher Schutzausrüstung Verhalten im Notfall Bedienung des Gerätes ohne die entsprechende Schutzausrüstung kann zu schweren äußeren sowie inneren Verletzungen führen. Tragen Sie stets die vorgeschriebene Schutzkleidung und arbeiten Sie bedacht. Leiten Sie die der Verletzung entsprechend notwendigen Erste Hilfe Maßnahmen ein und fordern Sie schnellst möglich qualifizierte ärztliche Hilfe an. Bewahren Sie den Verletzten vor weiteren Schädigungen und stellen Sie diesen ruhig. Für einen eventuell eintretenden Unfall sollte immer ein Verbandskasten nach DIN am Arbeitsplatz griffbereit vorhanden sein. Dem Verbandskasten entnommenes Material ist sofort wieder aufzufüllen. Wenn Sie Hilfe anfordern, machen Sie folgende Angaben: 1. Ort des Unfalls 2. Art des Unfalls 3. Zahl der Verletzten 4. Art der Verletzungen Entsorgung Die Entsorgungshinweise ergeben sich aus den Piktogrammen die auf dem Gerät bzw. der Verpackung aufgebracht sind. Eine Beschreibung der einzelnen Bedeutungen finden Sie im Kapitel Kennzeichnung. Entsorgung der Transportverpackung Die Verpackung schützt das Gerät vor Transportschäden. Die Verpackungsmaterialien sind in der Regel nach umweltverträglichen und entsorgungstechnischen Gesichtspunkten ausgewählt und deshalb recycelbar. Das Rückführen der Verpackung in den Materialkreislauf spart Rohstoffe und verringert das Abfallaufkommen. Verpackungsteile (z.b. Folien, Styropor ) können für Kinder gefährlich sein. Es besteht Erstickungsgefahr! Bewahren Sie Verpackungsteile außerhalb der Reichweite von Kindern auf und entsorgen Sie sie so schnell wie möglich. 7

8 Anforderungen an den Bediener Der Bediener muss vor Gebrauch des Gerätes aufmerksam die Bedienungsanleitung gelesen haben. Qualifikation Außer einer ausführlichen Einweisung durch eine sachkundige Person ist keine spezielle Qualifikation für den Gebrauch des Gerätes notwendig. Mindestalter Das Gerät darf nur von Personen betrieben werden, die das 16. Lebensjahr vollendet haben. Eine Ausnahme stellt die Benutzung als Jugendlicher dar, wenn die Benutzung im Zuge einer Berufsausbildung zur Erreichung der Fertigkeit unter Aufsicht eines Ausbilders erfolgt. Schulung Die Benutzung des Gerätes bedarf lediglich einer entsprechenden Unterweisung. Eine spezielle Schulung ist nicht notwendig. Service Sie haben technische Fragen? Eine Reklamation? Benötigen Ersatzteile oder eine Bedienungsanleitung? Auf unserer Homepage im Bereich Service helfen wir Ihnen schnell und unbürokratisch weiter. Bitte helfen Sie uns Ihnen zu helfen. Um Ihr Gerät im Reklamationsfall identifizieren zu können benötigen wir die Seriennummer sowie Artikelnummer und Baujahr. Alle diese Daten finden Sie auf dem Typenschild. Um diese Daten stets zur Hand zu haben, tragen Sie diese bitte unten ein. Seriennummer: Artikelnummer: Baujahr: Tel.: +49 (0) / Fax: +49 (0) / support@ts.guede.com EG-KONFORMITÄTSERKLÄRUNG Hiermit erklären wir, Güde GmbH & Co. KG Birkichstrasse 6 D Wolpertshausen Deutschland, dass die nachfolgend bezeichneten Geräte aufgrund ihrer Konzipierung und Bauart sowie in den von uns in Verkehr gebrachten Ausführungen den einschlägigen, grundlegenden Sicherheits- und Gesundheits-anforderungen der EG- Richtlinien entsprechen. Bei einer nicht mit uns abgestimmten Änderung der Geräte verliert diese Erklärung ihre Gültigkeit. Bezeichnung der Geräte: ELEKTROWINDE 1800/12 VOLT Artikel-Nr: #55128 Einschlägige EG-Richtlinien: 2004/108 EG Angewandte harmonisierte Normen: EN :2007 EN :2007 Ort/Datum/Herstellerunterschrift: Wolpertshausen, Angaben zum Unterzeichner: Technische Dokumentation: Geschäftsführer Hr. Arnold J. Bürkle; FBL QS 8

9 Introduction To enjoy your new appliance as long as possible, please read carefully the Operating Instructions and the attached safety instructions before using it. Further, we recommend keeping the Operating Instructions to recall the product features in the future. Within the continuous product development, we reserve the right to make technical changes to improve it. Translation of original operating instructions Warranty The warranty exclusively applies to material or manufacturing defects. The original proof of purchase including the date of purchase must be submitted when applying a claim in the warranty period. The warranty does not cover any unauthorised use such as appliance overload, violent use, damage by a foreign person or an undesirable item. The failure to follow the Operating Instructions and assembly instructions and common wear and tear are also excluded from the warranty. Marking Product safety: Commands: Please read the Operating Instructions before using the appliance Safety shoes to be used Environment protection: Dispose waste professionally so as not harm the environment. Any defective and/or disposed electric or electronic devices must be delivered to respective collection centres. Protective gloves to be used Packing cardboard material may be delivered to collecting centres for recycling. Package: Product corresponds to applicable EU standards Protection class 3 Prohibitions: Protect against moisture This side up No pulling the plug! Protect against rain and moisture! Interseroh-Recycling Technical specifications: No touching inside Do not operate the appliance with tie Connection Weight Do not operate the appliance with chain on neck Do not operate the appliance with long hair Ø Warning: Cable length Cable thickness IP54 Warning/Caution Risk of drawing-in Max. pulling force Protection type Bystanders must keep safe distance Caution Risk of tripping 1800/12V winch technical specifications Max. pulling force 1800 kg Max. pulling force with idle pulley: 3600 kg Max. pulling force floating items: 3200 kg Max. pulling force travelling items: 4100 kg Protection type: IP 54 Protection class: 3 Connection: 12 V Cable length: 9 m Cable thickness Ø: 5.5 mm 9

10 Pulling speed: Drop-shaped opening in hook: Mounting plate (attachment): Cable for remote control: Electric cable: Weight: Supply includes 1,8 m per minute 95 x mm 230 x 125 mm 3 m 4,5 m 15 kg Take the appliance out of the transport package and check it whether there are the following parts: Utility cable with On/Off Electric cable with 2 grounding terminals 9 m hauling rope with hook. Adapter plate for suspension equipment. Hand crank Idle pulley Operating Instructions Please contact your dealer if any parts are missing or are damaged. Appliance description (pic. A) 1. Hand crank 2. Cable winch body 3. Utility cable 4. On/Off 5. Utility cable connection 6. Lifting hook 7. Idle pulley 8. Electric cable 9. Adapter plate 10. Hand wheel 11. Utility cable connection outlet 12. Electric cable connection outlet 13. Terminal electric cable 14. Plug of the power cord Use as designated The electrical cable winch is only suitable for pulling loads stated in the technical specifications. The electric cable winch must be mounted properly and may only be used with 12 V battery appropriate for such work. The electric cable winch is not suitable for lifting loads. The appliance cannot be used for works other than for which the appliance has been designed and that are specified in the Operating Instructions. Any other use will be considered a use in conflict with the designation. The manufacturer will not be liable for any consequential damage and injuries. Please be sure to know that the appliance has not been designed for industrial purposes. General safety instructions & preventive measures CAUTION Please read all safety instructions and directives. The failure to follow the safety instructions and directives may result in electric shock, fire and/or serious injuries. Keep all safety instructions and directives for future reference. This appliance has not been designed to be operated by persons (including children) with limited physical, sensory or mental skills or insufficient experience and/or knowledge, unless they work under the supervision of a safety engineer and have received instructions from the engineer on how to use the appliance. Children must be supervised to make sure they do not play with the appliance. LEARN THOROUGHLY ALL INSTRUCTIONS BEFORE USING THIS APPLIANCE! KEEP THE PLACE OF YOUR WORK CLEAN. Mess in the place of work means a higher risk of injury. PROVIDE PROPER CONDITIONS IN THE PLACE OF YOUR WORK. Do not use appliances in moist, wet or poorly illuminated places. Do not expose the appliance to rain. Provide adequate lighting of the place of your work. Do not use electrically driven appliances near flammable gases or liquids. STORE ANY EQUIPMENT NOT BEING USED. If appliances are not being used, they must be stored in a dry place to prevent them from corrosion. Store the appliances in a lockable place at all times so that they cannot be accessed by children. DO NOT OVERLOAD THE APPLIANCE. The appliance works better and safer at the output for which it has been designed. Trying to increase the appliance performance using inappropriate extensions is prohibited. USE THE RIGHT APPLIANCE FOR THE TASK TO BE PERFORMED. The appliance must not be used for purposes for which it has not been designed. WEAR APPROPRIATE CLOTHING. Do not wear loose clothing or jewels as they could get caught by the rotating parts. Wearing anti-slip shoes is recommended. Long hair must be covered by appropriate headwear. Appropriate working clothes need to be worn at all times. USE EYE, HEARING AND BREATHING PROTECTION EQUIPMENT. Glasses meeting statutory requirements need to be worn for any works where turnings or chippings are produced. A respirator or breathing apparatus meeting statutory requirements needs to be worn for works where metal dust, wood dust, chemical dust and fog are produced. Appropriate ear protectors need to be work for works in a noisy environment. DO NOT USE THE ELECTRIC CABLE WINCH FOR PURPOSES FOR WHICH IT HAS NOT BEEN DESIGNED. Protect the electric cable against damage as a result of mechanical influences, tension or corroding agents. Do not pull the plug out of socket by pulling the electric cable. DO NOT INCLINE ABOVE THE APPLIANCE. Make always sure your posture is stable and balance kept. Do not incline above the appliance when running. SERVICE THE APPLIANCES CAREFULLY. Appliances must be kept clean at all times to work properly and safely. Follow the lubrication instructions and accessory part changing instructions. Check the electric cable at regular intervals and have it repaired by a qualified expert if damaged. Check all rotating parts and fixing bolts before using the appliance. The switch handle and electric switch must be clean, dry and with no oil and grease at all times. REMOVE ANY ADJUSTING WRENCHES. It is necessary to make sure any wrenches and adjusting tools are removed off the appliance or working surface before starting your work. PREVENT UNATTENDED STARTING. Do not press the switch before all the preparation for work initiation is finished. DO NOT LOSE CONCENTRATION. Pay always attention to what you are doing. Do not use the appliance when you are tired. DO NOT USE THE APPLIANCE UNDER THE INFLUENCE OF ALCOHOL, DRUGS OR PRESCRIBED PHARMACEUTICALS. CHECK THE APPLIANCE FOR ANY DAMAGED PARTS. All checks that seem to be damaged need to be thoroughly checked before using the appliance to make sure they work perfectly and meet their intended purpose. In addition, it is necessary to check whether the rotating parts are adjusted and fastened properly, whether parts or fastening are not broken and whether there are no conditions that could negatively affect the proper working of the appliance. Any damaged parts must be professionally repaired or replaced by a qualified engineer. The appliance must not be used if he switch cannot be turned on and off properly. 10

11 SPARE PARTS AND ACCESSORY EQUIPMENT Original spare parts may only be used for servicing. The warranty will not apply when other parts are used. Parts and accessory parts considered to be used with this appliance may only be used. The respective parts can be obtained from Güde GmbH & Co. KG. Special instructions for using this electric winch The use of this power appliance may lead to special dangerous situations. The use requires a special caution to provide safety of the operator and other persons. Cable: Check whether the cable is in a good condition and whether fixed properly. Do not use the winch if the cable is worn through. Do not change the cable for a cable that is less firm. Battery: Check whether the battery is in a good condition. Avoid any contact with the accumulator acid or any other harmful substances. Use appropriate eye protection equipment for works on the battery. Let the engine run when using the winch to prevent the battery from discharging. Keep distance: Do not stand in the cable pull direction. If the cable slips off or pulls apart, it gets shot in that direction. If the winch is being operated, avoid any contact with hands, clothing, hair or jewels near the winch. Invite another person who will check whether the winch can be used safely. Before starting the winch, make sure such person keeps sufficient distance from the vehicle and the cable. Performance limits: Do not try to exceed the limit values for the pulling force of this winch. Never use the hand crank to support the winch. This would damage the winch and could cause injuries. Secure the pulled load before releasing the cable on the winch. Installation (pic. E) Connection of electric winch cables The winch cables can be connected temporarily or permanently: 1. Lift the rubber gasket and put the cable outlet to the plug on the right of the winch body. Put the cable from the winch to the battery and make sure it does not get to the rotating parts and the risk of tripping is prevented. 2. Connect the black terminal on the cable to the vehicle frame to form ground connection. Connect the red terminal to the positive pole (+ / red) of the battery. Notice: Make sure the battery used is a 12 V car battery or a similar battery in a good condition. Caution: the appliance cannot be connected to a vehicle lighter. 3. Lift the rubber gasket on the left of the winch body. Grasp the remote control and put the outlet on the cable end to the plug on the left of the winch body. 4. Put the remote control on a safe place until the winch is ready to be operated. CAUTION! 1. Red and red (positive and positive) and black with frame to be connected at all times as ground connection if the battery of the vehicle is used as a source of current. 2. Never use the winch or any other accessory equipment until the battery gets discharged to the full extent. 3. If the engine is running when the winch is being operated to make the battery charged, maximum caution is necessary for works on the vehicle and around the vehicle. 4. Any dirty, corroded or leaking battery must not be used as the leaking acid could cause a risk of injury. 5. For all works on the battery or with the battery, protective glasses meeting applicable requirements for works of that type must be worn. Winch installation (pic. B, C, D) The winch has been dimensioned in a way it can be temporarily installed using foxing equipment for attachment. 1. Hook the adapter plate to the winch basic plate using the three pin screws. 2. The assembly comprising the winch and adapter plate can be fastened to the attachment by putting the spherical head through the given opening in the adapter plate. Using the winch (pic. F, G, H, I) 1. Put the vehicle transmission to an idle position (never use the winch when a gear is engaged or the park braking system applied as the vehicle transmission could get damaged). Apply the hand brake. Support the wheels by suitable wedges to prevent the vehicle from moving. 2. To lift the cable, press the respective switch on the remote control and put it out of the coil with slight tension. Leave at least three cable windings on the coil at all times to prevent the cable from pulled out of the coil. Alternatively, the rope may also be pulled out using the coil idle function. For that purpose, turn the coupling knob (pic. 1/10) clockwise and release it. Pull the rope out to the required length. Keep at least three windings on the coil. 3. Hook the cable using the hauling rope, chain or hook it in any other suitable manner to the pulled object. Never put the cable around any object and then hook directly to the rope as the pulled item would get damaged by this and the cable could pull apart or fray. 4. Retighten the coupling knob. 5. Move back to a safe place from where operate the remote control switch in a way to draw the cable and pull the item using the winch in the required manner. 6. When lowering the load, press the respective remote control switch and release slowly. CAUTION! 1. If the winch is being operated, avoid any contact with hands, clothing, hair or jewels near the drum and cable. 2. Never use the winch if the cable is frayed, broken or damaged. 3. Never let anyone standing near the cable or at the winch in line with the cable if pulling force is being applied on the cable. If the cable slips off or gets broken, it may suddenly shoot backward and put all bystanders at risk. If the winch is being operated, all persons must be in sufficient side distance from the winch. Operation with the idle pulley (pic. K, L, M) Pulling force 1. The winch has a pulling force of 1800 kg without the idle pulley and 3600 kg with the idle pulley. As a result, the winch may be practically used for the following: 11

12 a. To put a load with maximum weight of 1800 kg from rest to motion on a level surface. b. To pull a vessel with maximum weight of 3200 kg. c. To keep a moving wheeled vehicle with maximum weight of 4100 kg. Using the hand crank (pic. J) Warning instruction: Do not use the crank to support the winch that is being operated. There is a risk of injury and the winch may get damaged. 1. Screw the hand crank on the winch. 2. Turn the hand crank clockwise to make the cable tight. Then turn until the cable is drawn in to the full extent. (Crank to be only worked with at relatively low weight.) THE HAND CRANK MUST NECESSARILY BE REMOVED AGAIN BEFORE USING THE WINCH! Servicing The appliance must always be unplugged before any servicing/cleaning or other works. Let the appliance cool down before the given work and transport. 1. Apply fine oil on the cable from time to time. 2. Lubricate the transmission every 6 months. In doing so, remove the left and right body. High-quality watertight grease may only be used for lubrication. The steel cable must be checked for any damage every time the appliance is to be used. The lifting hook and the idle pulley must regularly be checked for any damage. Residual risks and protective measures Mechanical residual risks Risk Description Protective measure(s) Getting caught, wound Broken cable Cutting injuries Loose clothing and jewels may get caught by rotating parts. Cable may get pulled apart and cause serious injuries as a result. Frayed cable may result in injuries. At all times, wear closefitting clothing and no jewels that could get caught. Do not exceed the pulling force. Check the cable! Wear protective gloves! Neglecting the ergonomic principles Risk Description Protective measure(s) Negligent use of personal protective equipment Operating the appliance without appropriate protective equipment may result in serious external and internal injuries. Behaviour in case of emergency Wear specified protective clothing and work cautiously at all times. Material taken out of the first aid kit needs to be supplemented right away. If help is needed, please provide the following details: 1. Place of accident 2. Accident nature 3. Number of injured persons 4. Injury type Disposal The disposal instructions are based on icons placed on the appliance or its package. The description of the meanings can be found in the Marking section. Transport package disposal The package protects the appliance against damage during transport. Packing materials are usually chosen depending on their environmental friendliness and disposal method and can therefore be recycled. Returning the package to material circulation saves raw materials and reduces waste disposal costs. Parts of packages (e.g. foils, styropor ) can be dangerous to children. Risk of suffocation! Keep parts of packages away from children and dispose them as soon as possible. Operator requirements The operator must carefully read the Operating Instructions before using the appliance. Qualification No special qualification is necessary for using the appliance apart from detailed instruction by an expert. Minimum age The appliance may only be operated by persons over 16 years of age. An exception includes youngsters operating the appliance within their professional education to achieve necessary skills under trainer's supervision. Training Using the appliance only requires appropriate instructions by a professional or reading the Operating Instructions. No special training necessary. Maintenance Do you have any technical questions? A claim? Do you need spare parts or the Operating Instructions? You will be helped quickly and without needless bureaucracy at our webpage in the Services part. Please help us be able to assist you. To identify your appliance when claimed, we need to know its serial No., order No, and year of production. All these details can be found on the type label. Enter the details below for future reference. Serial No.: Order No.: Year of production: Tel. +49 (0) / Fax: +49 (0) / support@ts.guede.com Provide necessary first aid treatment corresponding to the injury nature and seek qualified medical help as soon as possible. Protect the injured person from other injuries and calm him/her down. In case of accident, first aid kit must always be available in the place of your work in accordance with DIN
 THE HAND CRANK MUST NECESSARILY BE REMOVED AGAIN BEFORE USING THE WINCH!")
13 EU DECLARATION OF CONFORMITY We, Güde GmbH & Co. KG Birkichstrasse 6 D Wolpertshausen Germany, hereby declare that the design of the appliances below corresponds to the applicable requirements of the basic EU safety and hygiene directives. In case of alternation of the appliance, not agreed upon by us, this Declaration will lose its validity. Appliance description: 1800/12 V ELECTRIC WINCH Art. No. #55128 Applicable EU Directives: 2004/108 EG Applicable harmonised standards: EN :2007 EN :2007 Date/authorised signature: Title of signatory: Managing Director Mr Arnold Technical documentation: J. Bürkle; FBL QS 13

14 Introduction Afin de pouvoir profiter le plus longtemps possible de votre nouvel appareil, veuillez lire attentivement le mode d emploi et les consignes de sécurité jointes. Nous vous recommandons également de conserver le mode d emploi pour une consultation ultérieure éventuelle. Dans le cadre du développement continu de nos produits, nous nous réservons le droit aux modifications techniques dans le but d améliorer nos produits. Ce document est un mode d emploi original. Garantie La garantie s applique exclusivement aux défauts provoqués par un défaut de matériel ou un défaut de fabrication. Lors de la réclamation pendant la durée de la garantie, il est nécessaire de joindre de certificat d achat comportant la date d achat. La garantie n inclut pas une utilisation incompétente telle que surcharge de la machine, utilisation de la force, endommagement par une tierce personne ou un objet étranger. Le non respect du mode d emploi et du mode de montage ainsi que l usure normale de la machine ne sont pas non plus inclus dans la garantie. Symboles Sécurité du produit : Consignes : Lisez le mode d emploi avant l utilisation! Portez des chaussures de sécurité! Protection de l environnement : Liquidez les déchets de manière à ne pas nuire à l environnement. Déposez les appareils électriques ou électroniques défectueux et/ou destinés à liquidation au centre de ramassage correspondant. Emballage : Portez des gants de sécurité! Déposez l emballage en carton au dépôt pour recyclage. Protégez de l humidité Sens de pose Produit répond aux normes correspondantes de la CE Classe de protection 3 Interdictions : Interseroh -Recycling Caractéristiques techniques : Défense de tirer sur le câble! Protégez l appareil de la pluie et de l humidité! Fiche Puissance du moteur Défense d introduire les mains dans l appareil Défense de port de cravate lors de l utilisation de l appareil Ø Longueur du câble Épaisseur du câble Défense de port de chaînes lors de l utilisation de l appareil Avertissement : Défense d utiliser l appareil avec cheveux longs Puissance de traction maximale IP54 Type de protection Avertissement/attention Les personnes aux alentours doivent respecter une distance de sécurité Risque d'entraînement Attention risque de trébuchement Caractéristiques techniques du treuil 1800/12 V Puissance de traction maximale: 1800 kg Puissance de traction maximale poulie de guidage: 3600 kg Puissance de traction maximale Objets flottants: 3200 kg Puissance de traction maximale objets roulants: 4100 kg Type de protection: IP 54 Classe de protection: 3 Fiche de contact: 12 V Longueur du câble: 9 m 14

15 Épaisseur du câble Ø: Vitesse en traction : Ouverture dans le crochet sous forme de goutte: Plaque de fixation (suspension): Câble pour commande à distance : Câble électrique : Poids : Contenu du colis 5,5 mm 1,8 m/min. 95 x mm 230 x 125 mm 3 m 4,5 m 15 kg Sortez l appareil de l emballage de transport et contrôlez l intégralité et l existence des pièces suivantes: Câble de commande avec interrupteur marche/arrêt Câble électrique avec 2 bornes de mise à la terre 9 m de câble de traction avec crochet Plaque de l adaptateur pour dispositif de suspension. Manivelle Poulie de guidage Mode d emploi Si certaines pièces manquent ou sont endommagées, veuillez contacter votre vendeur. Description de l appareil (fig. A) 1. Manivelle 2. Corps de treuil 3. Câble de commande 4. Interrupteur marche/arrêt 5. Raccord du câble de commande 6. Crochet à charge 7. Poulie de guidage 8. Câble électrique 9. Plaque de l adaptateur 10. Vis étoile 11. Fiche de raccordement du câble de commande 12. Fiche de raccordement du câble électrique 13. Câble électrique à bornes 14. Branchez le cordon d'alimentation Utilisation en conformité avec la destination Le treuil électrique convient uniquement à la traction de charges indiquées dans les caractéristiques techniques. Le treuil électrique doit être bien fixé et peut être utilisé uniquement avec une batterie de 12 V convenant à ce type de travail. Le treuil électrique ne convient pas au levage de charges. Cet appareil ne doit pas être utilisé dans un autre but que celui pour lequel il a été conçu et qui est décrit dans le mode d emploi. Toute autre utilisation est contraire à la destination. Le fabricant décline toute responsabilité pour des dommages et accidents consécutifs à une telle utilisation. Notez que l appareil n a pas été conçu pour une utilisation industrielle. Consignes générales de sécurité & mesures préventives AVERTISSEMENT : Lisez toutes les consignes de sécurité et instructions. Le non respect des consignes de sécurité et instructions peut engendrer une électrocution, un incendie et/ou des blessures graves. Conservez toutes les consignes de sécurité et instructions pour une utilisation ultérieure. Cet appareil ne doit pas être utilisé par des personnes (y compris des enfants) dont les capacité physiques, sensorielles ou psychiques sont limitées ou dont l expérience ou les connaissances sont insuffisantes, à moins de travailler sous la surveillance d un technicien de sécurité et d être informé par ce technicien sur les consignes d utilisation. Veillez à ce que les enfants ne jouent pas avec l appareil. AVANT D UTILISER CET APPAREIL, FAMILIARISEZ- VOUS BIEN AVEC TOUTES LES CONSIGNES! MAINTENEZ VOTRE LIEU DE TRAVAIL EN ORDRE. Le désordre sur le lieu de travail augmente des risques d accidents et de blessures. VEILLEZ A DES CONDITIONS ADÉQUATES SUR LE LIEU DE TRAVAIL. N utilisez pas l appareil sur des lieux humides, mouillés ou mal éclairés. Ne l exposez pas à la pluie. Veillez à un bon éclairage du lieu de travail. N utilisez pas des appareils à entraînement électrique à proximité des gaz ou liquides inflammables. RANGEZ LES DISPOSITIFS QUE VOUS N UTILISEZ PAS. Rangez les appareils que vous n utilisez pas à un endroit sec afin d empêcher leur corrosion. Rangez toujours les appareils à un endroit fermé à clé de façon à ce que les enfants n y aient pas accès. NE SURCHARGEZ PAS L APPAREIL. L appareil fonctionne mieux et de façon plus sûre pour la puissance pour laquelle il est dimensionné. Il est interdit d essayer d augmenter la puissance de l appareil à l aide de dispositifs inadéquats. UTILISEZ POUR CHAQUE TRAVAIL L OUTIL ADEQUAT. N utilisez pas l appareil à des fins auxquelles il n est pas destiné. PORTEZ UNE TENUE ADEQUATE. Ne portez pas de vêtements larges ou bijoux pouvant s accrocher aux pièces en rotation. Nous recommandons de porter des chaussures antidérapantes. Les cheveux longs doivent être protégés par un couvre-chef. Il est nécessaire de porter toujours une tenue de travail adéquate. UTILISEZ DES ACCESSOIRES DE PROTECTION DES YEUX, DE L AUDITION ET DE LA RESPIRATION. Portez toujours lors des travaux engendrant la formation de copeaux ou échardes des lunettes de protection répondant aux exigences légales. Lors des travaux engendrant la formation de la poussière métallique, de bois ou poussières et vapeurs chimiques, portez un masque ou un appareil respiratoire répondant aux exigences légales. Lors des travaux dans un environnement bruyant, portez toujours une protection auditive adéquate. N UTILISEZ PAS LE CABLE ELECTRIQUE A DES FINS AUXQUELLES IL N EST PAS DESTINE. Protégez le câble électrique de l endommagement consécutif à des influences mécaniques, à la traction ou aux matières corrosives. Ne retirez pas la fiche électrique en tirant sur le câble électrique. NE VOUS PENCHEZ PAS AU-DESSUS DE L APPAREIL. Veillez à toujours maintenir une posture stable qui assure votre équilibre. Ne vous penchez pas au-dessus de l appareil lorsqu il est en marche. ENTRETENEZ BIEN LES APPAREILS. Afin que les appareils fonctionnent toujours bien et de façon sûre, il est nécessaire de les maintenir toujours propres. Respectez les consignes de graissage et les consignes de remplacement des accessoires. Contrôlez régulièrement le câble électrique et faites-le réparer par un réparateur qualifié lorsqu il est endommagé. Contrôlez toutes les pièces rotatives et vis de fixation avant l utilisation. La poignée d enclenchement et l interrupteur électrique doivent toujours être propres, secs et sans huile et graisse. RETIREZ LES CLE DE REGLAGE. Veillez à retirer toutes les clés et outils de réglage de l appareil ou de la surface de travail avant de commencer le travail. EVITEZ LA MISE EN MARCHE SANS SURVEILLANCE. Appuyez sur l interrupteur uniquement lorsque vous avez terminé toutes les préparations pour débuter le travail. SOYEZ ATTENTIFS. Faites attention à ce que vous faites. N utilisez pas l appareil si vous êtes fatigués. N UTILISEZ PAS CET APPAREIL SI VOUS ÊTES SOUS L INFLUENCE D ALCOOL, DE DROGUES OU DE MEDICAMENTS SUR ORDONNANCE. CONTRÔLEZ L APPAREIL DU POINT DE VUE DE PIECES DETACHEES ENDOMMAGEES. Avant 15

16 d utiliser l appareil, contrôlez toutes les pièces qui paraissent endommagées, afin de vérifier si elles fonctionnent correctement et remplissent le but envisagé. Il est également nécessaire de contrôler si les pièces rotatives sont bien réglées et fixées, si les pièces ou fixations ne sont pas cassées et également l absence de faits pouvant influencer négativement le fonctionnement correct de l appareil. Les pièces endommagées doivent être réparées ou remplacées par un technicien qualifié. Il est interdit d utiliser l appareil lorsqu il est impossible de mettre et d arrêter correctement l interrupteur. PIECES DETACHEES ET ACCESSOIRES. Utilisez lors de l entretien uniquement des pièces détachées d origine. L utilisation d autres pièces entraîne la perte de la garantie. Utilisez uniquement les pièces et accessoires destinés à l utilisation avec cet appareil. Les pièces correspondantes sont disponibles auprès de la société Güde GmbH & Co. KG. Consignes spéciales d utilisation du treuil électrique L utilisation de cet appareil performant peut engendrer des situations spéciales dangereuses. L utilisation nécessite une prudence particulière pour votre propre sécurité et celle d autres personnes. Câble: Contrôlez si le câble est en bon état et correctement fixé. N utilisez pas le treuil lorsque le câble est usé. Ne remplacez pas le câble par un câble moins solide. Batterie: Contrôlez si la batterie est en bon état. Évitez le contact avec l acide de l accumulateur ou d autres matières nocives. Lors du travail sur la batterie, portez toujours des accessoires de protection des yeux adéquats. Pendant l utilisation du treuil, laissez le moteur tourner afin d éviter le déchargement de la batterie. Respectez une distance de sécurité: Ne vous placez pas dans la direction de la traction du câble. Si le câble glisse ou casse, il sera éjecté dans cette direction. Lorsque le treuil est en train de fonctionner, éviter le contact avec les mains, les vêtements, les cheveux et les bijoux à sa proximité. Faites appel à une autre personne qui contrôlera s il est possible d utiliser le treuil en toute sécurité. Avant de mettre le treuil en marche, veillez à ce que cette personne respecte une distance suffisante du véhicule et du câble. Limites de la puissance: N essayez pas de dépasser les valeurs limites de la puissance de traction de ce treuil. N utilisez jamais la manivelle pour soutenir le treuil. Cela endommage le treuil et peut provoquer des blessures. Bloquez la charge tractée avant de desserrer le câble sur le treuil. Installation (fig. E) Branchement des câbles du treuil électrique Les câbles du treuil peuvent être branchés de façon temporaire ou continue : 1. Levez le joint en caoutchouc et insérez la douille du câble dans la fiche située à droite du corps de treuil. Posez le câble du treuil vers la batterie et veillez à ce qu il ne soit pas accroché par les pièces en rotation ou à ce qu il ne devienne pas source de trébuchement. 2. Branchez la pince noire sur le câble au châssis du véhicule afin de créer une mise à la terre. Branchez la pince rouge au pôle positif (+ / rouge) de la batterie. Avertissement : Veillez à ce que la batterie utilisée soit une batterie auto de 12 V ou une autre batterie similaire en bon état. Attention, l appareil ne peut pas être branché à l allume-cigare de la voiture. 3. Levez le joint en caoutchouc sur le côté gauche du corps de treuil. Saisissez la commande à distance (4) et insérez la douille sur l extrémité du câble dans la fiche située sur le côté gauche du corps de treuil. 4. Posez la commande à distance (4) dans un endroit sûr en attendant que le treuil soit prêt à l emploi. ATTENTION! 1. Si la batterie de votre propre voiture est utilisée comme source de courant, reliez toujours la pince rouge à la rouge (positive et positive) et la noire au châssis (mise à la terre). 2. N utilisez jamais le treuil ou un autre accessoire jusqu au déchargement complet de la batterie. 3. Si vous laissez le moteur tourner pendant l utilisation du treuil, afin de recharger continuellement la batterie, soyez particulièrement prudents lors des travaux sur et autour de la voiture. 4. Il est interdit d utiliser des batteries sales, corrodées ou non étanches pour cause de risque de blessures provoquées par une fuite d acide. 5. Lors de tous les travaux sur la batterie ou avec la batterie, il est nécessaire de porter des lunettes de protection répondant aux exigences en vigueur pour des travaux de ce type. Montage du treuil (fig. B, C, D) Le treuil est dimensionné de façon à ce qu il soit possible de le monter provisoirement à l aide du dispositif de fixation du crochet d attelage. 1. Accrochez la plaque de l adaptateur à l aide de trois vis à tourillon à la plaque de base du treuil. 2. Fixez le groupe de construction formé par le treuil et la plaque de l adaptateur au crochet en passant la boule du crochet par l orifice correspondant de la plaque de l adaptateur. Utilisation du treuil (fig. F, G, H, I) 1. Placez la boîte de transmission de la voiture à la position neutre (n utilisez jamais le treuil lorsqu une vitesse est mise ou le frein à main tiré, faute de quoi vous pourriez endommager la boîte de transmission de la voiture). Tirez sur le frein à main. Calez les roues à l aide de cales adéquates de façon à ce que la voiture ne puisse pas rouler. 2. Pour tirer le câble, appuyez sur l interrupteur correspondant sur la télécommande et retirez-le de la bobine avec une légère tension. Laissez toujours au minimum trois tours de câble sur la bobine, afin d éviter la sortie du câble de la bobine. Vous pouvez tirer le câble également à l aide de la fonction à régime lent de la bobine. Pour cela, tournez le bouton de l embrayage (fig. 1/10) dans le sens des aiguilles d une montre et desserrez-le. Tirez le câble à la longueur souhaitée. Laissez au moins trois tours sur la bobine. 3. Accrochez le câble à l aide du câble de traction, une chaîne ou par un autre moyen adéquat à l objet tiré. N enroulez jamais le câble autour de l objet pour l accrocher ensuite directement au câble, faute de quoi vous risquez d endommager l objet tracté et de provoquer la rupture ou l usure du câble. 4. Resserrez le bouton de l embrayage. 16

17 5. Allez à un endroit sûr d où vous pouvez commander l interrupteur par l intermédiaire de la commande à distance de façon à enrouler le câble et tirer l objet à l aide du treuil de manière souhaitée. 6. Pour libérer la charge, appuyez sur l interrupteur correspondant sur la télécommande et libérer-la lentement. ATTENTION! 1. Lorsque le treuil est en marche, évitez le contact avec les mains, les vêtements, les cheveux et les bijoux à proximité du tambour et du câble. 2. N utilisez jamais le treuil lorsque le câble est usé, cassé ou endommagé. 3. Veillez à ce que personne ne se trouve à proximité du câble ou derrière le treuil dans la même ligne que le câble lorsque la force de traction opère encore sur le câble. Si le câble glisse ou casse, il peut être éjecté vers l arrière et menacer toutes les personnes se trouvant à proximité. Lorsque le treuil fonctionne, il est nécessaire que toutes les personnes respectent une distance de sécurité latérale suffisante du treuil. Fonctionnement avec la poulie de guidage (fig. K, L, M) Force de traction 1. La force de traction de ce treuil s élève à 1800 kg sans la poulie de guidage et à 3600 kg avec la poulie de guidage. Par conséquent, le treuil peut être utilisé en pratique à des fins suivantes: a. Mettre en mouvement une charge au repos avec poids maximal de 1800 kg sur une surface droite. b. Tirer un bateau avec poids maximal de 3200 kg. c. Maintenir une voiture à roues avec poids maximal de 4100 kg en mouvement. Utilisation de la manivelle (fig. J) Consigne d avertissement : N utilisez pas la manivelle pour soutenir le treuil en fonctionnement. Risque de blessures et d endommagement du treuil. 1. Vissez la manivelle sur le treuil. 2. Tournez la manivelle dans le sens des aiguilles d une montre, afin que le câble se tende. Continuez à tourner jusqu à ce que le câble soit complètement entraîné. (Utilisez la manivelle uniquement lors des poids relativement bas.) DEMONTEZ TOUJOURS LA MANIVELLE AVANT D UTILISER LE TREUIL! Entretien Avant de procéder à l entretien/nettoyage, débranchez toujours l appareil du secteur. Avant de procéder aux travaux et au transport, laissez l appareil refroidir. 1. Graissez de temps en temps le câble avec une huile légère. 2. Graissez la boîte de transmission tous les 6 mois. Retirez alors les corps gauche et droit. Utilisez pour le graissage uniquement une graisse étanche à l eau. Avant toute utilisation, contrôlez l état du câble en acier! Contrôlez régulièrement l état du crochet à charge et de la poulie de guidage. Risques résiduels et mesures de protection Risques résiduels mécaniques Risque Description Mesure(s) de protection Accrochage, enroulement Des vêtements larges ou bijoux Portez toujours des vêtements adhérents et Câble rompu Blessures par coupure peuvent être accrochés par des pièces en rotation. Le câble peut casser et son rebond provoquer de graves blessures. Un câble usé peut provoquer des blessures. aucun bijou pouvant être accroché. Ne dépassez pas la force de traction. Contrôlez le câble! Portez des gants de protection! Manquement aux principes ergonomiques Risque Description Mesure(s) de protection Utilisation négligée d accessoire s de protection personnels L utilisation de l appareil sans accessoires de protection adéquats peut engendrer de graves blessures externes et internes. Conduite en cas d urgence Portez toujours une tenue de protection prescrite et soyez prudents lors du travail. Effectuez les premiers gestes de secours et appelez rapidement les premiers secours. Protégez le blessé d autres blessures et calmez-le. Pour des raisons de risque d accident, le lieu de travail doit être équipé d une armoire à pharmacie selon DIN Il est nécessaire de compléter immédiatement le matériel pris dans l armoire à pharmacie. Si vous appelez les secours, fournissez les renseignements suivants: 1. Lieu d accident 2. Type d accident 3. Nombre de blessés 4. Type de blessure Liquidation Les consignes de liquidation résultent des pictogrammes indiqués sur l appareil ou sur l emballage. La description des significations individuelles se trouve dans le chapitre «Indications sur l appareil». Liquidation de l emballage de transport L emballage protège l appareil de l endommagement lors du transport. En général, le matériel d emballage est choisi de façon à ce qu il réponde aux règles de protection de l environnement et de liquidation des déchets, par conséquent, il peut être recyclé. La remise de l emballage dans le circuit de matières permet d économiser des matières premières et de réduire les déchets. Des parties de l emballage (telles que films, styropore) peuvent être dangereux pour les enfants. Danger d étouffement! Rangez les parties de l emballage hors de portée des enfants et liquidez-les le plus rapidement possible. Exigences à l égard de l utilisateur L utilisateur doit lire attentivement le mode d emploi avant d utiliser l appareil. Qualification Mis à part l instruction détaillée par un spécialiste, aucune autre qualification spécifique n est requise. 17

18 Âge minimal L appareil peut être utilisé uniquement par des personnes de plus de 16 ans, exception faite des adolescents manipulant l appareil dans le cadre de l enseignement professionnel sous la surveillance du formateur. Formation L utilisation de l appareil nécessite uniquement l instruction par un spécialiste, éventuellement par la notice. Une formation spéciale n est pas nécessaire. Service Vous avez des questions techniques? Une réclamation? Vous avez besoin de pièces détachées ou d un mode d emploi? Nous vous aiderons rapidement et sans bureaucratie inutile par l intermédiaire de nos pages Web dans la rubrique Service. Aidez-nous pour que nous puissions vous aider. Pour identifier votre appareil en cas de réclamation, nous avons besoins du numéro de série, numéro de produit et l année de fabrication. Toutes ces informations se trouvent sur la plaque signalétique. Pour avoir ces informations toujours à porté de main, veuillez les inscrire ici : Numéro de série: N de commande: Année de fabrication: Tél.: +49 (0) / Fax: +49 (0) / support@ts.guede.com DÉCLARATION DE CONFORMITÉ CE Nous, Güde GmbH & Co. KG Birkichstraße 6 D Wolpertshausen Allemagne Déclarons par la présente que les appareils indiqués cidessous répondent du point de vue de leur conception, construction ainsi que de leur réalisation mise sur le marché, aux exigences fondamentales correspondantes des directives de la CE en matière de sécurité et d hygiène. Cette déclaration perd sa validité après une modification de l appareil sans notre approbation préalable. Désignation des appareils: TREUIL ÉLECTRIQUE 1800/12 V N de commande: #55128 Directives applicables de la CE: 2004/108 EG Normes harmonisées applicables: EN :2007 EN :2007 Date/signature du fabricant: Titre du Signataire : Documents techniques : gérant Monsieur Arnold J. Bürkle FBL; QS 18

19 Úvod Abyste ze svého nového přístroje měli co možná nejdéle radost, přečtěte si prosím před uvedením do provozu pečlivě návod k obsluze a přiložené bezpečnostní pokyny. Dále doporučujeme, abyste si návod k použití uschovali pro případ, že byste si později chtěli znovu připomenout funkce výrobku. V rámci neustálého dalšího vývoje výrobku si vyhrazujeme právo provádět technické změny za účelem vylepšení. Překlad originálního návodu k provozu. Záruka Záruka se vztahuje výlučně na vady materiálu nebo výrobní vady. Při uplatňování reklamace v záruční době přiložte originální doklad o koupi s datem koupě. Ze záruky je vyloučeno neodborné použití jako např. přetížení přístroje, násilné použití, poškození cizí osobou nebo cizím předmětem. Nedodržení návodu k použití a návodu k montáži a normální opotřebení je rovněž vyloučeno ze záruky. Označení Bezpečnost produktu: Používejte bezpečnostní obuv Ochrana životního prostředí: Odpad zlikvidujte odborně tak, abyste neškodili životnímu prostředí. Vadné a/nebo likvidované elektrické či elektronické přístroje musí být odevzdány do příslušných sběren. Obal: Chraňte před vlhkem Obalový materiál z lepenky lze odevzdat za účelem recyklace do sběrny. Obal musí směřovat nahoru Produkt odpovídá příslušným normám EU Třída ochrany 3 Interseroh-Recycling Zákazy: Technické údaje: Zákaz tahání za zástrčku! Chraňte před deštěm a vlhkostí! Přípojka Hmotnost Ø Zákaz sahání dovnitř Zákaz obsluhy s kravatou Délka lana Tloušťka lana IP54 Zákaz obsluhy s řetízkem na krku Zákaz obsluhy s dlouhými vlasy Max. tažná síla Typ ochrany Výstraha: Technické údaje navijáku 1800/12 V Výstraha/Pozor Okolostojící osoby musí dodržovat bezpečnou vzdálenost Příkazy: Před použitím si přečtěte návod k obsluze Nebezpečí vtažení Pozor - nebezpečí klopýtnutí Používejte ochranné rukavice Max. tažná síla: 1800 kg Max. tažná síla s vodicí kladkou: 3600 kg Max. tažná síla plovoucí předměty: 3200 kg Max. tažná síla-pojíždějící předměty: 4100 kg Typ ochrany: IP 54 Třída ochrany: 3 Přípojka: 12 V Délka lana: 9 m Tloušťka lana Ø: 5,5 mm Rychlost tahu: 1,8 m/min. Otvor v háku ve tvaru kapky: 95 x mm Připevňovací deska (závěs): 230 x 125 mm Kabel pro dálkové ovládání: 3 m Elektrický kabel: 4,5 m Hmotnost: 15 kg 19

20 Objem dodávky Přístroj vyjměte z přepravního obalu a zkontrolujte úplnost a existenci těchto dílů: Obslužný kabel se zapínačem/vypínačem Elektrický kabel se 2 zemnicími svorkami 9 m tažné lano s hákem Deska adaptéru pro závěsné zařízení Ruční klika Vodicí kladka Návod k obsluze Pokud díly v dodávce chybí nebo jsou poškozené, obraťte se prosím na svého prodejce. Popis přístroje (obr. A) 1. Ruční klika 2. Těleso lanového navijáku 3. Obslužný kabel 4. Zapínač/vypínač 5. Přípojka obslužného kabelu 6. Břemenový hák 7. Vodicí kladka 8. Elektrický kabel 9. Deska adaptéru 10. Ruční kolo 11. Připojovací zásuvka obslužného kabelu 12. Připojovací zásuvka elektrického kabelu 13. Svorkový elektrický kabel 14. Zapojte napájecí kabel Použití v souladu s určením Elektrický lanový naviják je vhodný jen k tažení nákladů uvedených v technických údajích. Elektrický lanový naviják musí být dobře připevněn a smí se používat jen na 12 V baterii, která je vhodná pro tuto práci. Elektrický lanový naviják není vhodný ke zvedání nákladů. S tímto strojem nelze vykonávat jiné práce, než pro jaké byl tento stroj zkonstruován a jež jsou popsány v návodu k obsluze. Každé jiné použití je považováno za použití v rozporu s určením. Za následné škody a úrazy výrobce neručí. Dbejte prosím na to, že tento přístroj není konstruován pro průmyslové použití. Všeobecné bezpečnostní pokyny & preventivní opatření VÝSTRAHA Přečtěte si všechny bezpečnostní pokyny a instrukce. Nedodržení bezpečnostních pokynů a instrukcí může způsobit úder elektrickým proudem, požár a/nebo vážné úrazy. Všechny bezpečnostní pokyny a instrukce si uschovejte pro budoucí použití. Tento přístroj není určen k tomu, aby jej obsluhovaly osoby (včetně dětí) s omezenými tělesnými, smyslovými či duševními schopnostmi či nedostatečnými zkušenostmi a/nebo nedostatečnými znalostmi, ledaže by pracovaly pod dohledem bezpečnostního technika a obdržely od něj pokyny, jak přístroj používat. Na děti je třeba dohlížet, aby bylo zajištěno, že si s přístrojem nehrají. PŘED POUŽITÍM TOHOTO PŘÍSTROJE SE DŮKLADNĚ SEZNAMTE SE VŠEMI POKYNY! UDRŽUJTE ČISTOTU NA PRACOVIŠTI. Nepořádek na pracovišti vede snadněji k úrazům. DBEJTE NA ŘÁDNÉ PODMÍNKY NA PRACOVIŠTI. Přístroje nepoužívejte na vlhkých, mokrých či špatně osvětlených místech. Nevystavujte je dešti. Zajistěte dobré osvětlení pracoviště. V blízkosti hořlavých plynů či kapalin nepoužívejte elektricky poháněné přístroje. ZAŘÍZENÍ, KTERÁ NEPOUŽÍVÁTE, USKLADNĚTE. Pokud se přístroje nepoužívají, musí být uschovány na suchém místě, aby se zabránilo jejich korozi. Přístroje uschovejte vždy na uzamykatelném místě, aby k nim neměly přístup děti. PŘÍSTROJ NEPŘETĚŽUJTE. Přístroj funguje nejlépe a nejbezpečněji při výkonu, pro který byl dimenzován. Je zakázáno pokoušet se pomocí nevhodných nástaveb zvýšit výkonnost přístroje. POUŽIJTE SPRÁVNÝ PŘÍSTROJ PRO ÚKOL, KTERÝ SE MÁ VYŘEŠIT. Přístroj se nesmí používat k účelu, k němuž není určen. NOSTE SPRÁVNÝ ODĚV. Nenoste volný oděv či šperky, neboť vzniká nebezpečí, že se dostanou do rotujících dílů. Doporučuje se nosit protiskluzovou obuv. Dlouhé vlasy musí být zakryty vhodnou pokrývkou hlavy. Je třeba nosit vždy vhodný pracovní oděv. POUŽÍVEJTE POMŮCKY NA OCHRANU ZRAKU, SLUCHU A DÝCHÁNÍ. Při pracích, při nichž vznikají špony či třísky, je třeba nosit vždy brýle, které splňují zákonné požadavky. Při pracích, při nichž vzniká kovový prach, dřevěný prach, chemický prach a mlha, je třeba nosit respirátor či dýchací přístroj, který splňuje zákonné požadavky. Při pracích v hlučném prostředí je třeba nosit vhodné chrániče uší. ELEKTRICKÝ KABEL NEPOUŽÍVEJTE K ÚČELŮM, K NIMŽ NENÍ URČEN. Elektrický kabel chraňte před poškozením v důsledku mechanických vlivů, tahu či korozivních látek. Síťovou zástrčku nevytahujte ze zásuvky zatažením za elektrický kabel. NENAKLÁNĚJTE SE NAD PŘÍSTROJ. Dbejte vždy na to, abyste zaujali stabilní postoj, při němž je zaručena Vaše rovnováha. Nenaklánějte se nad přístrojem, je-li v chodu. PROVÁDĚJTE PEČLIVĚ ÚDRŽBU PŘÍSTROJŮ. Aby přístroje vždy dobře a bezpečně fungovaly, musí být neustále udržovány v čistotě. Dodržujte pokyny pro mazání a pokyny pro výměnu dílů příslušenství. Elektrický kabel pravidelně kontrolujte a nechte jej v případě poškození opravit kvalifikovaným odborníkem. Všechny rotující díly a upevňovací šrouby před použitím zkontrolujte. Spínací rukojeť a elektrický spínač musí být vždy čisté, suché a bez oleje a tuku. ODSTRAŇTE SEŘIZOVACÍ KLÍČE. Je třeba zajistit, aby byly z přístroje či pracovní plochy před zahájením práce odstraněny klíče a seřizovací nástroje. ZABRAŇTE ZAPNUTÍ BEZ DOZORU. Zapínač stiskněte až tehdy, jsou-li dokončeny všechny přípravy pro zahájení práce. NEPOLEVUJTE V POZORNOSTI. Dbejte vždy na to, co děláte. Tento přístroj nepoužívejte, jste-li unavení. TENTO PŘÍSTROJ NEPOUŽÍVEJTE POD VLIVEM ALKOHOLU, DROG ČI LÉKŮ NA LÉKAŘSKÝ PŘEDPIS. ZKONTROLUJTE PŘÍSTROJ Z HLEDISKA POŠKOZENÝCH DÍLŮ. Před použitím přístroje je třeba všechny díly, které se jeví jako poškozené, důkladně zkontrolovat, aby se zjistilo, zda řádně fungují a splňují svůj zamýšlený účel. Navíc je třeba zkontrolovat, zda jsou rotující díly správně seřízeny a připevněny, zda nejsou díly či připevnění zlomené, a zda neexistují takové stavy, které by mohly negativně ovlivnit řádné fungování přístroje. Poškozené díly musí odborně opravit či vyměnit kvalifikovaný technik. Přístroj se nesmí používat, nejde-li spínač správně zapnout a vypnout. NÁHRADNÍ DÍLY A PŘÍSLUŠENSTVÍ. Při údržbě se smí používat jen originální náhradní díly. Při použití jiných dílů zaniká záruka. Je třeba použít jen díly a díly příslušenství, jež jsou uvažovány pro použití s tímto přístrojem. Odpovídající díly lze odebrat od firmy Güde GmbH & Co. KG. 20

TCNF 185 TCNF 185 IX NO-FROST FRIGORÍFICO
 TCNF 185 TCNF 185 IX NO-FROST FRIGORÍFICO ATTENTION Cet appareil est destiné à un usage domestique uniquement. Toute utilisation autre que celle prévue pour cet appareil, ou pour une autre application
UŽIVATELSKÁ PŘÍRUČKA
 UŽIVATELSKÁ PŘÍRUČKA Plni víry a naděje míříme kupředu. S odhodláním zlepšujeme své dovednosti. Zapomeňte na zklamání, ale nikoli na svůj nevyužitý potenciál. Touha překonat sám sebe a dosáhnout hranice
BEDIENUNGS- UND SICHERHEITSHINWEISE 3 OPERATION AND SAFETY NOTES 19 UNITÀ PRINCIPALE LP PLUS INDICAZIONI PER L USO E PER LA SICUREZZA 47
 DE LADEGERÄT LP PLUS BEDIENUNGS- UND SICHERHEITSHINWEISE 3 GB MAIN UNIT LP PLUS OPERATION AND SAFETY NOTES 19 FR UNITÉ PRINCIPALE LP PLUS INSTRUCTIONS D UTILISATION ET CONSIGNES DE SÉCURITÉ 33 IT UNITÀ
Litosil - application
 Litosil - application The series of Litosil is primarily determined for cut polished floors. The cut polished floors are supplied by some specialized firms which are fitted with the appropriate technical
REFERENCE: MTF4 CODIC:
 MARQUE: PROLINE REFERENCE: MTF4 CODIC: 3523551 MTF4 AVERTISSEMENTS Cet appareil est destiné à un usage domestique uniquement. Toute utilisation autre que celle prévue pour cet appareil, ou pour une autre
Easy-6 Pivottür mit Seitenwand / Otočné dveře s boční stěnou
 Easy-6 Pivottür mit Seitenwand / Otočné dveře s boční stěnou Lesen Sie die Bedienungsanleitung sorgfältig durch und bewahren Sie diese für den späteren Gebrauch auf. Wir empfehlen die Montage unseres Produktes
Herzlichen Glückwunsch! Sie haben sich für ein Qualitätsprodukt der Firma Zangenberg entschieden.
 Herzlichen Glückwunsch! Sie haben sich für ein Qualitätsprodukt der Firma Zangenberg entschieden. Bitte lesen Sie die Anleitung vor der ersten Benutzung aufmerksam durch. Sie erhalten wichtige Hinweise
USER'S MANUAL FAN MOTOR DRIVER FMD-02
 USER'S MANUAL FAN MOTOR DRIVER FMD-02 IMPORTANT NOTE: Read this manual carefully before installing or operating your new air conditioning unit. Make sure to save this manual for future reference. FMD Module
Uživatelská příručka. USB Charger UCH20
 Uživatelská příručka USB Charger UCH20 Obsah Úvod...3 USB Charger popis... 3 Používání nabíječky USB... 4 Nabíjení zařízení... 4 Právní informace... 5 Declaration of Conformity...6 2 Úvod USB Charger popis
Qualität aus erster Hand! Sie haben sich für ein Markenprodukt der Firma Zangenberg entschieden.
 Qualität aus erster Hand! Sie haben sich für ein Markenprodukt der Firma Zangenberg entschieden. Bitte lesen Sie die Anleitung vor der ersten Benutzung aufmerksam durch. Sie erhalten wichtige Hinweise
WICHTIG - FÜR SPÄTERE VERWENDUNG AUFBEWAHREN - SORGFÄLTIG LESEN.
 WICHTIG - FÜR SPÄTERE VERWENDUNG AUFBEWAHREN - SORGFÄLTIG LESEN. Ignorierung der Warnungen und Hinweise in der Gebrauchsanleitung können zu ernsten Verletzungen und Todesfällen führen. Achtung: Zur Vermeidung
Mechanika Teplice, výrobní družstvo, závod Děčín TACHOGRAFY. Číslo Servisní Informace Mechanika: 5-2013
 Mechanika Teplice, výrobní družstvo, závod Děčín TACHOGRAFY Servisní Informace Datum vydání: 20.2.2013 Určeno pro : AMS, registrované subj.pro montáž st.měř. Na základě SI VDO č./datum: Není Mechanika
Deutsch. Einstellhilfe Einachser. Grundsätzlich sollten die Seilzugeinstellungen immer 1 x im Jahr nachgeprüft werden. Einstellhilfe Kupplung
 Deutsch Einstellhilfe Einachser Grundsätzlich sollten die Seilzugeinstellungen immer 1 x im Jahr nachgeprüft werden. Einstellhilfe Kupplung Die Kupplung ist vom Werk aus grundeingestellt. 2. Ganghebel
Personenwaage Osobní váha MD 13894. Bedienungsanleitung Návod k obsluze
 Personenwaage Osobní váha MD 13894 Bedienungsanleitung Návod k obsluze Inhalt Zu dieser Anleitung... 2 In dieser Anleitung verwendete Symbole und Signalwörter...2 Einsatzbereich/bestimmungsgemäßer Gebrauch...3
POLO 2.0. Art. Nr.: 5460 - BEZPEČNOST - OBSLUHA. Výhradní dovozce a distributor pro Českou republiku a Slovensko Caravan Centrum Hykro s.r.o.
 POLO 2.0 TERRASSENHEIZUNG PLYNOVÝ ZÁŘIČ GAS Výhradní dovozce a distributor pro Českou republiku a Slovensko Caravan Centrum Hykro s.r.o. Ořešská Enders Colsman 1542 AG 155 00 Praha 5 - Řeporyje tel.: +420
STAVEBNÍ PŘIPRAVENOST GILOTINA VLO DIMENSIONAL SHEET VLO MASSBLATT VERTIKALER BESCHLAG VLO МОНТАЖ МЕТАЛЛОКОНСТРУКЦИИ ВОРОТ СИСТЕМЫ ГИЛЬОТИНА ВЛО
 CZ VOLNÝ PROSTOR PRO POHYBUJÍCÍ SE VRATA EN FREE SPACE FOR THE DOORMOVEMENT DE FREIRAUM FÜR DIE BEWEGUNGSABLÄUFE RU РАЗМЕРЫ НЕОБХОДИМЫЕ ДЛЯ УСТАНОВКИ ВОРОТ CZ A - šířka otvoru B - výška otvoru C - nadpraží
ROEDL & PARTNER ERSTES BÜRO IN PRAG MATERIÁLY PRO UČITELE
 ROEDL & PARTNER ERSTES BÜRO IN PRAG MATERIÁLY PRO UČITELE Roedl & Partner: Erstes Büro in Prag A: So und Sie haben sich vorgestellt, dass Sie hier in Prag ein Büro haben werden, ist das richtig? B: Wir
ROLLO STANDARD ELECTRIC. Montageanleitung / Mounting Instruction / Montážní návod
 ROLLO STANDARD ELECTRIC Montageanleitung / Mounting Instruction / Montážní návod Teileliste / Parts List / Seznam dílů (1) 2x ( 2) 2x (3) 2x Nur von Erwachsenen zu bedienen! Kinder nicht an der Bildwand
EINBAUANWEISUNG FÜR SCHALLDÄMM-SET BWS/DWS MONTÁŽNÍ NÁVOD PRO ZVUKOVĚ IZOLAČNÍ SOUPRAVY BWS/DWS
 EINUNWEISUNG FÜR SCHLLÄMM-SET WS/WS MONTÁŽNÍ NÁVO PRO ZVUKOVĚ IZOLČNÍ SOUPRVY WS/WS Wichtige Hinweise - unbedingt beachten! ůležitá upozornění bezpodmínečně dodržujte! Schalldämm-Set muss vollständig und
Size / Světlost : DN 1/4 to 4 / DN 1/4 až 4
 Size / Světlost : 1/4 to 4 / 1/4 až 4 Ends / Konce : Threaded BSP / Závitové BSP Min. Temperature / Minimální teplota : -20 C Max. Temperature / Maximální teplota : +180 C Max. Pressure / Maximální tlak
VESTAVBOVÝ RÁM - ROLLO JUMBO
 VESTAVBOVÝ RÁM - ROLLO JUMBO Montageanleitung / Mounting Instruction / Montážní návod Nur von Erwachsenen zu bedienen! Kinder nicht an der Bildwand spielen lassen! Operation by adults only! Do not let
Hi-Res Audio/DNC Headset MDR-NC750
 Uživatelská příručka Hi-Res Audio/DNC Headset MDR-NC750 Obsah Začínáme...3 Úvod...3 Přehled... 3 Základy práce...4 Nošení náhlavní soupravy...4 Připojení náhlavní soupravy k vašemu zařízení... 4 Nastavení
PLASTICPARTS. -Parts not for use. -Teile werden nicht verwendet. -Pieces a ne pas utiliser. -Tyto díly nepoužívejte při stavbě. -
 742 SpitfireMk.VI 1/72 A> 70120 A PLASTICPARTS B> 70120 B C> 70120 C D> F> E> 70120 D 70120 E GUNZE 70120 F H4 C4 YELLOW H12 H13 C3 FLAT RED H33 C81 RUSSET H51 C11 LIGHT GULL GRAY H71 C21 MIDDLE STONE
ROLZ-2. Portable AV/Conference Center. Assembly Instructions
 1 ROLZ-2 Portable AV/Conference Center Assembly Instructions Rolz-2 Portable AV/Conference Center Part Drawing Description Qty Part Drawing Description Qty Hardware List A 1 ½ Flat Head Screw 2 EA P-1
GUIDELINES FOR CONNECTION TO FTP SERVER TO TRANSFER PRINTING DATA
 GUIDELINES FOR CONNECTION TO FTP SERVER TO TRANSFER PRINTING DATA What is an FTP client and how to use it? FTP (File transport protocol) - A protocol used to transfer your printing data files to the MAFRAPRINT
2N Voice Alarm Station
 2N Voice Alarm Station 2N Lift1 Installation Manual Version 1.0.0 www.2n.cz EN Voice Alarm Station Description The 2N Voice Alarm Station extends the 2N Lift1/ 2N SingleTalk with an audio unit installed
GENERAL INFORMATION RUČNÍ POHON MANUAL DRIVE MECHANISM
 KATALOG CATALOGUE RUČNÍ POHONY PRO VENKOVNÍ PŘÍSTROJE, MONTÁŽ NA BETONOVÉ SLOUPY MANUAL DRIVE MECHANISM FOR THE ACTUATION OF OUTDOOR TYPE SWITCHING DEVICES MOUNTED ON THE CONCRETE POLES TYP RPV ISO 9001:2009
Brzda Bremse Brake F-350. Katalog náhradních dílů Ersatzteilkatalog Spare parts catalogue
 Brzda Bremse Brake F-350 Katalog náhradních dílů Ersatzteilkatalog Spare parts catalogue 03 / 2014 2 Pokyny k objednávání náhradních dílů Tento katalog obsahuje seznam součástí a jejich sestavení do montážních
Assembly Instructions, Montageanleitung, Montážní návod HB-S
 Assembly Instructions, Montageanleitung, Montážní návod HB-S A-44pcs B1-30pcs B2-12pcs B3-8pcs B4-4pcs C-2pcs D-2pcs E-1pc G - 4pcs F-1pc H-4pcs Bech dogs, Bankhaken, Poděráky 8x40 mm 4x20mm 7x50mm 6x30mm
Einbauanleitung zu Elektro-Einbausatz 736694 Elektro-Einbausatz für Anhängerkupplung, 7-polig, 12 Volt, nach ISO 1724
 Einbauanleitung zu Elektro-Einbausatz 736694 Elektro-Einbausatz für Anhängerkupplung, 7-polig, 12 Volt, nach ISO 1724 Peugeot 206 alle Modelle ab 09/98 Inhalt: 1 Steckdose 7-polig mit Abschaltkontakt für
Manuel d'utilisation 4 Pokyny pro uživatele 5
 Manuel d'utilisation 4 Pokyny pro uživatele 5 4 2 1 3 7 5 6 1 : Interrupteur marche / arrêt - Hlavní vypínač Zapnuto/Vypnuto L interrupteur principal de la S8 LAN TV permet la mise sous tension et l arrêt
Einbauanleitung zu Elektro-Einbausatz 736652 Elektro-Einbausatz für Anhängerkupplung, 7-polig, 12 Volt, nach ISO 1724
 Einbauanleitung zu Elektro-Einbausatz 736652 Elektro-Einbausatz für Anhängerkupplung, 7-polig, 12 Volt, nach ISO 1724 PEUGEOT 307 Kombi ab ab 04/02 PEUGEOT 307 Station Wagon ab 04/02 Inhalt: 1 Steckdosen-Gehäuse
Uživatelská příručka. Xperia P TV Dock DK21
 Uživatelská příručka Xperia P TV Dock DK21 Obsah Úvod...3 Přehled zadní strany stanice TV Dock...3 Začínáme...4 Správce LiveWare...4 Upgradování aplikace Správce LiveWare...4 Použití stanice TV Dock...5
 11.12. 100 ΕΙΣΟΔΟΣ = E / ENTRANCE = E = = 1174 550 ΤΥΠΟΠΟΙΗΜΕΝΟ ΚΥ = 2000 (ΕΠΙΛΟΓΗ: 2100) / CH STANDARD = 2000 (OPTIONAL: 2100) 243 50 ΚΥ/CH + 293 ΚΥ/CH +103 100 ΚΥ /CH 6 11 6 20 100 0,25 ΚΑ (CO) + 45
Projekt: ŠKOLA RADOSTI, ŠKOLA KVALITY Registrační číslo projektu: CZ.1.07/1.4.00/21.3688 EU PENÍZE ŠKOLÁM
 ZÁKLADNÍ ŠKOLA OLOMOUC příspěvková organizace MOZARTOVA 48, 779 00 OLOMOUC tel.: 585 427 142, 775 116 442; fax: 585 422 713 email: kundrum@centrum.cz; www.zs-mozartova.cz Projekt: ŠKOLA RADOSTI, ŠKOLA
USER'S MANUAL FAN MOTOR DRIVER FMD-01, FMD-03
 USER'S MANUAL FAN MOTOR DRIVER FMD-01, FMD-03 IMPORTANT NOTE: Read this manual carefully before installing or operating your new air conditioning unit. Make sure to save this manual for future reference.
FIRE INVESTIGATION. Střední průmyslová škola Hranice. Mgr. Radka Vorlová. 19_Fire investigation CZ.1.07/1.5.00/
 FIRE INVESTIGATION Střední průmyslová škola Hranice Mgr. Radka Vorlová 19_Fire investigation CZ.1.07/1.5.00/34.0608 Výukový materiál Číslo projektu: CZ.1.07/1.5.00/21.34.0608 Šablona: III/2 Inovace a zkvalitnění
Einbauanleitung zu Elektro-Einbausatz 736551 Elektro-Einbausatz für Anhängerkupplung, 7-polig, 12 Volt, nach ISO 1724
 Einbauanleitung zu Elektro-Einbausatz 736551 Elektro-Einbausatz für Anhängerkupplung, 7-polig, 12 Volt, nach ISO 1724 CITROËN BERLINGO alle Modelle ab 10/96 PEUGEOT PARTNER alle Modelle ab 11/96 Inhalt:
Hanriot HD.2 PLASTIC PARTS. Mr.METAL COLOR METALLICS
 8413 1/48 Hanriot HD.2 PLASTIC PARTS A> 3 B> 1 2 13 5 23 7 6 9 8 12 25 7 9 5 15 15 14 21 29 28 31 30 37 36 35 34 4 12 20 11 6 17 16 8 38 24 25 4 3 26 20 2 17 11 10 27 28 14 13 33 27 26 32 19 18 10 22 1
WORKSHEET 1: LINEAR EQUATION 1
 WORKSHEET 1: LINEAR EQUATION 1 1. Write down the arithmetical problem according the dictation: 2. Translate the English words, you can use a dictionary: equations to solve solve inverse operation variable
SERVISNÍ MANUÁL PEGAS 250 E CEL OVO SERVICE MANUAL PEGAS 250 E CEL OVO
 MG136-1 PEGAS 250 E CEL OVO SERVICE MANUAL page 1 SERVISNÍ MANUÁL PEGAS 250 E CEL OVO SERVICE MANUAL PEGAS 250 E CEL OVO 1. VAROVÁNÍ WARNING UPOZORNĚNÍ Pouze osoba splňující kvalifikaci danou zákonem je
CHAIN TRANSMISSIONS AND WHEELS
 Second School Year CHAIN TRANSMISSIONS AND WHEELS A. Chain transmissions We can use chain transmissions for the transfer and change of rotation motion and the torsional moment. They transfer forces from
Neplatí pro přístroje série Pro EVO!
 Neplatí pro přístroje série Pro EVO! Montážní návod vkládací řídící jednotka pro WGB C/D, WGB-K C, WBS/WBC C/D pro BGB, BBS C, BBK C/D pro SGB C/D Neplatí pro přístroje série Pro EVO! Obsah Často kladené
Einbauanleitung zu Elektro-Einbausatz 736566 Elektro-Einbausatz für Anhängerkupplung, 7-polig, 12 Volt, nach ISO 1724. FIAT PUNTO ab 09/99
 Einbauanleitung zu Elektro-Einbausatz 736566 Elektro-Einbausatz für Anhängerkupplung, 7-polig, 12 Volt, nach ISO 1724 FIAT PUNTO ab 09/99 Inhalt: 1 Steckdose 7-polig, 1 Leitungssatz 7-adrig, 1 Gummidichtung
UPM3 Hybrid Návod na ovládání Čerpadlo UPM3 Hybrid 2-5 Instruction Manual UPM3 Hybrid Circulation Pump 6-9
 www.regulus.cz UPM3 Hybrid Návod na ovládání Čerpadlo UPM3 Hybrid 2-5 Instruction Manual UPM3 Hybrid Circulation Pump 6-9 CZ EN UPM3 Hybrid 1. Úvod V továrním nastavení čerpadla UPM3 Hybrid je profil PWM
Training Board TB series 3. SolderBoard
 Training Board TB series 3 SolderBoard Elektronická stavebnice SOLDERBOARD byla speciálně navržena pro účely praktické výuky ručního osazování a pájení desek plošných spojů v technologii SMT. Je levným
Saurer Regen. V rámci následujícího úkolu se studenti seznámí s odborným textem v němčině. Dozvědí se základní informace o kyselém dešti.
 NĚMČINA Saurer Regen V rámci následujícího úkolu se studenti seznámí s odborným textem v němčině. Dozvědí se základní informace o kyselém dešti. Gymnázium Frýdlant, Mládeže 884, příspěvková organizace
GFS 1020 # 58080 D GB F DK CZ SK NL I. GÜDE Slovakia s.r.o Podtúreň-Roveň 208 SK-033 01 Liptovský Hrádok
 GFS 1020 D GB F DK CZ SK NL I NOR S # 58080 Güde GmbH & Co. KG Birkichstraße 6 D-74549 Wolpertshausen www.guede.com Güde Scandinavia A/S Engelsholmvej 33 DK-8900 Randers www.guede.com UNICORE nářadí s.r.o.
SPECIFICATION FOR ALDER LED
 SPECIFICATION FOR ALDER LED MODEL:AS-D75xxyy-C2LZ-H1-E 1 / 13 Absolute Maximum Ratings (Ta = 25 C) Parameter Symbol Absolute maximum Rating Unit Peak Forward Current I FP 500 ma Forward Current(DC) IF
2N LiftIP. IO Extender. Communicator for Lifts. Version
 2N LiftIP Communicator for Lifts IO Extender Version 2.4.0 www.2n.cz Description The IO extender helps you extend 2N LiftIP with 1 input and 2 outputs. The purpose of the input is to cancel the rescue
Gymnázium, Brno, Slovanské nám. 7 WORKBOOK. Mathematics. Teacher: Student:
 WORKBOOK Subject: Teacher: Student: Mathematics.... School year:../ Conic section The conic sections are the nondegenerate curves generated by the intersections of a plane with one or two nappes of a cone.
User manual SŘHV Online WEB interface for CUSTOMERS June 2017 version 14 VÍTKOVICE STEEL, a.s. vitkovicesteel.com
 1/ 11 User manual SŘHV Online WEB interface for CUSTOMERS June 2017 version 14 2/ 11 Contents 1. MINIMUM SYSTEM REQUIREMENTS... 3 2. SŘHV ON-LINE WEB INTERFACE... 4 3. LOGGING INTO SŘHV... 4 4. CONTRACT
Informace o písemných přijímacích zkouškách. Doktorské studijní programy Matematika
 Informace o písemných přijímacích zkouškách (úplné zadání zkušebních otázek či příkladů, které jsou součástí přijímací zkoušky nebo její části, a u otázek s výběrem odpovědi správné řešení) Doktorské studijní
NÁVOD K OBSLUZE KOMBINOVANÝ OBUVNICKÝ STROJ BT - 202
 NÁVOD K OBSLUZE KOMBINOVANÝ OBUVNICKÝ STROJ BT - 202 OBSAH I. Hlavní součásti obuvnického stroje. II. Konstrukce III. Schéma elektrického zapojení IV. Instalace a uvedení do provozu V. Obsluha stroje VI.
Začínáme. Entfernen Sie beide Seitenteile und die Gehäuseoberseite. Remove both side panels and the case top. Odstraňte oba boční a horní panel.
 Začínáme Entfernen Sie beide Seitenteile und die Gehäuseoberseite. Remove both side panels and the case top. Odstráňte oba bočné a horný panel. Odstraňte oba boční a horní panel. Entfernen Sie die Frontblende,
Název společnosti: VPK, s.r.o. Vypracováno kým: Ing. Michal Troščak Telefon: Datum:
 Pozice Počet Popis 1 SCALA2 3-45 A Datum: 2.7.217 Výrobní č.: 98562862 Grundfos SCALA2 is a fully integrated, self-priming, compact waterworks for pressure boosting in domestic applications. SCALA2 incorporates
František. Hrachovina. přeprava nadměrných nákladů / transport of oversize cargo / Großraum- und Schwertransporte
 František Hrachovina přeprava nadměrných nákladů / transport of oversize cargo / Großraum- und Schwertransporte O firmě / About / Gessellschaft Hrachovina.cz Dne 4.2.1992 založil Miroslav Hrachovina dopravní
DATA SHEET. BC516 PNP Darlington transistor. technický list DISCRETE SEMICONDUCTORS Apr 23. Product specification Supersedes data of 1997 Apr 16
 zákaznická linka: 840 50 60 70 DISCRETE SEMICONDUCTORS DATA SHEET book, halfpage M3D186 Supersedes data of 1997 Apr 16 1999 Apr 23 str 1 Dodavatel: GM electronic, spol. s r.o., Křižíkova 77, 186 00 Praha
Stříkací pistole. Striekacia pištoľ 10.25-007
 Stříkací pistole Profi-Farbpistole Striekacia pištoľ 10.25-007 CZ 7 6 2 4 5 3 1 1) rychloupínací konektor 2) regulace množství barvy 3) regulace množství vzduchu 4) nastavení stříkacího modulu 5) spoušť
Einbauanleitung zu Elektro-Einbausatz 736216 Elektro-Einbausatz für Anhängerkupplung, 7-polig, 12 Volt, nach ISO 1724
 Einbauanleitung zu Elektro-Einbausatz 736216 Elektro-Einbausatz für Anhängerkupplung, 7-polig, 12 Volt, nach ISO 1724 FIAT ULYSSE ab 09/94 bis 08/02 PEUGEOT 806 ab 09/94 bis 08/02 CITROËN EVASION ab 09/94
TECHNICKÝ LIST řada mechanických odvaděčů kondenzátu AUTODRAIN TECHNICAL DATA SHEET for mechanical autodrain equipment AUTODRAIN
 Popis: Nádoba s mechanickým plovákem k odstraňování pevných nečistot, vody, aerosolů, uhlovodíků, prachu oddělených separátory KING AIR se systémem stlačeného vzduchu. Rozdělení dle využití instalace:
ZÓNOVÉ VENTILY S VRATNOU PRUŽINOU dvoucestné VZP 2XX 230 1P 001 třícestné VZP 3XX 230 1P 001
 Návod na instalaci a použití ZÓNOVÉ VENTILY S VRATNOU PRUŽINOU dvoucestné VZP 2XX 230 1P 001 třícestné VZP 3XX 230 1P 001 CZ verze 1.2 Popis: Zónové ventily s vratnou pružinou jsou určeny do hydraulických
Czech Republic. EDUCAnet. Střední odborná škola Pardubice, s.r.o.
 Czech Republic EDUCAnet Střední odborná škola Pardubice, s.r.o. ACCESS TO MODERN TECHNOLOGIES Do modern technologies influence our behavior? Of course in positive and negative way as well Modern technologies
JUNIOR RANGER PROJECT
 JUNIOR RANGER PROJECT pro chráněné krajinné oblasti nízkonákladová verze projektu Mladých strážců Květa Černohlávková, Praha 2007 Vydalo Ministerstvo životního prostředí JUNIOR RANGER PROJECT pro chráněné
20 ka / 1 s (dle typu cívky) přirozené
 přirozené") KATALOG CATALOGUE 051/03/2013 VÝKONOVÝ REAKTOR NN, NASTAVITELNÝ LOW VOLTAGE POWER REACTOR COIL, ADJUSTABLE pro napětí do 1000 V for voltages up to 1000V TYP LNN ISO 9001:2009 ISO 14001:2005 VŠEOBECNĚ Výkonový
KATALOG CATALOGUE 051/03/2013 VÝKONOVÝ REAKTOR NN, NASTAVITELNÝ LOW VOLTAGE POWER REACTOR COIL, ADJUSTABLE pro napětí do 1000 V for voltages up to 1000V TYP LNN ISO 9001:2009 ISO 14001:2005 VŠEOBECNĚ Výkonový
SG 650 D GB CZ. Art.-Nr.: 240.100.210. Originalbetriebsanleitung Farb-spritzpistole Translation of the original instructions Colour spray gun
 Originalbetriebsanleitung Farb-spritzpistole Translation of the original instructions Colour spray gun Originální návod stříkací pistole D GB CZ SG 650 Art.-Nr.: 240.100.210 b a c B1 2 7 1 13 12 3 B2 4
Kapitola 2 Dokumentace č. 11 103 CS
 Kapitola Dokumentace č. 0 CS Přívod oleje kanálový Sortimentní číslo výrobku 0088-6-5-70040 Ortlinghaus-Werke GmbH Postfach 4 40 4907 Wermelskirchen Kenkhauser Str. 5 499 Wermelskirchen Deutschland Tel.
MC Tlumiče (řízení pohybu) MC Damper
 MC Damper") MC Tlumiče (řízení pohybu) MC Damper Fitness a volný čas Leisure and Training equipment Strojírenství Machinery Automobilový průmysl Vehicle Industry MC Tlumiče (pro řízení pohybu) se používají jako bezpečnostní
MC Tlumiče (řízení pohybu) MC Damper Fitness a volný čas Leisure and Training equipment Strojírenství Machinery Automobilový průmysl Vehicle Industry MC Tlumiče (pro řízení pohybu) se používají jako bezpečnostní
PC/104, PC/104-Plus. 196 ept GmbH I Tel. +49 (0) / I Fax +49 (0) / I I
 / I Fax +49 (0) / I I") E L E C T R O N I C C O N N E C T O R S 196 ept GmbH I Tel. +49 (0) 88 61 / 25 01 0 I Fax +49 (0) 88 61 / 55 07 I E-Mail sales@ept.de I www.ept.de Contents Introduction 198 Overview 199 The Standard 200
E L E C T R O N I C C O N N E C T O R S 196 ept GmbH I Tel. +49 (0) 88 61 / 25 01 0 I Fax +49 (0) 88 61 / 55 07 I E-Mail sales@ept.de I www.ept.de Contents Introduction 198 Overview 199 The Standard 200
Montážní návod ZENEC OPEL CORSA. ze-nc501 0 TO U C H A N O T H E R W O R L D
 Montážní návod ZENEC OPEL CORSA ze-nc50 0 TO U C H A N O T H E R W O R L D MONTÁŽNÍ NÁVOD OPEL CORSA Bitte Beachten/Pamatujte prosím Das Fahrzeug ist mit einem Eigendiagnosegerät (DME) ausgestattet. Um
ABS DOORS TÜREN DVEŘE
 ABS DOORS TÜREN DVEŘE Obsah 4 TECHNIC 6 Agata 7 Erika 8 Gabriela 9 Linda 10 Nora 11 Olivie 12 Stela 14 CLASSIC 16 Alena 17 Anna 18 Dana 19 Eva 20 Iveta 21 Jana 22 Petra 23 Radka 24 INFO 26 Minimální rozměry
Manuel d'utilisation 4 Pokyny pro uživatele 5
 Manuel d'utilisation 4 Pokyny pro uživatele 2 1 4 3 6 1 : Interrupteur marche / arrêt - Hlavní vypínač Zapnuto/Vypnuto L interrupteur principal de la S LAN permet la mise sous tension et l arrêt des prises.
Tento materiál byl vytvořen v rámci projektu Operačního programu Vzdělávání pro konkurenceschopnost.
 Tento materiál byl vytvořen v rámci projektu Operačního programu Vzdělávání pro konkurenceschopnost. Projekt MŠMT ČR Číslo projektu Název projektu školy Klíčová aktivita III/2 EU PENÍZE ŠKOLÁM CZ.1.07/1.4.00/21.2146
Výukový materiál zpracovaný v rámci operačního programu Vzdělávání pro konkurenceschopnost
 Výukový materiál zpracovaný v rámci operačního programu Vzdělávání pro konkurenceschopnost Registrační číslo: CZ.1.07/1. 5.00/34.0084 Šablona: II/2 Inovace a zkvalitnění výuky cizích jazyků na středních
DEMATECH PREISANGEBOT / CENOVÁ NABÍDKA
 PREISANGEBOT / CENOVÁ NABÍDKA Maschinenart / Druh stroje: Anlage zum Pelletieren / Pellet line / Peletovací linka Marke und Typ / Značka a typ: MGL 400 Baujahr / Rok výroby: 2011 Hersteller / Výrobce:
ROLZ-2. Portable AV/Conference Center. Assembly Instructions
 1 ROLZ-2 Portable AV/Conference Center Assembly Instructions Rolz-2 Portable AV/Conference Center Part Drawing Description Qty Part Drawing Description Qty Hardware List A 1 ½ Flat Head Screw 2 EA P-1
Název společnosti: VPK, s.r.o. Vypracováno kým: Ing. Michal Troščak Telefon: Datum:
 Počet 1 SCALA2 3-45 A Datum: 2.7.217 Výrobní č.: 98562862 Grundfos SCALA2 is a fully integrated, self-priming, compact waterworks for pressure boosting in domestic applications. SCALA2 incorporates integrated
 [KLICK] GB Instruction Manual POWERLINE 4 LIGHT FOREWORD Dear Customer, Thank you for purchasing the POWERLINE 4 LIGHT charger. These operating instructions will help you to get the best from your charger.
SERVICE MANUAL PEGAS 250 E CEL SERVISNÍ MANUÁL PEGAS 250 E CEL
 MG-011-05 PEGAS 250 E CEL SERVICE MANUAL page 1 SERVISNÍ MANUÁL PEGAS 250 E CEL SERVICE MANUAL PEGAS 250 E CEL 1. VAROVÁNÍ WARNING UPOZORNĚNÍ Pouze osoba splňující kvalifikaci danou zákonem je oprávněna
Predator Predator Predator ÚPRAVA RAMENE - Predátor P50R ARM-ADJUSTIERUNG - Predator P50R ARM ADJUSTMENT - Predator P50R
 Predator Predator Predator ÚPRV RMENE - Predátor P50R RM-DJUSTIERUNG - Predator P50R RM DJUSTMENT - Predator P50R Katalog náhradních dílů Ersatzteilkatalog Spare parts catalogue 03 / 2011 2 Pokyny k objednávání
Introduction to MS Dynamics NAV
 Introduction to MS Dynamics NAV (Item Charges) Ing.J.Skorkovský,CSc. MASARYK UNIVERSITY BRNO, Czech Republic Faculty of economics and business administration Department of corporate economy Item Charges
L-force Drives. EDK84DGFCxxxx.O=I. Ä.O=Iä. Montážní návod motec. E84DGFCxxxx. Komunikační modul Communication unit
 EDK8DGFCxxxx.O=I Ä.O=Iä L-force Drives Montážní návod 800 motec E8DGFCxxxx Komunikační modul Communication unit 0 0.7 kw 7.kW E8DG0a E8DG0b EDK8DGFCxxxx CS.0 V Warnings! Operation of this equipment requires
EU peníze středním školám digitální učební materiál
 EU peníze středním školám digitální učební materiál Číslo projektu: Číslo a název šablony klíčové aktivity: Tematická oblast, název DUMu: Autor: CZ.1.07/1.5.00/34.0515 III/2 Inovace a zkvalitnění výuky
STORAGE, TRANSPORTATION, HANDLING MANUAL D0141.STHM.01
 STORAGE, TRANSPORTATION, HANDLING MANUAL GENERÁTOROVÉ ROZVÁDĚCÍ SKŘÍNĚ VN - PRIMÁRNÍ ROZVOD, VNITŘNÍ / VENKOVNÍ PROVEDENÍ GENERATOR MV SWITCHGEAR PRIMARY DISTRIBUTION, INDOOR / OUTDOOR DESIGN ISO 9001:2009
Nové bezpečnostní pokyny
 skip English version Nové bezpečnostní pokyny V naší společnosti MMHP platí od 1.9.2011 upravené bezpečnostní pokyny, které upravují zejména pobyt a jízdu v areálu společnosti a dále vyžadují používání
Izolační manipulační tyče typ IMT IMT Type Insulated Handling Rod
 KATALOG CATALOGUE 024/09/2011 IZOLAČNÍ MANIPULAČNÍ TYČ INSULATED HANDLING ROD TYP IMT KOVOVÁ MANIPULAČNÍ TYČ METALLIC HANDLING ROD TYP KMT ISO 9001:2009 ISO 14001:2005 Izolační manipulační tyče typ IMT
eduard WEEKEND EDITION
 3741 1:35 Pz.Kpfw. VI Ausf.B Tiger II PLASTIC PARTS A> B> C> D> eduard WEEKEND EDITION E> F> G> 2 pcs. H> 2 pcs. -Parts not for use. -Teile werden nicht verwendet. -Pieces a ne pas utiliser. -Tyto díly
A Sloupkové stojánky. B Broušené desky a lišty. Transportní a upínací přípravky. D Vodící prvky. Přesné díly. Pružiny. G Elastomery H FIBROCHEMIE
 A Sloupkové stojánky B Broušené desky a lišty C Transportní a upínací přípravky D Vodící prvky E Přesné díly F Pružiny G Elastomery H FIBROCHEMIE J Periferní zařízení K Klínové jednotky L Normálie pro
NOVINKA. [Řada System 2] Dynamic Electronic Control
![NOVINKA. [Řada System 2] Dynamic Electronic Control](/thumbs/26/8859700.jpg "NOVINKA. [Řada System 2] Dynamic Electronic Control") MADE IN ITALY NOVÝ elektrický lineární hřebenový pohon s technologií DEC NEW Electrical linear rack actuator DEC technology: Technology DEC Dynamic Electronic Control Vyšší životnost pohonu a okna Automatické
MADE IN ITALY NOVÝ elektrický lineární hřebenový pohon s technologií DEC NEW Electrical linear rack actuator DEC technology: Technology DEC Dynamic Electronic Control Vyšší životnost pohonu a okna Automatické
The tension belt serves as a tension unit. After emptying the belt is cleaned with a scraper.
 Second School Year BELT AND WORM CONVEYORS They are machines for transporting piece or loose materials even for great distances. In loaders and unloaders it is not necessary to stop the conveyor. The transport
450 / 900 / 1300. Automatické univerzální olejové hořáky
 Automatické univerzální olejové hořáky 450 / 900 / 1300 Zástupce pro ČR: EKOTEZ spol. s r.o. Koněvova 47 130 00 Praha 3 Česká republika Tel.: + 420 221 599 163 Fax: + 420 222 582 495 vytapeni@ekotez.cz
VY_32_INOVACE_06_Předpřítomný čas_03. Škola: Základní škola Slušovice, okres Zlín, příspěvková organizace
 VY_32_INOVACE_06_Předpřítomný čas_03 Autor: Růžena Krupičková Škola: Základní škola Slušovice, okres Zlín, příspěvková organizace Název projektu: Zkvalitnění ICT ve slušovské škole Číslo projektu: CZ.1.07/1.4.00/21.2400
Návod k obsluze a montáži N129/R04 (10.03.14 ) SUŠÁK NA RUCE
 SUŠÁK NA RUCE") Návod k obsluze a montáži N129/R04 (10.03.14 ) SUŠÁK NA RUCE Čtěte prosím pozorně informace uvedené v tomto návodu, který obsahuje důležité pokyny pro bezpečnou montáž, použití a údržbu jednotky. Uchovávejte
Návod k obsluze a montáži N129/R04 (10.03.14 ) SUŠÁK NA RUCE Čtěte prosím pozorně informace uvedené v tomto návodu, který obsahuje důležité pokyny pro bezpečnou montáž, použití a údržbu jednotky. Uchovávejte
Výukový materiál zpracovaný v rámci operačního programu Vzdělávání pro konkurenceschopnost
 Výukový materiál zpracovaný v rámci operačního programu Vzdělávání pro konkurenceschopnost Registrační číslo: CZ.1.07/1. 5.00/34.0084 Šablona: II/2 Inovace a zkvalitnění výuky cizích jazyků na středních
2N LiftIP. Voice Alarm Station. Communicator for Lifts. Version
 2N LiftIP Communicator for Lifts Voice Alarm Station Version 2.4.0 www.2n.cz Description The 2N Voice Alarm Station is a switch that helps you extend 2N LiftIP with one or more audio units installed on
Mounting Instructions Návod k montáži LS 106 LS 176 LS 186
 Montageanleitung Mounting Instructions Návod k montáži LS 106 LS 176 LS 186 2/2002 Warnhinweise. Warnings. Důležitá upozorněn DIN EN 100 015 1 CECC 00015 1 0 I Maße in mm Dimensions in mm Rozměry v mm
Německý jazyk. Jaroslav Černý
 P S N Í Jazyk Úroveň utor Kód materiálu Německý jazyk 9. třída Jaroslav Černý nj9-kat-cer-psa-02 rbeitsagentur Unsere gentur sucht für einen ausländisch 1 Klienten neu 1 rbeitskräfte auf dem tschechisch
FEATURES. Kvalita oceli: Ochrana proti korozi: APPLICATIONS. Technical data sheet AKRX3 - ÚHELNíK
 Tyto úhelníky umožnují optimální spojení mezi dřevem a jiným stavebním materiálem, jako je beton, ocel. Jedná se o ekonomické spoje, které lze využít v mnoha oblastech. AKR a AKR-L se liší v otvorech pro
EXACT DS OFFICE. The best lens for office work
 EXACT DS The best lens for office work EXACT DS When Your Glasses Are Not Enough Lenses with only a reading area provide clear vision of objects located close up, while progressive lenses only provide
Čas potřebný k prostudování učiva lekce: 5 vyučujících hodin Čas potřebný k ověření učiva lekce: 30 minut
 Thema: 8 Plat a mzda Gramatika: modální slovesa a vyjádření modality (je nutné, je možné, ) pomocí haben či sein a infinitivu s,, zu ;zájmenná příslovce; rozkaz Čas potřebný k prostudování učiva lekce: