GB Multi Power pack Fr Pack Multi-Power. Sk Multi-Powerpack. Multi-Powerpack
|
|
|
- Irena Jandová
- před 8 lety
- Počet zobrazení:
Transkript
1 De Multi-Powerpack BEDIENUNGSANLEITUNG 3 GB Multi Power pack INSTRUCTIONS FOR USE 15 Fr Pack Multi-Power MODE D EMPLOI 27 it Multi-Powerpack MANUALE D ISTRUZIONI 39 CZ Multifunkční Power Pack NÁVOD K OBSLUZE 51 Sk Multi-Powerpack NÁVOD NA OBSLUHU Multi-Powerpack

2 2 DE - Seite 3 Vor jeder Benutzung unbedingt lesen. Anleitung und Ratschläge befolgen. GB - Page 15 Read these instructions before using the charger. Follow all instructions and recommendations. FR - Page 27 Veuillez lire les présentes instructions avant toute utilisation de l appareil et suivre les conseils mentionnés ici. IT - Pagina 39 Leggere attentamente le istruzione i seguire tutti i consigli e gli avvisi prima di utilizzare il prodotto. CZ - Strana 51 Před použitim nabiječky si přečtěte tento navod. Dodržujte všechny pokyny a doporučeni. SK - Strana 63 Pred použitim nabijačky si prečitajte tento navod. Dodržujte všetky pokyny a odporučania.

3 DE 3 Inhalt Einleitung Bestimmungsgemäßer Gebrauch Lieferumfang Technische Daten Sicherheit Produktübersicht Verwendung Hinweise zur Verwendung Ladevorgang des Multi-Powerpacks Ladevorgang eines mobilen Endgeräts Licht ein-/ausschalten Starthilfe für Motorrad und PKW Abklemmen Reinigung, Pflege und Wartung Service Entsorgung

4 4 Einleitung Erklärung der Symbole und Signalworte, die in dieser Bedienungsanleitung und/ oder am Gerät verwendet werden: Beachten Sie diese Bedienungsanleitung bei der Verwendung des Geräts. Lebens- und Unfallgefahr für Kinder! Beachten Sie Warn- und Sicherheitshinweise! Gerät nur an witterungsgeschützten Standorten verwenden! Entsorgen Sie Verpackung und Gerät umweltgerecht! Symbol/Signalwort Gefahr! Warnung! Vorsicht! Achtung! Mögliche Folgen bei Nichtbeachtung Unmittelbar drohende Lebensgefahr oder schwerste Verletzungen. Schwere Verletzungen, möglicherweise Lebensgefahr. Leichte bis mittelschwere Verletzungen. Gefahr von Sachschäden. Hinweis: Für das Multi-Powerpack wird in dieser Bedienungsanleitung auch der Begriff Gerät verwendet.

5 DE 5 Bestimmungsgemäßer Gebrauch Das Multi-Powerpack ist für den Einsatz als universale Hochleistungs-Stromversorgung für Smartphone, Tablet-PC und mobile Endgeräte geeignet sowie als Starthilfefunktion für Motorrad und PKW. Dieses Gerät ist nicht dafür bestimmt, durch Kinder und Personen mit eingeschränkten geistigen/körperlicher Fähigkeiten oder mangels Erfahrung und/oder mangels Wissen benutzt zu werden. Kinder sollten beaufsichtigt werden, um sicherzustellen, dass sie nicht mit dem Gerät spielen. Das Gerät ist nicht für den gewerblichen Einsatz bestimmt. Jede andere Verwendung oder Veränderung des Geräts gilt als nicht bestimmungsgemäß und birgt erhebliche Gefahren. Für Schäden, die aus bestimmungswidriger Verwendung entstanden sind, übernimmt der Hersteller keine Haftung. Lieferumfang Kontrollieren Sie unmittelbar nach dem Auspacken den Lieferumfang. Prüfen Sie das Gerät sowie alle Teile auf Beschädigungen. Nehmen Sie ein defektes Gerät oder Teile nicht in Betrieb. Multi-Powerpack Adapterset (16 verschiedene Anschlüsse) USB-Verbindungskabel (5 V) 12 V Verbindungskabel Anschlusskabel mit 12 V Kfz-Stecker Anschlusskabel mit 230 V Netzstecker Starthilfekabel mit Klemmen Aufbewahrungstasche mit Reißverschluss Bedienungsanleitung Geben Sie alle Unterlagen auch an andere Benutzer weiter!

6 6 Technische Daten Abmessungen (H x B x T) Gewicht Eingangsspannung Ausgangsspannung Stromversorgung Ladezeit Umgebungstemperatur 17,7 x 7,6 x 2,9 cm 430 g 230 V Ladenetzteil: V AC / 50 Hz 12 V Kfz-Ladekabel: 12 V DC/1 A USB: 5 V DC/2 A 19 V DC/3,5 A 12 V DC/2 A Starthilfekabel: 12 V DC/200 A (max. 400 A) Li-Ion-Akku (12 Ah Kapazität) ca. 5 Stunden -15 bis +60 º C Sicherheit Allgemeine Sicherheitshinweise Lesen Sie alle Sicherheitshinweise und Anweisungen. Versäumnisse bei der Einhaltung der Sicherheitshinweise und Anweisungen können elektrischen Schlag, Brand und/oder schwere Verletzungen verursachen. Bewahren Sie alle Sicherheitshinweise und Anweisungen für die Zukunft auf. Warnung! Lebens- und Unfallgefahr für Kinder. Erstickungs- und Strangulationsgefahr! Halten Sie das Gerät aus der Reichweite von Kindern fern. Kinder können die Gefahren, die durch das Produkt entstehen, nicht erkennen! Lebensgefahr! Beschädigte Leitungen können einen tödlichen elektrischen. Schlag auslösen. Beschädigte Kabel nicht mehr verwenden. Der Hersteller ist nicht verantwortlich für Schäden verursacht durch:

7 Unsachgemäßen Anschluss und/oder Betrieb. DE 7 Äußere Krafteinwirkung, Beschädigungen des Geräts und/oder Beschädigungen von Teilen des Geräts durch mechanische Einwirkungen oder Überlastung. Jede Art von Veränderungen des Geräts. Verwendung des Geräts zu Zwecken, die nicht in dieser Bedienungsanleitung beschrieben wurden. Folgeschäden durch nicht bestimmungsgemäße und/oder unsachgemäße Verwendung. Feuchtigkeit und/oder unzureichende Belüftung. Unberechtigtes Öffnen des Geräts. Explosions- und Brandgefahr! Zündquellen (z. B. brennende Zigarette) von der Batterie fernhalten. Das Multi-Powerpack muss die gleiche Spannung (V) wie die entladene Batterie haben (siehe Angaben auf der Batterie). Verwenden Sie das Starthilfekabel nicht in explosionsgefährdeter Umgebung. Eine eingefrorene Batterie vor dem Starten auftauen. Stellen Sie sicher, dass die Bordspannung mit der auf dem Gerät angegebenen Eingangsspannung (12 V DC) übereinstimmt, um Brandgefahr und Geräteschäden zu vermeiden. Stellen Sie die Verwendung des Geräts sofort ein, wenn Rauch sichtbar wird oder ein ungewöhnlicher Geruch wahrzunehmen ist. Setzen Sie das Gerät nicht direkter Sonneneinstrahlung aus. Batterien können platzen oder explodieren, wenn sie ins Feuer geworfen oder extremer Hitze ausgesetzt werden. Setzen Sie das Gerät keiner extremen Hitze aus. Verätzungsgefahr! Risiko von Augenverletzungen. Schutzbrille tragen und nicht über die Batterie beugen. Das Elektrolyt der entladenen Starterbatterie ist auch bei niedrigen Temperaturen flüssig.
 von der Batterie fernhalten. Das Multi-Powerpack muss die gleiche Spannung (V) wie die entladene Batterie haben (siehe Angaben auf der Batterie).")
8 8 Stromschlaggefahr Die beteiligten Kabelzangen dürfen sich nicht berühren. Die Kontakte des am Pluspol der Batterie angebrachten Kabels dürfen nicht mit elektrisch leitfähigen Fahrzeugteilen in Berührung kommen. Setzen Sie das Gerät nicht Regen oder nassen Bedingungen aus. Vermeiden Sie es, Wasser oder andere Flüssigkeiten darüber zu verschütten oder zu tropfen. Dringt Wasser in elektrische Geräte ein, erhöht sich das Risiko eines Stromschlags. Stellen Sie sicher, dass alle Stecker und Kabel frei von Feuchtigkeit sind. Schließen Sie das Gerät niemals mit feuchten Händen an das Bordnetz an. Verwenden Sie kein beschädigtes Gerät. Beschädigungen erhöhen das Risiko eines Stromschlags. Versuchen Sie nicht das Gerät auseinander zu bauen oder es zu reparieren. Lassen Sie ein defektes Gerät umgehend von einer Fachwerkstatt reparieren oder ersetzen. Ziehen Sie ein Kabel nur am Stecker aus der Steckdose. Das Kabel kann sonst beschädigt werden. Verwenden Sie das Kabel niemals, um das Gerät zu tragen oder zu ziehen. Betreiben Sie das Gerät niemals, wenn es heruntergefallen ist oder anderweitig beschädigt wurde. Bringen Sie es zur Inspektion und Reparatur zu einem qualifizierten Elektriker. Verletzungsgefahr Das Produkt nicht verändern oder manipulieren, es besteht sonst erhöhte Verletzungsgefahr. Wenn Sie das Gerät in einem Fahrzeug transportieren, bewahren Sie es im Kofferraum oder einer geeigneten Ablage auf, damit das Gerät bei plötzlichen Fahrzeugbewegungen nicht in Bewegung geraten kann.

9 De 9 ProDuktÜBerSicHt
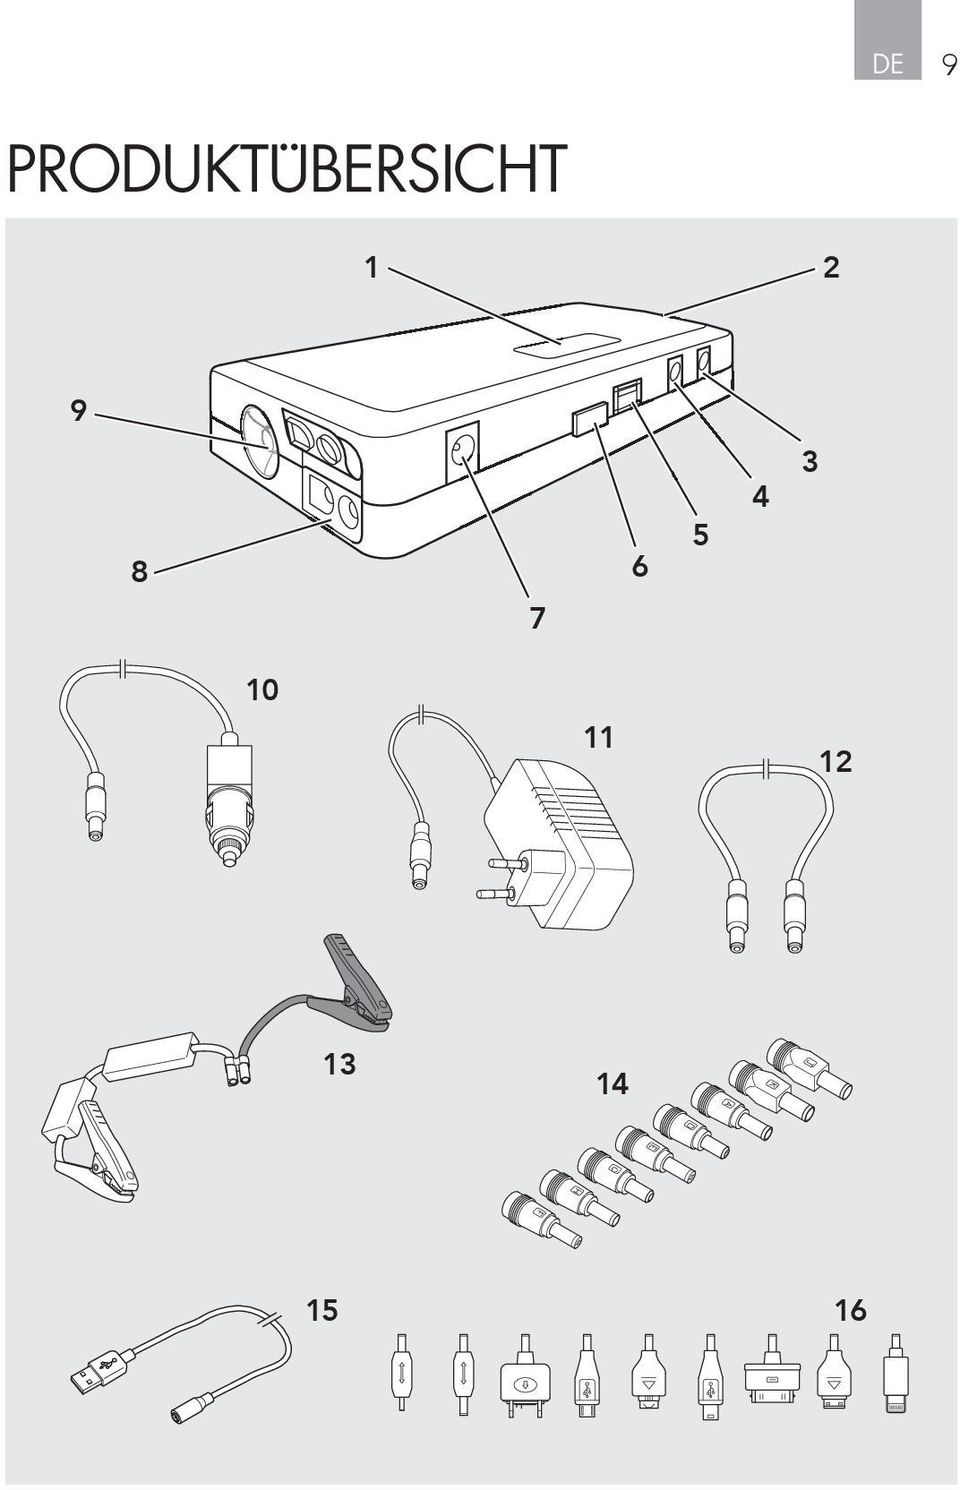
10 10 1. Display 2. Nothammer V Eingang (1 A) V Ausgang (2 A) 5. USB-Anschluss (5 V) 6. Aktivierungstaste V Ausgang (3,5 A) 8. Anschluss für Starthilfekabel 9. LED-Leuchte V Kfz-Ladekabel V Netzadapter 12. Anschlusskabel für Adapter 13. Starthilfekabel 14. Adapter für mobile Endgeräte 15. Anschlusskabel für Adapter 16. Adapter für mobile Endgerät Verwendung Hinweise zur Verwendung Die 12 V Kfz-Steckdose ist möglicherweise erst nach dem Einschalten der Zündung aktiv. Beachten Sie die Bedienungsanleitung Ihres Fahrzeugs. Kontaktieren Sie Ihre Fachwerkstatt, wenn Sie unsicher sind. Decken Sie das Gerät während der Verwendung nicht ab und Achten Sie auf eine gute Belüftung. Ladevorgang des Multi-Powerpacks Achtung! Denken Sie daran, dass die Fahrzeugbatterie entladen wird, wenn das Fahrzeug nicht in Betrieb ist. Überprüfen Sie regelmäßig, während der Lagerung, durch Drücken der Aktivierungstaste (6) die Akkukapazität des Multi-Powerpacks. Laden Sie ca. alle 3 Monate das Multi-Powerpack vollständig auf. Eine Tiefenentladung kann das Gerät beschädigen. Ist die Akkukapazität zu gering ist keine Anzeige mehr möglich. Das Multi-Powerpack muss dann geladen werden. 1. Gewünschtes Anschlusskabel in die Anschlussbuchse (X) des Multi-Powerpacks stecken. 230 V: Stecken Sie den Stecker (11) in die 12 V Buchse (3) am Gerät. 12 V: Stecken Sie den Stecker (10) in die 12 V Buchse (3) am Gerät V Netzstecker (11) in eine Netzsteckdose einstecken oder Kfz-Stecker (10) in eine 12 V Kfz-Steckdose einstecken.

11 DE Ladevorgang startet. Die Akkukapazität wird in Prozent im Display angezeigt (50 = 50% Akkukapazität geladen). 4. Der Ladevorgang ist beendet, sobald die Anzeige 99 anzeigt. 5. Ziehen Sie den 230 V Netzstecker (11) aus der Netzsteckdose oder den Kfz- Stecker (10) aus der 12 V Kfz-Steckdose und rollen Sie das Kabel ordentlich auf. Ladevorgang eines mobilen Endgeräts Versichern Sie sich, dass das Multi-Powerpack vollständig aufgeladen ist. Das Multi-Powerpack schaltet sich nach 20 Sekunden automatisch aus, sofern keine Benutzung erfolgt. Displayanzeige erlischt. 1. Wählen Sie einen für Ihr mobiles Endgerät geeigneten Adapter (14,16) aus und stecken diesen auf das Anschlusskabel (12 oder 15). 2. Verbinden Sie das Multi-Powerpack mit dem Anschlusskabel mit dem zu ladenden Endgerät. 3. Drücken Sie die Aktivierungstaste (6). Der Ladevorgang wird gestartet. Die Akkukapazität des Multi-Powerpacks wird in Prozent im Display angezeigt. Hinweis: Laden Sie das Multi-Powerpack erneut auf (siehe Ladevorgang des Multi- Powerpacks ), sobald die Anzeige im Display (1) erloschen ist. 4. Trennen Sie das Multi-Powerpack von dem Endgerät nach dem Ladevorgang (Anzeige auf angeschlossenem Gerät beachten). Licht ein-/ausschalten Das Multi-Powerpack verfügt über eine LED-Leuchte (9) mit verschiedenen Leuchtvarianten. Warnung! Verletzungsgefahr! Nicht direkt in den Lichtstrahl schauen oder anderen Personen in die Augen leuchten, die Netzhaut kann sonst geschädigt werden. Ein-/Ausschalten: Drücken Sie ca. 2 Sekunden die Aktivierungstaste (6). Die LED leuchtet konstant. Blinklicht: Erneutes Drücken Aktivierungstaste nach dem Einschalten. SOS: Drücken Sie 2x die Aktivierungstaste nach dem Einschalten. Ausschalten: Drücken Sie ca. 2 Sekunden die Aktivierungstaste (6) oder drücken Sie 3x die Aktivierungstaste nach dem Einschalten. Die Leuchte kann auch während dem Ladevorgang eines mobilen Endgeräts benutzt werden.

12 12 Starthilfe für Motorrad und PKW Vorbereitungen 1. Beachten Sie unbedingt die Hinweise zur Starthilfe in den Betriebsanleitungen der Fahrzeuge. 2. Feststellbremse an den Fahrzeugen anziehen. 3. Schalthebel in Leerlaufstellung bringen, Automatikgetriebe in Stellung P. 4. Zündungen und alle Verbraucher ausschalten. 5. Die entladene Batterie nicht vom Bordnetz trennen. Anklemmen Polklemmen der Kabel in folgender Reihenfolge anklemmen: 1. Pluskabel (rot) an den Pluspol der entladenen Batterie. 2. Minuskabel (schwarz) an den Minuspol der entladenen Batterie, oder an einen geeigneten Massepunkt (z.b. Motorblock) am Fahrzeug. 3. Öffnen Sie die Abdeckung der Buchse (8) und verbinden Sie nun das Starthilfekabel (13) mit dem Multi-Powerpack. Starten Den Motor des Fahrzeugs mit der entladenen Batterie starten (Startversuch max. 15 Sekunden - zwischen weiteren Versuchen mindestens eine Minute warten). Abklemmen Vorsicht! Beim Entfernen der Leitungen des Starthilfekabels darauf achten, dass diese nicht in Kontakt mit sich drehenden Teilen der Motoren kommen. Achtung! Beschädigungsgefahr durch Überspannung! Das Multi-Powerpack innerhalb 30 Sekunden von der Fahrzeugbatterie abklemmen, nachdem das Fahrzeug gestartet wurde, um Schäden am Gerät zu vermeiden. Polklemmen der Kabel in folgender Reihenfolge abklemmen: 1. Minuskabel (schwarz) vom Massepunkt des Fahrzeugs. 2. Pluskabel (rot). 3. Starthilfekabel (13) von dem Multi-Powerpack. 4. Schließen Sie die Buchse (8) mit der Abdeckung wieder.
 an den Minuspol der entladenen Batterie, oder an einen geeigneten Massepunkt (z.b. Motorblock) am Fahrzeug. 3.")
13 DE 13 Nach der Starthilfe das liegengebliebene Fahrzeug über eine größere Distanz fahren, um die Batterie zu laden. Oder die Batterie mit einem Ladegerät nachladen. Nachdem das Multi-Powerpack zur Starthilfe verwendet wurde, laden Sie das Multi-Powerpack wieder vollständig auf (siehe Ladevorgang des Multi-Powerpacks ). Reinigung, Pflege und Wartung Ihr Gerät kann mit minimalem Pflegeaufwand über Jahre funktionsfähig gehalten werden Rollen Sie die Kabel ordentlich auf, wenn Sie das Gerät lagern. Das hilft, versehentliche Beschädigungen der Kabel und des Geräts zu vermeiden. Reinigen Sie das Gerät innen und außen gelegentlich mit einem feuchten Tuch Lagern Sie das Gerät an einem sauberen und trockenen Ort. Service Sollten Sie trotz Studiums dieser Bedienungsanleitung noch Fragen zur Inbetriebnahme oder Bedienung haben, oder sollte wider Erwarten ein Problem auftreten, setzen Sie sich bitte mit Ihrem Fachhändler in Verbindung. Entsorgung Die Verpackung besteht aus umweltfreundlichen Materialien, die Sie über die örtlichen Recyclingstellen entsorgen können. Werfen Sie Elektrogeräte nicht in den Hausmüll! Gemäß Europäischer Richtlinie 2002/96/EC über Elektro- und Elektronik- Altgeräte und Umsetzung in nationales Recht müssen verbrauchte Elektrogeräte getrennt gesammelt und einer umweltgerechten Wiederverwertung zugeführt werden. Über Entsorgungsmöglichkeiten für Elektronik-Altgeräte informieren Sie sich bei Ihrer Gemeinde- oder Stadtverwaltung. Abbildungen können geringfügig vom Produkt abweichen. Änderungen, die dem technischen Fortschritt dienen, vorbehalten. Dekoration nicht enthalten.

14 14

15 GB 15 Table of Contents Introduction Normal use Contents Technical data Safety Product Overview Use Information about use Multi Power Pack charging process Mobile device charging process Switching the light on/off Motorcycle and car jump starting Disconnecting Cleaning, care and maintenance Service Disposal

16 16 Introduction Explanation of symbols and signal words used in these operating instructions and/ or the device: Follow instructions when using the machine. Risk of bodily or fatal injury to children! Follow warnings and safety instructions! Only use device in locations protected from weather! Consider the environment when disposing of the packaging! Symbol/signal word Danger! Warning! Caution! Attention! Follow instructions when using the machine. Immediate danger to life or severe injuries. Serious injuries, potentially life-threatening. Light to moderate injuries. Risk of property damage. Note: These instructions for use also refer to the Multi Power Pack as device.

17 GB 17 Normal use The Multi Power Pack is suitable as a universal heavy duty power supply for smartphone, tablet-pc and mobile devices, and to jump start a motorcycle or car. This device is not intended for use by children or persons with limited mental capacity or lacking experience and/or lacking expertise. Children should be supervised to ensure they do not play with the device. This device is not intended for commercial use. Any other use or modification of the device is considered improper and involves significant risks. The manufacturer assumes no liability for damages due to improper use. Contents Be sure to verify contents immediately upon opening the product. Check the product and all parts for damage. Do not use a defective product or parts. Multi Power Pack 16 Adapters for mobile devices USB patch cable (5 V) 12 V patch cable Connecting cable with 12 V car plug Connecting cable with 230 V mains plug Jumper leads Storage bag with zip Decal operating instruction Please include all relevant documentation to other users!

18 18 Technical data Dimensions Weight Input voltage Output voltage Power supply Charging time Ambient temperature 17.7 x 7.6 x 2.9 cm 430 g 230 V mains charging adapter: V AC / 50 Hz 12 V car charging cable 12 V DC/1 A USB: 5 V DC/2 A 19 V DC/3,5 A 12 V DC/2 A Jumper leads: 12 V DC/200 A (max. 400 A) Rechargeable Li-ion battery (12 Ah capacity) approx. 5 hours -15 º C to +60 º C Safety Read all safety guidelines and instructions. Non-compliance with safety guidelines and instructions can cause electric shock, fire and / or serious injury. Keep all safety guidelines and instructions for future reference. Warning! Risk of bodily or fatal injury to children! Risk of suffocation or strangulation! Keep the machine out of the reach of children. Children are unable to assess the risks associated with use of this product! Danger! Damaged leads may cause fatal electric shock. Discontinue use if leads are damaged.

19 GB 19 The manufacturer is not responsible for damages caused by: Improper connection and/or operation. External forces, damage to the device and/or damage to parts of the device due to mechanical impacts or overload. Any type of modifications to the device. Using the device for purposes not described in this operating manual. Subsequent damages from improper and/or incorrect use and/or defective batteries. Moisture and/or inadequate ventilation. Unauthorised opening of the device. This will void the warranty. Explosion and fire hazard! Keep sources of ignition (e.g. lit cigarettes) away from battery. The Multi Power Pack and the drained battery must have the same voltage (V) (see specifications on the battery). Never use the jumper leads in explosion-prone surroundings. Thaw frozen batteries before starting. Verify the on-board voltage matches the input voltage specified on the device to prevent damage to the device. Immediately stop using the device if you notice smoke or an unusual odour. Never expose the device to direct sunlight. Batteries can burst or explode when thrown into fire or exposed to extreme heat. Do not expose the device to extreme heat. Risk of chemical burns! Risk of injury to the eye. Wear protective eyewear and do not lean over the battery. The electrolyte inside the drained starter battery remains liquid even at low temperatures.
 away from battery.")
20 20 Risk of electrical shock! Do not allow the clamps involved to touch. Never allow the contacts of the lead connected to the battery s positive terminal to come into contact with electrically conductive vehicle parts. Avoid pouring or dripping water or other liquids over it. If water penetrates electrical devices, the risk of electric shock increases. Ensure that all plugs and cables are free of moisture. Never connect the device to the mains with wet or moist hands. Do not use device if damaged. Damage to the power cable, the device or the charging cable increase the risk of electrical shock. Do not attempt to disassemble or repair the device. Immediately have a defective device or damaged power cable repaired or replaced by a speciality shop. Always unplug device by the plug. The cable may be damaged. Never use the cable to carry or pull the device. Never operate the device if it has been dropped or damaged in any other way. For inspection and repair, take it to a qualified electrician. Risk of injury! Do not modify or manipulate the product as this will increase the risk of injury. When transporting the device in a vehicle, keep it in the boot or on a suitable shelf so that it cannot move in the event of sudden vehicle movements.

21 GB 21 ProDuct overview
22 22 1. Display 2. Emergency hammer V input (1 A) V output (2 A) 5. USB-Anschluss (5 V) 6. Activation button V output (3.5 A) 8. Jumper leads connection 9. LED light V car charging cable V mains adapter 12. Adapter connecting cable 13. Jumper leads 14. Adapters for mobile devices 15. Adapter connecting cable 16. Adapters for mobile devices Use Information about use Some car outlets will only become active once the ignition is turned on. Please refer to your vehicle s operating manual or contact your specialised garage if you are unsure. Do not cover the device during use and ensure proper ventilation. Multi Power Pack charging process Attention! Remember the vehicle s battery will be discharged when the vehicle is not running. Regularly check the battery capacity of the Multi Power Pack whilst stored by pressing the power button (6). Fully charge the Multi Power Pack every approx. 3 months. A deep discharge could damage the device. If the battery capacity is too low, it is unable to display. The Multi Power Pack must then be charged. 1. Plug the respective connecting cable into the Multi Power Pack jack. 230 V: Insert the plug (11) into the 12 V jack (3) on the device. 12 V: Insert the plug (10) into the 12 V jack (3) on the device. 2. Plug the 230 V power plug (11) into a mains socket or the car plug (10) into a 12 V car outlet. 3. Charging will start. The display will show the battery capacity in percent (50 = 50% battery capacity charged). 4. Charging is complete, the display will show 99.
23 GB Unplug the 230 V mains plug (11) from the mains socket or the car plug (10) from the 12 V car outlet and roll up the cable neatly. Mobile device charging process Verify the Multi Power Pack is fully charged. The Multi Power Pack will automatically switch off after 20 seconds when not in use. The display will turn off. 1. Select an adapter (14, 16) to fit your mobile device and plug it into the connecting cable (12 or 15). 2. Connect the Multi Power Pack to the devices to be charged using the connecting cable 3. Press the activation button (6). Charging will start. The display shows the battery capacity of the Multi Power Pack in percent. Note: Recharge the Multi Power Pack (see Multi Power Pack charging process ), once the information disappears from the display (1). 4. Disconnect the Multi Power Pack from the device after charging (note display on the connected device). Switching the light on/off The Multi Power Pack features an LED light (9) with various lighting options. Warning! Risk of injury! Do not look directly into the light or shine into others eyes as this may damage the retina. Switching on/off: Press the activation button for approx. 2 seconds (6). The LED will light steady. Flashing light: Pressing the activation button again once switched on. SOS: Press the activation button 2x once switched on. Switching off: Press the activation button (6) for approx. 2 seconds or press the activation button 3x once switched on. The light may also be used whilst charging a mobile device.
24 24 Motorcycle and car jump starting Preparations 4. Be sure to follow the indications on jumpstarting inside the vehicles operator s manuals. 5. Set the parking brake on both vehicles. 6. Set gearstick to neutral, for automatic transmissions to P. 7. Switch off ignition on both vehicles and all devices. 8. Do not disconnect the drained battery from the vehicle s electrical system. Connecting Connect the terminal clamps of the leads in the following order: 1. Positive lead (red) to positive terminal of drained battery. 2. Negative lead (black) to the negative pole on the drained battery, or to a suitable mass (e.g. engine block) on the vehicle. 3. Open the jack cover (8) and connect the jumper leads (13) to the Multi Power Pack. Starting Start the engine of the vehicle with the drained battery (starting attempt max. 15 seconds - wait at least one minute between additional attempts to start). Disconnecting Caution! When disconnecting the jumper cables, be careful they do not come into contact with the moving parts of the engine. Attention! Risk of damage from electrical surge! Disconnect the Multi Power Pack from the vehicle s battery within 30 seconds after the vehicle ist started to prevent damaging the device. Disconnect the terminal posts of the cables in the following order: 1. Negative cable (black) from the vehicle s mass point. 2. Positive cable (red). 3. Jumper leads (13) from the Multi Power Pack. 4. Close the jack (8) with the cover.
25 GB 25 After jumpstarting drive the broken-down vehicle for a longer distance to charge the battery. You may also recharge the battery with a charger. Fully recharge the Multi Power Pack after using the Multi Power Pack for jump starting (see Multi Power Pack charging process ). Cleaning, care and maintenance Clean clamps after every charging. To prevent corrosion, wipe off any battery fluid which may have come into contact with the clamps. Carefully wind the cable when storing the device. This will help prevent accidental damage to the cable and the device. Clean the product with a soft, dry cloth. Store the machine in a clean, dry place. Service Should you have any questions regarding commissioning or operating in spite of studying these operating instructions, or if a problem should occur against all expectations, please get in contact with your specialist supplier. Disposal The packaging consists of non-contaminating materials that you can dispose of at your local recycling point. Do not throw electrical appliances in with domestic waste! In accordance with European Directive 2002 / 96 / EC for waste electrical and electronic equipment (WEEE) and conversion to national law, used electrical appliances must be collected separately and taken to a recycling point. For ways to dispose of old electrical appliances please contact your community or city administration. Illustrations may vary slightly from the product itself. We reserve the right to modify the product in accordance with technical advances. Decoration not included.
26 26
27 FR 27 Table des matières Introduction Utilisation conforme Contenu de l emballage Caractéristiques techniques Sécurité Aperçu du produit Utilisation Informations relatives à l utilisation Processus de charge du Pack Multi-Power Processus de charge d un appareil mobile Allumer/éteindre le voyant Aide au démarrage pour moto et voiture Débranchement Nettoyage, entretien et maintenance Service Mise au rebut
28 28 Introduction Explication des symboles et mots d avertissements qui sont utilisés dans la présente notice d explication et/ou sur l appareil: Lorsque vous utilisez l appareil, veuillez vous conformer à la présente notice d utilisation. Risque d accident et danger de mort pour les enfants! Veuillez respecter les consignes de mise en garde et de sécurité! Utiliser l appareil uniquement dans des endroits protégés des intempéries! Éliminez l emballage et l appareil de manière respectueuse de l environnement! Symbole / mot d avertissement Danger! Avertissement! Prudence! Attention! Conséquences possibles en cas de non-observation Danger de mort direct ou risque de blessures graves. Blessures graves probables danger de mort Blessures légères à moyennes Risque de dégâts matériels. Remarque : Le terme «appareil» est également utilisé dans ce mode d emploi pour désigner le Pack Multi-Power.
29 FR 29 Utilisation conforme Le Pack Multi-Power convient à l alimentation électrique universelle haute puissance des smartphones, tablettes, ordinateurs portables et autres appareils mobiles, et possède également une fonction d aide au démarrage pour moto et voiture. Cet appareil n est pas conçu pour être utilisé par des enfants ou des personnes à capacités mentales réduites ou manquant d expérience et/ou de connaissances. Les enfants devraient être surveillés pour s assurer qu ils ne jouent pas avec l appareil. L appareil n est pas prévu pour une utilisation commerciale. Toute autre utilisation ou modification de l appareil est considérée comme non conforme à sa destination et présente des risques sérieux. Le fabricant ne peut être tenu responsable pour des dommages résultant d une utilisation non conforme. Contenu de l emballage Contrôlez le volume de livraison immédiatement après le déballage. Contrôlez l appareil et les pièces pour dépister tout endommagement. Ne mettez pas un appareil endommagé en marche. Multi-Powerpack 16 Adaptateurs pour appareils mobiles Câble de connexion 5 V Câble de connexion 12 V Câble de raccordement avec fiche allume-cigare 12 V Câble de raccordement avec fiche secteur 230 V Câble de démarrage Sac de rangement avec fermeture à glissière L autocollant Notice d utilisation Fournissez tous les documents aux autres utilisateurs!
30 30 Caractéristiques techniques Dimensions Poids Tension d entrée Tension de sortie Alimentation électrique Durée de charge Température ambiante 17,7 x 7,6 x 2,9 cm 430 g Chargeur 230 V : V AC / 50 Hz Câble de recharge véhicule 12 V : 12 V DC/1 A USB : 5 V DC/2 A 19 V DC/3,5 A 12 V DC/2 A Câbles d aide au démarrage : 12 V DC/200 A (max. 400 A) Batterie lithium-ion (capacité de 12 Ah) env. 5 heures -15 à +60 º C Sécurité Consignes générales de sécurité Veuillez lire toutes les consignes de sécurité et les instructions. Le non respect des consignes de sécurité et des instructions peut provoquer un choc électrique, des brûlures et/ou des blessures graves. Conservez toutes les consignes de sécurité et les instructions afin de pouvoir les consulter ultérieurement. Danger! Risque d accident et danger de mort pour les enfants! Risque d étouffement et d étranglement! Maintenez l appareil hors de portée des enfants. Les enfants ne peuvent pas reconnaître les risques liés à la machine! Risque pour la vie! Des câbles endommagés peuvent déclencher un choc électrique mortel. Ne plus utiliser les câbles endommagés
31 FR 31 Le fabricant n est pas responsable des dommages causés par : un branchement et/ou un fonctionnement non conformes. L intervention d une force extérieure, les dégradations des câbles de démarrage et/ou des pièces des câbles causées par des influences mécaniques ou une surcharge. Tout type de modification des câbles de démarrage. L utilisation des câbles de démarrage à des fins non décrites dans la présente notice d utilisation. Les dommages consécutifs causés par une utilisation non conforme et/ou incorrecte. L humidité et/ou une aération insuffisante. L ouverture non autorisée des câbles de démarrage. Explosions- und Brandgefahr! Les sources d allumage (p.ex. cigarette brûlante) sont à tenir hors de portée. Le Pack Multi-Power doit avoir la même tension (V) que la batterie déchargée (voir données inscrites sur la batterie). N utilisez pas le câble de démarrage dans un environnement explosif. Une batterie gelé doit être décongelée avant le démarrage. Assurez-vous que la tension du véhicule correspond à la tension d entrée indiquée sur l appareil afin d éviter tout endommagement de l appareil. Arrêtez immédiatement l utilisation de l appareil si de la fumée est visible ou que vous sentez une odeur inhabituelle. N exposez pas l appareil aux rayons directs du soleil. Les batteries peuvent éclater ou exploser lorsqu elles sont jetées au feu ou exposées à une forte chaleur. N exposez pas l appareil à une chaleur extrême. Risque de brûlure causée par l acide! Risque de blessures aux yeux. Portez des lunettes de protection et ne vous penchez pas sur la batterie. L électrolyte de la batterie de démarrage est également liquide en étant exposée à des températures basses.
32 32 Risque de choc électrique! Les pinces de câble utilisées ne doivent pas se toucher. Les bornes du câble branché au pôle positif de la batterie ne doivent pas entrer en contact avec des pièces automobiles conductrices. Veillez à empêcher que de l eau d autres liquides ne soient renversés sur l appareil. Le risque de choc électrique augmente si de l eau pénètre dans un appareil électrique. Assurez-vous que les prises et les câbles ne sont pas humides. Ne raccordez jamais l appareil au réseau électrique si vous avez les mains humides ou mouillées. N utilisez pas un appareil défectueux. Les dommages du câble d alimentation, de l appareil ou du câble de charge augmentent le risque de choc électrique. N essayez pas de démonter l appareil ou de le réparer. Faites immédiatement réparer ou remplacer un appareil défectueux ou un câble d alimentation endommagé par un atelier spécialisé. Débranchez le câble de la prise uniquement par la fiche. Dans le cas contraire, le câble peut être endommagé. N utilisez jamais le câble pour porter ou tirer l appareil. N utilisez jamais l appareil si celui-ci est tombé ou a été endommagé de quelque autre manière que ce soit. Demandez un entretien et une réparation auprès d un électricien qualifié. Risque de blessure! Ne pas modifier ou manipuler le produit, ceci présente un risque de blessure élevé. Si vous transportez l appareil dans un véhicule, conservez-le dans un coffre ou sur un support adapté afin qu il ne bouge pas en cas de mouvement soudain du véhicule.
33 Fr 33 aperçu Du ProDuit
34 34 1. Écran 2. Marteau de secours 3. Entrée 13 V (1 A) 4. Sortie 12 V (2 A) 5. Port USB (5 V) 6. Touche d activation 7. Sortie 19 V (3,5 A) 8. Branchement pour câbles de démarrage 9. Voyant LED 10. Câble de recharge véhicule 12 V 11. Prise secteur 230 V 12. Câble de raccordement pour adaptateurs 13. Câbles d aide au démarrage 14. Adaptateurs pour appareils mobiles 15. Câble de raccordement pour adaptateurs 16. Adaptateurs pour appareils mobiles Utilisation Informations relatives à l utilisation La prise allume-cigare peut ne s activer qu après la mise en marche de l allumage. Si vous êtes incertain, consultez la notice d utilisation de votre véhicule ou contactez votre garage. Ne pas recouvrir l appareil pendant son fonctionnement et veillez à une bonne aération. Processus de charge du Pack Multi-Power Attention! N oubliez pas que la batterie du véhicule se décharge lorsque ce dernier n est pas utilisé. Durant le stockage du produit, vérifiez régulièrement la capacité de batterie du Pack Multi-Power en appuyant sur la touche Power (6). Rechargez complètement le Pack Multi-Power tous les 3 mois. Un déchargement complet peut endommager l appareil. Si la capacité de batterie est trop faible, il ne sera pas possible de consulter l écran du produit. Le Pack Multi-Power doit alors être rechargé. 1. Branchez les câbles de raccordement que vous souhaitez utiliser dans la prise de raccordement du Pack Multi-Power. 230 V : Branchez la fiche (11) dans la prise 12 V (3) sur l appareil. 12 V : Branchez la fiche (10) dans la prise 12 V (3) sur l appareil.
35 FR Enfichez la fiche secteur 230 V (11) dans une prise secteur ou la fiche allumecigare (10) dans une prise allume-cigare de 12 V. 3. Le processus de charge démarre. La capacité de la batterie est affichée en pourcentage sur l écran (50 = batterie chargée à 50%). 4. Le processus de charge est terminé, la capacité de la batterie est Retirez la fiche de la prise secteur de 230 V (11) ou la fiche allume-cigare (10) de la prise allume-cigare de 12 V et enroulez le câble soigneusement. Processus de charge d un appareil mobile Assurez-vous que le Pack Multi-Power est complètement rechargé. Le Pack Multi-Power s éteint automatiquement après 20 secondes si aucune autre action n est détectée. L affichage sur l écran disparaît. 1. Choisissez un adaptateur convenant à votre appareil mobile (14,16) et branchez-le au câble de raccordement (12 ou 15). 2. Connectez le Pack Multi-Power avec le câble de raccordement à l appareil à recharger. 3. Appuyez sur la touche d activation (6). Le processus de charge commence. La capacité de la batterie du Pack Multi-Power est affichée en pourcentage sur l écran. Remarque : Rechargez de nouveau le Pack Multi-Power (Voir «Processus de charge du Pack Multi-Power») aussitôt que l affichage sur l écran (1) disparaît. 4. Débranchez le Pack Multi-Power de l appareil après que le processus de charge soit terminé (considérer l affichage sur l appareil connecté). Allumer/éteindre le voyant Le Pack Mutli-Power dispose d un voyant LED (9) avec différents modes d éclairage. Attention! Risque de blessures! Ne pas regarder directement dans les rayons lumineux émis ou ne pas éclairer les yeux d autres personnes, ceci pouvant endommager la rétine. Allumer/éteindre : Appuyez durant 2 secondes env. sur la touche d activation (6). La LED est allumée de manière constante. Luminère clignotante : Appuyez de nouveau sur la touche d activation après avoir allumé le produit. SOS : Appuyez 2x sur la touche d activation après avoir allumé le produit.
36 36 Éteindre : Appuyez 2x sur la touche d activation (6) durant 2 secondes env. ou appuyez 3x sur la touche d activation après avoir allumé le produit. Le voyant peut également être utilisé durant le processus de charge d un appareil mobile. Aide au démarrage pour moto et voiture Préparations 1. Respectez impérativement les indications relatives à l aide au démarrage indiquées dans les modes d emploi des véhicules. 2. Tirez le frein à main des véhicules. 3. Mettez le levier d embrayage en position à vide, la boîte de vitesse automatique en position P. 4. Mettez hors marche tous les allumages et consommateurs des véhicules. 5. Ne pas déconnecter la batterie déchargée du réseau de bord. Branchement es bornes polaires des câbles sont à brancher dans l ordre suivant : 1. Câble positif (rouge) au pôle positif de la batterie déchargée. 2. Câble négatif (noir) sur le pôle négatif de la batterie déchargée ou sur un point de masse approprié (p. ex. bloc moteur) du véhicule. 3. Ouvrir le couvercle de la prise (8) et connectez alors le câble d aide au démarrage (13) avec le Pack Multi-Power. Démarrage Le moteur du véhicule avec la batterie déchargée est à mettre en marche (essai de démarrage de max. 15 secondes attendre au moins une minute entre chaque essai). Débranchement Attention! Veillez lors de l enlèvement des câbles du câble de démarrage à ce que ceux-ci n entrent pas en contact avec les pièces rotatives du moteur. Attention! Risque de détérioration pour cause de surtension!
37 FR 37 Après le démarrage de la voiture, débranchez le Pack Multi-Power sous 30 secondes afin d éviter l endommagement de l appareil. Débranchez les bornes polaires des câbles dans l ordre suivant : 4. Câble négatif (noir) à un point de masse du véhicule. 5. Câble positif (rouge). 6. Câbles d aide au démarrage (13) du Pack Multi-Power. 7. Rebranchez la fiche (18) avec le couvercle. Le véhicule doit être roulé sur une longue distance afin de recharger la batterie. Ou continuer le rechargement de la batterie avec un chargeur. Après l utilisation du Pack Multi-Power comme outil d aide au démarrage, rechargez complètement le Pack Multi-Power (voir «Processus de charge du Pack Multi-Power»). Nettoyage, entretien et maintenance Nettoyez la pince à chaque fois une fois que le processus de charge est terminé. Essuyez tout liquide de la batterie pouvant être entré en contact avec les pinces pour éviter toute corrosion. Enroulez correctement le câble lorsque vous rangez l appareil. Cela permet d éviter des dommages par erreur du câble et de l appareil. Nettoyez le produit avec un chiffon doux et sec. Stocker l appareil dans un endroit propre et sec.
38 38 Service Si après avoir lu soigneusement le présent mode d emploi vous avez encore des questions concernant la mise en service ou l utilisation ou si un problème venait à se produire contre toute attente, veuillez prendre contact avec un commerce spécialisé. Mise au rebut L emballage est composé de matériaux respectueux de l environnement que vous pourrez éliminer dans les points de recyclages locaux prévus à cet effet. Ne jetez pas les appareils électriques avec vos déchets ménagers! Conformément à la directive européenne 2002 / 96 / EC relative aux appareils électriques et électroniques usagés et à sa transposition dans le droit national, vous devez effectuer le tri sélectif des appareils et les apporter dans des points de collecte spécialisés qui assureront leur recyclage dans le respect de l environnement. Pour connaître les lieux où vous pouvez déposer vos anciens appareils électriques pour leur mise au rebut, adressez-vous à votre mairie ou à votre administration locale. Les images peuvent différer légèrement du produit. Nous nous réservons le droit d y apporter des modifications dans l intérêt du progrès technique. Décoration non comprise
39 IT 39 Sommario Introduzione Uso conforme Fornitura Dati tecnici Sicurezza Descrizione del prodotto Utilizzo Avvertenze per l utilizzo Procedura di ricarica del Multi-Powerpack Ricarica di un apparecchio portatile Accensione/spegnimento luce: Ausilio all avviamento per moto e veicoli Scollegamento Pulizia, manutenzione e riparazioni Assistenza Smaltimento
40 40 Introduzione Spiegazione dei simboli e dei termini di avvertenza utilizzati in queste istruzioni per l uso e/o sul cavo ausiliario di avviamento: Per l utilizzo del cavo ausiliario di avviamento attenersi a queste istruzioni. Pericolo di vita e di incidenti per i bambini! Attenersi alle avvertenze e indicazioni di sicurezza! Utilizzare il cavo esclusivamente in ambienti non soggetti agli agenti atmosferici! Smaltire in modo ecocompatibile la confezione e il cavo! Simbolo/termine di avvertenza Pericolo! Avvertenza! Attenzione! Cautela! Possibili conseguenze dovute alla mancata osservanza delle istruzioni e delle avvertenze per la sicurezza Pericolo di vita immediato o lesioni molto gravi. Lesioni gravi, possibile pericolo di vita. Lesioni di lieve o media entità. Pericolo di danni materiali. Nota: In queste Istruzioni per l uso il Multi-Powerpack viene indicato anche col termine dispositivo.
41 IT 41 Uso conforme Il Multi-Powerpack è un dispositivo universale a elevate prestazioni per l alimentazione di smartphone, PC-tablet e altri apparecchi portatili. Inoltre, svolge una funzione di ausilio all avviamento per moto e veicoli. Questo prodotto non è concepito per essere usato da persone (compresi bambini) con limitate capacità fisiche, sensoriali o mentali o senza sufficiente esperienza e/o che non hanno le nozioni necessarie. Tenerlo lontano dalla portata dei bambini. Il prodotto non è destinato all uso commerciale. Ogni altro uso o modifica del dispositivo è considerato improprio e può causare pericoli. Il produttore è esonerato da qualunque responsabilità per danni derivanti da un uso improprio del dispositivo. Fornitura Controllare la fornitura subito dopo averla aperta. Controllare se il dispositivo o i componenti sono danneggiati. Non utilizzare il dispositivo o componenti guasti. Multi-Powerpack 16 Adattatori per apparecchi portatili Cavo di collegamento USB (5 V) Cavo di collegamento 12 V Cavo di collegamento con spina per auto da 12 V Cavo di collegamento con spina di rete da 230 V Cavo di avviamento Custodia con cerniera L etichetta Istruzioni per l uso Consegnare la documentazione completa agli altri utenti!
42 42 Dati tecnici Dimensions Weight Input voltage Output voltage Alimentazione Durata ricarica Temperatura ambiente 17,7 x 7,6 x 2,9 cm 430 g Caricatore 230 V: V CA / 50 Hz Cavo di carica auto 12 V: 12 V CC/1 A USB: 5 V CC/2 A 19 V CC/3,5 A 12 V CC/2 A Cavo della funzione di ausilio all avviamento: 12 V CC/200A (max. 400 A) Batteria agli ioni di litio (capacità 12 Ah) circa 5 ore -15 a +60 º C Sicurezza Indicazioni di sicurezza generali Leggere tutte le indicazioni e le istruzioni di sicurezza. Omissioni nell osservanza delle indicazioni di sicurezza e delle istruzioni possono provocare scosse elettriche, ustioni e/o gravi lesioni. Conservare per future consultazioni tutte le indicazioni di sicurezza e le istruzioni. Pericolo! Pericolo di vita e di incidenti per i bambini!. Pericolo di soffocamento e strangolamento! Tenere il cavo ausiliario di avviamento lontano dalla portata dei bambini. I bambini non sanno riconoscere i pericoli legati al prodotto! Pericolo di vita! I fili danneggiati possono generare una scossa elettrica mortale.
43 IT 43 Il produttore non è da considerarsi responsabile per danni causati da: uso non conforme cause esterne, danni al dispositivo e/o a parti del dispositivo dovuti ad azione meccanica o sovraccarico qualsiasi tentativo di modificare il dispositivo uso del dispositivo per scopi diversi da quelli descritti nelle presenti istruzioni per l uso. danni dovuti a uso non previsto e/o non conforme umidità e/o aerazione insufficiente apertura non autorizzata del dispositivo. In tali casi la garanzia decade. Pericolo di esplosione e incendio! Tenere lontane dalla batteria le fonti ignifere (per es. sigarette accese). Il Multi-Powerpack deve avere la stessa tensione (V) della batteria scarica (fare riferimento ai dati indicati sulla batteria). Non utilizzate il cavo ausiliario di avviamento in ambienti con pericolo di esplosione. Disgelare le batterie congelate prima di mettere in moto. Accertarsi che la tensione di bordo corrisponda a quella d ingresso dell apparecchio, per evitare di danneggiare lo stesso. Sospendere immediatamente l utilizzo del dispositivo, nel caso in cui sia visibile del fumo o sia presente un odore insolito. Non esporre l apparecchio ad irradiazione solare diretta. Se gettate nel fuoco o sottoposte a fonti di calore estreme, le batterie possono danneggiarsi ed esplodere. Non sottoporre il dispositivo a fonti di calore estreme. Pericolo di corrosione! Rischio di lesioni agli occhi. Indossare gli occhiali di protezione e non piegarsi sulla batteria. L elettrolita della batteria di avviamento scarica è fluido anche a basse temperature.
44 44 Pericolo di folgorazione! Le pinze del cavo non devono entrare in contatto tra loro. I contatti del cavo applicato al polo positivo della batteria non devono venire a contatto con le parti del veicolo elettricamente conduttive. Accertarsi sempre di conservarlo in un luogo asciutto e sicuro. La penetrazione di acqua nei dispositivi elettrici accresce il pericolo di folgorazione. Assicurarsi che tutte le spine e i cavi siano privi di umidità. Non collegare mai il dispositivo alla rete elettrica con mani umide o bagnate. Non utilizzare dispositivi danneggiati. Danneggiamenti del dispositivo o del cavo di rete aumentano il rischio di folgorazione. Non tentare di smontare o riparare il dispositivo. In caso di dispositivo o cavo di rete difettoso o danneggiato, rivolgersi subito a un centro specializzato. Per scollegare il cavo dalla presa tirarlo esclusivamente dalla spina. Altrimenti il cavo potrebbe danneggiarsi. Non utilizzare mai il cavo per spostare o trascinare il dispositivo. Non mettere mai in funzione il dispositivo nel caso in cui fosse caduto per terra o risultasse danneggiato in altro modo. Rivolgersi a un elettricista qualificato per un controllo e una riparazione. Pericolo di lesioni! Non modificare o manipolare il prodotto, altrimenti sussiste un elevato rischio di lesioni. Se trasportate l apparecchio in un veicolo, posizionarlo nel portabagagli o su un piano d appoggio adeguato, di modo che non possa spostarsi in seguito a movimenti bruschi del veicolo stesso.
45 it 45 DeScriZioNe Del ProDotto
46 46 1. Display 2. Martello d emergenza 3. Entrata 13 V (1 A) 4. Uscita 12 V (2 A) 5. Porta USB (5 V) 6. Tasto di attivazione 7. Uscita 19 V (3,5 A) 8. Porta per il cavo della funzione di ausilio all avviamento 9. Luce LED 10. Cavo di carica auto 12 V 11. Adattatore di rete 230 V 12. Cavo di collegamento per adattatore 13. Cavo della funzione di ausilio all avviamento 14. Adattatori per apparecchi portatili 15. Cavo di collegamento per adattatore 16. Adattatori per apparecchi portatili Utilizzo Avvertenze per l utilizzo La presa per auto da sarà attiva probabilmente solo dopo l accensione. Attenersi alle istruzioni per l uso del veicolo e contattare un officina specializzata in caso di dubbi. Non coprire mai l apparecchio durante l uso e assicurarsi una buona aerazione. Procedura di ricarica del Multi-Powerpack Attenzione! Ricordare che la batteria del veicolo si scarica quando il veicolo non è in funzione. Quando il Multi-Powerpack viene conservato, controllare regolarmente la capacità della sua batteria premendo il tasto POWER (6). Effettuare una ricarica completa del Multi-Powerpack ogni 3 mesi. Lo scaricamento completo potrebbe infatti provocare danni al dispositivo. Se la capacità della batteria è troppo bassa, la visualizzazione sul display non sarà possibile. Il Multi-Powerpack deve essere quindi ricaricato. 1. Inserire il cavo di collegamento prescelto nella presa del Multi-Powerpack. 230 V: inserire la spina (11) nella presa 12 V (3) del dispositivo. 12 V: inserire la spina (10) nella presa 12 V (3) del dispositivo. 2. Inserire la spina di rete 230 V (9) in una presa di rete oppure la spina auto (10) in una presa auto 12 V.
BEDIENUNGS- UND SICHERHEITSHINWEISE 3 OPERATION AND SAFETY NOTES 19 UNITÀ PRINCIPALE LP PLUS INDICAZIONI PER L USO E PER LA SICUREZZA 47
 DE LADEGERÄT LP PLUS BEDIENUNGS- UND SICHERHEITSHINWEISE 3 GB MAIN UNIT LP PLUS OPERATION AND SAFETY NOTES 19 FR UNITÉ PRINCIPALE LP PLUS INSTRUCTIONS D UTILISATION ET CONSIGNES DE SÉCURITÉ 33 IT UNITÀ
TCNF 185 TCNF 185 IX NO-FROST FRIGORÍFICO
 TCNF 185 TCNF 185 IX NO-FROST FRIGORÍFICO ATTENTION Cet appareil est destiné à un usage domestique uniquement. Toute utilisation autre que celle prévue pour cet appareil, ou pour une autre application
REFERENCE: MTF4 CODIC:
 MARQUE: PROLINE REFERENCE: MTF4 CODIC: 3523551 MTF4 AVERTISSEMENTS Cet appareil est destiné à un usage domestique uniquement. Toute utilisation autre que celle prévue pour cet appareil, ou pour une autre
Personenwaage Osobní váha MD 13894. Bedienungsanleitung Návod k obsluze
 Personenwaage Osobní váha MD 13894 Bedienungsanleitung Návod k obsluze Inhalt Zu dieser Anleitung... 2 In dieser Anleitung verwendete Symbole und Signalwörter...2 Einsatzbereich/bestimmungsgemäßer Gebrauch...3
97008, 97009 WERKSTATT LADEGERÄT WM 8 / WM 12
 DE WERKSTATT-LADEGERÄT BEDIENUNGSANLEITUNG 3 GB SHOP CHARGING DEVICE INSTRUCTIONS FOR USE 17 FR CHARGEUR D ATELIER MODE D EMPLOI 31 IT CARICABATTERIE DA OFFICINA MANUALE D ISTRUZIONI 45 CZ Dílenská nabíječka
USER'S MANUAL FAN MOTOR DRIVER FMD-02
 USER'S MANUAL FAN MOTOR DRIVER FMD-02 IMPORTANT NOTE: Read this manual carefully before installing or operating your new air conditioning unit. Make sure to save this manual for future reference. FMD Module
UŽIVATELSKÁ PŘÍRUČKA
 UŽIVATELSKÁ PŘÍRUČKA Plni víry a naděje míříme kupředu. S odhodláním zlepšujeme své dovednosti. Zapomeňte na zklamání, ale nikoli na svůj nevyužitý potenciál. Touha překonat sám sebe a dosáhnout hranice
 [KLICK] GB Instruction Manual POWERLINE 4 LIGHT FOREWORD Dear Customer, Thank you for purchasing the POWERLINE 4 LIGHT charger. These operating instructions will help you to get the best from your charger.
Uživatelská příručka. USB Charger UCH20
 Uživatelská příručka USB Charger UCH20 Obsah Úvod...3 USB Charger popis... 3 Používání nabíječky USB... 4 Nabíjení zařízení... 4 Právní informace... 5 Declaration of Conformity...6 2 Úvod USB Charger popis
CZ DVOJITÁ ZÁSUVKA. DoppelSteckdose DB 70
 De Doppelsteckdose BEDIENUNGSANLEITUNG 3 GB DOUBLE PLUG SOCKET INSTRUCTIONS FOR USE 13 FR DOUBLE PRISE MODE D EMPLOI 23 It PRESA DOPPIA MANUALE D ISTRUZIONI 33 CZ DVOJITÁ ZÁSUVKA NÁVOD K OBSLUZE 43 Sk
PLASTICPARTS. -Parts not for use. -Teile werden nicht verwendet. -Pieces a ne pas utiliser. -Tyto díly nepoužívejte při stavbě. -
 742 SpitfireMk.VI 1/72 A> 70120 A PLASTICPARTS B> 70120 B C> 70120 C D> F> E> 70120 D 70120 E GUNZE 70120 F H4 C4 YELLOW H12 H13 C3 FLAT RED H33 C81 RUSSET H51 C11 LIGHT GULL GRAY H71 C21 MIDDLE STONE
LADEGERÄt. BEDIEnunGSAnLEItunG 3. FR chargeur MODE D EMPLOI , DE LADEGERÄt LK 1204 / LK 1206
 DE LADEGERÄt BEDIEnunGSAnLEItunG 3 GB charging DEVIcE InStRuctIOnS FOR use 17 FR chargeur MODE D EMPLOI 31 It caricabatterie MAnuALE D IStRuZIOnI 45 cz NABÍJEČKA návod K OBSLuZE 59 SK NABÍJAČKA návod na
L-force Drives. EDK84DGFCxxxx.O=I. Ä.O=Iä. Montážní návod motec. E84DGFCxxxx. Komunikační modul Communication unit
 EDK8DGFCxxxx.O=I Ä.O=Iä L-force Drives Montážní návod 800 motec E8DGFCxxxx Komunikační modul Communication unit 0 0.7 kw 7.kW E8DG0a E8DG0b EDK8DGFCxxxx CS.0 V Warnings! Operation of this equipment requires
WERKSTATT LADEGERÄT WM 18
 DE WERKSTATT-LADEGERÄT BEDIENUNGSANLEITUNG 3 GB SHOP CHARGING DEVICE INSTRUCTIONS FOR USE 17 FR CHARGEUR D ATELIER MODE D EMPLOI 31 IT CARICABATTERIE DA OFFICINA MANUALE D ISTRUZIONI 45 CZ Dílenská nabíječka
Quick Installation Guide
 Quick Installation Guide FR Guide d installation P instalací DE Installationsanleitung IT Guida all installazione 1 Thank you for choosing the Withings Pulse Merci d avoir choisi le Withings Pulse Wie
Manuel d'utilisation 4 Pokyny pro uživatele 5
 Manuel d'utilisation 4 Pokyny pro uživatele 5 4 2 1 3 7 5 6 1 : Interrupteur marche / arrêt - Hlavní vypínač Zapnuto/Vypnuto L interrupteur principal de la S8 LAN TV permet la mise sous tension et l arrêt
Litosil - application
 Litosil - application The series of Litosil is primarily determined for cut polished floors. The cut polished floors are supplied by some specialized firms which are fitted with the appropriate technical
97003, 97004, Automatik Ladegerät AG 1208 / AG 1210 / AG 1212
 de Automatik-LADEGERÄT BEDIENUNGSANLEITUNG 3 GB Automatic Charging Device INSTRUCTIONS FOR USE 17 Fr Chargeur automatique MODE D EMPLOI 31 it Caricabatterie automatico MANUALE D ISTRUZIONI 47 CZ Automatická
Easy-6 Pivottür mit Seitenwand / Otočné dveře s boční stěnou
 Easy-6 Pivottür mit Seitenwand / Otočné dveře s boční stěnou Lesen Sie die Bedienungsanleitung sorgfältig durch und bewahren Sie diese für den späteren Gebrauch auf. Wir empfehlen die Montage unseres Produktes
S310 PŘÍDAVNÁ MLHOVÁ SVĚTLA HALOGEN H3 55W 12V
 N Descrizione Caratteristiche Codice Quantità Mlhová světla halogen - - 2 (Dx,Sx) 2 Přepínač - 3 Objímka světla - - 2 4 Objímka přepínače - - 5 Úchyt - - 4 6 Šroub M6-2 7 Šroub samořezný - - 2 8 Krytka
Kühlbox NÁVOD K OBSLUZE 45 NÁVOD NA OBSLUHU DE Kühlbox KK 29
 DE Kühlbox BEDIENUNGSANLEITUNG 3 Gb Cool Box INSTRUCTIONS FOR USE 15 FR Glacière MODE D EMPLOI 25 IT Box frigo MANUALE D ISTRUZIONI 35 CZ Chladící box NÁVOD K OBSLUZE 45 SK Chladiaci box NÁVOD NA OBSLUHU
2N LiftIP. IO Extender. Communicator for Lifts. Version
 2N LiftIP Communicator for Lifts IO Extender Version 2.4.0 www.2n.cz Description The IO extender helps you extend 2N LiftIP with 1 input and 2 outputs. The purpose of the input is to cancel the rescue
GUIDELINES FOR CONNECTION TO FTP SERVER TO TRANSFER PRINTING DATA
 GUIDELINES FOR CONNECTION TO FTP SERVER TO TRANSFER PRINTING DATA What is an FTP client and how to use it? FTP (File transport protocol) - A protocol used to transfer your printing data files to the MAFRAPRINT
Manuel d'utilisation 4 Pokyny pro uživatele 5
 Manuel d'utilisation 4 Pokyny pro uživatele 2 1 4 3 6 1 : Interrupteur marche / arrêt - Hlavní vypínač Zapnuto/Vypnuto L interrupteur principal de la S LAN permet la mise sous tension et l arrêt des prises.
Uživatelská příručka. Xperia P TV Dock DK21
 Uživatelská příručka Xperia P TV Dock DK21 Obsah Úvod...3 Přehled zadní strany stanice TV Dock...3 Začínáme...4 Správce LiveWare...4 Upgradování aplikace Správce LiveWare...4 Použití stanice TV Dock...5
Hanriot HD.2 PLASTIC PARTS. Mr.METAL COLOR METALLICS
 8413 1/48 Hanriot HD.2 PLASTIC PARTS A> 3 B> 1 2 13 5 23 7 6 9 8 12 25 7 9 5 15 15 14 21 29 28 31 30 37 36 35 34 4 12 20 11 6 17 16 8 38 24 25 4 3 26 20 2 17 11 10 27 28 14 13 33 27 26 32 19 18 10 22 1
UPM3 Hybrid Návod na ovládání Čerpadlo UPM3 Hybrid 2-5 Instruction Manual UPM3 Hybrid Circulation Pump 6-9
 www.regulus.cz UPM3 Hybrid Návod na ovládání Čerpadlo UPM3 Hybrid 2-5 Instruction Manual UPM3 Hybrid Circulation Pump 6-9 CZ EN UPM3 Hybrid 1. Úvod V továrním nastavení čerpadla UPM3 Hybrid je profil PWM
Einbauanleitung zu Elektro-Einbausatz 736694 Elektro-Einbausatz für Anhängerkupplung, 7-polig, 12 Volt, nach ISO 1724
 Einbauanleitung zu Elektro-Einbausatz 736694 Elektro-Einbausatz für Anhängerkupplung, 7-polig, 12 Volt, nach ISO 1724 Peugeot 206 alle Modelle ab 09/98 Inhalt: 1 Steckdose 7-polig mit Abschaltkontakt für
Mechanika Teplice, výrobní družstvo, závod Děčín TACHOGRAFY. Číslo Servisní Informace Mechanika: 5-2013
 Mechanika Teplice, výrobní družstvo, závod Děčín TACHOGRAFY Servisní Informace Datum vydání: 20.2.2013 Určeno pro : AMS, registrované subj.pro montáž st.měř. Na základě SI VDO č./datum: Není Mechanika
User Guide / Gebrauchsanweisung Mode d emploi / Uživatelská příručka
 User Guide / Gebrauchsanweisung Mode d emploi / Uživatelská příručka Components and functions Komponenten und Funktionen Composants et fonctions Komponenty a funkce Roger DynaMic e Power supply Netzteil
Roger AudioHub. User Guide / Gebrauchsanweisung Mode d emploi / Uživatelská příručka
 Roger AudioHub User Guide / Gebrauchsanweisung Mode d emploi / Uživatelská příručka 2 Components and functions Komponenten und Funktionen Composants et fonctions Komponenty a funkce Roger AudioHub a b
2N Voice Alarm Station
 2N Voice Alarm Station 2N Lift1 Installation Manual Version 1.0.0 www.2n.cz EN Voice Alarm Station Description The 2N Voice Alarm Station extends the 2N Lift1/ 2N SingleTalk with an audio unit installed
WICHTIG - FÜR SPÄTERE VERWENDUNG AUFBEWAHREN - SORGFÄLTIG LESEN.
 WICHTIG - FÜR SPÄTERE VERWENDUNG AUFBEWAHREN - SORGFÄLTIG LESEN. Ignorierung der Warnungen und Hinweise in der Gebrauchsanleitung können zu ernsten Verletzungen und Todesfällen führen. Achtung: Zur Vermeidung
USER'S MANUAL FAN MOTOR DRIVER FMD-01, FMD-03
 USER'S MANUAL FAN MOTOR DRIVER FMD-01, FMD-03 IMPORTANT NOTE: Read this manual carefully before installing or operating your new air conditioning unit. Make sure to save this manual for future reference.
Einbauanleitung zu Elektro-Einbausatz 736652 Elektro-Einbausatz für Anhängerkupplung, 7-polig, 12 Volt, nach ISO 1724
 Einbauanleitung zu Elektro-Einbausatz 736652 Elektro-Einbausatz für Anhängerkupplung, 7-polig, 12 Volt, nach ISO 1724 PEUGEOT 307 Kombi ab ab 04/02 PEUGEOT 307 Station Wagon ab 04/02 Inhalt: 1 Steckdosen-Gehäuse
Lenovo A5000. Quick Start Guide v1.0. English/Česky
 Lenovo A5000 Quick Start Guide v1.0 English/Česky English Read this guide carefully before using your smartphone. Learning more Getting support Electronic emission notices To learn more information about
Herzlichen Glückwunsch! Sie haben sich für ein Qualitätsprodukt der Firma Zangenberg entschieden.
 Herzlichen Glückwunsch! Sie haben sich für ein Qualitätsprodukt der Firma Zangenberg entschieden. Bitte lesen Sie die Anleitung vor der ersten Benutzung aufmerksam durch. Sie erhalten wichtige Hinweise
10A. BEdienungsanleitung
 97024 DE GB FR IT CZ SK Bedienungsanleitung Mikroprozessor Ladegerät Lt10 Instructions for use Microprocessor charger Lt10 Mode d emploi Chargeur à microprocesseur Lt10 Manuale d istruzioni Caricabatterie
WG 60. DE - Seite 3 Vor jeder Benutzung unbedingt lesen. Anleitung und Ratschläge befolgen.
 DE BATTERIELADEGERÄT BEDIENUNGSANLEITUNG 3 GB BATTERY CHARGER USER MANUAL 15 FR CHARGEUR DE BATTERIE INSTRUCTIONS D UTILISATION 27 IT CARICABATTERIA ISTRUZIONE D USO 39 CZ NABÍJEČKA AKUMULÁTORŮ NÁVOD K
DVOJITÁ ZÁSUVKA ELEKTRICKÁ DVOJZÁSUVKA. návod k obsluze / Doppel- DB 130 & DH 200
 DE GB FR IT CZ SK Doppelsteckdose DOUBLE PLUG SOCKET DOUBLE PRISE PRESA DOPPIA DVOJITÁ ZÁSUVKA ELEKTRICKÁ DVOJZÁSUVKA BedienungsanLEITUNg 3 INSTRUCTIONS FOR USE 13 MODE D EMPLOI 23 MANUALE D ISTRUZIONI
2N LiftIP. Voice Alarm Station. Communicator for Lifts. Version
 2N LiftIP Communicator for Lifts Voice Alarm Station Version 2.4.0 www.2n.cz Description The 2N Voice Alarm Station is a switch that helps you extend 2N LiftIP with one or more audio units installed on
sk Mikroprocesorová nabíjačka batérií Mikroprozessor LaDegerät LL10.0
 De Mikroprozessor-Ladegerät BEDIENUNGSANLEITUNG 3 GB roprocessor charger INSTRUCTIONS FOR USE 21 Fr Chargeur à microprocesseur MODE D EMPLOI 37 it Caricabatterie con microprocessore MANUALE D ISTRUZIONI
Qualität aus erster Hand! Sie haben sich für ein Markenprodukt der Firma Zangenberg entschieden.
 Qualität aus erster Hand! Sie haben sich für ein Markenprodukt der Firma Zangenberg entschieden. Bitte lesen Sie die Anleitung vor der ersten Benutzung aufmerksam durch. Sie erhalten wichtige Hinweise
EINBAUANWEISUNG FÜR SCHALLDÄMM-SET BWS/DWS MONTÁŽNÍ NÁVOD PRO ZVUKOVĚ IZOLAČNÍ SOUPRAVY BWS/DWS
 EINUNWEISUNG FÜR SCHLLÄMM-SET WS/WS MONTÁŽNÍ NÁVO PRO ZVUKOVĚ IZOLČNÍ SOUPRVY WS/WS Wichtige Hinweise - unbedingt beachten! ůležitá upozornění bezpodmínečně dodržujte! Schalldämm-Set muss vollständig und
POLO 2.0. Art. Nr.: 5460 - BEZPEČNOST - OBSLUHA. Výhradní dovozce a distributor pro Českou republiku a Slovensko Caravan Centrum Hykro s.r.o.
 POLO 2.0 TERRASSENHEIZUNG PLYNOVÝ ZÁŘIČ GAS Výhradní dovozce a distributor pro Českou republiku a Slovensko Caravan Centrum Hykro s.r.o. Ořešská Enders Colsman 1542 AG 155 00 Praha 5 - Řeporyje tel.: +420
Roger Clip-On Mic. Quick setup guide / Schnellstartanleitung Guide d installation rapide / Stručný návod k použití
 Roger Clip-On Mic Quick setup guide / Schnellstartanleitung Guide d installation rapide / Stručný návod k použití Components Komponenten Composants Komponenty Roger Clip-On Mic 2 Setting up the docking
Hi-Res Audio/DNC Headset MDR-NC750
 Uživatelská příručka Hi-Res Audio/DNC Headset MDR-NC750 Obsah Začínáme...3 Úvod...3 Přehled... 3 Základy práce...4 Nošení náhlavní soupravy...4 Připojení náhlavní soupravy k vašemu zařízení... 4 Nastavení
PC/104, PC/104-Plus. 196 ept GmbH I Tel. +49 (0) / I Fax +49 (0) / I I
 / I Fax +49 (0) / I I") E L E C T R O N I C C O N N E C T O R S 196 ept GmbH I Tel. +49 (0) 88 61 / 25 01 0 I Fax +49 (0) 88 61 / 55 07 I E-Mail sales@ept.de I www.ept.de Contents Introduction 198 Overview 199 The Standard 200
E L E C T R O N I C C O N N E C T O R S 196 ept GmbH I Tel. +49 (0) 88 61 / 25 01 0 I Fax +49 (0) 88 61 / 55 07 I E-Mail sales@ept.de I www.ept.de Contents Introduction 198 Overview 199 The Standard 200
 11.12. 100 ΕΙΣΟΔΟΣ = E / ENTRANCE = E = = 1174 550 ΤΥΠΟΠΟΙΗΜΕΝΟ ΚΥ = 2000 (ΕΠΙΛΟΓΗ: 2100) / CH STANDARD = 2000 (OPTIONAL: 2100) 243 50 ΚΥ/CH + 293 ΚΥ/CH +103 100 ΚΥ /CH 6 11 6 20 100 0,25 ΚΑ (CO) + 45
FIRE INVESTIGATION. Střední průmyslová škola Hranice. Mgr. Radka Vorlová. 19_Fire investigation CZ.1.07/1.5.00/
 FIRE INVESTIGATION Střední průmyslová škola Hranice Mgr. Radka Vorlová 19_Fire investigation CZ.1.07/1.5.00/34.0608 Výukový materiál Číslo projektu: CZ.1.07/1.5.00/21.34.0608 Šablona: III/2 Inovace a zkvalitnění
SERVISNÍ MANUÁL PEGAS 250 E CEL OVO SERVICE MANUAL PEGAS 250 E CEL OVO
 MG136-1 PEGAS 250 E CEL OVO SERVICE MANUAL page 1 SERVISNÍ MANUÁL PEGAS 250 E CEL OVO SERVICE MANUAL PEGAS 250 E CEL OVO 1. VAROVÁNÍ WARNING UPOZORNĚNÍ Pouze osoba splňující kvalifikaci danou zákonem je
SPECIFICATION FOR ALDER LED
 SPECIFICATION FOR ALDER LED MODEL:AS-D75xxyy-C2LZ-H1-E 1 / 13 Absolute Maximum Ratings (Ta = 25 C) Parameter Symbol Absolute maximum Rating Unit Peak Forward Current I FP 500 ma Forward Current(DC) IF
Einbauanleitung zu Elektro-Einbausatz 736566 Elektro-Einbausatz für Anhängerkupplung, 7-polig, 12 Volt, nach ISO 1724. FIAT PUNTO ab 09/99
 Einbauanleitung zu Elektro-Einbausatz 736566 Elektro-Einbausatz für Anhängerkupplung, 7-polig, 12 Volt, nach ISO 1724 FIAT PUNTO ab 09/99 Inhalt: 1 Steckdose 7-polig, 1 Leitungssatz 7-adrig, 1 Gummidichtung
Pokyny k použití. Model-300. Napájecí zdroj. Návod na obsluhu Operating Instructions. se systémem Aquacontrol Napájací zdroj
 Pokyny k použití Model-300 Návod na obsluhu Operating Instructions Napájecí zdroj se systémem Napájací zdroj so systémom Power Supply with System BK 0011900 / PC AQUACONTROL Kryt aquacontrol Kryt aquacontrol
:= = := :=.. := := := := ρ := := α := π α = α = := = :=
 := = := :=.. := := := := ρ := := α := π α = α = := = := := α := α := = := α := := α = = ρ ρ := := := = := = := := := + + := + + := + := := := := + + := + + := + = = = :=.. := η := η := := π = :=.. :=,
Roger Pen. Quick setup guide / Schnellstartanleitung Guide d installation rapide / Stručný návod k použití
 Roger Pen Quick setup guide / Schnellstartanleitung Guide d installation rapide / Stručný návod k použití Components Komponenten Composants Komponenty Roger Pen 2 Setting up the docking station Docking
Size / Světlost : DN 1/4 to 4 / DN 1/4 až 4
 Size / Světlost : 1/4 to 4 / 1/4 až 4 Ends / Konce : Threaded BSP / Závitové BSP Min. Temperature / Minimální teplota : -20 C Max. Temperature / Maximální teplota : +180 C Max. Pressure / Maximální tlak
ROLLO STANDARD ELECTRIC. Montageanleitung / Mounting Instruction / Montážní návod
 ROLLO STANDARD ELECTRIC Montageanleitung / Mounting Instruction / Montážní návod Teileliste / Parts List / Seznam dílů (1) 2x ( 2) 2x (3) 2x Nur von Erwachsenen zu bedienen! Kinder nicht an der Bildwand
obal manuálu, asi něco podobného jako u LC 100 asi by to chtělo lepší obrázek!!! FYTOSCOPE FS130 Instruction Guide
 obal manuálu, asi něco podobného jako u LC 100 asi by to chtělo lepší obrázek!!! FYTOSCOPE FS130 Instruction Guide možná tohle trochu zmenšit a dát sem i to varování LED RADIATION co je na další straně
eduard WEEKEND EDITION
 3741 1:35 Pz.Kpfw. VI Ausf.B Tiger II PLASTIC PARTS A> B> C> D> eduard WEEKEND EDITION E> F> G> 2 pcs. H> 2 pcs. -Parts not for use. -Teile werden nicht verwendet. -Pieces a ne pas utiliser. -Tyto díly
DATA SHEET. BC516 PNP Darlington transistor. technický list DISCRETE SEMICONDUCTORS Apr 23. Product specification Supersedes data of 1997 Apr 16
 zákaznická linka: 840 50 60 70 DISCRETE SEMICONDUCTORS DATA SHEET book, halfpage M3D186 Supersedes data of 1997 Apr 16 1999 Apr 23 str 1 Dodavatel: GM electronic, spol. s r.o., Křižíkova 77, 186 00 Praha
ČSN EN ISO 28199-1 OPRAVA 1 67 3131
 ICS 87.040 ČSN EN ISO 28199-1 OPRAVA 1 67 3131 Červen 2010 ČESKÁ TECHNICKÁ NORMA Nátěrové hmoty Hodnocení vlastností nátěrových systémů v závislosti na způsobu nanášení Část 1: Terminologie a příprava
KTM Battery Charger KTM Устройство для заряда батарей КТМ Usměrňovač a nabíječ Ftz Gleichrichter und Ladegerät Ftz
 Usměrňovač a nabíječ KTA Gleichrichter und Ladegerät KTA Rectifier and Batterey Charger KTA Устройство для заря батарей KTA Usměrňovač a nabíječ KTZ Gleichrichter und Ladegerät KTZ Rectifer and Batterey
User manual SŘHV Online WEB interface for CUSTOMERS June 2017 version 14 VÍTKOVICE STEEL, a.s. vitkovicesteel.com
 1/ 11 User manual SŘHV Online WEB interface for CUSTOMERS June 2017 version 14 2/ 11 Contents 1. MINIMUM SYSTEM REQUIREMENTS... 3 2. SŘHV ON-LINE WEB INTERFACE... 4 3. LOGGING INTO SŘHV... 4 4. CONTRACT
Ecosun CH. Napětí V. 1096x155x115* 230 V 1N I IP 44 Ecosun CH x155x115*
 Návod k obsluze a montáži N631/R02 (06.08.14 ) Ecosun CH Sálavé panely do kostelních lavic 1. Použití Sálavé panely Ecosun CH jsou určeny k instalaci pod pevně připevněné kostelní lavice. Panely se instaluji
Lenovo A606. Quick Start Guide v1.0. English/Česky
 Lenovo A606 Quick Start Guide v1.0 English/Česky English Read this guide carefully before using your smartphone. Learning more Getting support Electronic emission notices To learn more information about
IT: Istruzioni d uso AM10 - Modulo regolazione in funzione della temperatura esterna
 7215 4300 07/2005 EU Per l utente / pro u ivatele / pre obsluhujúceho IT: Istruzioni d uso AM10 - Modulo regolazione in funzione della temperatura esterna CZ: Návod k obsluze AM10 - Moduly pracující v
Einbauanleitung zu Elektro-Einbausatz 736551 Elektro-Einbausatz für Anhängerkupplung, 7-polig, 12 Volt, nach ISO 1724
 Einbauanleitung zu Elektro-Einbausatz 736551 Elektro-Einbausatz für Anhängerkupplung, 7-polig, 12 Volt, nach ISO 1724 CITROËN BERLINGO alle Modelle ab 10/96 PEUGEOT PARTNER alle Modelle ab 11/96 Inhalt:
STAVEBNÍ PŘIPRAVENOST GILOTINA VLO DIMENSIONAL SHEET VLO MASSBLATT VERTIKALER BESCHLAG VLO МОНТАЖ МЕТАЛЛОКОНСТРУКЦИИ ВОРОТ СИСТЕМЫ ГИЛЬОТИНА ВЛО
 CZ VOLNÝ PROSTOR PRO POHYBUJÍCÍ SE VRATA EN FREE SPACE FOR THE DOORMOVEMENT DE FREIRAUM FÜR DIE BEWEGUNGSABLÄUFE RU РАЗМЕРЫ НЕОБХОДИМЫЕ ДЛЯ УСТАНОВКИ ВОРОТ CZ A - šířka otvoru B - výška otvoru C - nadpraží
Pracovní LED svítilna
 Pracovní LED svítilna Dobíjecí ruční LED svítilny s 60 LED diodami Str. 1-12 Str. 13-24 Str. 25-36 Str. 35-40 Str. 40-60 Návod k použití DŮLEŽITÉ: Pečlivě si přečtěte tento návod a uschovejte si ho. Dbejte
ZÓNOVÉ VENTILY S VRATNOU PRUŽINOU dvoucestné VZP 2XX 230 1P 001 třícestné VZP 3XX 230 1P 001
 Návod na instalaci a použití ZÓNOVÉ VENTILY S VRATNOU PRUŽINOU dvoucestné VZP 2XX 230 1P 001 třícestné VZP 3XX 230 1P 001 CZ verze 1.2 Popis: Zónové ventily s vratnou pružinou jsou určeny do hydraulických
Quick Installation Guide
 Smart Body Analyzer WS-50 Quick Installation Guide FR Guide d installation CZ Průvodce instalací DE Installationsanleitung IT Guida all installazione NEED help BESoIN D aide BRauchEN SIE hilfe potřebujete
Mgr. Jakub Lukeš. Praha (pracovní list) Ročník: 1. 4. Datum vytvoření: listopad 2013 VY_32_INOVACE_09.2.16.NEJ
 Ročník: 1. 4. Datum vytvoření: listopad 2013 VY_32_INOVACE_09.2.16.NEJ") Autor: Mgr. Jakub Lukeš Předmět/vzdělávací oblast: Německý jazyk Tematická oblast: Téma: Poznatky o zemích Praha (pracovní list) Ročník: 1. 4. Datum vytvoření: listopad 2013 Název: VY_32_INOVACE_09.2.16.NEJ
Autor: Mgr. Jakub Lukeš Předmět/vzdělávací oblast: Německý jazyk Tematická oblast: Téma: Poznatky o zemích Praha (pracovní list) Ročník: 1. 4. Datum vytvoření: listopad 2013 Název: VY_32_INOVACE_09.2.16.NEJ
PET ACTIVITY TRACKER USER MANUAL UŽIVATELSKÝ MANUÁL. Bedienungsanleitung * Mode d emploi * Manuale dell Utente Manual do Usuário * Manual * Käyttöohje
 PET ACTIVITY TRACKER USER MANUAL UŽIVATELSKÝ MANUÁL Bedienungsanleitung * Mode d emploi * Manuale dell Utente Manual do Usuário * Manual * Käyttöohje Tractive MOTION Tractive Activity MOTION tracker pro
Bf 108 B> 5 4 GUNZE. Mr.METAL COLOR SM01 MMC-001 SUPER CHROME. Mr.COLOR METALLIC
 Bf 108 8479 1/48 PLASTIC PARTS A> 3 B> 5 4 15 7 1 6 7 14 11 9 8 15 14 17 1 0 1 1 18 19 6 10 1 11 3 11 10 C> 1 6 7 3 4 8 9 10 10 14 11 15 17 18 19 1 0 19 3 D> 5 8 9 7 9 8 4 GUNZE H C H11 C6 H1 C33 H15 C65
ROEDL & PARTNER ERSTES BÜRO IN PRAG MATERIÁLY PRO UČITELE
 ROEDL & PARTNER ERSTES BÜRO IN PRAG MATERIÁLY PRO UČITELE Roedl & Partner: Erstes Büro in Prag A: So und Sie haben sich vorgestellt, dass Sie hier in Prag ein Büro haben werden, ist das richtig? B: Wir
WL-5480USB. Quick Setup Guide
 Quick Setup Guide 1 Czech 7 Install Utility Software Note1: Before installing the utility software, DO NOT inserts the into your computer. If the adapter is inserted already, Windows will detect the adapter
1-AYKY. Instalační kabely s Al jádrem. Standard TP-KK-133/01, PNE 347659-3. Konstrukce. Použití. Vlastnosti. Installation cables with Al conductor
 Instalační kabely s Al jádrem Installation cables with Al conductor Standard TP-KK-133/01, PNE 347659-3 4 3 2 1 Konstrukce Construction 1 Hliníkové jádro Aluminium conductor 2 Izolace PVC 3 Výplňový obal
ČSN EN ed. 2 OPRAVA 1
 ČESKÁ TECHNICKÁ NORMA ICS 31.060.10 Říjen 2016 Neproměnné kondenzátory pro použití v elektronických zařízeních Část 14: Dílčí specifikace Neproměnné kondenzátory pro elektromagnetické odrušení a pro připojení
TechoLED H A N D B O O K
 TechoLED HANDBOOK Světelné panely TechoLED Úvod TechoLED LED světelné zdroje jsou moderním a perspektivním zdrojem světla se širokými možnostmi použití. Umožňují plnohodnotnou náhradu žárovek, zářivkových
Haarschneider. Hair Trimmer Zastřihovač vlasů Strihač vlasov DE GB CZ SK. Bedienungsanleitung Instruction manual Instrukcja obsługi Návod k použití
 Haarschneider Hair Trimmer Zastřihovač vlasů Strihač vlasov DE GB CZ SK Bedienungsanleitung Instruction manual Instrukcja obsługi Návod k použití PL DE GB CZ SK PL HR RO BG Inhalt...3 Content...22 Obsah...40
ČSN EN ISO OPRAVA 1
 ICS 13.040.35 ČSN EN ISO 14698-2 OPRAVA 1 12 5370 Listopad 2006 ČESKÁ TECHNICKÁ NORMA Čisté prostory a příslušné řízené prostředí Regulace biologického znečištění Část 2: Vyhodnocení a výklad údajů o biologickém
Studentská výměna mezi žáky Sigmundovy střední školy strojírenské, Lutín a žáky Werner von Siemens Schule Wetzlar
 SIGMUNDOVA STŘEDNÍ ŠKOLA STROJÍRENSKÁ, LUTÍN Jana Sigmunda 242, 783 49 LUTÍN Studentská výměna mezi žáky Sigmundovy střední školy strojírenské, Lutín a žáky Werner von Siemens Schule Wetzlar Schüleraustausch
Neplatí pro přístroje série Pro EVO!
 Neplatí pro přístroje série Pro EVO! Montážní návod vkládací řídící jednotka pro WGB C/D, WGB-K C, WBS/WBC C/D pro BGB, BBS C, BBK C/D pro SGB C/D Neplatí pro přístroje série Pro EVO! Obsah Často kladené
SG 650 D GB CZ. Art.-Nr.: 240.100.210. Originalbetriebsanleitung Farb-spritzpistole Translation of the original instructions Colour spray gun
 Originalbetriebsanleitung Farb-spritzpistole Translation of the original instructions Colour spray gun Originální návod stříkací pistole D GB CZ SG 650 Art.-Nr.: 240.100.210 b a c B1 2 7 1 13 12 3 B2 4
0-10 V Interface AM 4
 Montage instructie Assembly instructions Instructions de montage Návod k montáži 0-10 V Interface AM 4 Bergen Master Line 0-10 V Interface Montage instructie voor 0-10 V interface Fitting instruction for
 TABELLA DI CORROSIONE GIRANTI IMPELLER CORROSION TABLE 13 Materiale Material Caratteristica Characteristic NBR Nitrile Nitrile A Ottimo Excellent EPDM Epdm Epdm B Discreto/Buono Fair/Good CR Neoprene Neoprene
Návod k obsluze/user manual LAD2 Propojovací krabička/cable junction box
 Návod k obsluze/user manual LAD2 Propojovací krabička/cable junction box K zapojení/for connecting:! optického senzoru/optoelectronic safety edges! kontaktu průchozích dveří/es! lankového kontaktu/es pro
Výukový materiál zpracován v rámci projektu EU peníze školám
 Výukový materiál zpracován v rámci projektu EU peníze školám Registrační číslo projektu: CZ.1.07/1.5.00/34.0229 Šablona: III/2 č. materiálu: VY_32_INOVACE_126 Jméno autora: Třída/ročník: Mgr. Anna Fekiačová
LED STANDARD 12V GU4, GU5.3, G53
 LED catalog/katalog OBSAH / CONTENT 3 LED STANDARD 12V GU4, GU5.3, G53 5 HIGH POWER LED 230V GU10 7 HIGH POWER LED 230V E14, E27 9 HIGH POWER LED 230V E27 11. HIGH POWER LED 230V GU10, E27 13. LED STANDARD
BENUTZERHANDBUCH USER MANUAL
 BENUTZERHANDBUCH USER MANUAL Elektro-Trolley Push-Trolley Pull-Trolley Zubehör Elektrický vozík Tlačný vozík Tažný vozík Příslušenství Lieferumfang Elektro-Trolley: Trolley, Akku, Ladegerät, Trolley-Cover
VESTAVBOVÝ RÁM - ROLLO JUMBO
 VESTAVBOVÝ RÁM - ROLLO JUMBO Montageanleitung / Mounting Instruction / Montážní návod Nur von Erwachsenen zu bedienen! Kinder nicht an der Bildwand spielen lassen! Operation by adults only! Do not let
Aufbauanleitung. notice de montage. Building Instructions. montagehandleiding. Instrucciones de construcción. Istruzioni per il montaggio
 70336 19.10.2016 Aufbauanleitung notice de montage Building Instructions montagehandleiding Instrucciones de construcción Istruzioni per il montaggio Montážní návod Service-Hotline:+49 421 38693 33 Vergleichen
Introduction to MS Dynamics NAV
 Introduction to MS Dynamics NAV (Item Charges) Ing.J.Skorkovský,CSc. MASARYK UNIVERSITY BRNO, Czech Republic Faculty of economics and business administration Department of corporate economy Item Charges
Training Board TB series 3. SolderBoard
 Training Board TB series 3 SolderBoard Elektronická stavebnice SOLDERBOARD byla speciálně navržena pro účely praktické výuky ručního osazování a pájení desek plošných spojů v technologii SMT. Je levným
Souminulý čas Imparfait Test
 VY_32_INOVACE_FJ_149 Souminulý čas Imparfait Test Mgr. Martina Šenkýřová Období vytvoření: únor 2013 Ročník: třetí a čtvrtý (opakování) SŠ Tematická oblast: Gramatika-morfologie: slovesné časy a způsoby
ČSN EN ISO OPRAVA
 ICS 13.030.99; 83.080.01 ČSN EN ISO 14855-1 OPRAVA 1 64 0512 Červen 2010 ČESKÁ TECHNICKÁ NORMA Stanovení úplné aerobní biodegrability za řízených podmínek kompostování Metoda stanovení uvolněného oxidu
Saurer Regen. V rámci následujícího úkolu se studenti seznámí s odborným textem v němčině. Dozvědí se základní informace o kyselém dešti.
 NĚMČINA Saurer Regen V rámci následujícího úkolu se studenti seznámí s odborným textem v němčině. Dozvědí se základní informace o kyselém dešti. Gymnázium Frýdlant, Mládeže 884, příspěvková organizace
Gymnázium a Střední odborná škola, Rokycany, Mládežníků 1115
 Číslo projektu: Číslo šablony: Název materiálu: Gymnázium a Střední odborná škola, Rokycany, Mládežníků 1115 CZ.1.07/1.5.00/34.0410 II/2 Parts of a computer IT English Ročník: Identifikace materiálu: Jméno
Brzda Bremse Brake F-350. Katalog náhradních dílů Ersatzteilkatalog Spare parts catalogue
 Brzda Bremse Brake F-350 Katalog náhradních dílů Ersatzteilkatalog Spare parts catalogue 03 / 2014 2 Pokyny k objednávání náhradních dílů Tento katalog obsahuje seznam součástí a jejich sestavení do montážních