Under-Cabinet Radio SKRD 30 A1
|
|
|
- Jakub Němec
- před 7 lety
- Počet zobrazení:
Transkript

1 4 Under-Cabinet Radio Under-Cabinet Radio Operating instructions Rádió Használati utasítás Rádio na vestavění Návod k obsluze Radio podwieszane Instrukcja obsługi Podelementni radio Navodila za uporabo Rádio Návod na obsluhu KOMPERNASS GMBH BURGSTRASSE 21 D BOCHUM ID-Nr.: -09/10-V3


2 A 1 z t q w e r u i o p p B
3 Index Introduction Information for these operating instructions Copyright Proper usage Warning notices Safety Danger from electric shock Handling of batteries Basic Safety Instructions Operating components Setting up and connecting... 7 Safety instructions Package contents and transport inspection Unpacking Disposal of the packaging Set-up location requirements Electrical connection Inserting the battery Mounting under a wall cupboard.. 9 Disassembly Setting up the device Providing mains power VHF wire antenna Handling and operation...11 Switching On and Off Basic settings Activating the settings menu Setting the time Setting the date Adjusting the display brightness...13 Setting the memory function Setting the time of day format Kitchen timer Setting the kitchen timer Starting the kitchen timer Pausing the kitchen timer Programming the kitchen timer Accessing the kitchen timer Programming alarm wake times...17 Wake with alarm tone Waken with radio Switching the alarm off When the wake time has arrived..18 Radio operation Switching the radio on/off Adjusting the volume Manual station selection Search for the next station Saving stations manually Access saved stations Automatic station search (AMS function) Additional functions Automatic switch off (Sleep function) 21 Button lock Bass accentuation Cleaning Safety instructions Cleaning the housing Troubleshooting Safety instructions Malfunction causes and remedies.23 Storage/Disposal Storage Disposal of the device Disposing of the batteries Appendix Information regarding the EG conformity declaration Technical data Warranty Service Importer GB 1
4 Introduction GB Introduction Information for these operating instructions These operating instructions are a component of the Under-Cabinet Radio (henceforth designated as the device) and they provide you with important information about the intended use, safety, installation and connection as well as operation of the device. The operating instructions must be kept available in the vicinity of the device at all times. They are to be read and used by anyone assigned to service and repair faults in the device. Retain these operating instructions and pass them on with the device to any future owners. Copyright Proper usage This documentation is copyright protected. Any copying or reproduction, including as extracts, as well as the reproduction of images, also in an altered state, is not permitted without the express written consent of the manufacturer. This device is only intended for the reception of VHF radio programmes, as a kitchen timer and as an alarm by means of an alarm tone or radio in enclosed spaces. The device is intended as a free standing unit or for mounting under a cupboard. For these purposes the supplied stand and/or mounting plate must be used. Any other use or uses beyond those mentioned are considered unintended use. The device is not intended for use in commercial or industrial environments. WARNING Danger from unintended use! Danger from the device can result if it is used for unintended purposes and/or other types of use. Use the device exclusively for intended purposes. Observe the procedures described in these operating instructions. No warranty claims of any kind will be accepted for damage caused by improper use, unauthorised repairs, unauthorised modifi cations or for the use of unapproved replacement parts. The operator alone bears liability. 2
5 Introduction Warning notices In the current operating instructions the following warning notices are used: GB DANGER A warning in this danger level indicates a hazard threatening situation. In the event that the hazardous situation is not avoided it can lead to death or serious injury. The directives in this warning are there in order to avoid the danger of death or serious injury. WARNING A warning of this danger level signifies a possible dangerous situation. If the dangerous situation is not avoided it can lead to injuries. The directives in this warning are there to avoid personal injuries. IMPORTANT A warning of this danger level signifies possible property damage. If the situation is not avoided it can lead to property damage. The directives in this warning are there to avoid property damage. NOTICE A notice signifi es additional information that assists in the handling of the device. 3
6 Introduction GB Safety In this section you receive important safety information regarding handling of the device. This device complies with the statutory safety regulations. Incorrect usage can lead to injuries and property damage. Danger from electric shock DANGER Risk of fatal electrocution! A life-threatening situation can arise from contact with live wires or components! Observe the following safety instructions to avoid electric shock hazards: Do not use the device if the mains power plug or the connection cable are damaged. Do not, under any circumstances, open the device housing. The risk of an electric shock is present if the power carrying connections are touched or the electrical or mechanical construction is changed. Handling of batteries WARNING Danger from improper use! For safe handling of batteries observe the following safety instructions: Do not throw batteries into a fi re. Do not short circuit batteries. Do not attempt to recharge batteries. Regularly check the condition of the batteries. Leaking battery acid can cause permanent damage to the device. Special caution should be shown when handling damaged or leaking batteries. Danger from acid burns! Wear protective gloves. Store batteries in a place inaccessible to children. If swallowed seek immediate medical attention. If you do not intend to use the device for an extended period of time, remove the batteries. 4
7 Introduction Basic Safety Instructions For safe handling of the device observe the following safety instructions: Before use check the device for visible external damage. Do not put into operation a device that is damaged or has been dropped. Damaged cables or connections should be replaced by authorised qualifi ed persons or by the customer service department. Persons who, due to their physical, intellectual or motor abilities, are incapable of operating the device safely may only use the device under supervision or direction from a responsible person. Only allow children to use the device under supervision. Repairs should only be carried out by authorized specialist companies or by the customer service department. Incorrect repairs can result in danger to the user. In addition warranty claims become void. A repair to the device during the warranty period may only be carried out by a customer service department authorized by the manufacturer otherwise no additional warranty claims can be considered for subsequent damages. Defective components may only be replaced with original replacement parts. Only by using original replacement parts can you guarantee that the safety requirements are complied with. Protect the device from moisture and liquid penetration. Never submerge the device in water, do not place the device in the vicinity of water and do not stand any object fi lled with liquid (i.e. vases) on the device. Do not place any objects on the device. Do not operate the device in the vicinity of open fl ames (i.e. candles). Avoid direct sunlight. Always pull on the power plug when disconnecting from the wall socket, never pull on the connection cable. If malfunctions occur or thunder storms threaten pull the power plug from the wall socket. GB 5
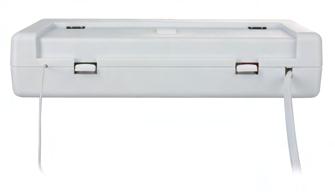
8 Operating components GB Operating components (for illustrations see fold out sides figure A) Mounting plate/stand 2 Control panel 3 Display 4 On/Off : On/Off switch (Radio) 5 AOT: Timer switch off 6 Lock/Mem.: Button lock/memory slot selection 7 Bass/AMS/Mode: Bass accentuation/station search/access setting menu 8 Alarm 1: Alarm 1 programming 9 Alarm 2: Alarm 2 programming 10 Preset : selection of the previous memory slot 11 Preset+: selection of the next memory slot 12 Tune : Decrease the reception frequency 13 Tune+: Increase the reception frequency 14 VOLUME/Snooze/Timer: Volume control/alarm switch off /Timer setting 15 Wire antenna for VHF reception 16 Mains connection cable 17 Recesses for stand 18 Speakers 19 Battery compartment 20 Unlocking buttons for the mounting plate 6
9 Setting up and connecting Setting up and connecting Safety instructions GB WARNING Damage may occur to property and injuries to people when operating the device! Observe the following safety instructions to avoid dangers: Packaging material should not be used as a play thing. There is a risk of suff ocation! To avoid risks to persons and property, observe the requirements for the set-up location and the electrical connections. Package contents and transport inspection Unpacking The device is delivered with the following components as standard: Under-Cabinet Radio Mounting plate/stand 4 Securing screws 1 x Battery 3 V Type CR2032 Operating instructions NOTICE Check the contents to make sure everything is there and for visible damage. If the items supplied are incomplete, or damaged due to defective packaging or transportation, contact the Service Hotline (see section Service). Remove all device parts and the operating instructions from the carton. Remove all packing material. 7
10 Setting up and connecting GB Disposal of the packaging The packaging protects the device from transport damage. The packaging materials are selected from the point of view of their environmental friendliness and disposal technology and are therefore recyclable. The recirculation of packaging into the material circuit saves on raw material and reduces generated waste. Dispose of packaging material that is no longer needed according to the regionally established regulations. NOTICE If possible preserve the device's original packaging during the warranty period so that in the case of a warranty claim you can package the device properly for return. Set-up location requirements For the safe and fault free operation of the device, the set-up location must fulfi ll the following conditions: When setting up the device place it on a fi rm, fl at and even surface. Use the supplied stand. Set up or mount the device in such a way that the available ventilation openings and the speaker are not covered. Do not operate the device in a hot, wet or very humid location or in the vicinity of fl ammable materials. The surfaces of furniture may contain components that could aff ect and soften the rubber feet on the device. If necessary, place an anti-slip mat under the rubber feet of the device. The wall socket must be easily accessible so that, in an emergency, the plug can be quickly withdrawn from the socket. Electrical connection Before connecting the device, compare the connection data (voltage and frequency) on the rating plate of the device with that of your power supply network. This data must be compatible to avoid possible damage to the device. Make sure that the device's connection cable is not damaged and is not laying over hot surfaces and/or sharp edges. Make sure that the connection cable is not tightly stretched or bent. Do not allow the connection cord to hang over edges (Trip wire eff ect). 8
11 Setting up and connecting Inserting the battery By inserting the battery you can avoid the loss of programmed time of day and alarm times in the event of a possible power outage. The battery ensures that the internal clock continues to run even during a power failure. When power is restored the correct time appears automatically in the display 3. GB NOTICE The device can also be operated without a battery. Open the cover of the battery compartment 19 on the underside of the device by turning the cover to the left, with a coin, as far as it will go and then lift off. Insert the battery type CR2032 (supplied) into the battery compartment. The side with the marking + points upwards. Close the battery compartment by attaching the cover and then with a coin turn it to the right. Mounting under a wall cupboard (Illustration see fold out side figure B) With the supplied mounting plate you can mount the device under, for example, a wall cupboard. For mounting of the device proceed as follows: Press both unlocking buttons 20 on the rear panel of the device downwards thereby, at the same time, sliding the mounting plate backwards and remove the mounting plate. Find a suitable set-up location for the device (see also the section Requirements for the set-up location). Hold the mounting plate under the set-up location. Thereby the front edge of the mounting plate should be approx. 4 cm behind the front of the cupboard so that, after Remove the mounting, the device is fl ush with the cupboard. Mark the 4 fastening points with a pencil. Using a spike or nail, make a small depression at the respective marking points. Screw the mounting plate tightly with the supplied screws as illustrated in fi gure B. Place the device aslant, with the front recesses in the top face, in the mounting plate. Press the rear part of the device upwards against the mounting plate until the device audibly locks into place. Check to make sure that the device is secure. 9
12 Setting up and connecting GB Disassembly Press both unlocking buttons 20 on the rear panel of the device downwards, thereby sliding, at the same time, the device forward and then remove the device downwards. Unscrew the screws on the mounting plate and remove the mounting plate. Setting up the device As an alternative you can stand the device on a top. So as not to cover up the ventilation slots and the speaker 18 on the underside of the device, when setting up the device it must be mounted on the stand. For assembly of the stand proceed as follows: Press both unlocking buttons 20 on the rear panel of the device downwards thereby, at the same time, sliding the mounting plate backwards and remove the mounting plate. The mounting plate can now be used as a stand. Slide both front retaining tabs of the stand into the rear recesses 17 on the underside of the device. Press both rear retaining tabs of the stand into the front recesses 17 on the underside of the device until the stand audibly locks into place. Find a suitable set-up location for the device (see also the section Requirements for the set-up location). Providing mains power Insert the mains connection cable 16 power plug into a socket. The time of day will be shown in the display 3 (0:00 o'clock). VHF wire antenna Unwind the wire antenna 15 completely for VHF reception. 10
13 Handling and operation Handling and operation In this section you receive important information for the handling and operation of the device. GB Switching On and Off After the device has been connected to the power supply it is already switched on. Via the On/Off 4 button you switch between the operational modes clock/ standby operation and radio. NOTICE The On/Off switch 4 does not disconnect the device completely from the mains power. To completely disconnect the device from the mains power the mains power cable plug 16 must be pulled from the mains socket. Basic settings After the device has been connected to the mains power supply it shows the time of day and the day of the week in the display 3. The device is in the operational mode clock/standby operation. Activating the settings menu To activate the settings menu, whilst in the operational mode clock/standby operation, press the Bass/AMS/Mode 7 button. The time of day, shown in the display 3, begins to blink. Each further actuation of the Bass/AMS/Mode 7 button switches to the next setting potential. The menu item sequence is: Setting the time of day Setting the date Adjusting the display brightness Setting the memory function Setting the time of day format NOTICE The setting menu ends automatically if you do not actuate any buttons for approx. 15 seconds. The executed setting is saved. 11
14 Handling and operation GB Setting the time Prerequisite: The device is in the operational mode clock/standby operation. Press the Bass/AMS/Mode 7 button once. The time of day indicator begins to blink. Set with the buttons Tune+ 13 and Tune 12 the current time of day. With each button press the time of day changes by one minute. Holding down the respective button for more than 2 seconds starts the speed setting. Press the Bass/AMS/Mode 7 button again to save the current setting and move to the next menu item. NOTICE The time of day will revert back to 00:00 o'clock if the device is disconnected from the mains power supply and no battery is inserted or if the battery is too weak. Setting the date Prerequisite: The device is in the operational mode clock/standby operation. Press the Bass/AMS/Mode 7 button twice. The date indicator begins to blink. Set with the buttons Tune+ 13 and Tune 12 the current date. With each button press the date is changed by one day. The weekday indicator changes automatically. Holding down the respective button for more than 2 seconds starts the speed setting. Press the Bass/AMS/Mode 7 button again to save the current setting and move to the next menu item. NOTICE The date will revert back to : if the device is disconnected from the mains power supply and no battery is inserted or if the battery is too weak. 12
15 Handling and operation Adjusting the display brightness Prerequisite: The device is in the operational mode clock/standby operation. Press the Bass/AMS/Mode 7 button three times. The current setting for the display brightness is shown (H=bright or L=dim). Set, with the button Tune+ 13, the display brightness to H if you want the display to be brighter. Set, with the button Tune 12, the display brightness to L if you want the display to be darker. Press the Bass/AMS/Mode 7 button again to save the current setting and move to the next menu item. GB Setting the memory function You can set up to 10 date reminders to which an automatic reminder will be triggered. The function SdA (SdA=Special Day Alert) is useful as a reminder, for example, of birthdays or other recurring events. The reminder occurs every year on the same date. Prerequisite: The device is in the operational mode clock/standby operation. Press the Bass/AMS/Mode 7 button four times. The current setting of the selected reminder date is shown alternating with the indicator SDA. Next to the indicator SDA is the number of the memory slot for that date. Possible reminders are SDA 0 to SDA 0. Select with the buttons Preset+ 11 and Preset 10 the memory slot for the date to be set. Set with the buttons Tune+ 13 and Tune 12 the date for this memory slot. With each button press the date is changed by one day. Holding down the respective button for more than 2 seconds starts the speed setting. NOTICE Press the button AOT 5 if you want to switch off the reminder function for the currently selected memory slot. In the display is shown. Press the button Lock/Mem. 6 to set the time of day at which the reminder function is to be triggered. The setting is carried out with the buttons Tune+ 13 and Tune 12 on the hour between 00 and 23. This setting applies to all programmed reminder dates Press the Bass/AMS/Mode 7 button again to save the current setting and move to the next menu item. 13
16 Handling and operation GB Setting the time of day format Prerequisite: The device is in the operational mode clock/standby operation. Press the Bass/AMS/Mode 7 button fi ve times. The current setting for the time of day format is shown (24=24 hour format or 12=12 hour format). With the button Tune+ 13 set the time of day format to 24 if you want a time of day display in the 24 hour format. With the button Tune 12 set the time of day format to 12 if you want a time of day display in the 12 hour format. Press the Bass/AMS/Mode 7 button again to save the current setting and move to the next menu item. Kitchen timer The device has a convenient kitchen timer with which, for example, cooking and baking times can be monitored. The programmable time range of the kitchen timer lies between 1 minute and 23 hours, 59 minutes. Setting the kitchen timer Press the Snooze/Timer 14 button. The display shows 00:00. In the right upper corner of the display the saucepan symbol for the kitchen timer is superimposed. Turn the VOLUME 14 knob to set the time range for the kitchen timer. Turning in a clockwise direction increases the time; turning in a counter clockwise direction reduces the time. NOTICE If, during the setting, approx. 15 seconds passes without any changes taking place the device reverts back to the previous operational mode. 14
17 Handling and operation Starting the kitchen timer After setting the time press the button Snooze/Timer 14 again. The displayed time begins to run backwards. In the right, upper corner of the display a backwards running clock is superimposed. GB NOTICE If, during the operation of the kitchen timer, another function is selected the display of the remaining time fades out. The saucepan symbol and the backward running clock in the right, upper corner of the display, however, continue to be shown. Press the button Snooze/Timer 14 again to allow the remaining time of the kitchen timer to be shown once more. 30 seconds before the kitchen timer run time has expired the device begins to acoustically indicate, with individual signal tones, the arrival of the set time. Thereby the interval between the individual tones becomes shorter and shorter. When the set time has arrived the kitchen timer's alarm signal sounds as a continuous tone. Press the button Snooze/Timer 14 to switch off the kitchen timer alarm signal. Pausing the kitchen timer. Press, while the kitchen timer is running, the button Snooze/Timer 14. The kitchen timer is paused. The displayed remaining time begins to blink. NOTICE After approx. 15 seconds the device reverts back to the previous operational mode. Press the button Snooze/Timer 14 again to allow the remaining time of the kitchen timer to be shown once more. To restart the kitchen timer press the button Snooze/Timer 14 again. The kitchen timer restarts. To switch off the kitchen timer before the set time has expired press and hold down the Snooze/Timer 14 button for at least 2 seconds. 15
18 Handling and operation GB Programming the kitchen timer You can preprogramme the kitchen timer with the most frequently used times so that it is not necessary to continually reenter them. Up to 10 times can be preprogrammed. All 10 memory slots are preprogrammed with 10 minutes as standard. For the programming of the kitchen timer proceed as follows: Press the button Snooze/Timer 14 to activate the kitchen timer. Turn the VOLUME 14 knob to set the time to be programmed. Turning in a clockwise direction increases the time; turning in a counter clockwise direction reduces the time. Press the button Lock/Mem. 6 to activate the timer selection. Under the kitchen timer saucepan symbol a blinking T is shown. Select with the buttons Preset+ 11 and Preset 10 a memory slot between T0 and T9 for the timer that is to be set. Press the button Lock/Mem. 6 again to programme the set time on the selected memory slot. The blinking T under the saucepan symbol is now showing constantly. Repeat the process for the other memory slots. Accessing the kitchen timer To access a programmed time for the kitchen timer proceed as follows: Press the button Snooze/Timer 14 to activate the kitchen timer. Select with the buttons Preset+ 11 and Preset 10 the desired timer between T0 and T9. Press the button Snooze/Timer 14 again to start the kitchen timer. 16
19 Handling and operation Programming alarm wake times The device has two alarms available. All settings for both alarms can be carried out independently from each other. You can select whether at the programmed time an alarm tone shall sound or the radio shall play. GB NOTICE If, during alarm wake programming, no button is pressed for approx. 15 seconds the alarm will activate with the current settings. Prerequisite: The device is in the operational mode clock/standby operation. To set the wake time proceed as follows: Press the Alarm1 button 8 or the Alarm2 button 9. The set wake time of the respective alarm is shown blinking in the display 3 and the indicator A1 and/or A2 appears. The weekday on which this alarm is to be activated is shown above the time indicator. Set with the buttons Tune+ 13 and Tune 12 the desired wake time. With each button press the wake time changes by one minute. Holding down the respective button for more than 2 seconds starts the speed setting. Press the button AOT 5 to switch between the weekday combinations Mo-Fr, Sa-Su or Mo-Su. The respective selected combination is shown above the wake time. Press and hold down the button AOT 5 for at least 2 seconds to switch between the weekday combinations and individual weekday setting alternatives. NOTICE With the individual weekday setting alternative you switch between the days of the week with the button AOT 5. Wake with alarm tone Prerequisite: The device is in the operational mode clock/standby operation. To select "Alarm tone" for the respective alarm press the Alarm1 button 8 or the Alarm2 button 9 several times in succession until, in the display 3, the symbol appears. 17
20 Handling and operation GB Waken with radio If you want to be woken by the radio, before activating the wake time carry out the following settings: Switch the radio on by pressing the On/Off 4 button. Select the station with which you want to be woken (see section Station setting). With the VOLUME 14 knob set the desired volume (see section Volume settings). Switch the radio off by pressing the On/Off 4 button. To select "Radio" for the respective alarm press the Alarm1 button 8 or the Alarm2 button 9 several times in succession until, in the display 3, the symbol appears. Switching the alarm off Prerequisite: The device is in the operational mode clock/standby operation. To switch off the respective alarm press the Alarm1 button 8 or the Alarm2 button 9 several times in succession until no symbols are shown in the display 3. When the wake time has arrived With the setting "Wake with alarm tone" a fourfold signal tone sounds in intervals of 2 seconds. The volume of the signal tone will continually increase until the maximum volume has been reached. The duration of the wake signal is restricted to 10 minutes. With the setting "Wake with radio" the radio will switch on. The previously selected station will be activated for a maximum of 60 minutes at the set volume. Press the button Snooze/Timer 14 to activate a repeat wake after 9 minutes. NOTICE The repeat wake function is possible up to 60 minutes after the set wake time has arrived. Press the Alarm1 button 8 or the Alarm2 button 9 to end the current alarm. NOTICE The alarm becomes active again when the next wake time has arrived (i.e. on the next day). 18
21 Handling and operation Radio operation NOTICE For a good radio reception the wire antenna 15 must be completely uncoiled. Adjust the antenna, whilst in radio operation, to the best reception. The technical factors of the device allow for tuning reception frequencies outside of the permitted VHF (FM) range of MHz. In some countries, diff erent national regulations may apply to the assigned radio frequency ranges. Please note that information received outside of the assigned radio frequency ranges may not be exploited, passed on to third parties or otherwise misused. GB Switching the radio on/off Switch the radio on by pressing the On/Off 4 button.the display 3 shows the current reception frequency of the tuned station. Switch the radio off by pressing the On/Off 4 button again.the device changes back to the operational mode clock/standby operation. The current time of day is shown. Adjusting the volume. With the VOLUME 14 knob set the desired volume. Turning in a clockwise direction increases the volume; turning in a counter clockwise direction reduces the volume. The volume level is shown on the left border of the display 3. Manual station selection By a single press on the buttons Tune+ 13 and Tune 12 tune the desired station. The frequency of the station is shown in the display 3. During the tuning the speaker is switched off. Search for the next station The device can automatically search for the nearest station. Press and hold down the button Tune+ 13 or Tune- 12 for at least two seconds. The device searches for the nearest station with suffi cient reception quality. Repeat this process until you have found the station you are looking for. 19
22 Handling and operation GB Saving stations manually Prerequisite: The device is in the radio operational mode. The device has 30 memory slots available for station frequencies. To save a station frequency proceed as follows: Tune, as described previously, the desired station. Press the button Lock/Mem. 6 once. The symbol MEM begins to blink in the lower, right corner of the display. Select with the buttons Preset+ 11 and Preset 10 the desired memory slot for the tuned station between 1 and 30. Press the button Lock/Mem. 6 again. The reception frequency of the tuned station is saved on the selected memory slot. The symbol MEM lights up constantly. Access saved stations Prerequisite: The device is in the radio operational mode. Select with the buttons Preset+ 11 and Preset 10 the desired memory slot for the saved station between 1 and 30. Automatic station search (AMS function) Prerequisite: The device is in the radio operational mode. To allocate the memory slots to the station frequencies with the strongest receivable stations a station search can be carried out. NOTICE With the carrying out of the following described function all previously saved stations will be lost. Press and hold down the button Bass/AMS/Mode 7 for at least two seconds. The device begins the station search and allocates to the memory slots 1-30 the found stations. NOTICE If more than 30 stations are found only the fi rst 30 reception frequencies will be saved. If less than 30 stations are found the last memory slots remain unchanged. 20
23 Handling and operation Additional functions Automatic switch off (Sleep function) With the sleep function the radio switches itself off after a time lapse of between 5 and 120 minutes. To access the function press the button AOT 5. The current remaining time until the radio switches itself off is shown. Press the button AOT 5 repeatedly to set the desired time. Holding down the button for more than 2 seconds starts the speed setting. GB NOTICE The setable time frame lasts from 120 to 5 minutes. The setting takes place in stages of 5 minutes. After which the indicator OFF appears. With the indicator OFF the sleep function is switched off. Button lock You can lock the buttons of the device so that settings cannot be altered by unauthorised people or children. Press and hold down the button Lock/Mem. 6 for at least two seconds to switch the button lock on or off. When the button lock is switched on the symbol appears in the display. Bass accentuation With the bass accentuation you can switch on an enhanced playback of the low frequencies. Prerequisite: The device is in the radio operational mode. Press briefl y the button Bass/AMS/Mode 7 to switch the bass accentuation on or off. With the bass accentuation switched on the symbol BASS appears in the display. 21
24 Cleaning/Troubleshooting GB Cleaning Safety instructions DANGER Life-threatening situation from electric shock! Remove the plug from the mains power socket before cleaning. IMPORTANT Damaging of the device! Make sure when you are cleaning the device that no moisture gets inside in order to avoid irreparable damage to it. Cleaning the housing Clean the surfaces of the device with a soft, dry cloth. Troubleshooting In this section you receive important information for the localization and remedying of malfunctions. Observe the instructions in order to avoid danger and damage. Safety instructions WARNING Observe the following safety information to avoid danger and property damage: Repairs to electronic devices may only be carried out by specialists who have been trained by the manufacturer. Considerable danger to the consumer and damage to the device can occur as a result of incorrect repairs. 22
25 Troubleshooting Malfunction causes and remedies The following table will help with localizing and remedying minor malfunctions: GB Defect Possible cause Solution The display is showing nothing. No sound Noisy radio reception The plug is not inserted. Mains power socket is not supplying power. The volume is set to minimum. The radio is switched off. The radio station is not properly tuned in. Reception is too weak. Insert the plug into the mains power socket. Check the circuit fuse. Increase the volume with the VOLUME 14 knob. Switch the radio on with the On/Off 4 button. Tune the station correctly with the buttons Tune+ 13 and Tune 12. Try to improve reception by moving the wire antenna 15. NOTICE If you cannot solve the problem with the aforementioned methods, please contact Customer Service. 23
26 Storage/Disposal GB Storage/Disposal Storage If you do not intend to use the device for an extended period of time, disconnect it from the mains power supply, remove the battery and store it at a clean, dry location that is not subjected to direct sunlight. Disposal of the device Do not dispose of the device in your normal domestic waste. This product is subject to the European directive 2002/96/EC-WEEE (Waste Electrical and Electronic Equipment). Dispose of the device through an approved disposal centre or at your community waste facility. Observe the currently applicable regulations. In case of doubt, please contact your waste disposal centre. Disposing of the batteries Batteries must not be disposed of in the household waste. Every consumer is legally obligated to hand in batteries at a collection centre in his/her community/district or a dealer. This obligation is intended to ensure that batteries are disposed of in an environmentally friendly manner. Hand batteries in only when they are fully discharged. 24
27 Appendix Appendix Information regarding the EG conformity declaration GB This device complies regarding conformance to the basic requirements and other relevant regulations of the European directive for electromagnetic compatibility 2004/108/EC, the low voltage directive 2006/95/EC as well as the Ecodesign directive 2009/125/EC (Supplement 1275/2008 Appendix II, Nr.1) The complete original declaration of conformity can be obtained from the importer. Technical data Operational voltage Battery for data retention Power consumption V / 50 Hz 1 x 3 V Type CR2032 (supplied) Operation approx. 5 W Standby approx. 1.8 W Speaker power output: approx. 1W (with 10 % harmonic distortion) Radio frequency range (VHF) MHz Operating temperature C Humidity (no condensation) 5-90 % Measurements (H x W x D): (without stand) 4.9 x 22 x 12 cm Weight approx. 600 g Protection class II 25
28 Appendix GB Warranty With this device you receive a 3 year warranty from the date of purchase. The device has been manufactured with care and meticulously examined before delivery. Please retain your receipt as proof of purchase. In the case of a warranty claim, please get in touch, by telephone, with our service department. Only in this way can a post-free dispatch for your goods be assured. NOTICE The warranty adjustment is valid only for material or manufacturing defects not, however, for transport damage, wear and tear or for damage to breakable parts, i.e. switches or rechargeable batteries. The device is intended solely for private, non-commercial use. If this product has been subjected to improper or inappropriate handling, abuse, or modifi cations not carried out by one of our authorised sales and service outlets, the warranty becomes void. Your statutory rights are not restricted in any way by this warranty. The warranty period will not be extended as a result of warranty adjustments. This applies also to replacement and repaired parts. Possible damage and/or faults present at the time of purchase must be reported immediately after unpacking or, at the very latest, within two days after the purchase date. After expiry of the warranty period incidental repairs are subject to payment. Service Importer DES UK LTD Tel.: ( 0.10 / minute) support.uk@kompernass.com Kompernass Service Ireland Tel: (0,082 EUR/Min.) Standard call rates apply. Mobile operators may vary. support.ie@kompernass.com KOMPERNASS GMBH BURGSTRASSE BOCHUM, GERMANY 26
29 Spis treści Wprowadzenie Informacje o niniejszej instrukcji obsługi. 28 Prawo autorskie Użycie zgodne z przeznaczeniem...28 Wskazówki ostrzegawcze Bezpieczeństwo Niebezpieczeństwo porażenia prądem elektrycznym Postępowanie z bateriami Podstawowe wskazówki bezpieczeństwa 31 Elementy obsługowe Ustawianie i podłączanie Wskazówki bezpieczeństwa Zakres dostawy i przegląd po rozpakowaniu Rozpakowanie Utylizacja opakowania Wymagania dotyczące miejsca ustawienia Przyłącze elektryczne Wkładanie baterii Podwieszanie pod wiszącą szafką...35 Demontaż Ustawianie urządzenia Podłączanie do zasilania prądem Antena przewodowa UKW Obsługa i użytkowanie Włączanie i wyłączanie Ustawienia podstawowe Otwieranie menu ustawień Ustawianie godziny Ustawianie daty Regulacja jasności wyświetlacza Ustawianie funkcji przypominania Ustawianie formatu czasu Minutnik Ustawianie czasomierza kuchennego.40 Włączanie minutnika Przerywanie odliczania czasu na minutniku Programowanie minutnika Wyświetlanie czasu minutnika Programowanie czasów budzenia...43 Budzenie dźwiękiem alarmu Budzenie radiem Wyłączanie budzika Gdy nadejdzie czas budzenia Słuchanie radia Włączanie/wyłączanie radia Ustawianie głośności Ręczne wyszukiwanie stacji Wyszukiwanie następnej stacji Ręczne zapamiętywanie stacji Nastawianie zaprogramowanej stacji.46 Automatyczne wyszukiwanie stacji (funkcja AMS) Pozostałe funkcje Automatyczne wyłączanie (funkcja sleep) 47 Blokada przycisków Wzmacnianie tonów niskich Czyszczenie Wskazówki bezpieczeństwa Czyszczenie obudowy Usuwanie usterek Wskazówki bezpieczeństwa Przyczyny błędów i ich usuwanie Przechowywanie/Utylizacja..50 Przechowywanie Utylizacja urządzenia Utylizacja akumulatorów Załącznik Wskazówki dotyczące deklaracji zgodności WE Dane techniczne Gwarancja Serwis Importer PL
30 Wprowadzenie Wprowadzenie PL Informacje o niniejszej instrukcji obsługi Niniejsza instrukcja obsługi stanowi część radia podwieszanego (zwanego dalej urządzeniem) i zawiera ważne wskazówki dotyczące użytkowania zgodnie z przeznaczeniem, bezpieczeństwa, podłączania oraz obsługi urządzenia. Instrukcję obsługi należy przechowywać stale w pobliżu urządzenia. Instrukcję musi przeczytać każda osoba, która będzie się zajmowała obsługą i usuwaniem usterek urządzenia. Przechowuj instrukcję obsługi i w razie odsprzedaży radioodtwarzacza przekaż ją wraz z urządzeniem nowemu właścicielowi. Prawo autorskie Niniejsza dokumentacja jest prawnie chroniona. Wszelkie rozpowszechnianie, wzgl. przedruk, także we fragmentach, jak również odtwarzanie ilustracji, nawet w zmienionym stanie, wymaga uzyskania pismnej zgodny producenta. Użycie zgodne z przeznaczeniem Niniejsze urządzenie jest przeznaczone do odbioru programów radiowych UKF, posiada funkcję minutnika i budzika budzącego dzwonkiem alarmu lub radiem i jest przeznaczone wyłącznie do pracy w pomieszczeniach zamkniętych. Urządzenie jest przystosowane do stawiania i do powieszania pod szafką. Należy do tego użyć dołączonej podstawki wzgl. płytki montażowej. Inne lub wykraczające poza powyższe użytkowanie, uznaje się za niezgodne z przeznaczeniem. Urządzenie nie jest przeznaczone do zastosowań przemysłowych ani profesjonalnych. OSTRZEŻENIE Niebezpieczeństwo spowodowane użytkowaniem niezgodnie z przeznaczeniem! Użytkowanie urządzenia niezgodnie z jego przeznaczeniem i/lub inne wykorzystanie urządzenia może wiązać się z różnymi zagrożeniami. Urządzenie należy użytkować wyłącznie zgodnie z jego przeznaczeniem. Należy przestrzegać opisanych w niniejszej instrukcji obsługi metod postępowania. Wszelkie roszczenia z powodu szkód wynikających z użytkowania niezgodnie z przeznaczeniem, niefachowych napraw, niedozwolonych zmian i stosowania niedopuszczonych części zamiennych, wykluczone. Wszelkie ryzyko ponosi wyłącznie użytkownik. 28
31 Wprowadzenie Wskazówki ostrzegawcze W niniejszej instrukcji obsługi zastosowano następujące wskazówki ostrzegawcze: NIEBEZPIECZEŃSTWO Wskazówka ostrzegawcza o tym stopniu zagrożenia oznacza występowanie groźnej sytuacji. Stwarzanie takich niebezpiecznych sytuacji może doprowadzić do śmierci lub ciężkich obrażeń ciała. Informacje podawane w tej wskazówce ostrzegawczej mają na celu uniknięcie zagrożenia utraty życia lub odniesienia ciężkich obrażeń. PL OSTRZEŻENIE Wskazówka ostrzegawcza tego stopnia zagrożenia oznacza możliwą do wystąpienia sytuację niebezpieczną. W razie braku możliwości uniknięcia niebezpiecznej sytuacji, może to doprowadzić do odniesienia obrażeń. Instrukcje w niniejszej wskazówce ostrzegawczej stosuje się, by uniknąć odniesienia obrażeń osób. UWAGA Wskazówka ostrzegawcza tego stopnia zagrożenia oznacza możliwą szkodę materialna. W razie braku możliwości uniknięcia niebezpiecznej sytuacji, może to doprowadzić do szkód materialnych. Instrukcje w niniejszej wskazówce ostrzegawczej stosuje się, by uniknąć szkód materialnych. WSKAZÓWKA Wskazówka oznacza dodatkowe informacje, ułatwiające korzystanie z urządzenia. 29
32 Wprowadzenie PL Bezpieczeństwo W tym rozdziale znajdziesz ważne wskazówki bezpieczeństwa związane z użytkowaniem urządzenia. Niniejsze urządzenie jest zgodne z odpowiednimi przepisami bezpieczeństwa. Nieprawidłowe użytkowanie może prowadzić do szkód osobowych i materialnych. Niebezpieczeństwo porażenia prądem elektrycznym NIEBEZPIECZEŃSTWO Niebezpieczeństwo spowodowane prądem elektrycznym! Dotknięcie przewodów lub elementów znajdujących się pod napięciem stwarza śmiertelne niebezpieczeństwo! Przestrzeganie niniejszych wskazówek ostrzegawczych pozwoli ci uniknąć niebezpieczeństwa porażenia prądem elektrycznym: Nie używaj urządzenia, w którym uszkodzeniu uległa wtyczka lub kabel przyłączeniowy. Nigdy nie próbuj otwierać obudowy urządzenia. Niebezpieczeństwo porażenia prądem elektrycznym po dotknięciu przyłączy pod napięciem i konstrukcji elektrycznej i mechanicznej. Postępowanie z bateriami OSTRZEŻENIE Niebezpieczeństwo spowodowane nieprawidłowym użytkowaniem! Przestrzegaj następujących wskazówek bezpieczeństwa dotyczących bezpiecznego użytkowania: Nie wrzucać baterii do ognia. Nie zwieraj baterii. Nie próbuj ponownie ładować zużytych baterii. Regularnie sprawdzaj stan baterii. Kwas wylany z baterii może spowodować trwałe uszkodzenie urządzenia. Postępuj wyjątkowo ostrożnie podczas obchodzenia się z uszkodzonymi lub rozlanymi bateriami. Niebezpieczeństwo poparzenia! Zakładaj rękawice ochronne. Baterie przechowuj z dala od dzieci. W przypadku połknięcia niezwłocznie udaj się do lekarza. Podczas dłuższej przerwy w użytkowaniu urządzenia, wyjmij baterie. 30
33 Wprowadzenie Podstawowe wskazówki bezpieczeństwa Mając na uwadze bezpieczne użytkowanie urządzenia, przestrzegaj następujących wskazówek bezpieczeństwa: Przed przystąpieniem do użytkowania sprawdź, czy urządzenie nie jest nigdzie uszkodzone. Nie uruchamiaj uszkodzonego ani upuszczonego urządzenia. W przypadku uszkodzenia kabli lub przyłączy, zwróć się do autoryzowanego serwisu lub obsługi klienta w celu dokonania wymiany tych części na nowe. Osoby, które ze względu na swoje fi zyczne, umysłowe lub ruchowe upośledzenie nie są w stanie obsługiwać urządzenia, mogą to robić wyłącznie pod nadzorem i z pomocą drugiej osoby. Zezwalaj dzieciom na użytkowanie urządzenia wyłącznie pod nadzorem osoby dorosłej. Naprawy urządzenia zlecaj wyłącznie autoryzowanym serwisom lub obsłudze klienta. Niefachowo przeprowadzone naprawy mogą doprowadzić do zagrożeń dla użytkownika. Do tego można stracić gwarancję. Naprawy urządzenia w okresie trwania gwarancji zlecaj wyłącznie autoryzowanym serwisom, ponieważ w przeciwnym razie może dojść do utraty gwarancji. Uszkodzone elementy wymieniaj zawsze na oryginalne części zamienne. Tylko te części gwarantują odpowiednie bezpieczeństwo użytkowania urządzenia. Chroń urządzenie przed wilgocią i przedostaniem się do środka płynów. Nigdy nie wkładaj urządzenia pod wodę, nie stawiaj go w pobliżu wody, ani nie stawiaj na urządzeniu żadnych przedmiotów wypełnionych wodą (np. wazonów). Na urządzeniu nie stawiaj żadnych przedmiotów. Nie stawiaj urządzenia w pobliżu otwartych płomieni (np. świec). Chroń urządzenie przed bezpośrednim nasłonecznieniem. Przewód zasilający odłączaj z gniazdka zawsze za wtyczkę, nigdy nie ciągnij za kabel. W razie pojawienia się usterek oraz podczas burzy odłącz wtyczkę z gniazdka. PL 31
34 Elementy obsługowe Elementy obsługowe (ilustracje patrz rozkładana strona ilustracja A) PL Płytka montażowa/podstawka 2 Panel obsługi 3 Wyświetlacz 4 On/Off : włączanie/wyłączanie (radio) 5 AOT: stoper 6 Lock/Mem.: blokada przycisków/wybór miejsca pamięci 7 Bass/AMS/Mode: wzmacnianie tonów niskich/wyszukiwanie stacji/ otwieranie menu ustawień 8 Alarm 1: programowanie alarmu 1 9 Alarm 2: programowanie alarmu 2 10 Preset : wybieranie poprzedniego miejsca pamięci 11 Preset+: wybieranie następnego miejsca pamięci 12 Tune : częstotliwość odbioru w dół 13 Tune+: częstotliwość odbioru w górę 14 VOLUME/Snooze/Timer: regulacja głośności/wyłączanie alarmu/ ustawianie zegara czasowego 15 Antena przewodowa do odbioru UKF 16 Kabel przyłącza sieciowego 17 Otwory na podstawkę 18 Głośnik 19 Komora na baterie 20 Przyciski odryglowania płytki montażowej 32
35 Ustawianie i podłączanie Ustawianie i podłączanie Wskazówki bezpieczeństwa OSTRZEŻENIE Podczas uruchamiania urządzenia może dojść do szkód osobowych i materialnych! By uniknąć zagrożeń, przestrzegaj następujących wskazówek bezpieczeństwa: Elementów opakowania nie dawaj dzieciom do zabawy. Występuje zagrożenie uduszeniem! By uniknąć szkód osobowych i materialnych, przestrzegaj wskazówek dotyczących warunków wymaganych w miejscu użytkowania, jak również związanych z podłączaniem urządzenia do zasilania elektrycznego. PL Zakres dostawy i przegląd po rozpakowaniu Urządzenie jest wyposażone standardowo w następujące elementy: Radio podwieszane Płytka montażowa/podstawka 4 śruby mocujące 1 x bateria 3 V typu CR2032 Instrukcja obsługi Rozpakowanie WSKAZÓWKA Po rozpakowaniu nowego urządzenia sprawdź, czy w środku są wszystkie części. Braki elementów wyposażenia oraz szkody spowodowane niedostatecznym zabezpieczeniem lub powstałe podczas transportu prosimy zgłaszać na infolinię (zobacz rozdział Serwis). Wyjmij z kartonu wszystkie elementy urządzenia oraz instrukcję obsługi. Usuń wszystkie materiały opakowaniowe. 33
36 Ustawianie i podłączanie PL Utylizacja opakowania Opakowanie chroni urządzenie przed uszkodzeniami podczas transportu. W trosce o ochronę środowiska, wszystkie zastosowane elementy opakowania nadają się do ponownego przetworzenia. Zwracanie opakowania do obiegu materiałów oszczędza surowce naturalne i zmniejsza zanieczyszczenie odpadami. Zbędne materiały opakowania utylizuj zgodnie z obowiązującymi przepisami. WSKAZÓWKA W miarę możliwości zachowaj oryginalne opakowanie na czas trwania gwarancji, by w razie odsyłania urządzenia móc je prawidłowo zapakować. Wymagania dotyczące miejsca ustawienia W celu zapewnienia bezpiecznej i bezbłędnej pracy urządzenia, miejsce ustawienia urządzenia powinno spełniać następujące wymagania: Urządzenie z zamontowaną podstawką stawiaj na twardym, równym i poziomym podłożu. Urządzenie stawiaj lub montuj w taki sposób, by nie zasłaniać istniejących otworów wentylacyjnych i głośników. Nie używaj urządzenia w gorącym, mokrym lub bardzo wilgotnym miejscu ani w pobliżu łatwopalnych materiałów. Na powierzchniach mebli mogą się znajdować składniki działające niszcząco na gumowe podkładki urządzenia. W razie konieczności podłóż pod urządzenie stosowną matę. Gniazdko sieciowe musi być zlokalizowane w łatwo dostępnym miejscu, by w razie niebezpieczeństwa móc natychmiast odłączyć wtyczkę z gniazdka. Przyłącze elektryczne Przed podłączeniem urządzenia porównaj dane z tabliczki znamionowej (napięcie i częstotliwość) z danymi technicznymi sieci elektrycznej. Dane te muszą się zgadzać. Inaczej urządzenie mogłoby ulec uszkodzeniu. Upewnij się również, czy kabel przyłączeniowy urządzenia nie jest uszkodzony, ani też czy nie biegnie nag gorącymi powierzchniami i/lub ostrymi krawędziami. Zwracaj uwagę na to, by kabel nie był naprężony ani załamany. Nie zostawiaj kabla zwisającego nad narożnikami (niebezpieczeństwo potknięcia). 34
2N Voice Alarm Station
 2N Voice Alarm Station 2N Lift1 Installation Manual Version 1.0.0 www.2n.cz EN Voice Alarm Station Description The 2N Voice Alarm Station extends the 2N Lift1/ 2N SingleTalk with an audio unit installed
UŽIVATELSKÁ PŘÍRUČKA
 UŽIVATELSKÁ PŘÍRUČKA Plni víry a naděje míříme kupředu. S odhodláním zlepšujeme své dovednosti. Zapomeňte na zklamání, ale nikoli na svůj nevyužitý potenciál. Touha překonat sám sebe a dosáhnout hranice
UPM3 Hybrid Návod na ovládání Čerpadlo UPM3 Hybrid 2-5 Instruction Manual UPM3 Hybrid Circulation Pump 6-9
 www.regulus.cz UPM3 Hybrid Návod na ovládání Čerpadlo UPM3 Hybrid 2-5 Instruction Manual UPM3 Hybrid Circulation Pump 6-9 CZ EN UPM3 Hybrid 1. Úvod V továrním nastavení čerpadla UPM3 Hybrid je profil PWM
GUIDELINES FOR CONNECTION TO FTP SERVER TO TRANSFER PRINTING DATA
 GUIDELINES FOR CONNECTION TO FTP SERVER TO TRANSFER PRINTING DATA What is an FTP client and how to use it? FTP (File transport protocol) - A protocol used to transfer your printing data files to the MAFRAPRINT
Litosil - application
 Litosil - application The series of Litosil is primarily determined for cut polished floors. The cut polished floors are supplied by some specialized firms which are fitted with the appropriate technical
USER'S MANUAL FAN MOTOR DRIVER FMD-02
 USER'S MANUAL FAN MOTOR DRIVER FMD-02 IMPORTANT NOTE: Read this manual carefully before installing or operating your new air conditioning unit. Make sure to save this manual for future reference. FMD Module
ROLZ-2. Portable AV/Conference Center. Assembly Instructions
 1 ROLZ-2 Portable AV/Conference Center Assembly Instructions Rolz-2 Portable AV/Conference Center Part Drawing Description Qty Part Drawing Description Qty Hardware List A 1 ½ Flat Head Screw 2 EA P-1
2N LiftIP. Voice Alarm Station. Communicator for Lifts. Version
 2N LiftIP Communicator for Lifts Voice Alarm Station Version 2.4.0 www.2n.cz Description The 2N Voice Alarm Station is a switch that helps you extend 2N LiftIP with one or more audio units installed on
 If there is any inconsistency of weather forecast between Local Weather Station and this unit, the Local Weather Station's forecast should prevail. The trend pointer displayed on the LCD indicates the
User manual SŘHV Online WEB interface for CUSTOMERS June 2017 version 14 VÍTKOVICE STEEL, a.s. vitkovicesteel.com
 1/ 11 User manual SŘHV Online WEB interface for CUSTOMERS June 2017 version 14 2/ 11 Contents 1. MINIMUM SYSTEM REQUIREMENTS... 3 2. SŘHV ON-LINE WEB INTERFACE... 4 3. LOGGING INTO SŘHV... 4 4. CONTRACT
2N LiftIP. IO Extender. Communicator for Lifts. Version
 2N LiftIP Communicator for Lifts IO Extender Version 2.4.0 www.2n.cz Description The IO extender helps you extend 2N LiftIP with 1 input and 2 outputs. The purpose of the input is to cancel the rescue
Tento materiál byl vytvořen v rámci projektu Operačního programu Vzdělávání pro konkurenceschopnost.
 Tento materiál byl vytvořen v rámci projektu Operačního programu Vzdělávání pro konkurenceschopnost. Projekt MŠMT ČR Číslo projektu Název projektu školy Klíčová aktivita III/2 EU PENÍZE ŠKOLÁM CZ.1.07/1.4.00/21.2146
MA251 (cz_en) Operating instructions. MA251 (cz_en) Montážní návod. Krimpovací kleště PV-CZM... pro MC3, MC4 a MC4-EVO 2
 Operating instructions. MA251 (cz_en) Montážní návod. Krimpovací kleště PV-CZM... pro MC3, MC4 a MC4-EVO 2") MA251 (cz_en) Montážní návod Krimpovací kleště PV-CZM... pro MC3, MC4 a MC4-EVO 2 MA251 (cz_en) Operating instructions Crimping pliers PV-CZM... for MC3, MC4 and MC4-EVO 2 Obsah Bezpečnostní pokyny...2
MA251 (cz_en) Montážní návod Krimpovací kleště PV-CZM... pro MC3, MC4 a MC4-EVO 2 MA251 (cz_en) Operating instructions Crimping pliers PV-CZM... for MC3, MC4 and MC4-EVO 2 Obsah Bezpečnostní pokyny...2
 [KLICK] GB Instruction Manual POWERLINE 4 LIGHT FOREWORD Dear Customer, Thank you for purchasing the POWERLINE 4 LIGHT charger. These operating instructions will help you to get the best from your charger.
SPECIFICATION FOR ALDER LED
 SPECIFICATION FOR ALDER LED MODEL:AS-D75xxyy-C2LZ-H1-E 1 / 13 Absolute Maximum Ratings (Ta = 25 C) Parameter Symbol Absolute maximum Rating Unit Peak Forward Current I FP 500 ma Forward Current(DC) IF
Hi-Res Audio/DNC Headset MDR-NC750
 Uživatelská příručka Hi-Res Audio/DNC Headset MDR-NC750 Obsah Začínáme...3 Úvod...3 Přehled... 3 Základy práce...4 Nošení náhlavní soupravy...4 Připojení náhlavní soupravy k vašemu zařízení... 4 Nastavení
Uživatelská příručka. USB Charger UCH20
 Uživatelská příručka USB Charger UCH20 Obsah Úvod...3 USB Charger popis... 3 Používání nabíječky USB... 4 Nabíjení zařízení... 4 Právní informace... 5 Declaration of Conformity...6 2 Úvod USB Charger popis
TechoLED H A N D B O O K
 TechoLED HANDBOOK Světelné panely TechoLED Úvod TechoLED LED světelné zdroje jsou moderním a perspektivním zdrojem světla se širokými možnostmi použití. Umožňují plnohodnotnou náhradu žárovek, zářivkových
Uživatelská příručka. Xperia P TV Dock DK21
 Uživatelská příručka Xperia P TV Dock DK21 Obsah Úvod...3 Přehled zadní strany stanice TV Dock...3 Začínáme...4 Správce LiveWare...4 Upgradování aplikace Správce LiveWare...4 Použití stanice TV Dock...5
Návod k obsluze a montáži N129/R04 (10.03.14 ) SUŠÁK NA RUCE
 SUŠÁK NA RUCE") Návod k obsluze a montáži N129/R04 (10.03.14 ) SUŠÁK NA RUCE Čtěte prosím pozorně informace uvedené v tomto návodu, který obsahuje důležité pokyny pro bezpečnou montáž, použití a údržbu jednotky. Uchovávejte
Návod k obsluze a montáži N129/R04 (10.03.14 ) SUŠÁK NA RUCE Čtěte prosím pozorně informace uvedené v tomto návodu, který obsahuje důležité pokyny pro bezpečnou montáž, použití a údržbu jednotky. Uchovávejte
ADDRESS CONVERSION TABLE FOR MANUAL SETTING
 - (06-57) - ADDRESS CVERSI TABLE FOR MANUAL SETTING In the case of a multiple refrigerant system, each refrigerant system should be set an exclusive refrigerant. Conversion table of refrigerant and rotary
Izolační manipulační tyče typ IMT IMT Type Insulated Handling Rod
 KATALOG CATALOGUE 024/09/2011 IZOLAČNÍ MANIPULAČNÍ TYČ INSULATED HANDLING ROD TYP IMT KOVOVÁ MANIPULAČNÍ TYČ METALLIC HANDLING ROD TYP KMT ISO 9001:2009 ISO 14001:2005 Izolační manipulační tyče typ IMT
ROLZ-2. Portable AV/Conference Center. Assembly Instructions
 1 ROLZ-2 Portable AV/Conference Center Assembly Instructions Rolz-2 Portable AV/Conference Center Part Drawing Description Qty Part Drawing Description Qty Hardware List A 1 ½ Flat Head Screw 2 EA P-1
Technical data Supply voltage: 230V 50/60Hz 120V AC 24V AC/DC
 LEXIC Time switch MicroRex D11 NT 29 17 97 02 GB Operating instructions afty notes Technical data 037 00 037 93 94 41 07 upply voltage: 230V 50/60Hz 120V AC 24V AC/DC Consumption: ca. 1W Contact rating:
Mechanika Teplice, výrobní družstvo, závod Děčín TACHOGRAFY. Číslo Servisní Informace Mechanika: 5-2013
 Mechanika Teplice, výrobní družstvo, závod Děčín TACHOGRAFY Servisní Informace Datum vydání: 20.2.2013 Určeno pro : AMS, registrované subj.pro montáž st.měř. Na základě SI VDO č./datum: Není Mechanika
Popis tlačítek a funkcí: Dálkový ovladač: CZ - 2
 NÁVOD K POUŽITÍ CD/Radio přehrávač NÁVOD NA POUŽITIE Radio/CD prehrávač INSTRUCTION MANUAL CD/Radio player Popis tlačítek a funkcí: 1) Hlavní vypínač: krátký stisk zapne přístroj, opětovný krátký stisk
INSTALAČNÍ NÁVOD OPERATING INSTRUCTION
 LED PRODISC II + LED PRODISC II MINI + LED PRODISC II MAXI INSTALAČNÍ NÁVOD OPERATING INSTRUCTION 4000944x 4000945x 4000940x 4000941x 4000946x 4000947x Prodisc II Mini Prodisc II Mini + MW senzor Prodisc
Introduction to MS Dynamics NAV
 Introduction to MS Dynamics NAV (Item Charges) Ing.J.Skorkovský,CSc. MASARYK UNIVERSITY BRNO, Czech Republic Faculty of economics and business administration Department of corporate economy Item Charges
Standardní záruka. http://www.alliedtelesis.cz/support/warranty/signup.aspx
 Standardní záruka Standardní produkty (Enterprise)» Switches» Routers» Converters» NICs, SFPs Operátorské produkty (NSP)» imgs» imaps» 3rd party (Extricom) Bez registrace 2 roky od prodeje koncovému zákazníkovi
Light (glass base with power cord and Ehmann dimmer, reflector, glass globe), light source, cotton gloves, installation manual
, light source, cotton gloves, installation manual") Package contents Name: BALLOONS PC858 Table light 607 850 Components included with unit: Light (glass base with power cord and Ehmann dimmer, reflector, glass globe), light source, cotton gloves, installation
Package contents Name: BALLOONS PC858 Table light 607 850 Components included with unit: Light (glass base with power cord and Ehmann dimmer, reflector, glass globe), light source, cotton gloves, installation
:= = := :=.. := := := := ρ := := α := π α = α = := = :=
 := = := :=.. := := := := ρ := := α := π α = α = := = := := α := α := = := α := := α = = ρ ρ := := := = := = := := := + + := + + := + := := := := + + := + + := + = = = :=.. := η := η := := π = :=.. :=,
Presenter SNP6000. Register your product and get support at CS Příručka pro uživatele
 Register your product and get support at www.philips.com/welcome Presenter SNP6000 CS Příručka pro uživatele 1 a b c d e 2 3 4 Federal Communication Commission Interference Statement This equipment has
1-AYKY. Instalační kabely s Al jádrem. Standard TP-KK-133/01, PNE 347659-3. Konstrukce. Použití. Vlastnosti. Installation cables with Al conductor
 Instalační kabely s Al jádrem Installation cables with Al conductor Standard TP-KK-133/01, PNE 347659-3 4 3 2 1 Konstrukce Construction 1 Hliníkové jádro Aluminium conductor 2 Izolace PVC 3 Výplňový obal
Amp1.
 Amp1 www.evolveo.com Vážený zákazníku, děkujeme, že jste si vybral produkt EVOLVEO Amp 1. Adaptér: DC 5 V 550 ma AC 220-240 V Funkce zesilovače: Zesílení přijímaného signálu až o 20dB pro všechny pasivní
Buderus System Logatherm Wps K
 Buderus System Logatherm Wps K XV1100K(C)/XV1100SK(C) All rights reserverd. Any reprinting or unauthorized use wihout the written permission of Buderus System Logatherm Wps K Corporation, is expressly
AIC ČESKÁ REPUBLIKA CZECH REPUBLIC
 ČESKÁ REPUBLIKA CZECH REPUBLIC ŘÍZENÍ LETOVÉHO PROVOZU ČR, s.p. Letecká informační služba AIR NAVIGATION SERVICES OF THE C.R. Aeronautical Information Service Navigační 787 252 61 Jeneč A 1/14 20 FEB +420
2N Lift8 Audio unit machine room
 2N Lift8 Audio unit machine room Brief Manual Version 3.0.0 www.2n.cz The machine room audio unit is intended for installation in the machine room or as an intercom solution located in the reception.
Plantronics Explorer 50. Návod k obsluze
 Plantronics Explorer 50 Návod k obsluze Obsah Vítejte 3 Obsah balení 4 Přehled náhlavní soupravy 5 Buďte opatrní 5 Pair and Charge 6 Get Paired 6 Activate pair mode 6 Use two phones 6 Reconnect 6 Charge
FIRE INVESTIGATION. Střední průmyslová škola Hranice. Mgr. Radka Vorlová. 19_Fire investigation CZ.1.07/1.5.00/
 FIRE INVESTIGATION Střední průmyslová škola Hranice Mgr. Radka Vorlová 19_Fire investigation CZ.1.07/1.5.00/34.0608 Výukový materiál Číslo projektu: CZ.1.07/1.5.00/21.34.0608 Šablona: III/2 Inovace a zkvalitnění
USER'S MANUAL FAN MOTOR DRIVER FMD-01, FMD-03
 USER'S MANUAL FAN MOTOR DRIVER FMD-01, FMD-03 IMPORTANT NOTE: Read this manual carefully before installing or operating your new air conditioning unit. Make sure to save this manual for future reference.
SERVICE ADVISORY SA-5A
 V510 PROPELLER TYPE SERIES REPLACEMENT OF BLADE BEARING SEAL VRTULE TYPOVÉ ŘADY V510 VÝMĚNA TĚSNÍCÍ MANŽETY ULOŽENÍ LISTU 1. GENERAL A. This document provides disassembly and assembly procedure in the
PC/104, PC/104-Plus. 196 ept GmbH I Tel. +49 (0) / I Fax +49 (0) / I I
 / I Fax +49 (0) / I I") E L E C T R O N I C C O N N E C T O R S 196 ept GmbH I Tel. +49 (0) 88 61 / 25 01 0 I Fax +49 (0) 88 61 / 55 07 I E-Mail sales@ept.de I www.ept.de Contents Introduction 198 Overview 199 The Standard 200
E L E C T R O N I C C O N N E C T O R S 196 ept GmbH I Tel. +49 (0) 88 61 / 25 01 0 I Fax +49 (0) 88 61 / 55 07 I E-Mail sales@ept.de I www.ept.de Contents Introduction 198 Overview 199 The Standard 200
harvia griffin COLOUR LIGHT Control unit Ridici jednotka
 harvia griffin COLOUR LIGHT Control unit Ridici jednotka 13082008 These instructions for installation and use are intended for owners of colour light units and control units and for electricians responsible
SERVISNÍ MANUÁL PEGAS 250 E CEL OVO SERVICE MANUAL PEGAS 250 E CEL OVO
 MG136-1 PEGAS 250 E CEL OVO SERVICE MANUAL page 1 SERVISNÍ MANUÁL PEGAS 250 E CEL OVO SERVICE MANUAL PEGAS 250 E CEL OVO 1. VAROVÁNÍ WARNING UPOZORNĚNÍ Pouze osoba splňující kvalifikaci danou zákonem je
 11.12. 100 ΕΙΣΟΔΟΣ = E / ENTRANCE = E = = 1174 550 ΤΥΠΟΠΟΙΗΜΕΝΟ ΚΥ = 2000 (ΕΠΙΛΟΓΗ: 2100) / CH STANDARD = 2000 (OPTIONAL: 2100) 243 50 ΚΥ/CH + 293 ΚΥ/CH +103 100 ΚΥ /CH 6 11 6 20 100 0,25 ΚΑ (CO) + 45
Gymnázium, Brno, Slovanské nám. 7 WORKBOOK. Mathematics. Teacher: Student:
 WORKBOOK Subject: Teacher: Student: Mathematics.... School year:../ Conic section The conic sections are the nondegenerate curves generated by the intersections of a plane with one or two nappes of a cone.
Návod na použití, montáž a údržbu Třícestný zónový kulový ventil s pohonem VZK 3xx - 230-1P - 001
 ávod na použití, montáž a údržbu Třícestný zónový kulový ventil s pohonem VZK 3xx - 230-1P - 001 CZ verze 1.0 1 POUŽITÍ Ventily s pohonem řady VZK 3xx - 230-1P mohou být použity ve spojení s jakýmkoliv
PITSTOP VY_22_INOVACE_26
 PITSTOP VY_22_INOVACE_26 Vzdělávací oblast: Jazyk a jazyková komunikace Vzdělávací obor: Anglický jazyk Ročník: 9. PITSTOP 1/ Try to complete the missing words. Then listen and check your ideas. Eight
obal manuálu, asi něco podobného jako u LC 100 asi by to chtělo lepší obrázek!!! FYTOSCOPE FS130 Instruction Guide
 obal manuálu, asi něco podobného jako u LC 100 asi by to chtělo lepší obrázek!!! FYTOSCOPE FS130 Instruction Guide možná tohle trochu zmenšit a dát sem i to varování LED RADIATION co je na další straně
Projekt: ŠKOLA RADOSTI, ŠKOLA KVALITY Registrační číslo projektu: CZ.1.07/1.4.00/21.3688 EU PENÍZE ŠKOLÁM
 ZÁKLADNÍ ŠKOLA OLOMOUC příspěvková organizace MOZARTOVA 48, 779 00 OLOMOUC tel.: 585 427 142, 775 116 442; fax: 585 422 713 email: kundrum@centrum.cz; www.zs-mozartova.cz Projekt: ŠKOLA RADOSTI, ŠKOLA
STORAGE, TRANSPORTATION, HANDLING MANUAL D0141.STHM.01
 STORAGE, TRANSPORTATION, HANDLING MANUAL GENERÁTOROVÉ ROZVÁDĚCÍ SKŘÍNĚ VN - PRIMÁRNÍ ROZVOD, VNITŘNÍ / VENKOVNÍ PROVEDENÍ GENERATOR MV SWITCHGEAR PRIMARY DISTRIBUTION, INDOOR / OUTDOOR DESIGN ISO 9001:2009
Quick Start Guide. Clear. Rychlý průvodce nastavením
 CZ EN Quick Start Guide Clear Rychlý průvodce nastavením Measurement Měření Před Fully prvním charge použitím the blood plně pressure dobijte monitor baterii before přístroje. first use. 1 Rest your bare
DATA SHEET. BC516 PNP Darlington transistor. technický list DISCRETE SEMICONDUCTORS Apr 23. Product specification Supersedes data of 1997 Apr 16
 zákaznická linka: 840 50 60 70 DISCRETE SEMICONDUCTORS DATA SHEET book, halfpage M3D186 Supersedes data of 1997 Apr 16 1999 Apr 23 str 1 Dodavatel: GM electronic, spol. s r.o., Křižíkova 77, 186 00 Praha
Vánoční sety Christmas sets
 Energy news 7 Inovace Innovations 1 Vánoční sety Christmas sets Na jaře tohoto roku jste byli informováni o připravované akci pro předvánoční období sety Pentagramu koncentrátů a Pentagramu krémů ve speciálních
Název společnosti: VPK, s.r.o. Vypracováno kým: Ing. Michal Troščak Telefon: Datum:
 Pozice Počet Popis 1 SCALA2 3-45 A Datum: 2.7.217 Výrobní č.: 98562862 Grundfos SCALA2 is a fully integrated, self-priming, compact waterworks for pressure boosting in domestic applications. SCALA2 incorporates
Návod na použití, montáž a údržbu Třícestný kulový ventil s pohonem (s možností směšování) VZK-S 3xx - 230-2P - 001
 VZK-S 3xx - 230-2P - 001") ávod na použití, montáž a údržbu Třícestný kulový ventil s pohonem (s možností směšování) VZK-S 3xx - 230-2P - 001 CZ verze 1.0 1 POUŽITÍ Ventily s pohonem řady VZK-S 3xx - 230-2P mohou být použity ve
ávod na použití, montáž a údržbu Třícestný kulový ventil s pohonem (s možností směšování) VZK-S 3xx - 230-2P - 001 CZ verze 1.0 1 POUŽITÍ Ventily s pohonem řady VZK-S 3xx - 230-2P mohou být použity ve
ZÓNOVÉ VENTILY S VRATNOU PRUŽINOU dvoucestné VZP 2XX 230 1P 001 třícestné VZP 3XX 230 1P 001
 Návod na instalaci a použití ZÓNOVÉ VENTILY S VRATNOU PRUŽINOU dvoucestné VZP 2XX 230 1P 001 třícestné VZP 3XX 230 1P 001 CZ verze 1.2 Popis: Zónové ventily s vratnou pružinou jsou určeny do hydraulických
AUTOMATICKÝ DÁVKOVAČ Harvia. Návod na instalaci a použití instructions for installation and Use
 AUTOMATICKÝ DÁVKOVAČ Harvia Návod na instalaci a použití instructions for installation and Use 15122011 CZ EN 1. OBECNÉ INFORMACE 1. GENEraL Účelem Harvia automatického dávkovače je aplikovat vodu a směs
Postup objednávky Microsoft Action Pack Subscription
 Postup objednávky Microsoft Action Pack Subscription DŮLEŽITÉ: Pro objednání MAPS musíte být členem Microsoft Partner Programu na úrovni Registered Member. Postup registrace do Partnerského programu naleznete
Lenovo A5000. Quick Start Guide v1.0. English/Česky
 Lenovo A5000 Quick Start Guide v1.0 English/Česky English Read this guide carefully before using your smartphone. Learning more Getting support Electronic emission notices To learn more information about
Připojení internetového modulu econet300 Do regulátoru ecomax 810P3-L TOUCH.
 Připojení internetového modulu econet300 Do regulátoru ecomax 810P3-L TOUCH. Connection of econet300 internet module to ecomax 810P3-L TOUCH Controller. Prosím ověřte verzi softwaru vašeho modulu ecomax.
Instalace Pokyny pro instalaci v operačním systému Windows XP / Vista / Win7 / Win8
 Instalace Pokyny pro instalaci v operačním systému Windows XP / Vista / Win7 / Win8 1. Stáhněte si instalační program HOST makro engine z oficiálního webu IABYTE. 2. Spusťte instalační program a postupujte
Název společnosti: VPK, s.r.o. Vypracováno kým: Ing. Michal Troščak Telefon: Datum:
 Počet 1 SCALA2 3-45 A Datum: 2.7.217 Výrobní č.: 98562862 Grundfos SCALA2 is a fully integrated, self-priming, compact waterworks for pressure boosting in domestic applications. SCALA2 incorporates integrated
Pokyny k použití. Model-300. Napájecí zdroj. Návod na obsluhu Operating Instructions. se systémem Aquacontrol Napájací zdroj
 Pokyny k použití Model-300 Návod na obsluhu Operating Instructions Napájecí zdroj se systémem Napájací zdroj so systémom Power Supply with System BK 0011900 / PC AQUACONTROL Kryt aquacontrol Kryt aquacontrol
Název společnosti: VPK, s.r.o. Vypracováno kým: Ing. Michal Troščak Telefon: Datum:
 Pozice Počet Popis 1 ALPHA2 25-6 18 Výrobní č.: 9799321 AUTOADAPT function automatically finds the best setpoint and thus reduces the energy consumption and setup time. Insulating shells are supplied with
WL-5480USB. Quick Setup Guide
 Quick Setup Guide 1 Czech 7 Install Utility Software Note1: Before installing the utility software, DO NOT inserts the into your computer. If the adapter is inserted already, Windows will detect the adapter
S113 BT Welcome Guide
 www.arctic.ac S113 BT Welcome Guide EN DE FR ES... support.arctic.ac/s113bt Dear Customer, Thank you for choosing the ARCTIC S113 BT. This smart little box allows you to bring your music wherever you go.
W3500, W3600. Parts Catalogue Seznam dílù
 PØEDNÍ ZÁVÌS FORE HANGINGS W3500, W3600 Parts Catalogue Seznam dílù 10-2009 WISCONSIN Engineering CZ s.r.o. Vrahovická 41, 796 01 PROSTÌJOV CZECH REPUBLIC Tel: +420 582 401 915 Fax: +420 582 401 919 E-mail:
Size / Světlost : DN 1/4 to 4 / DN 1/4 až 4
 Size / Světlost : 1/4 to 4 / 1/4 až 4 Ends / Konce : Threaded BSP / Závitové BSP Min. Temperature / Minimální teplota : -20 C Max. Temperature / Maximální teplota : +180 C Max. Pressure / Maximální tlak
INSTALLATION MANUAL PD 0027.01
 INSTALLATION MANUAL PD 0027.01 OUTDOOR MOTOR DRIVE FOR MV DISCONNECTORS ISO 9001:2009 ISO 14001:2005 OHSAS 18001:2008 TYPE SUP a) STORAGE / SKLADOVÁNÍ The packed devices on wooden pallet it is not allowed
AKTIVACE. Nabíjení Před prvním použitím nechte chytrý náramek nabíjet po dobu 45 minut. Vysuňte zařízení z náramku.
 116HR COLOR AKTIVACE Nabíjení Před prvním použitím nechte chytrý náramek nabíjet po dobu 45 minut. Vysuňte zařízení z náramku. Připojte do USB nabíječky (5V 1A). Nabíjet lze jen z jedné strany. Pokud se
GENERAL INFORMATION RUČNÍ POHON MANUAL DRIVE MECHANISM
 KATALOG CATALOGUE RUČNÍ POHONY PRO VENKOVNÍ PŘÍSTROJE, MONTÁŽ NA BETONOVÉ SLOUPY MANUAL DRIVE MECHANISM FOR THE ACTUATION OF OUTDOOR TYPE SWITCHING DEVICES MOUNTED ON THE CONCRETE POLES TYP RPV ISO 9001:2009
Transportation Problem
 Transportation Problem ١ C H A P T E R 7 Transportation Problem The transportation problem seeks to minimize the total shipping costs of transporting goods from m origins (each with a supply s i ) to n
Get started Začínáme Začíname
 Get started Začínáme Začíname Get started Začínáme Začíname 1 Insert the included AA batteries before proceeding with the installation. Před zahájením instalace vložte přiložené baterie AA. Pred začatím
MP3/CD CAR RADIO. Operating instructions. Návod k obsluze. Návod na obsluhu MP3/CD CAR RADIO AUTORÁDIO S PŘEHRÁVAČEM MP3 A CD AUTORÁDIO MP3-CD KH 2382
 4B MP3/CD CAR RADIO Operating instructions Návod k obsluze Návod na obsluhu GB CZ SK MP3/CD CAR RADIO AUTORÁDIO S PŘEHRÁVAČEM MP3 A CD AUTORÁDIO MP3-CD KOMPERNASS GMBH BURGSTRASSE 21 D-44867 BOCHUM www.kompernass.com
Bluetooth Car Radio SAB 160 A1
 4 Bluetooth Car Radio KOMPERNASS GMBH BURGSTRASSE 21 D-44867 BOCHUM www.kompernass.com ID-Nr.: SAB160A1-05/11-V3 IAN: 66837 Bluetooth Car Radio Operating instructions Bluetooth autórádió Használati utasítás
Installation and Operation Manual Before operating the unit, please read this manual thoroughly and retain it for future reference!
 EN Wireless Analog Camera (ANL-01-BZ) Installation and Operation Manual Before operating the unit, please read this manual thoroughly and retain it for future reference! 1. Features 640 x 480 Video resolution
EXACT DS OFFICE. The best lens for office work
 EXACT DS The best lens for office work EXACT DS When Your Glasses Are Not Enough Lenses with only a reading area provide clear vision of objects located close up, while progressive lenses only provide
Vypsání závodu / Notice of Race strana/page 1/5. Compotech Cup. v lodních třídách / in classes. D-One, 7P CTL 161315
 Vypsání závodu / Notice of Race strana/page 1/5 Compotech Cup v lodních třídách / in classes D-One, 7P CTL 161315 Datum / date: 04.06.2016 05.06.2016 místo konání : Kemp Jestřábí 1, Lipno Černá v Pošumaví
DVM CHILLER. Installation manual. Module control MCM-A00N
 Installation manual Module control MCMA00N Thank you for purchasing this Samsung air conditioner. Before operating this unit, please read this installation manual carefully and retain it for future reference.
Uživatelská příručka. Mono Bluetooth Headset MBH10
 Uživatelská příručka Mono Bluetooth Headset MBH10 Obsah Přehled funkcí...3 Přehled příslušenství...4 Základní postupy...5 Nabíjení baterie...5 Zapnutí a vypnutí náhlavní soupravy...5 Párování náhlavní
Vypracováno: Telefon:
 Počet Popis ALPHA2 25-8 8 Výrobní č.: 98649757 Pozn.: obr. výrobku se může lišit od skuteč. výrobku AUTOADAPT function automatically finds the best setpoint and thus reduces the energy consumption and
SERVICE MANUAL PEGAS 250 E CEL SERVISNÍ MANUÁL PEGAS 250 E CEL
 MG-011-05 PEGAS 250 E CEL SERVICE MANUAL page 1 SERVISNÍ MANUÁL PEGAS 250 E CEL SERVICE MANUAL PEGAS 250 E CEL 1. VAROVÁNÍ WARNING UPOZORNĚNÍ Pouze osoba splňující kvalifikaci danou zákonem je oprávněna
CZ EN SK. U-Smart. WiFi Desk Lamp
 CZ EN SK U-Smart WiFi Desk Lamp U-Smart WiFi Desk Lamp CZ časovač EN timer SK časovač CZ tlačítko M EN M button SK tlačidlo M CZ tlačítko ON/OFF EN ON/OFF button SK tlačidlo ON/OFF CZ Kliknutím na tlačítko
Radiova meteoricka detekc nı stanice RMDS01A
 Radiova meteoricka detekc nı stanice RMDS01A Jakub Ka kona, kaklik@mlab.cz 15. u nora 2014 Abstrakt Konstrukce za kladnı ho softwarove definovane ho pr ijı macı ho syste mu pro detekci meteoru. 1 Obsah
3 Výplňový obal. 4 Plášť PE. Bedding
 Instalační kabely s Al jádrem Installation cables with Al conductor Standard VDE0276 T.603-5G-2 4 3 2 1 Konstrukce Construction 1 Hliníkové jádro Aluminium conductor 2 Izolace XLPE XLPE insulation 3 Výplňový
VY_32_INOVACE_06_Předpřítomný čas_03. Škola: Základní škola Slušovice, okres Zlín, příspěvková organizace
 VY_32_INOVACE_06_Předpřítomný čas_03 Autor: Růžena Krupičková Škola: Základní škola Slušovice, okres Zlín, příspěvková organizace Název projektu: Zkvalitnění ICT ve slušovské škole Číslo projektu: CZ.1.07/1.4.00/21.2400
Czech Republic. EDUCAnet. Střední odborná škola Pardubice, s.r.o.
 Czech Republic EDUCAnet Střední odborná škola Pardubice, s.r.o. ACCESS TO MODERN TECHNOLOGIES Do modern technologies influence our behavior? Of course in positive and negative way as well Modern technologies
20 ka / 1 s (dle typu cívky) přirozené
 přirozené") KATALOG CATALOGUE 051/03/2013 VÝKONOVÝ REAKTOR NN, NASTAVITELNÝ LOW VOLTAGE POWER REACTOR COIL, ADJUSTABLE pro napětí do 1000 V for voltages up to 1000V TYP LNN ISO 9001:2009 ISO 14001:2005 VŠEOBECNĚ Výkonový
KATALOG CATALOGUE 051/03/2013 VÝKONOVÝ REAKTOR NN, NASTAVITELNÝ LOW VOLTAGE POWER REACTOR COIL, ADJUSTABLE pro napětí do 1000 V for voltages up to 1000V TYP LNN ISO 9001:2009 ISO 14001:2005 VŠEOBECNĚ Výkonový
3 Výplňový obal. 4 Plášť PE. Bedding
 Instalační kabely s Al jádrem Installation cables with Al conductor Standard TP-KK-145/03 4 3 2 1 Konstrukce Construction 1 Hliníkové jádro Aluminium conductor 2 Izolace XLPE XLPE insulation 3 Výplňový
4Ever H A N D B O O K
 4Ever HANDBOOK Kancelářský systém 4Ever Úvod Základními stavebními komponenty podnoží jsou bočnice a podélné nosníky. Bočnice je tvořena nohami čtvercového průřezu 45 x 45 mm, spojovacím vodorovným bočním
3 Výplňový obal. 4 Plášť PE. Bedding
 Instalační kabely s Cu jádrem Installation cables with Cu conductor Standard VDE0276 T.603-5G-2 4 3 2 1 Konstrukce Construction 1 Měděné jádro Copper conductor 2 Izolace XLPE XLPE insulation 3 Výplňový
Fytomineral. Inovace Innovations. Energy News 04/2008
 Energy News 4 Inovace Innovations 1 Fytomineral Tímto Vám sdělujeme, že již byly vybrány a objednány nové lahve a uzávěry na produkt Fytomineral, které by měly předejít únikům tekutiny při přepravě. První
2N Lift8 Audio unit shaft
 2N Lift8 Audio unit shaft Brief Manual Version 3.0.0 www.2n.cz This audio unit is designed for installation on the lift shaft bottom or lift cabin roof, or wherever it is necessary to communicate (during
Invitation to ON-ARRIVAL TRAINING COURSE for EVS volunteers
 Invitation to ON-ARRIVAL TRAINING COURSE for EVS volunteers (český text pro hostitelské organizace následuje na str. 3) 6.11. 11.11. 2015 Hotel Kaskáda, Ledeč nad Sázavou Husovo nám. 17, 584 01 Ledeč nad
GENERAL INFORMATION MATCH: ALSA PRO ARENA MASTERS DATE: TIME SCHEDULE:
 GENERAL INFORMATION MATCH: ALSA PRO ARENA MASTERS DATE: 22.9. - 23.9.2018 TIME SCHEDULE: Mainmatch 1 - Saturday 22.9. registration: 22.9.2018-9.00h first shot: 22.9.2018-10.00h Mainmatch 2 - Sunday 23.9.
Zubní pasty v pozměněném složení a novém designu
 Energy news4 Energy News 04/2010 Inovace 1 Zubní pasty v pozměněném složení a novém designu Od října tohoto roku se začnete setkávat s našimi zubními pastami v pozměněném složení a ve zcela novém designu.
UŽIVATELSKÁ PŘÍRUČKA. Uninterruptible Power System. Line-Interactive Network UPS 400VA / 500VA / 600VA / 800VA. Obsah:
 Obsah: IMPORTANT SAFETY INSTRUCTIONS. CHYBA! ZÁLOŽKA NENÍ DEFINOVÁNA. Uninterruptible Power System INTRODUCTION... CHYBA! ZÁLOŽKA NENÍ DEFINOVÁNA. 1.PRESENTATION...3 2.INSTALLATION...4 3.OPERATION...4
2N Helios Vario departure switch
 Description 2N Helios Vario departure switch Order no. 9135251E The purpose of this module is to extend the 2N Helios Vario door communicator with another switch, e.g., for switching the electric door
Instalační kabely s koncentrickým vodičem a Cu jádrem
 Instalační kabely s koncentrickým vodičem a Cu jádrem Installation screened cables with Cu conductor NYCWY 0,6/1 kv Standard VDE 0276 T.603-3G-1 5 4 3 2 1 Konstrukce Construction 1 Měděné jádro Copper