GPS 7,2V LI-IO # Copyright Güde GmbH & Co. KG - Birkichstrasse Wolpertshausen - Germany
|
|
|
- Pavel Pešan
- před 6 lety
- Počet zobrazení:
Transkript


1 GPS 7,2V LI-IO Deutsch English Français Čeština Slovenčina Magyar Nederlands Italiano # Copyright Güde GmbH & Co. KG - Birkichstrasse Wolpertshausen - Germany


2 A B 2


3 C D 3


4 E a F 4


5 G a b c H 5


6 I 6
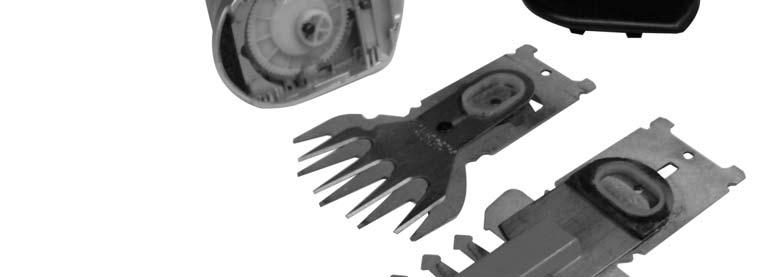
7 DE Lesen Sie bitte diese Bedienungsanleitung sorgfältig durch, bevor Sie das Gerät in Betrieb nehmen. A.V. 2 Nachdrucke, auch auszugsweise, bedürfen der Genehmigung. Technische Änderungen vorbehalten. Abbildungen beispielhaft!!! DE Sie haben technische Fragen? Eine Reklamation? Benötigen Ersatzteile oder eine Bedienungsanleitung? Auf der Homepage der Firma Güde GmbH & Co. KG ( im Bereich Service helfen wir Ihnen schnell und unbürokratisch weiter. Bitte helfen Sie uns Ihnen zu helfen. Um Ihr Gerät im Reklamationsfall identifizieren zu können benötigen wir die Seriennummer sowie Artikelnummer und Baujahr. Alle diese Daten finden Sie auf dem Typenschild. Um diese Daten stets zur Hand zu haben, tragen Sie diese bitte unten ein. Seriennummer: Artikelnummer: Baujahr: support@ts.guede.com Gerät AKKU-GARTENPFLEGE-SET GPS 7,2V LI-ION Komplett mit Teleskop-Verlängerung und Fahrwerk (Grasschere). Marken-Akku (Samsung), durch einfaches, werkzeugloses Umstecken als Grasschere oder Strauchschere einsetzbar. Inklusiv 3-5 Std. Batterielader. Drehbarer Handgriff (5-fach-Raster). Teleskop- Verlängerung hervorragend geeignet für größere Sträucher und leichtere Hecken bei Verwendung des Strauchscheren- Vorsatzes. Grasschere mit Fahrwerk für bequemes Grasscheren in aufrechter Haltung, Softgriff. Bestimmungsgemäße Verwendung Das Gerät ist zum Schneiden von Rasenkanten und kleineren Grasflächen im privaten Haus- und Hobbygarten bestimmt. Das Gerät darf nicht zum Zerkleinern von Kompostmaterial verwendet werden, da Personen- oder Sachschäden auftreten könnten. Das Gerät darf nur nach seiner Bestimmung verwendet werden. Jede weitere darüber hinausgehende Verwendung ist nicht bestimmungsgemäß. Für daraus hervorgerufene Schäden oder Verletzungen aller Art haftet der Benutzer/Bediener und nicht der Hersteller. Lieferumfang und Gerätebeschreibung (Bild A) 1. Grasschneidmesser 2. Räder 3. Einschaltsperre 4. Einschalttaste 5. Teleskop-Führungsholm 6. Teleskopverschraubung 7. Führungsgriff 8. Geräteaufnahme 9. Messerschutz 10. Ladegerät 11. Strauchmesser DE EG-Konformitätserklärung Güde GmbH & Co. KG Birkichstraße Wolpertshausen - Germany, daß die nachfolgend bezeichneten Geräte aufgrund ihrer Konzipierung und Bauart sowie in den von uns in Verkehr gebrachten Ausführungen den einschlägigen, grundlegenden Sicherheits- und Gesundheitsanforderungen der EG-Richtlinien entsprechen. Bei einer nicht mit uns abgestimmten Änderung der Geräte verliert diese Erklärung ihre Gültigkeit. Bezeichnung der Geräte: GPS 7,2V LI-IO Artikel-Nr.: Datum/Herstellerunterschrift: Angaben zum Unterzeichner: Hr. Arnold, Geschäftsführer Technische Dokumentation: J. Bürkle FBL; QS Einschlägige EG-Richtlinien: 2006/42 EG 2006/95 EC 2004/108 EG 2000/14 EG 2002/95/EC (RoHS) REACH EG-VO Nr. 1907/2006 Angewandte harmonisierte Normen: EN :2002+A1+A11+A12+A2 EN /A2:2006 EN :2006 EN 50366/A1:2006 EN :2006 EN /A1:2001 EN :2001 EN :2006 EN :2006 EN 14875:2004 ZEK Rep.Ref Zertifizierstelle: TÜV SÜD Product Service GmbH, Ridlerstraße 65, München, Germany Gewährleistung Gewährleistungsansprüche laut beiliegender Gewährleistungskarte. Für Schäden durch eine nicht fachgerechte Installation oder unsachgemäßem Betrieb übernimmt der Hersteller keine Haftung. Allgemeine Sicherheitshinweise Kontrollieren Sie das Gerät vor jedem Gebrauch. Das Gerät darf nicht verwendet werden, falls Sicherheitsvorrichtungen und/oder Messer beschädigt oder abgenutzt sind. Die Sicherheitshinweise sind stets zu beachten. Verwenden Sie das Gerät ausschließlich für die in der Gebrauchsanweisung angegebenen Zwecke. Für die Sicherheit in Ihrem Arbeitsbereich sind Sie selbst verantwortlich. Untersuchen Sie vor Arbeitsbeginn die Schnittobjekte. Entfernen Sie alle Fremdkörper, die Sie finden. Achten Sie auch während der Arbeit auf Fremdkörper. Sollten Sie beim Schneiden trotzdem auf ein Hindernis stoßen, schalten Sie das Gerät ab (den Schalter loslassen) und beseitigen das Hindernis. Falls die Messer blockieren, schalten Sie das Gerät ab und beseitigen die Störung (dicker Zweig, Fremdkörper) mit einem stumpfen Gegenstand. Benutzen Sie nie Ihre Finger - die unter Spannung stehenden Messer können ernsthafte 7
8 DE Verletzungen hervorrufen. Am besten entfernen Sie den Akku, bevor Sie die Störung beheben. Die Messer laufen nach dem Abschalten des Gerätes noch kurze Zeit weiter! Überprüfen Sie das Ladekabel regelmäßig auf Anzeichen von Beschädigung und Verschleiß (spröde Kabel). Das Kabel darf nur in einwandfreiem Zustand verwendet werden. Arbeiten Sie nur bei guten Sichtverhältnissen. Achten Sie beim Arbeiten immer auf einen sicheren Stand. Seien Sie vorsichtig, wenn Sie rückwärts gehen - Stolpergefahr! Wenn Sie Ihre Arbeit unterbrechen und an einem anderen Ort fortsetzen möchten, muss das Gerät abgeschaltet werden, während Sie sich an den nächsten Einsatzort begeben. Verwenden Sie das Gerät niemals bei Regen oder Feuchtigkeit. Schützen Sie das Ladegerät und das Kabel gegen Beschädigungen und vor scharfen Kanten. Beschädigte Kabel müssen unverzüglich durch einen Elektriker ersetzt werden. Arbeiten Sie mit dem Gerät nie bei Regen. Lassen Sie das Gerät niemals im Freien stehen. Das Gerät darf bei Nässe nicht benutzt werden. Wir empfehlen während der Arbeit mit dem Gerät das Tragen von Sicherheitshandschuhen. Tragen Sie geeignete Arbeitskleidung wie Handschuhe und rutschfeste Schuhe. Tragen Sie keine weiten Kleidungsstücke und schützen Sie lange Haare durch ein Haarnetz. Vermeiden Sie unnormale Arbeitshaltungen und achten Sie auf einen sicheren Stand. Achten Sie beim eingeschalteten Gerät auf einen Sicherheitsabstand zwischen Arbeitsgerät und Körper. Achten Sie darauf, dass sich in Ihrem Arbeitsbereich keine anderen Personen oder Tiere aufhalten (Drehradius). Im Schnittbereich dürfen sich keine Kabel befinden. Verwenden Sie das Gerät nur, wenn es sich in einem ordentlichen Betriebszustand befindet. Prüfen Sie die Schneidvorrichtung regelmäßig auf Anzeichen von Beschädigungen und sorgen Sie bei Bedarf dafür, dass das Gerät durch den Kundendienst oder eine qualifizierte Werkstatt fachgerecht repariert wird. Bewahren Sie das Gerät an einem trockenen Ort auf, der für Kinder unzugänglich ist. Wenn das Gerät nicht benutzt wird, müssen Sie es mit der mitgelieferten Schutzabdeckung sichern, damit ein versehentlicher Kontakt mit den Messern ausgeschlossen ist. Das Gerät darf nicht überladen werden. Setzen Sie das Gerät nicht für Arbeiten ein, für die es nicht vorgesehen ist. Das Gerät muss regelmäßig geprüft und gewartet werden. Tauschen Sie beschädigte Messer stets paarweise aus. Falls das Gerät durch einen Aufprall beschädigt wird (falls es auf einen harten Untergrund fällt usw.), müssen Sie es umgehend durch einen Fachmann überprüfen lassen. Gehen Sie mit Ihrem Gerät sorgfältig um. Halten Sie es sauber und scharf, um ein effizientes und sicheres Schneiden zu gewährleisten. Befolgen Sie die Wartungsund Reinigungsvorschriften. Dieses Gerät ist nicht für den Gebrauch von Personen (einschließlich Kindern) bestimmt, die körperlich, sensorisch oder geistig eingeschränkt sind. Auch Personen mit Mangel an Erfahrung oder Wissen über das Gerät ist es untersagt mit dem Gerät zu arbeiten. Laden Sie die Akkus nur in Ladegeräten auf, die vom Hersteller empfohlen werden. Für ein Ladegerät, das für eine bestimmte Art von Akkus geeignet ist, besteht Brandgefahr, wenn es mit anderen Akkus verwendet wird. Verwenden Sie nur die dafür vorgesehenen Akkus in den Elektrowerkzeugen. Der Gebrauch von anderen Akkus kann zu Verletzungen und Brandgefahr führen. Halten Sie den nicht benutzten Akku fern von Büroklammern, Münzen, Schlüsseln, Nägeln, Schrauben oder anderen kleinen Metallgegenständen, die eine Überbrückung der Kontakte verursachen könnten. Ein Kurzschluss zwischen den Akkukontakten kann Verbrennungen oder Feuer zur Folge haben. Bei falscher Anwendung kann Flüssigkeit aus dem Akku austreten. Vermeiden Sie den Kontakt damit. Bei zufälligem Kontakt mit Wasser abspülen. Wenn die Flüssigkeit in die Augen kommt, nehmen Sie zusätzlich ärztliche Hilfe in Anspruch. Austretende Akkuflüssigkeit kann zu Hautreizungen führen. Elektrische Sicherheit: GEFAHR! Stromschlag! Es besteht Verletzungsgefahr durch elektrischen Strom! Bei Beheben von Störungen und vor der Wartung den Netzstecker ziehen. Nur an Anschlüssen mit Fehlerstromschalter (RCD) betreiben! Bitte fragen Sie eine Elektrofachkraft. Die Angaben auf dem Typschild müssen mit den Daten des Stromnetzes übereinstimmen. Das Kabel vor Hitze, Öl und scharfen Kanten schützen. Allgemeine Hinweise: Führen Sie vor Benutzung stets eine Sichtprüfung durch, um festzustellen, ob Netzkabel und Stecker, beschädigt sind. Eine beschädigte Gerät darf nicht benutzt werden. Gerät im Schadensfall vom GÜDE Service oder dem autorisierten Elektrofachmann prüfen lassen. Verhalten im Notfall Leiten Sie die der Verletzung entsprechend notwendigen Erste Hilfe Maßnahmen ein und fordern Sie schnellst möglich qualifizierte ärztliche Hilfe an. Bewahren Sie den Verletzten vor weiteren Schädigungen und stellen Sie diesen ruhig. Für einen eventuell eintretenden Unfall sollte immer ein Verbandskasten nach DIN am Arbeitsplatz griffbereit vorhanden sein. Dem Verbandskasten entnommenes Material ist sofort wieder aufzufüllen. Wenn Sie Hilfe anfordern, machen Sie folgende Angaben: 1. Ort des Unfalls 2. Art des Unfalls 3. Zahl der Verletzten 4. Art der Verletzungen Kennzeichnung: Produktsicherheit: Produkt ist mit den einschlägigen Normen der Europäischen Gemeinschaft konform Verbote: Verbot, allgemein (in Verbindung mit anderem Piktogramm) Nicht in rotierende Teile fassen 8
9 DE Warnung: Gebote: Warnung/Achtung Augenschutz benutzen Vor Gebrauch Bedienungsanleitung lesen Schutzhandschuhe benutzen Umweltschutz: Warnung vor gefährlicher elektrischer Spannung Gehörschutz benutzen Kopfschutz benutzen getrennt gesammelt und einer umweltgerechten Wiederverwertung zugeführt werden. Anforderungen an den Bediener Der Bediener muss vor Gebrauch des Gerätes aufmerksam die Bedienungsanleitung gelesen und verstanden haben. Qualifikation: Außer einer ausführlichen Einweisung durch eine sachkundige Person ist keine spezielle Qualifikation für den Gebrauch des Gerätes notwendig. Mindestalter: Das Gerät darf nur von Personen betrieben werden, die das 16. Lebensjahr vollendet haben. Eine Ausnahme stellt die Benutzung als Jugendlicher dar, wenn die Benutzung im Zuge einer Berufsausbildung zur Erreichung der Fertigkeit unter Aufsicht eines Ausbilders erfolgt. Schulung Die Benutzung des Gerätes bedarf lediglich einer entsprechenden Unterweisung durch eine Sachkundige Person bzw. die Bedienungsanleitung. Eine spezielle Schulung ist nicht notwendig. Technische Daten Abfall nicht in die Umwelt sondern fachgerecht entsorgen. Schadhafte und/oder zu entsorgende elektrische oder elektronische Geräte müssen an den dafür vorgesehen Recycling- Stellen abgegeben werden. Verpackungsmaterial aus Pappe kann an den dafür vorgesehen Recycling-Stellen abgegeben werden. Akku: 7,2 V / 1300 m Ah ( Li-Ion ) Ladegerät: 3-5 Std. Schnittbreite Grasschere: 100 mm Schnittlänge Strauchschere: 190 mm / max. Stärke 8 mm Teleskop-Stiel ausziehbar ca mm Akku-Laufzeit: ca. 50 min. Schalldruckpegel L WA 87 db Gewicht: 1,9 kg Verpackung: Vor Nässe schützen Packungsorientierung Oben Transport und Lagerung Bewahren Sie das Gerät trocken und Frostfrei, ausser Reichweite von Kindern auf. Reinigen Sie das Gerät mit einem feuchten Tuch. Berühren Sie nie die Polklemmen des Akkus! Restgefahren und Schutzmaßnahmen Elektrische Restgefahren Gefährdung Beschreibung Schutzmaßnahme(n) Direkter Stromschlag Fehlerstromschalter FI elektrischer Kontakt Indirekter elektrischer Kontakt Stromschlag durch Medium Fehlerstromschalter FI Entsorgung Die Entsorgungshinweise ergeben sich aus den Piktogrammen die auf dem Gerät bzw. der Verpackung aufgebracht sind. Eine Beschreibung der einzelnen Bedeutungen finden Sie im Kapitel Kennzeichnungen auf dem Gerät. Werfen Sie Elektrowerkzeuge nicht in den Hausmüll! Gemäß der Europäischen Richtlinie 2002/96/EG über Elektro- und Elektronik-Altgeräte und ihrer Umsetzung in nationales Recht müssen nicht mehr gebrauchsfähige Elektrowerkzeuge Montage und Erstinbetriebnahme Hinweis: Der Akku wird teilgeladen ausgeliefert. Um die volle Leistung des Akkus zu gewährleisten, laden Sie vor dem ersten Einsatz den Akku vollständig auf. Der Li-Ionen-Akku kann jederzeit aufgeladen werden, ohne die Lebensdauer zu verkürzen. Eine Unterbrechung des Ladevorganges schädigt den Akku nicht. Der Li-Ionen-Akku ist elektonisch gegen Tiefentladung geschützt. Bei entladenem Akku wird das Elektrowerkzeug durch eine Schutzschaltung abgeschaltet: Das Einsatzwerkzeug bewegt sich nicht mehr. Drücken Sie nach dem automatischen Abschalten des Elektrowerkzeuges nicht weiter auf den Ein-/Ausschalter. Es ist ratsam den Akku bei Nichtgebrauch alle 6 Monate mindestens einmal vollständig zu laden. Das Gerät darf nicht über 40 C gelagert oder betrieben werden, das verringert die Lebensleistung des Akkus. 9
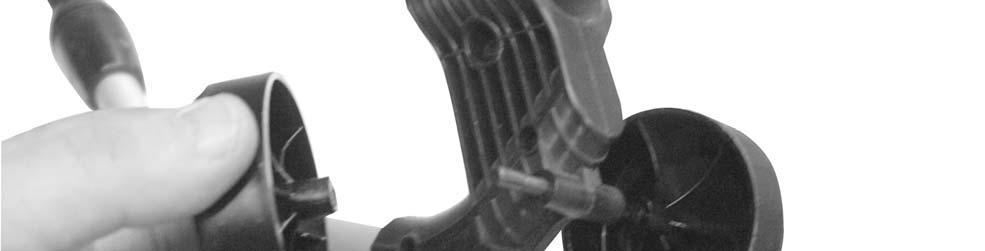
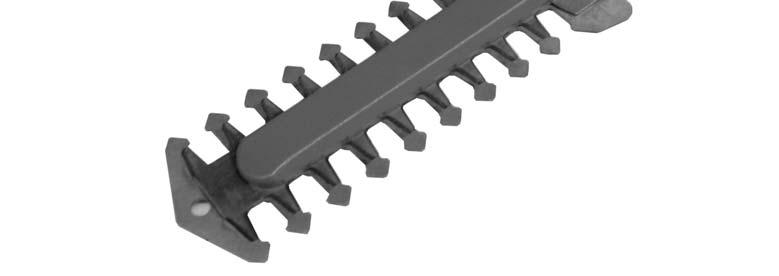
10 DE Achten Sie darauf, dass der Messerschutz montiert ist um Schnittverletzungen zu vermeiden! Vergleichen Sie die Spannung Ihres Stromnetzes mit der des Ladegerätes. Stimmt dies überein schließen Sie das Ladegerät am Stromnetz an. Stecken Sie das Ladekabel in die dazugehörige Buchse am Griffrücken der Grasschneiders (F). Laden Sie den Akku vollständig auf (die Kontrolleuchte erlischt bei geladenem Akku (Fa)) Nehmen Sie den Messerschutz ab Um den Grasschneider zu betätigen, muss Erst die Einschaltsperre, dann die Einschalttaste betätigt werden. Der Grasschneider ist nun Betriebsbereit Betrieb mit Teleskop Führungsholm Stecken Sie die Räder zusammen (C) Schieben Sie den Grasschneider auf den Gerätehalter bis dieser einrastet (D) Stellen Sie sich Ihre Arbeitshöhe durch verstellen des Teleskop-Führungsholms ein. Hierzu Teleskopverschraubung lösen, Arbeitshöhe einstellen und Verschraubung wieder festdrehen. Stecken Sei das Steuerkabel des Führungsholmes in die passende Buchse am Griffrücken (E) Um den Grasschneider zu betätigen muss Erst die Einschaltsperre, dann die Einschalttaste am Führungsgriff betätigt werden. Der Grasschneider ist nun im Führungsholm einsatzbereit. Messerwechsel Achten Sie darauf, dass der Messerschutz montiert ist um Schnittverletzungen zu vermeiden! Um das Grasschneidmesser gegen das Strauchmesser zu tauschen muss der untere Deckel (G) des Grasscheiders abgenommen werden. Hierzu wird die Griffasche mit dem Pfeil wie in Abbildung G gezeigt angehoben und 6-8 mm in Richtung Bediengriff gezogen. Der Deckel kann nun abgehoben werden. Tauschen Sie das Grasschneidmesser durch das Strauchmesser. Der Exzenter des Triebrades (H a) muss hierbei exakt in die Aufnahme (H b) greifen. Hierzu kann eine leichte Korrektur (Verschieben) der Aufnahme auf den Messer nötig sein bevor das Messer auf das Treibrad passt. Die Bohrung des Messers muss genau auf die beiden Zentrierstifte (H c) passen. Der Messerkopf kann durch drücken der Arretierknopfes In mehreren Stellungen fixiert werden (I) Wartung und Reinigung Bringen Sie vor allen Arbeiten am Elektrowerkzeug (z.b. Wartung, Werkzeugwechsel etc.) sowie bei dessen Transport und Aufbewahrung den Messerschutz an! Bei unbeabsichtigtem Betätigen des Ein-/Ausschalters besteht Verletzungsgefahr. Halten Sie das Elektrowerkzeug und eventuelle Lüftungsschlitze sauber, um gut und sicher zu arbeiten. Ist der Akku nicht mehr funktionsfähig, wenden Sie sich bitte an unseren Kundendienst. 10
11 GB Please read carefully these Operating Instructions before putting the appliance into operation. A.V. 2 Any reprints, even partial, are subject to approval. Technical changes reserved. Pictures just for illustration purposes!!! GB Do you have any technical questions? A claim? Do you need spare parts or the Operating Instructions? You will be helped quickly and without needless bureaucracy at our webpage in the Services part. Please help us be able to assist you. To be able to identify your appliance when claimed, we need to know its serial No., order No. and year of production. All these details can be found on the type label. Enter the details below for future reference. Serial No. Order No. Year of production: support@ts.guede.com Appliance GPS 7.2V LI-ION ACCU SET OF GARDEN TOOLS Set with telescopic extension and chassis (grass shears). Branded accumulator (Samsung); due to simple exchange, it can be used as grass shears or shrub shears. Including battery charger (3-5 hours). Twist handle (fivefold raster). Telescopic extension is great for bigger shrubs and simpler hedge structures if extension for shrub shears is used. The grass shears with a chassis for comfortable grass trimming in a vertical position, soft handle. Use as designated The appliance has been designed for trimming lawn edges and small grass plots for handymen and gardeners. The appliance must not be used for crushing compost material as persons and things could be put at risk. The appliance can only be used in accordance with its designation. Any other use is not in accordance with the designation. The user/operator, not the producer, is liable for any related damage and injuries of all kinds. Scope of supply and appliance description (pic. A) 1. Grass knife 2. Wheels 3. Switching bar 4. Switch-on button 5. Telescopic guide rod 6. Telescopic screw coupling 7. Guide handle 8. Appliance fixture 9. Knife cover 10. Charger 11. Shrub knife GB EU Declaration of Conformity We, Güde GmbH & Co. KG Birkichstraße Wolpertshausen - Germany, herewith declare that the following appliance complies with the appropriate basic safety and health requirements of the EU Directives based on its design and type, as brought into circulation by us. In case of alternation of the machine, not agreed upon by us, this declaration will lose its validity. Machine description: GPS 7.2V LI-IO Article No Date/authorised signature: 25 Nov, 2008 Title of signatory: Mr Arnold, Managing Director Technical documentation: J. Bürkle FBL; QS Applicable EU Directives: 2006/42 EG 2006/95 EC 2004/108 EG 2000/14 EG 2002/95/EC (RoHS) REACH EG-VO No. 1907/2006 Applicable harmonised standards: EN :2002+A1+A11+A12+A2 EN /A2:2006 EN :2006 EN 50366/A1:2006 EN :2006 EN /A1:2001 EN :2001 EN :2006 EN :2006 EN 14875:2004 ZEK Ref. No Place of certification: TÜV SÜD Product Service GmbH, Ridlerstraße 65, Munich, Germany Guarantee The guarantee solely covers inadequacies caused by material defect or manufacturing defect. Original payment voucher with the sales date needs to be submitted for any claim in the guarantee period. The guarantee does not cover any unauthorised use such as appliance overloading, use of violence, damage as a result of any unauthorised interference or caused by foreign items. Failing to follow the operating and assembly instructions and common wear are also not included in the guarantee. General safety instructions Check the appliance before using it. The appliance must not be used if any safety equipment and/or knives are damaged or worn-out. It is always necessary to follow the safety instructions. Use the appliance exclusively for purposes specified in the Operating Instructions. Safety in the workplace is your responsibility. Before you start working, check the area you are going to trim. Remove any foreign items you find. Look out for foreign items even when working. If you encounter any obstacle when trimming, switch the appliance off (by releasing the switch) and remove the obstacle. If the knives are blocked, switch the appliance off and remove the failure (thick branch, foreign item) by a blunt object. Never use your fingers knives under voltage can 7
12 GB seriously injure you. You should rather take out the accumulator first and then remove the failure. Knives keep rotating for some time after the appliance is switched off! Check the electric cable regularly for any damage and wear (weak cable). The cable can only be used when in a perfect condition. Work only when there is good visibility. Make always sure you take stable stand when working. Be careful when reversing risk of trip! If you interrupt your work and would like to continue in any other place, you must switch the appliance off and switch it on only after reaching the new place of work. Never use the appliance when raining and in a damp environment. Protect the charger and cable against damage and sharp edges. Cables that are damaged must be immediately replaced by an electrician. Never work with the appliance when raining. Do not leave the appliance outdoors. The appliance must not be used in a damp environment. Wearing safety gloves is recommended for work with the appliance. Wear appropriate working clothes such as gloves and nonslip shoes. Do not wear loose clothes. Long hair should be protected by a hairnet. Avoid abnormal body posture and ensure stability. Ensure a safe distance between the appliance and your body when the appliance is switched on. Make sure there are no other persons and animals in your place of work (turning radius). There must be no cables in the trimming area. Use the appliance only if in a proper operating condition. Check the knives regularly for any damage and have the appliance professionally repaired by the customer service or a qualified shop if necessary. Keep the appliance in a dry place, out of reach of children. If the appliance is not used, you must provide it with a protection cover included in the supply to prevent any unintentional contact with the knives. The appliance must not be overloaded. Do not use the appliance for works not designed for. The appliance must be regularly checked and maintained. Knives that are damaged always need to be exchanged in pairs. If the appliance is damaged by an impact (falls on hard surface, etc.), it must be immediately checked by a professional. Treat the appliance carefully. Keep it clean and sharp to ensure efficient and safe trimming. Observe the maintenance and cleaning rules. The appliance has not been designed to be used by persons (including children) with physical or sensory disability or mental disorder. Persons with lack of experience in or knowledge of the appliance are also prohibited to work with the appliance. Electric safety: CAUTION! Risk of electric shock! There is a risk of electric shock! Pull the plug out of socket when removing any failure and before maintenance work. To be used only with connections with safety switch against stray current (RCD)! Please ask your electrician. Details on the type label must correspond to electrical network details. Protect the cable against excess temperatures, oil and sharp edges. General instructions: Always carry out visual inspection before using the appliance to find out if especially the electric cable and plug are not damaged. An appliance that is damaged must not be used. Have a damaged appliance checked in the GÜDE service department or at an authorised electrician. Behaviour in case of emergency Provide necessary first aid treatment corresponding to the injury nature and seek qualified medical help as soon as possible. Protect the injured person from other injuries and calm him/her down. First aid kit must always be available in the place of your work in case of accident in accordance with DIN Material taken out of the first aid kit needs to be supplemented right away. If help is needed, please provide the following details: 1. Place of accident 2. Accident nature 3. Number of injured persons 4. Injury type Marking: Product safety: Product corresponds to appropriate EU standards Prohibitions: Charge the accumulator only in chargers recommended by the producer. There is a risk of fire at a charger suitable for a certain type of accumulators if used with other accumulators. Use only the specified accumulators for your electric appliance. Use of other accumulators can lead to injuries and represent a risk of fire. An accumulator not used needs to be stored out of reach of paperclips, coins, keys, nails, screws and other small metal items that could cause short-circuiting. Short circuit between the accumulator contacts can lead to burn injuries or fire. Liquid may run out of the accumulator in case of improper use. Prevent contact with the liquid. Rinse with water at any accidental contact. Seek medical advice if your eyes have been involved. Liquid run out of the accumulator may irritate your skin. General prohibition (in connection with any other icon) Warning: Warning/caution Commands: Use protective glasses Do not touch the rotating parts Warning against hazardous voltage Use earphones 8
13 GB Read the Operating Instructions before using the appliance Use a helmet Training Using the appliance requires only corresponding instruction by a professional or reading the Operating Instructions. No special training necessary. Technical specification Use protective gloves Environment protection: Dispose waste professionally so as not to harm the environment. Packing cardboard material may be delivered to collecting centres for recycling. Accumulator: 7.2 V / 1,300 m Ah ( Li-Ion ) Charger: 3-5 hours Grass shears trimming 100 mm width: Hedge shears trimming length: 190 mm / max. diameter 8 mm Pull-out telescopic rod app ,150 mm Operating time with fully app. 50 min. charged battery: Noise level WA 87 db Weight: 1.9 kg Any defective and/or disposed electric or electronic appliances must be delivered to appropriate collecting centres. Package: Transport and storing Store the appliance in a dry condition, with no rust, out of reach of children. Clean the appliance with a damp cloth. Never touch the pole terminals of the accumulator! Protect against moisture This side up Residual risks and protective measures Electric residual risks Threat Description Protective measure(s) Direct electrical contact Electric shock Safety switch against FI stray current Indirect electrical contact Disposal Electric shock through a medium Safety switch against FI stray current The disposal instructions are based on icons placed on the appliance or its package. The description of the meanings can be found in the Marking chapter. Do not put the electric appliance to household waste! Electric appliances must be collected separately and recycled in an environment friendly manner according to the European Directive 2002/96/EG on used electric and electronic appliances and its application in the national law. Operating staff requirements The operator must carefully read and understand the Operating Instructions before using the appliance. Qualification: No special qualification is necessary for using the appliance apart from detailed instruction by an expert. Minimum age: The appliance can only be operated by persons over 16 years of age. An exception includes youngsters operating the appliance within their professional education to achieve necessary skills under trainer's supervision. Assembly and first start-up Caution: The accumulator is supplied partially charged. To ensure full power of the accumulator, charge it to the full extent before first start-up. The Li-Ion accumulator can be charged anytime without its service life being reduced as a result. Charging interruption does not damage the accumulator. The Li-Ion accumulator has electronic protection against deep discharge. Due to the safety switch, the electric appliance switches off when the accumulator is discharged: The inserted tool is no longer moving. After the electric appliance is switched off, do not press the on/off button anymore. If you do not use the accumulator, we recommend charging it to the full extent at least once in 6 months. The appliance must not be stored or used at temperatures exceeding 40 C as it reduces the accumulator life. Make sure the knife cover is fitted, which prevents cutting injuries! Compare the voltage of your network with that of the charger. If corresponding, plug the charger. Plug the charging cable into appropriate outlet on the back of the grass shears handle (F). Charge the accumulator to the full extent (indicator turns off when the accumulator is fully charged (Fa)) Remove the knife cover To start the grass shears, you must first press the switching bar and then the switch-on button. The grass shears can now be operated. Operation with the telescopic guide rod Fit the appliance fixture to the guide rod end until it snaps in audibly (B) Put the wheels into each other (C) Push the grass shears in the appliance holder until they snap in (D) 9
14 GB Adjust your operating height by shifting the telescopic guide rod. Release the telescopic screw coupling, adjust the operating height and tighten the screw coupling again. Plug the control cable of the guide rod into appropriate outlet on the back of the handle (E) To start the grass shears, you must first press the switching bar and then the switch-on button on the guide rod. The grass shears in the guide rod can now be operated. Knife change Make sure the knife cover is fitted, which prevents cutting injuries! When changing the grass knife for a shrub knife you must remove the bottom cover (G) of the grass knife. To that end, the deflected cover with an arrow (pic. G) needs to be lifted and pulled out 6-8 mm in the operating handle direction. The cover can now be taken out. Replace the grass knife with the shrub knife. The eccentric of the drive wheel (H a) must bite exactly into the fixture (H b). Moreover, it may be necessary to slightly adjust (shift) the knife fixture so that the knife matches the drive wheel. The knife hole must exactly match both centring pins (H c). The knife head can be fixed in several positions by pressing the locking button (I). Maintenance and cleaning Install the knife cover before all works on the electric appliance (e.g. maintenance, tool change, etc.) and during its transport and storing! There is a risk of injury associated with unintentional pressing the on/off button. Keep the electric appliance and any ventilation slot clean to ensure good and safe operation. If the accumulator does not work anymore, please contact our customer service department. 10
15 F Avant de mettre l appareil en marche, veuillez lire attentivement ce mode d emploi. A.V. 2 Toute réimpression, même partielle, nécessite une autorisation. Modifications techniques réservées. Images d illustration!!! F Vous avez des questions techniques? Une réclamation? Vous avez besoin de pièces détachées ou d un mode d emploi? Nous vous aiderons rapidement et sans bureaucratie inutile par l intermédiaire de nos pages Web dans la rubrique Service. Aidez-nous pour que nous puissions vous aider. Pour identifier votre appareil en cas de réclamation, nous avons besoins du numéro de série, numéro de produit et l année de fabrication. Toutes ces informations se trouvent sur la plaque signalétique. Pour avoir ces informations toujours à porté de main, veuillez les inscrire ici : Numéro de série Numéro de produit : Année de fabrication : support@ts.guede.com Appareil SET D OUTILS DE JARDIN AKU GPS 7,2V LI-ION Complet avec rallonge télescopique et roues (cisaille à gazon). Accumulateur de marque (Samsung), grâce à l échange simple, possibilité d utiliser en tant que cisaille à gazon ou taille haie. Avec chargeur de batteries (3-5 h). Poignée rotative (grille quintuple). La rallonge télescopique convient parfaitement aux arbustes plus grands et haies simples, à condition d utiliser l embout pour taille haie. Cisaille à gazon avec roues pour taille confortable de l herbe en position verticale, poignée souple. Utilisation en conformité avec la destination L appareil est destiné à la taille des bords des pelouses et petites surfaces herbeuses par des bricoleurs et jardiniers. Il est interdit d utiliser l appareil pour broyer le matériel de compostage, car le broyage pourrait engendrer des blessures des personnes ou endommager des objets. L appareil doit être utilisé uniquement en conformité avec sa destination. Toute autre utilisation n est pas en conformité avec la destination. Le fabricant décline toute responsabilité en cas d une telle utilisation, ainsi, c est l utilisateur qui répond de toutes dommages et blessures. Contenu du colis et description de l appareil (fig. A) 1. Cisaille à gazon 2. Roues 3. Loquet de mise en marche 4. Bouton de mise en marche 5. Manchon de guidage télescopique 6. Boulonnage télescopique 7. Poignée de guidage 8. Fixation de l appareil 9. Fourreau 10. Chargeur 11. Taille haie F Déclaration de conformité CE Nous, Güde GmbH & Co. KG Birkichstraße 6, Wolpertshausen, Allemagne Déclarons par la présente que les appareils indiqués cidessous répondent du point de vue de leur conception, construction ainsi que de leur réalisation mise sur le marché, aux exigences fondamentales correspondantes des directives de la CE en matière de sécurité et d hygiène. Cette déclaration perd sa validité après une modification de l appareil sans notre approbation préalable. Désignation de l appareil : GPS 7,2V LI-IO Commande n : Date/Signature du fabricant : Titre du Signataire : Monsieur Arnold, Gérant Documents techniques : J. Bürkle FBL; QS Directives correspondantes de la CE : 2006/42 EG 2006/95 EC 2004/108 EG 2000/14 EG 2002/95/EC (RoHS) REACH EG-VO Nr. 1907/2006 Normes harmonisées utilisées : EN :2002+A1+A11+A12+A2 EN /A2:2006 EN :2006 EN 50366/A1:2006 EN :2006 EN /A1:2001 EN :2001 EN :2006 EN :2006 EN 14875:2004 ZEK Rep.Ref Lieu de certification : TÜV SÜD Product Service GmbH, Ridlerstraße 65, München, Germany Garantie Selon le bulletin de garantie joint. Le fabricant décline toute responsabilité en cas de dommages engendrés par une installation ou une utilisation incompétente. Consignes générales de sécurité Contrôlez l appareil avant toute utilisation. Il est interdit d utiliser l appareil lorsque les dispositifs de sécurité et/ou les lames sont endommagés ou usés. Il est nécessaire de toujours respecter les consignes de sécurité. Utilisez l appareil uniquement à des fins indiquées dans le mode d emploi. Vous êtes le seul responsable de la sécurité sur votre lieu de travail. Avant de commencer à travailler, contrôlez la surface à tailler. Supprimez tout objet étranger que vous trouvez. Faites attention aux objets étrangers également lors du travail. Si, malgré toutes ces précautions, vous rencontrez un obstacle, arrêtez l appareil (lâchez l interrupteur) et supprimez l obstacle. Si les lames sont bloquées, arrêtez l appareil et supprimez la panne (forte branche, objet étranger) à l aide d un objet émoussé. N utilisez jamais les doigts les lames sous tension peuvent provoquer des blessures sérieuses. Retirez plutôt l accumulateur et seulement après procédez à la suppression de la panne. 7
16 F Après l arrêt de l appareil, les lames continuent à tourner quelques instants! Contrôlez régulièrement l endommagement et l usure éventuels du câble électrique (câble fragile). Seul un câble en parfait état peut être utilisé. Travaillez uniquement lorsque la visibilité est bonne. Adoptez toujours lors du travail une posture stable. Soyez prudents si vous reculez danger de trébuchement! Si vous interrompez votre travail et souhaitez le reprendre à un autre endroit, vous devez arrêter l appareil avant de vous déplacer vers cet endroit. N utilisez jamais l appareil sous la pluie et l humidité. Protégez le chargeur et le câble de l endommagement et des bords tranchants. Les câbles endommagés doivent être immédiatement remplacés par un électricien. N utilisez jamais l appareil sous la pluie. Ne laissez pas l appareil dehors. Il est interdit d utiliser l appareil par temps humide. Il est recommandé de porter lors du travail avec l appareil des gants de sécurité. Portez une tenue de travail adéquate telle que gants et chaussures antidérapantes. Ne portez pas de vêtements larges et protégez vos cheveux par un filet. Évitez des postures anormales et maintenez la stabilité. Lorsque l appareil est en marche, respectez une distance de sécurité entre l appareil et le corps. Veillez à ce qu aucune personne ou animal ne se trouve sur votre lieu de travail (rayon des rotations). La zone de taille doit être exempte de tout câble. Utilisez l appareil uniquement lorsqu il est en parfait état de fonctionnement. Contrôlez régulièrement les lames du point de vue d endommagement et en cas de besoin, veillez à ce que l appareil soit réparé de façon professionnelle par le service après-vente ou un atelier qualifié. Rangez l appareil à un endroit sec, hors de portée des enfants. Si l appareil n est pas utilisé, il doit être protégé par le fourreau livré avec l appareil, de façon à éviter tout contact accidentel avec les lames. Il est interdit de surcharger l appareil. N utilisez pas l appareil pour les travaux pour lesquels il n a pas été conçu. Il est nécessaire de contrôler et d entretenir régulièrement l appareil. Remplacez toujours les lames endommagées par deux. En cas d endommagement de l appareil provoqué par une chute (chute sur une surface dure, etc.), il est nécessaire de le faire contrôler par un spécialiste. Prenez soin de votre appareil. Maintenez le propre et affûté de façon à assurer une taille efficace et sûre. Respectez les consignes d entretien et de nettoyage. Cet appareil n est pas destiné aux personnes (y compris les enfants) ayant un problème physique, sensoriel ou psychique, ainsi qu aux personnes avec expérience insuffisante ou manque de connaissances sur l appareil. Chargez les accumulateurs uniquement à l aide des chargeurs recommandés par le fabricant. L utilisation d un chargeur destiné à un certain type d accumulateurs engendre le risque d incendie lorsqu il est utilisé avec des accumulateurs différents. Utilisez pour les outils électriques uniquement les accumulateurs prescrits. L utilisation d autres accumulateurs peut engendrer le risque de blessures et d incendie. Éloignez l accumulateur non utilisé des agrafes de bureau, pièces, clés, clous, vis et d autres petits objets métalliques pouvant provoquer le pontage. Le court-circuit entre les contacts de l accumulateur peut provoquer des brûlures ou l incendie. Une mauvaise utilisation peut entraîner l écoulement du liquide de l accumulateur. Évitez le contact celui-ci. En cas de contact accidentel, rincez à l eau. En cas de contact avec les yeux, consultez un médecin. Le liquide qui s écoule de l accumulateur peut irriter la peau. Sécurité électrique : ATTENTION! Électrocution! Danger d électrocution! Avant de procéder à la suppression d une panne et avant l entretien, retirez la fiche de la prise. Utilisez uniquement sur les prises avec un interrupteur de protection contre le courant de défaut (RCD)! Consultez un électricien. Les données figurant sur la plaque signalétique doivent correspondre aux données du secteur. Protégez le câble des températures excessives, de l huile et des bords tranchants. Consignes générales : Avant toute utilisation, effectuez un contrôle visuel pour vérifier l état du câble électrique et de la fiche. Il est interdit d utiliser un appareil endommagé. Faites contrôler l appareil endommagé par le service GÜDE ou par un électricien agréé. Conduite en cas d urgence Effectuez les premiers gestes de secours et appelez rapidement les premiers secours. Protégez le blessé d autres blessures et calmez-le. Pour des raisons de risque d accident, le lieu de travail doit être équipé d une armoire à pharmacie selon DIN Il est nécessaire de compléter immédiatement le matériel pris dans l armoire à pharmacie. Si vous appelez les secours, fournissez les renseignements suivants : 1. Lieu d accident 2. Type d accident 3. Nombre de blessés 4. Type de blessure Symboles : Sécurité du produit : Produit répond aux normes correspondantes de la CE Interdictions : Interdiction générale (en combinaison avec un autre pictogramme) Avertissement : Avertissement/attention Consignes: Utilisez des lunettes de protection Ne pas toucher les pièces en rotation Avertissement : tension électrique dangereuse Portez un casque 8
17 F Lisez le mode d emploi avant l utilisation. Portez un casque le cadre de l enseignement professionnel sous la surveillance du formateur. Formation : L utilisation de l appareil nécessite uniquement l instruction par un spécialiste, éventuellement par la notice. Une formation spéciale n est pas nécessaire. Portez des gants de protection Caractéristiques techniques Protection de l environnement : Liquidez les déchets de manière à ne pas nuire à l environnement. Déposez les appareils électriques ou électroniques défectueux et/ou destinés à liquidation au centre de ramassage correspondant. Emballage : Protégez de l humidité Déposez l emballage en carton au dépôt pour recyclage. Sens de pose Dangers résiduels et mesures de protection Danger résiduel électrique Risque Description Mesure(s) de sécurité Contact électrique direct Électrocution Interrupteur de protection contre le courant de défaut FI Contact électrique indirect Liquidation Électrocution par l intermédiaire du liquide Interrupteur de protection contre le courant de défaut FI Les consignes de liquidation résultent des pictogrammes indiqués sur l appareil ou sur l emballage. La description des significations individuelles se trouve dans le chapitre «Symboles». Ne jetez pas les outils électriques avec les déchets domestiques! Conformément à la Directive européenne 2002/96/EG sur les appareils électriques et électroniques et son application dans la loi nationale, les outils électriques doivent être collectés séparément et recyclés écologiquement. Accumulateur : 7,2 V / 1300 m Ah (Li-Ion) Chargeur : 3-5 h Largeur de prise de la cisaille 100 mm à gazon : Largeur de prise du taille haie : 190 mm / diamètre maximal 8 mm Manche télescopique avec environ mm possibilité d extraction Durée de travail avec batterie environ 50 min. chargée : Niveau de bruit L WA 87 db Poids : 1,9 kg Transport et stockage Rangez l appareil sec et sans rouille, hors de portée des enfants. Nettoyez l appareil à l aide d un chiffon humide. Ne touchez jamais les bornes de l accumulateur! Montage et première mise en marche Avertissement : L accumulateur est livré partiellement chargé. Pour assurer la puissance maximale de l accumulateur, chargez-le complètement avant la première utilisation. L accumulateur Li-Ion peut être rechargé à n importe quel moment, sans que cela réduise sa durée de vie. L interruption du chargement n endommage pas l accumulateur. L accumulateur Li-Ion est protégé électroniquement contre le déchargement profond. Lorsque l accumulateur est déchargé, l outil électrique s arrête grâce à l interrupteur de protection : L outil inséré ne bouge plus. Après l arrêt automatique de l outil électrique, n appuyez plus sur l interrupteur de marche/arrêt. Si vous n utilisez pas l accumulateur, nous vous recommandons de le charger complètement au minimum une fois tous les 6 mois. Il est interdit de stocker ou utiliser l appareil lorsque la température dépasse 40 C, cela réduit la durée de vie de l accumulateur. Exigences à l égard de l opérateur L opérateur doit lire attentivement la notice avant d utiliser l appareil. Qualification : Mis à part l instruction détaillée par un spécialiste, aucune autre qualification spécifique n est requise. Âge minimal : L appareil peut être utilisé uniquement par des personnes de plus de 16 ans. Exception faite des adolescents manipulant l appareil dans 9
18 F Veuillez à ce que le fourreau soit monté de façon à éviter les blessures par coupures! Comparez la tension de votre réseau avec la tension du chargeur. Si ces deux données correspondent, vous pouvez brancher le chargeur au réseau. Insérez le câble de chargement dans la douille correspondante à l arrière de la poignée de la cisaille à gazon (F). Chargez complètement l accumulateur (lorsque l accumulateur est chargé, le témoin lumineux s éteint (Fa)) Retirez le fourreau. Pour activer la cisaille à gazon, appuyez d abord sur le loquet de mise en marche puis sur le bouton de mise en marche. À présent, la cisaille à gazon est prête à l emploi. Fonctionnement avec le manche de guidage télescopique Placez la fixation de l appareil sur l extrémité du manche télescopique pour qu il s enclenche de façon audible (B) Insérez les roues l un dans l autre (C) Placez la cisaille à gazon sur le support de l appareil de façon à ce qu elle s enclenche (D) Réglez la hauteur de travail en déplaçant le manche de guidage télescopique. Desserrez le boulonnage télescopique, réglez la hauteur de travail et resserrez les boulonnages. Insérez le câble de commande du manche de guidage dans la douille correspondante située sur l arrière de la poignée (E) Pour activer la cisaille à gazon, appuyez d abord sur le loquet de mise en marche puis sur le bouton de mise en marche. À présent, la cisaille à gazon est prête à l emploi. Remplacement des lames Pour éviter des coupures, veillez à ce que le fourreau soit monté! Si vous remplacez la cisaille à gazon par le taille bordure, vous devez retirer le couvercle inférieur (G) de la cisaille à gazon. Pour cela, levez le couvercle cambré avec flèche (fig. G) et tirez le 6-8 mm dans le sens de la poignée de commande. À présent, le couvercle peut être retiré. Remplacez la cisaille à gazon par le taille bordure, en veillant à ce que l excentrique de la roue d entraînement (H a) s accroche avec précision à la fixation (H b). En outre, il peut être possible de régler (déplacer) légèrement la fixation de la lame de façon à ce que la lame s aligne avec la roue d entraînement. L ouverture dans la lame doit être alignée précisément avec les deux chevilles de centrage (H c). La tête de lame peut être fixée en plusieurs positions en appuyant sur le bouton de blocage (I) Entretien et nettoyage Avant toute intervention sur l outil électrique (par exemple, entretien, remplacement de l outil, etc.), ainsi que lors du transport et stockage, placez le fourreau sur la lame! Un appui accidentel de l interrupteur de mise en marche/arrêt peut engendrer des blessures. Maintenez l outil électrique et les fentes de ventilation éventuelles propres de façon à qu il travaille de façon sûre. Si l'accumulateur ne fonctionne plus, veuillez contacter notre service après-vente. 10
19 CZ Dříve než uvedete přístroj do provozu, pročtěte si prosím pečlivě tento návod k obsluze. A.V. 2 Dotisky, a to i částečné, vyžadují schválení.technické změny vyhrazeny. Ilustrační obrázky!!! CZ Máte technické otázky? Reklamaci? Potřebujete náhradní díly nebo návod k obsluze? Na naší domovské stránce Vám v oddílu Servis pomůžeme rychle a nebyrokraticky. Prosím pomožte nám pomoci Vám. Aby bylo možné Váš přístroj v případě reklamace identifikovat, potřebujeme sériové číslo, objednací číslo a rok výroby. Všechny tyto údaje najdete na typovém štítku. Abyste měli tyto údaje vždy po ruce, zapište si je prosím dole. Sériové číslo: Objednací číslo: Rok výroby: support@ts.guede.com Přístroj AKU SADA ZAHRADNÍHO NÁČINÍ GPS 7,2V LI-ION Komplet s teleskopickým prodloužením a podvozkem (nůžky na trávu). Značkový akumulátor (Samsung), díky jednoduché výměně lze použít jako nůžky na trávu nebo nůžky na keře. Včetně nabíječky baterií (3-5 hod.). Otočná rukojeť (5-násobný rastr). Teleskopické prodloužení se skvěle hodí pro větší keře a jednodušší živé ploty, pokud se použije nástavec k nůžkám na keře. Nůžky na trávu s podvozkem pro pohodlné stříhání trávy ve svislé poloze, měkká rukojeť. Použití v souladu s určením Přístroj je určen ke stříhání hran trávníků a menších travnatých ploch pro domácí kutily a zahrádkáře. Přístroj se nesmí používat k rozmělňování kompostovacího materiálu, neboť by mohlo dojít k poškození osob a věcí. Přístroj se smí používat jen v souladu s jeho určením. Každé jiné použití není v souladu s určením. Za z toho plynoucí škody a úrazy všeho druhu ručí uživatel/obsluha a ne výrobce. Objem dodávky a popis přístroje (obr. A) 1. Nůž na trávu 2. Kola 3. Zapínací závora 4. Zapínací tlačítko 5. Teleskopická vodicí tyč 6. Teleskopické šroubení 7. Vodicí rukojeť 8. Úchyt přístroje 9. Kryt nože 10. Nabíječka 11. Nůž na keře CZ Prohlášení o shodě EU Güde GmbH & Co. KG Birkichstraße Wolpertshausen - Germany, že koncepce a konstrukce níže uvedených přístrojů v provedeních, která uvádíme do oběhu, odpovídá příslušným základním požadavkům směrnic EU na bezpečnost a hygienu. V případě změny přístroje, která s námi nebyla konzultována, ztrácí toho prohlášení svou platnost. Označení přístrojů: GPS 7,2V LI-IO Obj. č.: Datum/podpis výrobce: Údaje o podepsaném: pan Arnold, jednatel Technická dokumentace: J. Bürkle FBL; QS Příslušné směrnice EU: 2006/42 EG 2006/95 EC 2004/108 EG 2000/14 EG 2002/95/EC (RoHS) REACH EG-VO Nr. 1907/2006 Použité harmonizované normy: EN :2002+A1+A11+A12+A2 EN /A2:2006 EN :2006 EN 50366/A1:2006 EN :2006 EN /A1:2001 EN :2001 EN :2006 EN :2006 EN 14875:2004 ZEK Rep.Ref Certifikační místo: TÜV SÜD Product Service GmbH, Ridlerstraße 65, München, Germany Záruka Záruka se vztahuje výhradně na nedostatky způsobené vadou materiálu nebo výrobní vadou. Při reklamaci v záruční době je třeba přiložit originální doklad o koupi s datem prodeje. Do záruky nespadá neodborné použití jako např. přetížení přístroje, použití násilí, poškození cizím zásahem nebo cizími předměty. Nedodržení návodu k použití a montáži a normální opotřebení rovněž nespadá do záruky. Všeobecné bezpečnostní pokyny Přístroj před každým použitím zkontrolujte. Přístroj se nesmí používat, jsou-li poškozena či opotřebena bezpečnostní zařízení a/nebo nože. Vždy je třeba dodržovat bezpečnostní pokyny. Přístroj používejte výhradně k účelům uvedeným v návodu k použití. Za bezpečnost na Vašem pracovišti jste odpovědni Vy sami. Před začátkem práce zkontrolujte plochu, kterou chcete stříhat. Odstraňte všechny cizí předměty, které najdete. I během práce dávejte pozor na cizí předměty. Pokud i přesto narazíte při stříhání na překážku, přístroj vypněte (pusťte spínač) a překážku odstraňte. Jsou-li nože zablokované, přístroj vypněte a poruchu odstraňte (silná větev, cizí předmět) tupým předmětem. Nikdy nepoužívejte prsty - nože, které jsou pod napětím, Vás mohou vážně zranit. Raději vyjměte akumulátor a teprve pak odstraňte poruchu. Nože po vypnutí přístroje ještě krátkou dobu dobíhají! 7
TCNF 185 TCNF 185 IX NO-FROST FRIGORÍFICO
 TCNF 185 TCNF 185 IX NO-FROST FRIGORÍFICO ATTENTION Cet appareil est destiné à un usage domestique uniquement. Toute utilisation autre que celle prévue pour cet appareil, ou pour une autre application
REFERENCE: MTF4 CODIC:
 MARQUE: PROLINE REFERENCE: MTF4 CODIC: 3523551 MTF4 AVERTISSEMENTS Cet appareil est destiné à un usage domestique uniquement. Toute utilisation autre que celle prévue pour cet appareil, ou pour une autre
BEDIENUNGS- UND SICHERHEITSHINWEISE 3 OPERATION AND SAFETY NOTES 19 UNITÀ PRINCIPALE LP PLUS INDICAZIONI PER L USO E PER LA SICUREZZA 47
 DE LADEGERÄT LP PLUS BEDIENUNGS- UND SICHERHEITSHINWEISE 3 GB MAIN UNIT LP PLUS OPERATION AND SAFETY NOTES 19 FR UNITÉ PRINCIPALE LP PLUS INSTRUCTIONS D UTILISATION ET CONSIGNES DE SÉCURITÉ 33 IT UNITÀ
Easy-6 Pivottür mit Seitenwand / Otočné dveře s boční stěnou
 Easy-6 Pivottür mit Seitenwand / Otočné dveře s boční stěnou Lesen Sie die Bedienungsanleitung sorgfältig durch und bewahren Sie diese für den späteren Gebrauch auf. Wir empfehlen die Montage unseres Produktes
Uživatelská příručka. USB Charger UCH20
 Uživatelská příručka USB Charger UCH20 Obsah Úvod...3 USB Charger popis... 3 Používání nabíječky USB... 4 Nabíjení zařízení... 4 Právní informace... 5 Declaration of Conformity...6 2 Úvod USB Charger popis
Litosil - application
 Litosil - application The series of Litosil is primarily determined for cut polished floors. The cut polished floors are supplied by some specialized firms which are fitted with the appropriate technical
UŽIVATELSKÁ PŘÍRUČKA
 UŽIVATELSKÁ PŘÍRUČKA Plni víry a naděje míříme kupředu. S odhodláním zlepšujeme své dovednosti. Zapomeňte na zklamání, ale nikoli na svůj nevyužitý potenciál. Touha překonat sám sebe a dosáhnout hranice
WICHTIG - FÜR SPÄTERE VERWENDUNG AUFBEWAHREN - SORGFÄLTIG LESEN.
 WICHTIG - FÜR SPÄTERE VERWENDUNG AUFBEWAHREN - SORGFÄLTIG LESEN. Ignorierung der Warnungen und Hinweise in der Gebrauchsanleitung können zu ernsten Verletzungen und Todesfällen führen. Achtung: Zur Vermeidung
PLASTICPARTS. -Parts not for use. -Teile werden nicht verwendet. -Pieces a ne pas utiliser. -Tyto díly nepoužívejte při stavbě. -
 742 SpitfireMk.VI 1/72 A> 70120 A PLASTICPARTS B> 70120 B C> 70120 C D> F> E> 70120 D 70120 E GUNZE 70120 F H4 C4 YELLOW H12 H13 C3 FLAT RED H33 C81 RUSSET H51 C11 LIGHT GULL GRAY H71 C21 MIDDLE STONE
ROLZ-2. Portable AV/Conference Center. Assembly Instructions
 1 ROLZ-2 Portable AV/Conference Center Assembly Instructions Rolz-2 Portable AV/Conference Center Part Drawing Description Qty Part Drawing Description Qty Hardware List A 1 ½ Flat Head Screw 2 EA P-1
Herzlichen Glückwunsch! Sie haben sich für ein Qualitätsprodukt der Firma Zangenberg entschieden.
 Herzlichen Glückwunsch! Sie haben sich für ein Qualitätsprodukt der Firma Zangenberg entschieden. Bitte lesen Sie die Anleitung vor der ersten Benutzung aufmerksam durch. Sie erhalten wichtige Hinweise
Qualität aus erster Hand! Sie haben sich für ein Markenprodukt der Firma Zangenberg entschieden.
 Qualität aus erster Hand! Sie haben sich für ein Markenprodukt der Firma Zangenberg entschieden. Bitte lesen Sie die Anleitung vor der ersten Benutzung aufmerksam durch. Sie erhalten wichtige Hinweise
EINBAUANWEISUNG FÜR SCHALLDÄMM-SET BWS/DWS MONTÁŽNÍ NÁVOD PRO ZVUKOVĚ IZOLAČNÍ SOUPRAVY BWS/DWS
 EINUNWEISUNG FÜR SCHLLÄMM-SET WS/WS MONTÁŽNÍ NÁVO PRO ZVUKOVĚ IZOLČNÍ SOUPRVY WS/WS Wichtige Hinweise - unbedingt beachten! ůležitá upozornění bezpodmínečně dodržujte! Schalldämm-Set muss vollständig und
VESTAVBOVÝ RÁM - ROLLO JUMBO
 VESTAVBOVÝ RÁM - ROLLO JUMBO Montageanleitung / Mounting Instruction / Montážní návod Nur von Erwachsenen zu bedienen! Kinder nicht an der Bildwand spielen lassen! Operation by adults only! Do not let
GFS 1020 # 58080 D GB F DK CZ SK NL I. GÜDE Slovakia s.r.o Podtúreň-Roveň 208 SK-033 01 Liptovský Hrádok
 GFS 1020 D GB F DK CZ SK NL I NOR S # 58080 Güde GmbH & Co. KG Birkichstraße 6 D-74549 Wolpertshausen www.guede.com Güde Scandinavia A/S Engelsholmvej 33 DK-8900 Randers www.guede.com UNICORE nářadí s.r.o.
USER'S MANUAL FAN MOTOR DRIVER FMD-02
 USER'S MANUAL FAN MOTOR DRIVER FMD-02 IMPORTANT NOTE: Read this manual carefully before installing or operating your new air conditioning unit. Make sure to save this manual for future reference. FMD Module
L-force Drives. EDK84DGFCxxxx.O=I. Ä.O=Iä. Montážní návod motec. E84DGFCxxxx. Komunikační modul Communication unit
 EDK8DGFCxxxx.O=I Ä.O=Iä L-force Drives Montážní návod 800 motec E8DGFCxxxx Komunikační modul Communication unit 0 0.7 kw 7.kW E8DG0a E8DG0b EDK8DGFCxxxx CS.0 V Warnings! Operation of this equipment requires
Mechanika Teplice, výrobní družstvo, závod Děčín TACHOGRAFY. Číslo Servisní Informace Mechanika: 5-2013
 Mechanika Teplice, výrobní družstvo, závod Děčín TACHOGRAFY Servisní Informace Datum vydání: 20.2.2013 Určeno pro : AMS, registrované subj.pro montáž st.měř. Na základě SI VDO č./datum: Není Mechanika
3/11 # 16949 D GB F DK CZ SK NL I NOR S H HR SLO. Güde Scandinavia A/S Engelsholmvej 33 DK-8900 Randers
 3/11 D GB F DK CZ SK NL I NOR S H HR SLO # 16949 Güde GmbH & Co. KG Birkichstraße 6 D-74549 Wolpertshausen Güde Scandinavia A/S Engelsholmvej 33 DK-8900 Randers GÜDE CZECH, s.r.o. Počernická 120 36017
ROLLO STANDARD ELECTRIC. Montageanleitung / Mounting Instruction / Montážní návod
 ROLLO STANDARD ELECTRIC Montageanleitung / Mounting Instruction / Montážní návod Teileliste / Parts List / Seznam dílů (1) 2x ( 2) 2x (3) 2x Nur von Erwachsenen zu bedienen! Kinder nicht an der Bildwand
Hi-Res Audio/DNC Headset MDR-NC750
 Uživatelská příručka Hi-Res Audio/DNC Headset MDR-NC750 Obsah Začínáme...3 Úvod...3 Přehled... 3 Základy práce...4 Nošení náhlavní soupravy...4 Připojení náhlavní soupravy k vašemu zařízení... 4 Nastavení
POLO 2.0. Art. Nr.: 5460 - BEZPEČNOST - OBSLUHA. Výhradní dovozce a distributor pro Českou republiku a Slovensko Caravan Centrum Hykro s.r.o.
 POLO 2.0 TERRASSENHEIZUNG PLYNOVÝ ZÁŘIČ GAS Výhradní dovozce a distributor pro Českou republiku a Slovensko Caravan Centrum Hykro s.r.o. Ořešská Enders Colsman 1542 AG 155 00 Praha 5 - Řeporyje tel.: +420
GUIDELINES FOR CONNECTION TO FTP SERVER TO TRANSFER PRINTING DATA
 GUIDELINES FOR CONNECTION TO FTP SERVER TO TRANSFER PRINTING DATA What is an FTP client and how to use it? FTP (File transport protocol) - A protocol used to transfer your printing data files to the MAFRAPRINT
STAVEBNÍ PŘIPRAVENOST GILOTINA VLO DIMENSIONAL SHEET VLO MASSBLATT VERTIKALER BESCHLAG VLO МОНТАЖ МЕТАЛЛОКОНСТРУКЦИИ ВОРОТ СИСТЕМЫ ГИЛЬОТИНА ВЛО
 CZ VOLNÝ PROSTOR PRO POHYBUJÍCÍ SE VRATA EN FREE SPACE FOR THE DOORMOVEMENT DE FREIRAUM FÜR DIE BEWEGUNGSABLÄUFE RU РАЗМЕРЫ НЕОБХОДИМЫЕ ДЛЯ УСТАНОВКИ ВОРОТ CZ A - šířka otvoru B - výška otvoru C - nadpraží
GFP 3500. Obj. č. 94615 D GB F DK CZ SK NL I. Güde GmbH & Co. KG Birkichstraße 6 D-74549 Wolpertshausen
 GFP 3500 D GB F DK CZ SK NL I NOR S Obj. č. 94615 Güde GmbH & Co. KG Birkichstraße 6 D-74549 Wolpertshausen www.guede.com Güde Scandinavia A/S Engelsholmvej 33 DK-8900 Randers www.guede.com UNICORE nářadí
ÚKLIDOVÁ TECHNIKA. Záruční list NÁVOD K OBSLUZE. Elektrická sněhová fréza ST 350. obj. číslo / product No.: 8159. Výrobek. Typ.
 Záruční list NÁVOD K OBSLUZE Výrobek Typ Datum Výrobní číslo Číslo výrobku ÚKLIDOVÁ TECHNIKA Elektrická sněhová fréza ST 350 obj. číslo / product No.: 8159 Odpad z elektrických výrobků nemůže být vyhazován
Manuel d'utilisation 4 Pokyny pro uživatele 5
 Manuel d'utilisation 4 Pokyny pro uživatele 2 1 4 3 6 1 : Interrupteur marche / arrêt - Hlavní vypínač Zapnuto/Vypnuto L interrupteur principal de la S LAN permet la mise sous tension et l arrêt des prises.
Hanriot HD.2 PLASTIC PARTS. Mr.METAL COLOR METALLICS
 8413 1/48 Hanriot HD.2 PLASTIC PARTS A> 3 B> 1 2 13 5 23 7 6 9 8 12 25 7 9 5 15 15 14 21 29 28 31 30 37 36 35 34 4 12 20 11 6 17 16 8 38 24 25 4 3 26 20 2 17 11 10 27 28 14 13 33 27 26 32 19 18 10 22 1
User manual SŘHV Online WEB interface for CUSTOMERS June 2017 version 14 VÍTKOVICE STEEL, a.s. vitkovicesteel.com
 1/ 11 User manual SŘHV Online WEB interface for CUSTOMERS June 2017 version 14 2/ 11 Contents 1. MINIMUM SYSTEM REQUIREMENTS... 3 2. SŘHV ON-LINE WEB INTERFACE... 4 3. LOGGING INTO SŘHV... 4 4. CONTRACT
ROLZ-2. Portable AV/Conference Center. Assembly Instructions
 1 ROLZ-2 Portable AV/Conference Center Assembly Instructions Rolz-2 Portable AV/Conference Center Part Drawing Description Qty Part Drawing Description Qty Hardware List A 1 ½ Flat Head Screw 2 EA P-1
ROEDL & PARTNER ERSTES BÜRO IN PRAG MATERIÁLY PRO UČITELE
 ROEDL & PARTNER ERSTES BÜRO IN PRAG MATERIÁLY PRO UČITELE Roedl & Partner: Erstes Büro in Prag A: So und Sie haben sich vorgestellt, dass Sie hier in Prag ein Büro haben werden, ist das richtig? B: Wir
Řetězový kladkostroj 1000 kg
 Řetězový kladkostroj 1000 kg Deutsch English Français Dansk Čeština Slovenčina Nederlands Italiano Norsk Svenska Magyar Hrvatski Slovenščina Româneşte Български Bosanski Srpski # 55103 Copyright Güde GmbH
Size / Světlost : DN 1/4 to 4 / DN 1/4 až 4
 Size / Světlost : 1/4 to 4 / 1/4 až 4 Ends / Konce : Threaded BSP / Závitové BSP Min. Temperature / Minimální teplota : -20 C Max. Temperature / Maximální teplota : +180 C Max. Pressure / Maximální tlak
2N LiftIP. IO Extender. Communicator for Lifts. Version
 2N LiftIP Communicator for Lifts IO Extender Version 2.4.0 www.2n.cz Description The IO extender helps you extend 2N LiftIP with 1 input and 2 outputs. The purpose of the input is to cancel the rescue
NTS 1600 I IPX4 # 16830 D GB F DK CZ SK NL I. GÜDE Slovakia s.r.o Podtúreň-Roveň 208 SK-033 01 Liptovský Hrádok
 NTS 1600 I D GB F DK CZ SK NL I NOR S IPX4 # 16830 Güde GmbH & Co. KG Birkichstraße 6 D-74549 Wolpertshausen Güde Scandinavia A/S Engelsholmvej 33 DK-8900 Randers GÜDE CZECH, s.r.o. Počernická 120 36017
Manuel d'utilisation 4 Pokyny pro uživatele 5
 Manuel d'utilisation 4 Pokyny pro uživatele 5 4 2 1 3 7 5 6 1 : Interrupteur marche / arrêt - Hlavní vypínač Zapnuto/Vypnuto L interrupteur principal de la S8 LAN TV permet la mise sous tension et l arrêt
Stříkací pistole. Striekacia pištoľ 10.25-007
 Stříkací pistole Profi-Farbpistole Striekacia pištoľ 10.25-007 CZ 7 6 2 4 5 3 1 1) rychloupínací konektor 2) regulace množství barvy 3) regulace množství vzduchu 4) nastavení stříkacího modulu 5) spoušť
Magnetický ventil s kulovým kohoutem. Ventil pro doplňování. Návod pro montáž, provoz a údržbu Stav k 01/03
 Ventil pro doplňování Návod pro montáž, provoz a údržbu Všeobecně Všeobecné bezpečnostní pokyny Ventil doplňování "Magnetický ventil s kulovým kohoutem" je smontovaná skupina armatur, která se skládá z
QUARZ 2000 S # Güde GmbH & Co. KG - Birkichstrasse 6 - D Wolpertshausen - Deutschland
 QUARZ 2000 S #73050 Deutsch 3 Originalbetriebsanleitung Quarz-Terrassenstrahler English 7 Original Operating Instructions for the Quarz Terrace Radiator Français 11 Mode d emploi original du radiateur
NÁVOD K OBSLUZE KOMBINOVANÝ OBUVNICKÝ STROJ BT - 202
 NÁVOD K OBSLUZE KOMBINOVANÝ OBUVNICKÝ STROJ BT - 202 OBSAH I. Hlavní součásti obuvnického stroje. II. Konstrukce III. Schéma elektrického zapojení IV. Instalace a uvedení do provozu V. Obsluha stroje VI.
Training Board TB series 3. SolderBoard
 Training Board TB series 3 SolderBoard Elektronická stavebnice SOLDERBOARD byla speciálně navržena pro účely praktické výuky ručního osazování a pájení desek plošných spojů v technologii SMT. Je levným
NÁVOD K OBSLUZE. Pásová pila na kov MBS 115 E Obj. č. 40536. Před použitím si prosím pečlivě pročtěte tento návod k obsluze
 NÁVOD K OBSLUZE Pásová pila na kov MBS 115 E Obj. č. 40536 Před použitím si prosím pečlivě pročtěte tento návod k obsluze Güde GmbH & Co. KG Birkichstrasse 6 74549 Wolpertshausen www.guede.com Obsah Označení
GENERAL INFORMATION RUČNÍ POHON MANUAL DRIVE MECHANISM
 KATALOG CATALOGUE RUČNÍ POHONY PRO VENKOVNÍ PŘÍSTROJE, MONTÁŽ NA BETONOVÉ SLOUPY MANUAL DRIVE MECHANISM FOR THE ACTUATION OF OUTDOOR TYPE SWITCHING DEVICES MOUNTED ON THE CONCRETE POLES TYP RPV ISO 9001:2009
Personenwaage Osobní váha MD 13894. Bedienungsanleitung Návod k obsluze
 Personenwaage Osobní váha MD 13894 Bedienungsanleitung Návod k obsluze Inhalt Zu dieser Anleitung... 2 In dieser Anleitung verwendete Symbole und Signalwörter...2 Einsatzbereich/bestimmungsgemäßer Gebrauch...3
GRH 350 # 18019. GÜDE Slovakia s.r.o Podtúreň-Roveň 208 SK-033 01 Liptovský Hrádok. Güde GmbH & Co. KG Birkichstraße 6 D-74549 Wolpertshausen
 GRH 350 # 18019 Güde GmbH & Co. KG Birkichstraße 6 D-74549 Wolpertshausen Güde Scandinavia A/S Engelsholmvej 33 DK-8900 Randers www.guede.com www.guede.com GÜDE ECH, s.r.o. Počernická 120 36017 Karlovy
 11.12. 100 ΕΙΣΟΔΟΣ = E / ENTRANCE = E = = 1174 550 ΤΥΠΟΠΟΙΗΜΕΝΟ ΚΥ = 2000 (ΕΠΙΛΟΓΗ: 2100) / CH STANDARD = 2000 (OPTIONAL: 2100) 243 50 ΚΥ/CH + 293 ΚΥ/CH +103 100 ΚΥ /CH 6 11 6 20 100 0,25 ΚΑ (CO) + 45
FIRE INVESTIGATION. Střední průmyslová škola Hranice. Mgr. Radka Vorlová. 19_Fire investigation CZ.1.07/1.5.00/
 FIRE INVESTIGATION Střední průmyslová škola Hranice Mgr. Radka Vorlová 19_Fire investigation CZ.1.07/1.5.00/34.0608 Výukový materiál Číslo projektu: CZ.1.07/1.5.00/21.34.0608 Šablona: III/2 Inovace a zkvalitnění
Brzda Bremse Brake F-350. Katalog náhradních dílů Ersatzteilkatalog Spare parts catalogue
 Brzda Bremse Brake F-350 Katalog náhradních dílů Ersatzteilkatalog Spare parts catalogue 03 / 2014 2 Pokyny k objednávání náhradních dílů Tento katalog obsahuje seznam součástí a jejich sestavení do montážních
Pneumatické sponkovačky Pneumatické hřebíkovačky
 Pneumatické sponkovačky Pneumatické hřebíkovačky CZ Návod k obsluze Pneumatické sponkovačky Pneumatické hřebíkovačky Pneumatická sponkovačka KN 14 # 40088 Pneumatická sponkovačka KN 26 # 40087 Pneumatická
Assembly Instructions, Montageanleitung, Montážní návod HB-S
 Assembly Instructions, Montageanleitung, Montážní návod HB-S A-44pcs B1-30pcs B2-12pcs B3-8pcs B4-4pcs C-2pcs D-2pcs E-1pc G - 4pcs F-1pc H-4pcs Bech dogs, Bankhaken, Poděráky 8x40 mm 4x20mm 7x50mm 6x30mm
Návod k obsluze/user manual LAD2 Propojovací krabička/cable junction box
 Návod k obsluze/user manual LAD2 Propojovací krabička/cable junction box K zapojení/for connecting:! optického senzoru/optoelectronic safety edges! kontaktu průchozích dveří/es! lankového kontaktu/es pro
GSS 700 P # 94220 D GB F DK CZ SK NL I NOR S H HR SLO. GÜDE Slovakia s.r.o Podtúreň-Roveň 208 SK-033 01 Liptovský Hrádok
 GSS 700 P D GB F DK CZ SK NL I NOR S H HR SLO # 94220 Güde GmbH & Co. KG Birkichstraße 6 D-74549 Wolpertshausen Güde Scandinavia A/S Engelsholmvej 33 DK-8900 Randers Güde Czech s.r.o. Počernická 120 CZ-360
SOLÁRNÍ ODPUZOVAČ PTÁKŮ
 SOLÁRNÍ ODPUZOVAČ PTÁKŮ VSS 1500 E ARTIKLOVÉ ČÍSLO: 94148 PŘED PRVNÍM POUŽITÍM SI POZORNĚ PŘEČTĚTE MANUÁL A BEZPEČNOSTNÍ POKYNY! DEMA-VERTRIEBS GMBH IM TOBEL 4 74547 ÜBRIGSHAUSEN WWW.DEMA-VERTRIEB.COM
Uživatelská příručka. Xperia P TV Dock DK21
 Uživatelská příručka Xperia P TV Dock DK21 Obsah Úvod...3 Přehled zadní strany stanice TV Dock...3 Začínáme...4 Správce LiveWare...4 Upgradování aplikace Správce LiveWare...4 Použití stanice TV Dock...5
GSH # 18016, 18017, 18018, 84115, 84117, 84118, 84120. Güde GmbH & Co. KG Birkichstraße 6 D-74549 Wolpertshausen
 GSH # 18016, 18017, 18018, 84115, 84117, 84118, 84120 Güde GmbH & Co. KG Birkichstraße 6 D-74549 Wolpertshausen Güde Scandinavia A/S Engelsholmvej 33 DK-8900 Randers GÜDE CZECH, s.r.o. Počernická 120 36017
Roger Clip-On Mic. Quick setup guide / Schnellstartanleitung Guide d installation rapide / Stručný návod k použití
 Roger Clip-On Mic Quick setup guide / Schnellstartanleitung Guide d installation rapide / Stručný návod k použití Components Komponenten Composants Komponenty Roger Clip-On Mic 2 Setting up the docking
GASTRO-INOX. Stránka 1. Značka a typ/marke und Typ/Mark and typ 1221103,1220301, 1220501. Výrobce/Hersteller/Producer MKN Germany
 NABÍDKA / ANGEBOT / OFFER Zařízení / Gerät / Equipment Grilovací deska,fritéra,vodní lázeň Grillplatte, Friteuse, Wasserbad Griddle, deep fryer, bain marie Značka a typ/marke und Typ/Mark and typ 1221103,1220301,
1-AYKY. Instalační kabely s Al jádrem. Standard TP-KK-133/01, PNE 347659-3. Konstrukce. Použití. Vlastnosti. Installation cables with Al conductor
 Instalační kabely s Al jádrem Installation cables with Al conductor Standard TP-KK-133/01, PNE 347659-3 4 3 2 1 Konstrukce Construction 1 Hliníkové jádro Aluminium conductor 2 Izolace PVC 3 Výplňový obal
GE 290 TC # 20007. Copyright Güde GmbH & Co. KG - Birkichstrasse 6-74549 Wolpertshausen - Germany
 GE 290 TC Deutsch 03 English 11 Français 19 Čeština 27 Slovenčina 35 Nederlands 43 Italiano 51 Magyar 59 Hrvatski 67 Slovenščina 75 Româneşte 83 Български 91 Türkçe 99 # 20007 Copyright Güde GmbH & Co.
SERVISNÍ MANUÁL PEGAS 250 E CEL OVO SERVICE MANUAL PEGAS 250 E CEL OVO
 MG136-1 PEGAS 250 E CEL OVO SERVICE MANUAL page 1 SERVISNÍ MANUÁL PEGAS 250 E CEL OVO SERVICE MANUAL PEGAS 250 E CEL OVO 1. VAROVÁNÍ WARNING UPOZORNĚNÍ Pouze osoba splňující kvalifikaci danou zákonem je
PC/104, PC/104-Plus. 196 ept GmbH I Tel. +49 (0) / I Fax +49 (0) / I I
 / I Fax +49 (0) / I I") E L E C T R O N I C C O N N E C T O R S 196 ept GmbH I Tel. +49 (0) 88 61 / 25 01 0 I Fax +49 (0) 88 61 / 55 07 I E-Mail sales@ept.de I www.ept.de Contents Introduction 198 Overview 199 The Standard 200
E L E C T R O N I C C O N N E C T O R S 196 ept GmbH I Tel. +49 (0) 88 61 / 25 01 0 I Fax +49 (0) 88 61 / 55 07 I E-Mail sales@ept.de I www.ept.de Contents Introduction 198 Overview 199 The Standard 200
Amp1.
 Amp1 www.evolveo.com Vážený zákazníku, děkujeme, že jste si vybral produkt EVOLVEO Amp 1. Adaptér: DC 5 V 550 ma AC 220-240 V Funkce zesilovače: Zesílení přijímaného signálu až o 20dB pro všechny pasivní
2N Voice Alarm Station
 2N Voice Alarm Station 2N Lift1 Installation Manual Version 1.0.0 www.2n.cz EN Voice Alarm Station Description The 2N Voice Alarm Station extends the 2N Lift1/ 2N SingleTalk with an audio unit installed
 [KLICK] GB Instruction Manual POWERLINE 4 LIGHT FOREWORD Dear Customer, Thank you for purchasing the POWERLINE 4 LIGHT charger. These operating instructions will help you to get the best from your charger.
Instalační kabely. Installation cables NYM 300/500 V. Konstrukce: Construction: Použití: Application: Vlastnosti: Properties: Standard: VDE
 Instalační kabely Installation cables Standard: VDE 0250-204 4 3 2 1 Konstrukce: Construction: 1 Měděná plná holá jádra, třída 1 dle ČSN EN 60228 Solid plain copper conductors, class 1 acc. to ČSN EN 60228
GMK 350 T # 40532. GÜDE Slovakia s.r.o Podtúreň-Roveň 208 SK-033 01 Liptovský Hrádok. Güde Scandinavia A/S Engelsholmvej 33 DK-8900 Randers
 GMK 350 T D GB F DK SK NL I NOR S # 40532 Güde GmbH & Co. KG Birkichstraße 6 D-74549 Wolpertshausen Güde Scandinavia A/S Engelsholmvej 33 DK-8900 Randers GÜDE ECH, s.r.o. Počernická 120 36017 Karlovy Vary
Web Element. Furniture for beautiful environments
 Web Element Furniture for beautiful environments Element Element range chairs boast subtle design and strikingly alluring look of backrest upholstery. Element chairs have been designed as a great working
2N LiftIP. Voice Alarm Station. Communicator for Lifts. Version
 2N LiftIP Communicator for Lifts Voice Alarm Station Version 2.4.0 www.2n.cz Description The 2N Voice Alarm Station is a switch that helps you extend 2N LiftIP with one or more audio units installed on
eduard WEEKEND EDITION
 3741 1:35 Pz.Kpfw. VI Ausf.B Tiger II PLASTIC PARTS A> B> C> D> eduard WEEKEND EDITION E> F> G> 2 pcs. H> 2 pcs. -Parts not for use. -Teile werden nicht verwendet. -Pieces a ne pas utiliser. -Tyto díly
ČSN EN ISO Oprava 1
 ICS 75.180.10 ČSN EN ISO 10418 Oprava 1 45 0029 Prosinec 2009 ČESKÁ TECHNICKÁ NORMA Naftový a plynárenský průmysl Těžba v příbřežních oblastech Analýza, navrhování, výstavba a testování základních bezpečnostních
Začínáme. Entfernen Sie beide Seitenteile und die Gehäuseoberseite. Remove both side panels and the case top. Odstraňte oba boční a horní panel.
 Začínáme Entfernen Sie beide Seitenteile und die Gehäuseoberseite. Remove both side panels and the case top. Odstráňte oba bočné a horný panel. Odstraňte oba boční a horní panel. Entfernen Sie die Frontblende,
Ecosun CH. Napětí V. 1096x155x115* 230 V 1N I IP 44 Ecosun CH x155x115*
 Návod k obsluze a montáži N631/R02 (06.08.14 ) Ecosun CH Sálavé panely do kostelních lavic 1. Použití Sálavé panely Ecosun CH jsou určeny k instalaci pod pevně připevněné kostelní lavice. Panely se instaluji
450 / 900 / 1300. Automatické univerzální olejové hořáky
 Automatické univerzální olejové hořáky 450 / 900 / 1300 Zástupce pro ČR: EKOTEZ spol. s r.o. Koněvova 47 130 00 Praha 3 Česká republika Tel.: + 420 221 599 163 Fax: + 420 222 582 495 vytapeni@ekotez.cz
TechoLED H A N D B O O K
 TechoLED HANDBOOK Světelné panely TechoLED Úvod TechoLED LED světelné zdroje jsou moderním a perspektivním zdrojem světla se širokými možnostmi použití. Umožňují plnohodnotnou náhradu žárovek, zářivkových
Saurer Regen. V rámci následujícího úkolu se studenti seznámí s odborným textem v němčině. Dozvědí se základní informace o kyselém dešti.
 NĚMČINA Saurer Regen V rámci následujícího úkolu se studenti seznámí s odborným textem v němčině. Dozvědí se základní informace o kyselém dešti. Gymnázium Frýdlant, Mládeže 884, příspěvková organizace
Ventil zpětný Z15.1 DN 10 50, PN 100 400 Piston check valve Z15.1 DN 10 50, PN 100 400
 DN 10 50, PN 100 400 DN 10 50, PN 100 400 Použití Zpětný ventil je samočinná armatura, zamezující zpětnému proudění provozní tekutiny, určená pro vodu, vodní páru, plyny i jiné provozní tekutiny používané
DHH 1050/6 TC # 01959 DHH 1050/7 TC # 01957 DHH 1050/8 TC # 01963
 DHH 1050/6 TC # 01959 DHH 1050/7 TC # 01957 DHH 1050/8 TC # 01963 D CZ Bedienungsanleitung Holzspalter Návod k obsluze Štípač špalků Güde GmbH & Co. KG Birkichstraße 6 D-74549 Wolpertshausen Güde Scandinavia
MARQUE: CANDY REFERENCE: CI 640 CB CODIC:
 MARQUE: CANDY REFERENCE: CI 640 CB CODIC: 4308867 NOTICE Instruction Manual For Induction Hob Table De Cuisson Induction Návod k použití pro indukní varnou desku Brugervejledning til induktionskogetop
Gebrauchsanweisung - Originalbetriebsanleitung Vor Inbetriebnahme Gebrauchsanweisung lesen!
 ART 522 AA Akku-Rasentrimmer Akumulátorová strunová sekaèka Akumulátorová strunová kosaèka DE CZ SK Gebrauchsanweisung - Originalbetriebsanleitung Vor Inbetriebnahme Gebrauchsanweisung lesen! Návod k použití
USER'S MANUAL FAN MOTOR DRIVER FMD-01, FMD-03
 USER'S MANUAL FAN MOTOR DRIVER FMD-01, FMD-03 IMPORTANT NOTE: Read this manual carefully before installing or operating your new air conditioning unit. Make sure to save this manual for future reference.
Instalační kabely s Cu jádrem
 Instalační kabely s Cu jádrem Installation cables with Cu conductor Standard: VDE 0276 T.603-3G-2 4 3 2 1 Konstrukce: Construction: 1 Měděné jádro Copper conductor 2 Izolace PVC 3 Výplňový obal 4 Plášť
ČSN EN ISO OPRAVA
 ICS 17.060; 71.040.20 ČSN EN ISO 8655-6 OPRAVA 1 70 4255 Srpen 2009 ČESKÁ TECHNICKÁ NORMA Pístové titrační přístroje Část 6: Gravimetrická metoda zkoušení Úřad pro technickou normalizaci, metrologii a
The tension belt serves as a tension unit. After emptying the belt is cleaned with a scraper.
 Second School Year BELT AND WORM CONVEYORS They are machines for transporting piece or loose materials even for great distances. In loaders and unloaders it is not necessary to stop the conveyor. The transport
BX 710 # 58020 # 58520 # 58520 (CH) D GB F DK CZ SK NL I NOR S H HR SLO. Güde GmbH & Co. KG Birkichstraße 6 D-74549 Wolpertshausen
 D GB F DK CZ SK NL I NOR S H HR SLO. Güde GmbH & Co. KG Birkichstraße 6 D-74549 Wolpertshausen") BX 710 D GB F DK CZ SK NL I NOR S H HR SLO # 58020 # 58520 # 58520 (CH) Güde GmbH & Co. KG Birkichstraße 6 D-74549 Wolpertshausen Güde Scandinavia A/S Engelsholmvej 33 DK-8900 Randers GÜDE CZECH, s.r.o.
BX 710 D GB F DK CZ SK NL I NOR S H HR SLO # 58020 # 58520 # 58520 (CH) Güde GmbH & Co. KG Birkichstraße 6 D-74549 Wolpertshausen Güde Scandinavia A/S Engelsholmvej 33 DK-8900 Randers GÜDE CZECH, s.r.o.
SPECIFICATION FOR ALDER LED
 SPECIFICATION FOR ALDER LED MODEL:AS-D75xxyy-C2LZ-H1-E 1 / 13 Absolute Maximum Ratings (Ta = 25 C) Parameter Symbol Absolute maximum Rating Unit Peak Forward Current I FP 500 ma Forward Current(DC) IF
Izolační manipulační tyče typ IMT IMT Type Insulated Handling Rod
 KATALOG CATALOGUE 024/09/2011 IZOLAČNÍ MANIPULAČNÍ TYČ INSULATED HANDLING ROD TYP IMT KOVOVÁ MANIPULAČNÍ TYČ METALLIC HANDLING ROD TYP KMT ISO 9001:2009 ISO 14001:2005 Izolační manipulační tyče typ IMT
ES prohlášení o shodě
 Výrobce Manufacturer Protherm Production s.r.o. Jurkovicova 45 909 01 Skalica Slovenska republika Označení výrobku Product description Závěsný plynový kotel, se systémem přívodu vzduchu / odvodu spalin
Neplatí pro přístroje série Pro EVO!
 Neplatí pro přístroje série Pro EVO! Montážní návod vkládací řídící jednotka pro WGB C/D, WGB-K C, WBS/WBC C/D pro BGB, BBS C, BBK C/D pro SGB C/D Neplatí pro přístroje série Pro EVO! Obsah Často kladené
GRT # 94003/94008 D GB F DK CZ SK NL I NOR S H HR SLO. Güde GmbH & Co. KG Birkichstraße 6 D-74549 Wolpertshausen
 GRT D GB F DK CZ SK NL I NOR S H HR SLO # 94003/94008 Güde GmbH & Co. KG Birkichstraße 6 D-74549 Wolpertshausen www.guede.com Güde Scandinavia A/S Engelsholmvej 33 DK-8900 Randers www.guede.com Güde/UNICORE
22000 PRO # Güde GmbH & Co. KG - Birkichstrasse 6 - D Wolpertshausen - Deutschland
 22000 PRO #75160 Deutsch D 3 Originalbetriebsanweisung DRUCKLUFT-STABSCHLEIFER English GB 7 Translation of original operating instructions PNEUMATIC ROD GRINDING MACHINE Français F 11 Traduction du mode
User Guide / Gebrauchsanweisung Mode d emploi / Uživatelská příručka
 User Guide / Gebrauchsanweisung Mode d emploi / Uživatelská příručka Components and functions Komponenten und Funktionen Composants et fonctions Komponenty a funkce Roger DynaMic e Power supply Netzteil
Deutsch. Einstellhilfe Einachser. Grundsätzlich sollten die Seilzugeinstellungen immer 1 x im Jahr nachgeprüft werden. Einstellhilfe Kupplung
 Deutsch Einstellhilfe Einachser Grundsätzlich sollten die Seilzugeinstellungen immer 1 x im Jahr nachgeprüft werden. Einstellhilfe Kupplung Die Kupplung ist vom Werk aus grundeingestellt. 2. Ganghebel
ABS DOORS TÜREN DVEŘE
 ABS DOORS TÜREN DVEŘE Obsah 4 TECHNIC 6 Agata 7 Erika 8 Gabriela 9 Linda 10 Nora 11 Olivie 12 Stela 14 CLASSIC 16 Alena 17 Anna 18 Dana 19 Eva 20 Iveta 21 Jana 22 Petra 23 Radka 24 INFO 26 Minimální rozměry
Einbauanleitung zu Elektro-Einbausatz 736652 Elektro-Einbausatz für Anhängerkupplung, 7-polig, 12 Volt, nach ISO 1724
 Einbauanleitung zu Elektro-Einbausatz 736652 Elektro-Einbausatz für Anhängerkupplung, 7-polig, 12 Volt, nach ISO 1724 PEUGEOT 307 Kombi ab ab 04/02 PEUGEOT 307 Station Wagon ab 04/02 Inhalt: 1 Steckdosen-Gehäuse
RP 36, RP 72 # 30007 # 30008 D GB F DK CZ SK NL I. Güde GmbH & Co. KG Birkichstraße 6 D-74549 Wolpertshausen
 RP 36, RP 72 D GB F DK CZ SK NL I # 30007 NOR S # 30008 Güde GmbH & Co. KG Birkichstraße 6 D-74549 Wolpertshausen Güde Scandinavia A/S Engelsholmvej 33 DK-8900 Randers UNICORE nářadí s.r.o. P.O.Box 8 Počernická
Návod k obsluze a montáži N129/R04 (10.03.14 ) SUŠÁK NA RUCE
 SUŠÁK NA RUCE") Návod k obsluze a montáži N129/R04 (10.03.14 ) SUŠÁK NA RUCE Čtěte prosím pozorně informace uvedené v tomto návodu, který obsahuje důležité pokyny pro bezpečnou montáž, použití a údržbu jednotky. Uchovávejte
Návod k obsluze a montáži N129/R04 (10.03.14 ) SUŠÁK NA RUCE Čtěte prosím pozorně informace uvedené v tomto návodu, který obsahuje důležité pokyny pro bezpečnou montáž, použití a údržbu jednotky. Uchovávejte
GWS 400 ECO # 01841 D GB F DK CZ SK NL I. Güde Scandinavia A/S Engelsholmvej 33 DK-8900 Randers
 GWS 400 ECO D GB F DK CZ SK NL I NOR S # 01841 Güde GmbH & Co. KG Birkichstraße 6 D-74549 Wolpertshausen www.guede.com Güde Scandinavia A/S Engelsholmvej 33 DK-8900 Randers www.guede.com UNICORE nářadí
ČSN EN ISO OPRAVA
 ICS 11.040.70 ČSN EN ISO 11981 OPRAVA 1 19 5208 Září 2009 ČESKÁ TECHNICKÁ NORMA Oční optika Kontaktní čočky a prostředky pro ošetřování kontaktních čoček Stanovení fyzikální kompatibility prostředků pro
UPM3 Hybrid Návod na ovládání Čerpadlo UPM3 Hybrid 2-5 Instruction Manual UPM3 Hybrid Circulation Pump 6-9
 www.regulus.cz UPM3 Hybrid Návod na ovládání Čerpadlo UPM3 Hybrid 2-5 Instruction Manual UPM3 Hybrid Circulation Pump 6-9 CZ EN UPM3 Hybrid 1. Úvod V továrním nastavení čerpadla UPM3 Hybrid je profil PWM
Kapitola 2 Dokumentace č. 11 103 CS
 Kapitola Dokumentace č. 0 CS Přívod oleje kanálový Sortimentní číslo výrobku 0088-6-5-70040 Ortlinghaus-Werke GmbH Postfach 4 40 4907 Wermelskirchen Kenkhauser Str. 5 499 Wermelskirchen Deutschland Tel.