English Polski Magyar Česky Slovenčina Deutsch
|
|
|
- Petr Mašek
- před 8 lety
- Počet zobrazení:
Transkript
1
2
3 English... 2 Polski Magyar Česky Slovenčina Deutsch V 1.2

4 Table of contents Information about trademarks... 4 Introduction... 4 Intended use... 4 Supplied items... 5 Control elements... 6 Technical data... 7 SilverCrest SFA 30 B1 hands-free kit... 7 Car charger adapter SDC Rating plate... 8 Safety instructions... 8 Copyright Prior to use First use Inserting the lithium-ion battery Charging the lithium-ion battery Switching on/off the hands-free kit English

5 Connect to compatible mobile phones Making calls Calling via voice dialling Accept / reject calls Volume setting Muting microphone Ending call Redialling Mounting on the sun visor Storage when not in use LED indicator Cleaning / maintenance Maintenance Cleaning Troubleshooting Environmental and disposal information Conformity information Warranty and servicing advice English - 3

6 Information about trademarks and Bluetooth are registered trademarks of Bluetooth SIG, Inc. USB is a registered trademark. Other names and products may be the trademarks or registered trademarks of their respective owners. Introduction Thank you for purchasing a SilverCrest product. The SilverCrest Bluetooth 3.0 SFA 30 B1 hands-free kit, hereinafter referred to as hands-free kit, enables you to conveniently use your mobile phone in hands-free mode. Power is supplied via a 12V/24V car power outlet. Intended use This hands-free kit is an electronic communications device. It allows you to make or answer telephone calls while driving, without having to hold your mobile phone. This hands-free kit is not designed for commercial use or operation in a company. Use the hands-free kit only for private purposes as any other use is not as intended. This hands-free kit meets all relevant norms and standards in conjunction with CE conformity. In the event of any modification to the hands-free kit that was not approved by the manufacturer, compliance with these standards is no longer guaranteed. The manufacturer does not accept any liability for any resulting damage or faults in such cases. Please observe the regulations and laws in the country of use. 4 - English

7 Supplied items Remove the device and all the accessories from the packaging. Remove the packaging material and check whether all the parts are complete and undamaged. In the case that you find anything missing or damaged, please contact the manufacturer. 1. SilverCrest Bluetooth 3.0 SFA 30 B1 hands-free kit 2. Lithium-ion battery BL-5B, 3.7V/700mAh 3. Car charger adapter SDC Mounting clip 5. These instructions (symbolic representation) English - 5

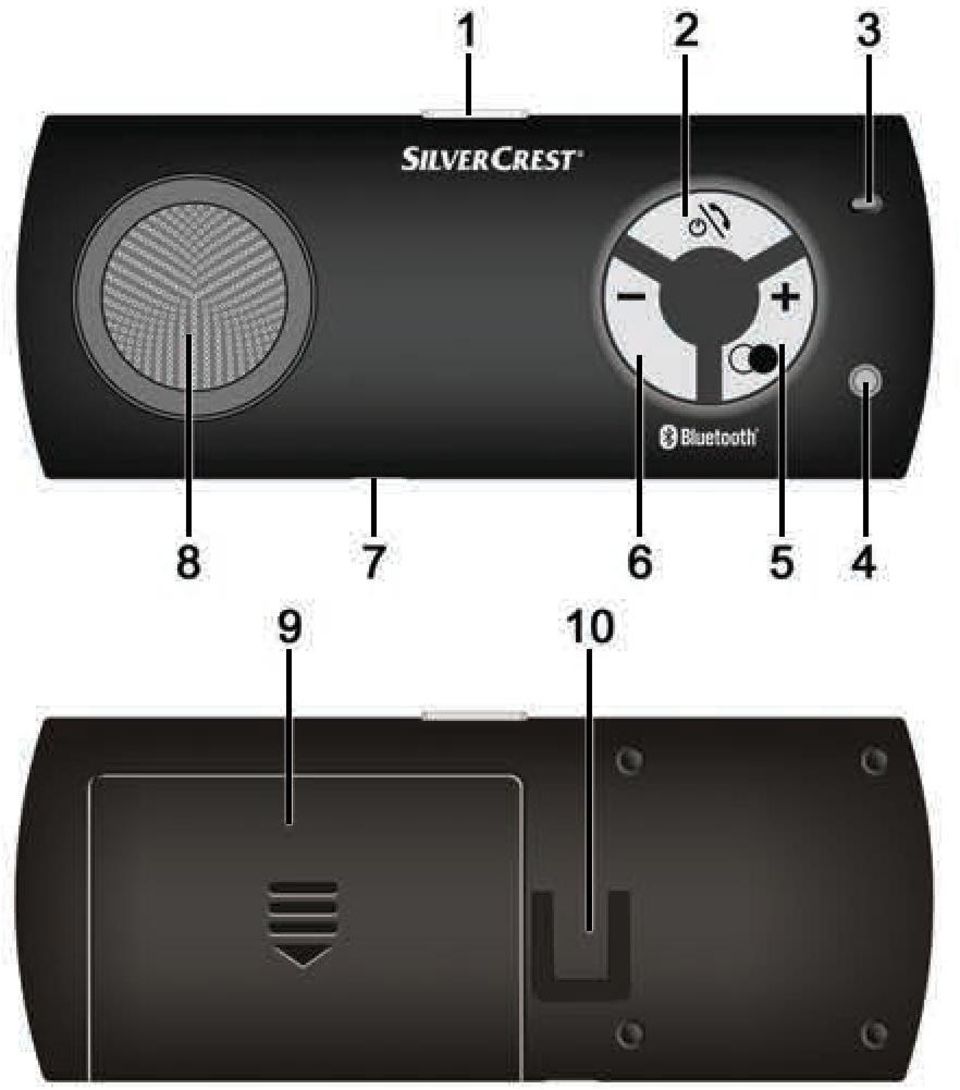
8 Control elements These instructions have a fold-out cover. The hands-free kit is illustrated with numbers on the inside cover. The numbers indicate the following: 1 Mute button (microphone muting) 2 Multifunction button (on/off, answer/end call, connect) 3 Microphone 4 LED indicator 5 + button (increase volume, redial) 6 - button (reduce volume) 7 USB charging socket 8 Loudspeaker 9 Battery compartment 10 Mounting bracket for retaining clip 6 - English
 3 Microphone 4 LED indicator 5 + button (increase volume, redial) 6 - button (reduce volume) 7 USB")
9 Technical data SilverCrest SFA 30 B1 hands-free kit SilverCrest SFA 30 B1 Operating voltage: 5V Battery: li-ion battery BL-5B; Shen Zhen Xin Hong Xing Energy Technology CO., LTD; 3.7V/700mAh/2.59Wh Bluetooth specification: V3.0 + EDR Profile support: BT headset, hands-free profile Frequency range: to 2.480GHz Charging time: max. 3 hours Talk time: up to 6 hours Standby time: up to 600 hours Dimensions (W x H x D): approx. 118 x 47 x 17mm Weight: approx. 76 g Operating temperature: 0 C to +45 C Storage temperature: -20 C to +60 C Car charger adapter SDC8311 Fuse: T2A L 250V Input voltage: 12-24V Output voltage: 5V Output current: 500mA English - 7

10 Rating plate The rating plate can be found in the battery compartment (9) of the hands-free kit. The technical data and design may be changed without notification. Safety instructions Before using the hands-free kit for the first time, read the following instructions and pay attention to all warnings, even if you are familiar with handling electronic devices. Store these instructions in a safe place for future reference. If you sell the hands-free kit or pass it on, always include these instructions. They are an integral part of the hands-free kit. Explanation of the symbols used in these instructions DANGER! This symbol together with the word DANGER indicates an impending dangerous situation which, if not prevented, can lead to serious injuries or even death. WARNING! This symbol together with the word WARNING indicates important information for the safe operation of the device and user safety. This symbol indicates other important information on the topic. 8 - English

11 DANGER! This hands-free kit can be used by children aged 8 and older and by persons with reduced physical, sensory or mental abilities or lack of experience and knowledge if they are supervised or have been instructed on the safe use of the hands-free kit and understand the resulting risks. Children must not play with the hands-free kit. Cleaning and user maintenance must not be carried out by children without supervision. Always keep plastic packaging away from children. It poses a suffocation risk! DANGER! If smoke is produced, or there are any unusual sounds or smells, disconnect the hands-free kit from the power supply immediately and remove the battery. In such cases, the hands-free kit should not be used until it has been inspected by authorised service personnel. Never inhale smoke from a potential device fire. If you have inhaled smoke, however, consult a doctor. The inhalation of smoke can be harmful. WARNING! The hands-free kit and its accessories must not become damaged in order to prevent hazards. The hands-free kit must not be used if it is damaged. DANGER! Ensure that no fire sources (e.g. burning candles) are placed on or near the hands-free kit. It poses a fire hazard! WARNING! The hands-free kit must never be exposed to any direct heat sources (for example, heaters) or direct sunlight or artificial light. Also avoid contact with dripping water and splashes and corrosive liquids. Do not use the hands-free kit near water. In particular, the hands-free kit should never be submerged in liquid and do not place any items filled with liquid, for example, vases or drinks, near the hands-free kit. Also ensure that the handsfree kit is never subjected to excessive shocks and vibrations. Furthermore, no foreign objects may penetrate the device. Otherwise, the hands-free kit could be damaged. English - 9

12 DANGER! Road safety always comes first! Mount the hands-free kit ideally on the sun visor in your vehicle so that it does not obstruct you when driving. The hand-free kit must never be mounted in the inflation range of an air bag. WARNING! Please bear in mind that wirelessly transmitted data can be intercepted by unauthorised third parties. DANGER! In the event of improper use of the battery, there is a risk of explosion and leakage. Only replace the battery with an identical model or one recommended by the manufacturer. Never replace the battery in an environment where there is a risk of explosion. During the insertion or removal of the battery, there might be a spark that could cause an explosion. Areas where there is an explosion risk are usually labelled as such, although not always clearly. This includes tank areas such as below deck on boats, refuelling or fuel storage areas, areas in which the air contains chemicals or particles such as e.g. cereals, dust or metallic powder as well as in all areas in which you are normally instructed to switch off your engine. DANGER! The battery must not be thrown into fire. It poses a risk of explosion. DANGER! The terminals of the battery must not be short-circuited. The battery must not be opened, damaged or deformed. It poses a risk of explosion. DANGER! There is a risk of suffocation if you swallow the battery English

13 DANGER! The hands-free kit may only be operated with a li-ion battery type BL-5B of the manufacturer Shen Zhen Xin Hong Xing Energy Technology CO., LTD. There is a risk of fire and explosion otherwise. Car charger adapter WARNING! Always handle the car charger adapter by the connector and do not pull on the connection cable itself. WARNING! Do not place furniture or other heavy objects on the connection cable and ensure that it is not kinked. WARNING! The connection cable must be laid in such a manner that it does not obstruct you when driving the vehicle. DANGER! Do not use adapter plugs or extension cables and do not make any alterations to the connection cable. If the connection cable is damaged, it must be replaced by the manufacturer or its customer service representative or a similarly qualified person to prevent any safety hazards. Remove the car charger adapter from the car power socket. English - 11

14 Copyright All information contained in these instructions is subject to copyright and is provided for information purposes only. It is only permitted to copy or duplicate data and information with the express and written consent of the author. This also includes commercial use of the content and data. The text and illustrations are based on the state of the art at the time of printing. Subject to change. Prior to use Remove the hands-free kit and the accessories from the packaging. Check the contents to ensure they are complete. Check the hands-free kit and the accessories for signs of damage. The hands-free kit must not be used if it is damaged. First use Before you use the hands-free kit for the first time, please insert the enclosed lithium-ion battery and charge it fully. WARNING! Please remove the car charger adapter when the engine is switched off to save the battery of your vehicle English

15 Inserting the lithium-ion battery Open the battery compartment (9) by pressing the centre of the battery compartment cover and removing it in the direction of the imprinted arrow. Insert the lithium-ion battery in the battery compartment (9) as shown in the illustration. Due to its design, it is not possible to insert the battery incorrectly. After inserting the battery, close the battery compartment (9) with the battery compartment cover. English - 13

16 Charging the lithium-ion battery Charge the lithium-ion battery fully before its first use. To do so, connect the USB connector of the enclosed car charger adapter to the USB charging socket (7) of the hands-free kit. Then insert the car charger adapter into an appropriate power outlet of your vehicle. The LED indicator (4) lights up orange while charging. A full charge cycle takes approximately 3 hours. If charging is complete, the LED indicator (4) goes out. Then disconnect the car charger adapter from the power outlet and the hands-free kit. WARNING! Charge the battery only when the engine is running to save the battery of your vehicle. Alternatively, you can also charge the battery via a PC or an external power supply. A connection cable and a proper USB connector are required for this purpose. Switching on/off the hands-free kit Press the multifunction button (2) for approx. 5 seconds until a beep sounds and the LED indicator (4) flashes blue. The hands-free kit is now ready to use. To switch off the hands-free kit, press the multifunction button (2) again for approx. 4 seconds. A beep sounds, the LED indicator (4) flashes orange briefly several times and then goes out completely English
 goes out. Then disconnect the car charger adapter from the power outlet and the hands-free kit. WARNING!")
17 Connect to compatible mobile phones SilverCrest SFA 30 B1 Pairing With the hands-free kit switched off, keep the multifunction button (2) pressed for approx. 9 seconds until a beep sounds and the LED indicator (4) alternates between flashing orange and blue. The hands-free kit is now in search mode. Activate the Bluetooth function of your mobile phone and let it search for Bluetooth devices nearby. For further details, please read the instructions of your mobile phone. Select the device "SFA 30 B1" from the list of devices which are found. If you are asked for a PIN during the pairing process, enter "0000". The name of the hands-free kit "SFA 30 B1" now appears in the list of devices connected to your mobile phone. The hands-free kit is now in standby mode and the LED indicator (4) flashes blue once briefly at regular intervals. Once the device is disconnected, it flashes blue twice. You can connect or pair additional devices to the hands-free kit in the same manner. The pairing begins for each device with the hands-free kit switched off as described above. The hands-free kit then has several "known" devices. This status is a prerequisite for an active connection between the hands-free kit and other devices. A maximum of 3 devices can be saved as "known devices". The number of devices that can be actively connected to the hands-free kit is limited to two. As soon as one or two of the known devices are in the vicinity of the hands-free kit, the connection to these devices is established automatically. You may need to confirm the connection on your mobile phone. If a third known device now comes in the vicinity of English - 15

18 the hands-free kit, the connection to it is blocked until one of the two active connections is interrupted or one of the two devices leaves the transmission range. If one of the two active connected devices is no longer paired, pairing is possible for the third (waiting) device. Once the hands-free kit has established a telephone connection with one of the mobile phones which is paired at the same time, no telephone connection can be established with the second device via the hands-free kit. This blocking is cancelled once the first telephone connection has ended. The pairing process can take up to 30 seconds depending on the mobile phone which is used. If two devices are connected to the hands-free kit, different ring tones will be used for incoming calls. Making calls If you want to make a call, dial the phone number as usual on your mobile phone. The LED indicator (4) rapidly flashes blue when the telephone connection is established. Once the telephone connection is established, the LED indicator (4) flashes blue once followed by a long pause. Calling via voice dialling The hands-free kit provides the option of making calls via voice dialling if your mobile phone supports this function and it is enabled. To establish a connection via voice dialling, press the multifunction button (2) of the hands-free kit once 16 - English

19 briefly in standby mode and then clearly say the name of the desired participant. For more detailed information on the voice dialling function of your mobile phone, please refer to the instructions of the mobile phone. Accept / reject calls The hands-free kit rings for an incoming call. The LED indicator (4) rapidly flashes blue when the telephone connection is established. Answer the call by briefly pressing the multifunction button (2). Once the telephone connection is established, the LED indicator (4) flashes blue once followed by a long pause. If the multifunction button (2) is pressed for approx. two seconds, the call can be transferred to the mobile phone. The call can then also be subsequently retrieved in the same manner. To reject the call, press the multifunction button (2) for approx. 2 seconds until a beep sounds. If two mobile phones are connected to the hands-free kit at the same time and a call is already being taken via the hand-free kit, a call to the second mobile phone is handled as follows: the second call is transferred to the hands-free kit as soon as it is accepted on the mobile phone. The first call is put on hold until the second call has finished. Then the first call can be continued via the hands-free kit. English - 17
. Once the telephone connection is established, the LED indicator (4) flashes blue once followed by a long pause.")
20 Volume setting You can increase the volume according to your needs during a call with the + button (5). A beep sounds if the maximum volume is reached. You can also reduce the volume with the - button (6). A beep sounds if the minimum volume is reached. Muting microphone You can use the mute button (1) to temporarily switch off the microphone (3) during a call so that the other person can no longer hear you. In this case, press the mute button (1) for approx. 2 seconds until a confirmation tone sounds and the LED indicator (4) flashes orange once. The microphone is now muted. When muted, 2 beeps sound at regular intervals to remind you of the muting. If you want to end the muting, press the mute button (1) again for approx. 2 seconds. A beep sounds and you are back in normal talk mode in which the other person can hear you. Ending call To end a call, press the multifunction button (2) once briefly. You will hear a confirmation tone when you release the button. Redialling You can redial the last number that was called via the hands-free kit. In this case, press the + button (5) for approx. 2 seconds in standby mode until a confirmation tone sounds English
 for approx. 2 seconds until a confirmation tone sounds and the LED indicator (4) flashes orange once. The microphone is now muted.")
21 Mounting on the sun visor You can mount the hands-free kit on the sun visor of your vehicle by means of the enclosed mounting clip. To do so, first attach the mounting clip to the clip fixing (10) on the back of your hands-free kit. You can now easily attach the hands-free kit to the sun visor of your vehicle. WARNING! The hands-free kit must be attached in such a manner that your vision is not impeded. Storage when not in use You should recharge the battery at regular intervals if you do not use the device for a prolonged period of time. This will maintain the performance of the battery. Store the device in a dry, clean and cool location. English - 19
22 LED indicator Refer to the table below for the different statuses of the LED indicator (4): Status of LED indicator (4) flashes blue 5 times alternates between flashing orange and blue flashes blue twice every 3 seconds flashes blue once every 4 seconds rapidly flashes blue (a ringtone also sounds for an incoming call) flashes orange once (2 beeps sound at regular intervals) lights up orange continuously flashes orange once in conjunction with a beep flashes orange 5 times Meaning power-on procedure Pairing standby mode (Bluetooth connection not established) standby mode (Bluetooth connection established) and during an active call. incoming or outgoing call muting of the microphone is active charging (after charging is complete, the LED goes out) the hands-free kit is not connected to the car power supply via the car charger adapter and the battery status is low power-off procedure 20 - English
23 Cleaning / maintenance Maintenance DANGER! It is necessary to repair the hands-free kit if it has been damaged in any way, for example, if the housing is damaged, if liquid or objects have penetrated the hands-free kit or if it has been exposed to rain or moisture. Repairs are also required if the hands-free kit is not working properly or has been dropped. If you notice any smoke, unusual noises or strange odours, remove the car charger adapter immediately from the socket and remove the battery. In such cases, the hands-free kit should not be used until it has been inspected by authorised service personnel. Only have the device repaired by qualified personnel. Never open the housing of the hands-free kit. Furthermore, the hands-free kit could be damaged upon opening and this would void your warranty. Cleaning WARNING! Disconnect the hands-free kit from the power supply before cleaning in order to prevent hazards. Use a dry cloth for cleaning and never use any solvent or cleaner that would corrode the plastic materials. Ensure that no liquid can penetrate the housing. Use a slightly damp cloth for more stubborn dirt. English - 21
24 Troubleshooting All aforementioned functions depend on the functionality of the mobile phone which is used. It is possible that some functions may not be supported. The hands-free kit is not working. Check whether the lithium-ion battery is charged. Charge it if necessary. Check whether the hands-free kit is switched on and the connection to the mobile phone is established. The lithium-ion battery is not charged. Check whether the car charge adapter is inserted correctly in the power outlet. Check whether the USB connector of the car charger adapter is inserted correctly in the USB charging socket (7) of the hands-free kit. Turn on the ignition of your vehicle because some vehicles supply power to the power outlet only when the ignition is turned on English
25 Check whether the car charger adapter's fuse is faulty and replace it if necessary. To do so remove the adapter's contact closure by turning it anti-clockwise. Replace the faulty fuse with a new one of the same type (see technical data) and then secure the contact closure by turning it clockwise. Environmental and disposal information When this symbol appears on a product, this indicates that the device is subject to the European Directive 2012/19/EU. All old electrical and electronic devices must be separated from normal household waste and disposed of at designated state facilities. The correct disposal of old devices in this manner will prevent environmental pollution and human health hazards. For further information about proper disposal, contact your local authorities, waste disposal office or the shop where you bought the device. Remember to protect the environment. Used batteries should not be disposed of in household waste. They must be taken to a collection point for old batteries. Please note that only discharged batteries may be deposited in battery English - 23
26 recycling bins. Care must be taken to ensure that batteries that are not fully discharged do not short circuit. Cover batteries that are not fully discharged with tape to prevent short circuits. Dispose of the packaging in an environmentally compatible manner. Cardboard can be put out for municipal paper collections or brought to public collection points for recycling. Films and plastic used for packaging the device are collected by your local disposal services and disposed of in an environmentally compatible manner. Conformity information This hands-free kit meets the basic requirements and other relevant regulations of the R&TTE Directive 1999/5/EC, the EMC Directive 2004/108/EC, the Low Voltage Directive 2006/95/EC as well as the RoHS Directive 2011/65/EU. The Declaration of Conformity can be found at the end of these instructions English
27 Warranty and servicing advice SilverCrest SFA 30 B1 Warranty of TARGA GmbH This device is sold with three years warranty from the date of purchase. Please keep the original receipt in a safe place as proof of purchase. Before using your product for the first time, please read the enclosed documentation. Should any problems arise which cannot be solved in this way, please call our hotline. Please have the article number and, if available, the serial number to hand for all enquiries. If it is not possible to solve the problem on the phone, our hotline support staff will initiate further servicing procedures depending on the fault. Within the warranty period the product will be repaired or replaced free of charge as we deem appropriate. No new warranty period commences if the product is repaired or replaced. Consumables such as batteries, rechargeable batteries and lamps are not covered by the warranty. Your statutory rights towards the seller are not affected or restricted by this warranty. English - 25
28 Service Phone: Phone: Phone: Phone: IAN: English Manufacturer TARGA GmbH Coesterweg SOEST GERMANY
29 Spis treści Informacje na temat znaków towarowych Wstęp Użytkowanie zgodne z przeznaczeniem Zakres dostawy Elementy obsługowe Dane techniczne Urządzenie głośnomówiące SilverCrest SFA 30 B Ładowarka samochodowa SDC Tabliczka znamionowa Wskazówki bezpieczeństwa Prawa autorskie Przed uruchomieniem Uruchomienie Wkładanie akumulatora litowego Ładowanie akumulatora litowego Włączanie/wyłączanie urządzenia głośnomówiącego Polski - 27
30 Nawiązywanie połączenia z kompatybilnymi telefonami komórkowymi Nawiązywanie połączeń Głosowe nawiązywanie połączeń Przyjmowanie / odrzucanie połączeń telefonicznych Ustawienie głośności Wyciszanie mikrofonu Zakończenie połączenia Powtórzenie połączenia Mocowanie na przesłonie przeciwsłonecznej Przechowywanie w czasie nieużywania Dioda LED Naprawy / czyszczenie Naprawy Czyszczenie Rozwiązywanie problemów Wskazówki dotyczące ochrony środowiska i prawidłowego usuwania Deklaracja zgodności Informacje na temat gwarancji i serwisowania Polski
31 Informacje na temat znaków towarowych i Bluetooth są zarejestrowanymi znakami towarowymi Bluetooth SIG, Inc. USB jest zarejestrowanym znakiem towarowym. Inne nazwy i produkty mogą być znakami towarowymi lub zarejestrowanymi znakami towarowymi odnośnych właścicieli. Wstęp Dziękujemy za zakup produktu SilverCrest. Urządzenie głośnomówiące SilverCrest Bluetooth 3.0 SFA 30 B1, zwane dalej "urządzenie głośnomówiące", umożliwia wygodne korzystanie z posiadanego telefonu komórkowego w trybie głośnomówiącym. Zasilanie zapewnia gniazdo 12 V/24 V w pojeździe. Użytkowanie zgodne z przeznaczeniem Urządzenie głośnomówiące należy do kategorii elektroniki komunikacyjnej. Umożliwia ono prowadzenie rozmów telefonicznych także w trakcie prowadzenia pojazdu bez potrzeby trzymania telefonu komórkowego w dłoni. Urządzenie głośnomówiące nie jest przewidziane do stosowania w przedsiębiorstwach ani do zastosowań komercyjnych. Urządzenie głośnomówiące jest przeznaczone wyłącznie do użytku prywatnego, a każde inne użytkowanie uznaje się za niezgodne z przeznaczeniem. Urządzenie głośnomówiące spełnia wymagania wszystkich odnośnych norm i dyrektyw, związanych ze zgodnością CE. W przypadku nieuzgodnionych z producentem modyfikacji urządzenia głośnomówiącego nie można zagwarantować spełnienia wymagań tych norm. Producent nie ponosi żadnej odpowiedzialności za wynikłe z tego szkody lub zakłócenia. Polski - 29
32 Należy przestrzegać przepisów krajowych lub przepisów kraju użytkowania. Zakres dostawy Wyjąć urządzenie i wszystkie akcesoria z opakowania. Usunąć materiał opakowaniowy i sprawdzić, czy wszystkie części są kompletne i nieuszkodzone. W przypadku stwierdzenia braku lub uszkodzenia jakiegoś elementu prosimy skontaktować się z producentem. 1. Urządzenie głośnomówiące SilverCrest Bluetooth 3.0 SFA 30 B1 2. Akumulator litowy BL-5B, 3,7 V/700 mah 3. Ładowarka samochodowa SDC Klips mocujący 5. Niniejsza instrukcja (ikona) 30 - Polski
33 Elementy obsługowe Niniejsza instrukcja ma odchylaną okładkę. Na wewnętrznej stronie odchylanej okładki jest przedstawione urządzenie głośnomówiące wraz z oznaczeniami liczbowymi. Liczby mają następujące znaczenie: 1 Przycisk wyciszenia (wyciszenie mikrofonu) 2 Przycisk wielofunkcyjny (włączanie/wyłączanie, przyjmowanie/zakończenie połączenia, nawiązywanie połączenia) 3 Mikrofon 4 Dioda LED 5 Przycisk + (zwiększenie głośności, powtórzenie wybierania) 6 Przycisk - (zmniejszenie głośności) 7 Złącze USB do ładowania 8 Głośnik 9 Wnęka akumulatora 10 Gniazdo klipsa mocującego Polski - 31
34 Dane techniczne Urządzenie głośnomówiące SilverCrest SFA 30 B1 Napięcie zasilania: 5 V Akumulator: litowy BL-5B; Shen Zhen Xin Hong Xing Energy Technology CO., LTD; 3,7 V/700 mah/2,59 Wh Specyfikacja Bluetooth : V3.0 + EDR Obsługa profili: zestaw słuchawkowy Bluetooth, profil głośnomówiący Zakres częstotliwości: 2,402 2,480 GHz Czas ładowania: maks. 3 godziny Czas rozmów: do 6 godzin Czas gotowości: do 600 godzin Wymiary (S x W x G): ok. 118 x 47 x 17 mm Masa: ok. 76 g Temperatura robocza: 0 C do +45 C Temperatura przechowywania: -20 C do +60 C Ładowarka samochodowa SDC8311 Bezpiecznik: T2A L 250 V Napięcie wejściowe: V Napięcie wyjściowe: 5 V Prąd wyjściowy: 500 ma 32 - Polski
35 Tabliczka znamionowa Tabliczka znamionowa znajduje się wnęce akumulatora. Zastrzegamy możliwość zmian danych technicznych i konstrukcyjnych bez wcześniejszego uprzedzenia. Wskazówki bezpieczeństwa Przed pierwszym użyciem urządzenia głośnomówiącego prosimy dokładnie zapoznać się z poniższymi instrukcjami. Należy stosować się do wszystkich ostrzeżeń o zagrożeniach, nawet jeśli masz doświadczenie w obsłudze urządzeń elektronicznych. Niniejszą instrukcję należy starannie przechowywać do wykorzystania w przyszłości. W razie sprzedaży lub przekazania urządzenia głośnomówiącego należy koniecznie dołączyć do niego niniejszą instrukcję. Jest ona częścią składową urządzenia głośnomówiącego. Wyjaśnienie zastosowanych w instrukcji symboli zagrożeń NIEBEZPIECZEŃSTWO! Symbol ten, oznaczony słowem NIEBEZPIECZEŃSTWO, wskazuje na potencjalną niebezpieczną sytuację, która może prowadzić do odniesienia ciężkich obrażeń lub nawet do śmierci, jeżeli nie zostaną podjęte działania zapobiegawcze. OSTRZEŻENIE! Symbol ten, oznaczony słowem OSTRZEŻENIE, wskazuje istotne wskazówki dotyczące bezpiecznego użytkowania urządzenia oraz ochrony użytkownika. Ten symbol oznacza dalsze, przydatne informacje na ten temat. Polski - 33
36 NIEBEZPIECZEŃSTWO! To urządzenie głośnomówiące może być używane przez dzieci od 8. roku życia oraz przez osoby o zmniejszonych zdolnościach fizycznych, sensorycznych lub umysłowych lub też osoby nieposiadające odpowiedniego doświadczenia i/lub wiedzy, wyłącznie pod nadzorem lub po przeszkoleniu w zakresie bezpiecznego używania urządzenia oraz wynikających z niego zagrożeń. Dzieci nie mogą bawić się urządzeniem głośnomówiącym. Czyszczenie i konserwacja przez użytkownika nie mogą być przeprowadzane przez dzieci bez nadzoru. Folie z opakowań należy także przechowywać poza zasięgiem dzieci. Istnieje niebezpieczeństwo uduszenia! NIEBEZPIECZEŃSTWO! W razie stwierdzenia tworzenia się dymu, zauważenia dziwnych odgłosów lub zapachów natychmiast wyjąć akumulator z urządzenia głośnomówiącego. W takich przypadkach urządzenia głośnomówiącego nie wolno dalej używać, dopóki nie zostanie ono sprawdzone przez specjalistę. W żadnym przypadku nie wolno wdychać dymu z możliwego pożaru urządzenia. O ile mimo to doszło do wdychania dymu, należy udać się do lekarza. Wdychanie dymu może być szkodliwe dla zdrowia. OSTRZEŻENIE! Urządzenie głośnomówiące i akcesoria nie mogą być uszkodzone, by nie dopuścić do powstania zagrożeń. W razie uszkodzenia nie wolno uruchamiać urządzenia głośnomówiącego. NIEBEZPIECZEŃSTWO! Należy dopilnować, by na urządzeniu głośnomówiącym ani w jego pobliżu nie było żadnych źródeł otwartego ognia (np. palące się świece). Istnieje niebezpieczeństwo pożaru! OSTRZEŻENIE! Urządzenie głośnomówiące nie może być narażone na oddziaływanie bezpośrednich źródeł ciepła (np. grzejników) ani bezpośredniego światła słonecznego ani sztucznego. Należy także unikać kontaktu z 34 - Polski
37 wodą rozpryskową i kroplową oraz agresywnymi cieczami. Nie używaj urządzenia głośnomówiącego w pobliżu wody. W szczególności, nigdy nie wolno zanurzać urządzenia głośnomówiącego w cieczach (nie stawiaj na nim żadnych przedmiotów napełnionych cieczą, np. wazonów ani napojów). Dopilnuj także, aby urządzenie głośnomówiące nie było narażone na nadmierne wstrząsy ani drgania. Nie wolno dopuścić, by do wnętrza urządzenia głośnomówiącego dostały się ciała obce. W przeciwnym razie może dojść do uszkodzenia urządzenia głośnomówiącego. NIEBEZPIECZEŃSTWO! Bezpieczeństwo na drodze jest zawsze najważniejsze! Urządzenie głośnomówiące należy zawsze umieszczać w pojeździe tak, by nie przeszkadzało w obsłudze pojazdu, najlepiej na przesłonie przeciwsłonecznej. W żadnym przypadku nie wolno umieszczać urządzenia w strefie wyzwolenia poduszek powietrznych. OSTRZEŻENIE! Należy pamiętać, że dane przesyłane drogą radiową mogą zostać przechwycone przez nieuprawnione osoby trzecie. NIEBEZPIECZEŃSTWO! W razie nieprawidłowego użycia istnieje niebezpieczeństwo eksplozji i wycieku z akumulatora. Akumulator należy wymieniać tylko na inny tego samego typu lub zalecany przez producenta. Nigdy nie wymieniaj akumulatora w otoczeniu potencjalnie zagrożonym wybuchem. Podczas wyjmowania lub wkładania akumulatora może powstać iskra, która spowoduje eksplozję. Obszary zagrożone wybuchem są z reguły, choć nie zawsze, oznakowane. Zaliczają się do nich między innymi pomieszczenia pod pokładem łodzi, obszary wokół rurociągów z paliwem, magazyny paliw, miejsca, w których powstaje mieszanina pyłu i powietrza, na przykład zboża, pyłu lub pyłów metali i powietrza oraz wszystkie inne miejsca, zwykle Polski - 35
38 oznakowane w sposób nakazujący wyłączenie silnika pojazdu spalinowego. NIEBEZPIECZEŃSTWO! Nie wolno wrzucać akumulatora do ognia. Istnieje niebezpieczeństwo eksplozji. NIEBEZPIECZEŃSTWO! Nie wolno zwierać biegunów akumulatora. Nie wolno otwierać, uszkadzać ani deformować akumulatora. Istnieje niebezpieczeństwo eksplozji. NIEBEZPIECZEŃSTWO! W razie połknięcia akumulatora istnieje niebezpieczeństwo uduszenia. NIEBEZPIECZEŃSTWO! Urządzenie głośnomówiące może być zasilane tylko z akumulatora litowego typu BL-5B produkcji Shen Zhen Xin Hong Xing Energy Technology CO., LTD. W przeciwnym razie istnieje niebezpieczeństwo pożaru i eksplozji. Ładowarka samochodowa OSTRZEŻENIE! Ładowarkę chwytaj zawsze za wtyk i nie ciągnij jej za sam kabel. OSTRZEŻENIE! Nigdy nie stawiaj na kablu zasilającym żadnych przedmiotów, mebli itp. i dopilnuj, by nie został pozaginany. OSTRZEŻENIE! Kabel zasilający należy prowadzić tak, by nie przeszkadzał przy obsłudze pojazdu. NIEBEZPIECZEŃSTWO! Nie używaj żadnych rozgałęźników ani przedłużaczy i nie wykonuj żadnych manipulacji ani przeróbek kabla. W celu uniknięcia zagrożeń, w razie uszkodzenia kabla zasilającego tego urządzenia, musi on być wymieniony przez producenta lub jego punkt serwisowy albo przez inne podobnie wykwalifikowane osoby. Wyjmij ładowarkę samochodową z gniazda pokładowej instalacji elektrycznej Polski
39 Prawa autorskie Cała zawartość tej instrukcji obsługi jest chroniona prawem autorskim i jest udostępniana czytelnikowi wyłącznie jako źródło informacji. Jakiekolwiek kopiowanie lub powielanie danych i informacji jest zabronione bez wyraźnej i pisemnej zgody autora. Dotyczy to również komercyjnego wykorzystania treści i danych. Tekst i ilustracje są zgodne ze stanem technicznym w chwili druku. Zmiany zastrzeżone. Przed uruchomieniem Wyjmij urządzenie głośnomówiące i akcesoria z opakowania. Należy sprawdzić, czy dostawa jest kompletna. Sprawdź, czy urządzenie głośnomówiące i akcesoria nie są uszkodzone. W razie uszkodzenia nie wolno uruchamiać urządzenia głośnomówiącego. Uruchomienie Przed pierwszym uruchomieniem urządzenia głośnomówiącego należy włożyć dołączony akumulator litowy i całkowicie go naładować. OSTRZEŻENIE! Przy wyłączonym silniku należy wyjąć ładowarkę z gniazda, by nie rozładować akumulatora pojazdu. Polski - 37
40 Wkładanie akumulatora litowego Otwórz wnękę akumulatora (9), naciskając pośrodku pokrywę wnęki i ściągając ją w kierunku oznaczonym strzałką. Włóż akumulator litowy do wnęki akumulatora (9), jak pokazano na poniższym rysunku. Ze względu na konstrukcję nie można włożyć akumulatora nieprawidłowo. Po włożeniu akumulatora zamknij wnękę akumulatora (9) pokrywą Polski
41 Ładowanie akumulatora litowego Przed pierwszym użyciem urządzenia naładuj do pełna akumulator litowy. W tym celu umieść wtyk USB dołączonej ładowarki samochodowej w złączu do ładowania USB (7) urządzenia głośnomówiącego. Następnie umieść ładowarkę samochodową w odpowiednim gnieździe pojazdu. W trakcie ładowania dioda LED (4) świeci w kolorze pomarańczowym. Pełne ładowanie trwa około 3 godziny. Po zakończeniu ładowania dioda LED (4) gaśnie. Wyjmij wówczas ładowarkę z gniazda pojazdu i odłącz ją od urządzenia głośnomówiącego. OSTRZEŻENIE! Akumulator należy ładować tylko przy pracującym silniku, by nie rozładować akumulatora pojazdu. Alternatywnie, akumulator można też naładować z gniazda USB komputera lub zewnętrznego zasilacza USB. Konieczny jest do tego odpowiedni kabel USB. Włączanie/wyłączanie urządzenia głośnomówiącego Naciśnij przycisk wielofunkcyjny (2) i przytrzymaj przez ok. 5 sekund, aż usłyszysz sygnał dźwiękowy, a dioda LED (4) zacznie migać w kolorze niebieskim. Urządzenie głośnomówiące jest teraz gotowe do pracy. Aby wyłączyć urządzenie głośnomówiące, ponownie naciśnij przycisk wielofunkcyjny (2) i przytrzymaj przez ok. 4 sekundy. Usłyszysz sygnał dźwiękowy, dioda LED (4) mignie kilkakrotnie krótko w kolorze pomarańczowym, po czym zgaśnie. Polski - 39
42 Nawiązywanie połączenia z kompatybilnymi telefonami komórkowymi Parowanie Przy wyłączonym urządzeniu głośnomówiącym naciśnij przycisk wielofunkcyjny (2) i przytrzymaj go przez ok. 9 sekund, aż usłyszysz sygnał dźwiękowy, a dioda LED (4) będzie migać na zmianę w kolorze pomarańczowym i niebieskim. Urządzenie głośnomówiące znajduje się teraz w trybie wyszukiwania. Aktywuj teraz funkcję Bluetooth w telefonie komórkowym i wybierz wyszukiwanie urządzeń Bluetooth w pobliżu. Postępuj zgodnie z instrukcją obsługi telefonu komórkowego. Na liście znalezionych urządzeń wybierz urządzenie SFA 30 B Polski Jeżeli konieczne będzie podanie kodu PIN, wpisz Nazwa urządzenia głośnomówiącego SFA 30 B1 jest teraz widoczna na liście urządzeń połączonych z telefonem komórkowym. Urządzenie głośnomówiące znajduje się teraz w trybie oczekiwania, a dioda LED (4) miga pojedynczo w jednakowych odstępach czasu w kolorze niebieskim. Gdy telefon komórkowy zostanie wyłączony, miga podwójnie w kolorze niebieskim. W ten sam sposób można sparować z urządzeniem głośnomówiącym kolejne urządzenia. Parowanie odbywa się dla każdego urządzenia w sposób opisany powyżej, przy wyłączonym urządzeniu głośnomówiącym. Urządzenie głośnomówiące jest wówczas sparowane z wieloma "znanymi" urządzeniami. Ten status jest warunkiem aktywnego połączenia między urządzeniu głośnomówiącym a innymi urządzeniami. Maksymalnie można zapisać 3 urządzenia jako "znane urządzenia". Liczba urządzeń, które mogą aktywnie łączyć się z urządzeniem głośnomówiącym, jest ograniczona do dwóch. Gdy jedno lub dwa znane urządzenia znajdą się w pobliżu urządzenia głośnomówiącego, nawiązywane jest automatycznie połączenie z tymi urządzeniami. Może być konieczne zatwierdzenie tego połączenia w telefonie
43 komórkowym. Jeżeli w pobliżu urządzenia głośnomówiącego znajdzie się trzecie znane urządzenie, połączenie z nim jest blokowane tak długo, aż zostanie przerwane jedno z dwóch aktywnych połączeń lub jedno z dwóch urządzeń znajdzie się poza zasięgiem. Gdy jedno z dwóch aktywnie połączonych urządzeń odłączy się, możliwe jest połączenie z trzecim (oczekującym) urządzeniem. Gdy urządzenie głośnomówiące nawiąże połączenie telefoniczne z jednym z dwóch jednocześnie sparowanych telefonów komórkowych, nie można nawiązać połączenia telefonicznego z drugiego telefonu komórkowego. Blokada ta zostanie zakończona, gdy pierwsze połączenie telefoniczne zostanie zakończone. Proces parowania może potrwać do 30 sekund, zależnie zastosowanego telefonu komórkowego. Gdy z urządzeniem głośnomówiącym połączone są dwa telefony, w połączeniach przychodzących stosowane są różne melodie dzwonków. Nawiązywanie połączeń Aby nawiązać połączenie, wybierz w zwykły sposób numer w telefonie komórkowym. Podczas nawiązywania połączenia dioda LED (4) miga szybko w kolorze niebieskim. Gdy połączenie telefoniczne jest już nawiązane, dioda LED (4) miga jeden raz w kolorze niebieskim, po czym następuje długa pauza. Głosowe nawiązywanie połączeń Urządzenie głośnomówiące oferuje możliwość głosowego nawiązywania połączeń, o ile telefon komórkowy obsługuje taką funkcję i jest ona aktywna. Aby głosowo nawiązać połączenie, w trybie oczekiwania naciśnij jeden raz krótko przycisk wielofunkcyjny (2) urządzenia głośnomówiącego i wymów wyraźnie nazwę żądanego kontaktu. Polski - 41
44 Szczegółowe informacje na temat funkcji wybierania głosowego telefonu komórkowego znajdują się w jego instrukcji obsługi. Przyjmowanie / odrzucanie połączeń telefonicznych Przy połączeniu przychodzącym urządzenie głośnomówiące dzwoni. Podczas nawiązywania połączenia dioda LED (4) miga szybko w kolorze niebieskim. Można odebrać połączenie, naciskając krótko przycisk wielofunkcyjny (2). Gdy połączenie telefoniczne jest już nawiązane, dioda LED (4) miga jeden raz w kolorze niebieskim, po czym następuje długa pauza. Gdy naciśniesz i przytrzymasz przez ok. dwie sekundy przycisk wielofunkcyjny (2), rozmowę można przekazać do telefonu komórkowego. W taki sam sposób można potem przekierować rozmowę ponownie do urządzenia głośnomówiącego. Aby odrzucić połączenie przychodzące, naciskaj przycisk wielofunkcyjny (2) przez ok. 2 sekundy, aż usłyszysz sygnał dźwiękowy. Jeżeli dwa telefony komórkowe jednego użytkownika są jednocześnie połączone z urządzeniem głośnomówiącym i przez urządzenie prowadzona jest już jedna rozmowa, drugie połączenie jest obsługiwane w następujący sposób: drugie połączenie jest przejmowane przez urządzenie głośnomówiące, gdy zostanie ono odebrane w telefonie. Pierwsze połączenie jest utrzymywane aż do zakończenia drugiego połączenia. Teraz można dalej prowadzić pierwszą rozmowę przez urządzenie głośnomówiące Polski
45 Ustawienie głośności Istnieje możliwość regulacji głośności w trakcie rozmowy odpowiednio do potrzeb za pomocą przycisku + (5). Po uzyskaniu maksymalnej głośności rozlega się sygnał dźwiękowy. Podobnie, za pomocą przycisku (6) można zmniejszyć głośność. Po uzyskaniu minimalnej głośności rozlega się sygnał dźwiękowy. Wyciszanie mikrofonu Za pomocą przycisku wyciszenia (1) można podczas rozmowy czasowo wyłączyć mikrofon (3), by nie być słyszanym w drugim telefonie. Naciśnij przycisk wyciszenia (1) i przytrzymaj przez ok. 2 sekundy, aż usłyszysz sygnał dźwiękowy, a dioda LED (4) mignie jeden raz w kolorze pomarańczowym. Mikrofon jest teraz wyciszony. Podczas wyciszenia rozlegają się w równomiernych odstępach czasu 2 sygnały dźwiękowe, by przypomnieć o wyciszeniu. Aby wyłączyć wyciszenie, ponownie naciśnij przycisk wyciszenia (1) i przytrzymaj przez ok. 2 sekundy. Rozlegnie się sygnał dźwiękowy i urządzenie powróci do normalnego trybu działania, w którym będziesz słyszany w drugim telefonie. Zakończenie połączenia Aby zakończyć połączenie, naciśnij krótko jeden raz przycisk wielofunkcyjny (2). Po zwolnieniu przycisku usłyszysz dźwięk potwierdzenia. Powtórzenie połączenia Urządzenie głośnomówiące umożliwia ponowne wybranie ostatnio wybieranego numeru. W tym celu należy w trybie oczekiwania nacisnąć przycisk + (5) i przytrzymać go przez ok. 2 sekundy, aż rozlegnie się sygnał dźwiękowy. Polski - 43
46 Mocowanie na przesłonie przeciwsłonecznej Urządzenie głośnomówiące można zamocować za pomocą dołączonego klipsa do osłony przeciwsłonecznej pojazdu. W tym celu należy najpierw zamocować klips mocujący w gnieździe (10) na tylnej stronie urządzenia głośnomówiącego. Teraz można łatwo zamocować urządzenie głośnomówiące na osłonie przeciwsłonecznej Polski OSTRZEŻENIE! Urządzenie głośnomówiące musi być tak umieszczone, by nie zasłaniało widoku. Przechowywanie w czasie nieużywania Jeżeli urządzenie nie będzie używane przez dłuższy czas, należy w regularnych odstępach czasu ładować akumulator. W ten sposób zachowuje się właściwości akumulatora (pojemność). Przechowywać urządzenie w czystym, chłodnym i suchym miejscu.
47 Dioda LED W poniższej tabeli opisujemy różne stany diody LED (4): Dioda LED statusu (4) Miga 5 razy w kolorze niebieskim Miga na zmianę w kolorze niebieskim i pomarańczowym Miga 2 razy co 3 sekundy w kolorze niebieskim Znaczenie Procedura włączania Łączenie Tryb oczekiwania (nie nawiązano połączenia Bluetooth ) Miga 1 razy co 4 sekundy w kolorze niebieskim Tryb oczekiwania (nawiązano połączenie Bluetooth ) Miga szybko w kolorze niebieskim (przy połączeniu przychodzącym dodatkowo melodia) Miga 1 raz w kolorze pomarańczowym (w regularnych odstępach czasu rozlegają się 2 sygnały dźwiękowe) Świeci stale w kolorze pomarańczowym Miga 1 raz w kolorze pomarańczowym w połączeniu z sygnałem dźwiękowym Miga 5 razy w kolorze pomarańczowym i podczas trwającej rozmowy. Połączenie przychodzące lub wychodzące Wyciszenie mikrofonu jest aktywne Proces ładowania (po zakończeniu ładowania dioda LED gaśnie) Urządzenie głośnomówiące nie jest połączone z ładowarką samochodową i gniazdem w pojeździe, a akumulator jest prawie rozładowany Procedura wyłączania Polski - 45
48 Naprawy / czyszczenie Naprawy NIEBEZPIECZEŃSTWO! Naprawy są konieczne, gdy urządzenie głośnomówiące zostało uszkodzone, np. uszkodzona jest obudowa urządzenia lub do środka obudowy dostała się woda lub ciała obce albo gdy urządzenie było narażone na działanie deszczu lub wilgoci. Naprawy są także konieczne, gdy urządzenie głośnomówiące nie działa prawidłowo lub gdy upadło. W razie stwierdzenia tworzenia się dymu, zauważenia dziwnych odgłosów lub zapachów natychmiast odłączyć ładowarkę samochodową od gniazda i wyjąć akumulator z urządzenia głośnomówiącego. W takich przypadkach urządzenia głośnomówiącego nie wolno dalej używać, dopóki nie zostanie ono sprawdzone przez specjalistę. Wszystkie naprawy należy zlecać tylko wykwalifikowanym specjalistom. Nigdy nie należy otwierać obudowy urządzenia głośnomówiącego. Ponadto, podczas otwierania urządzenia głośnomówiącego mogłoby dojść do jego uszkodzenia i utraty gwarancji. Czyszczenie OSTRZEŻENIE! Przed czyszczeniem odłącz urządzenie głośnomówiące od zasilania elektrycznego, by uniknąć zagrożeń. Do czyszczenia używaj czystej szmatki i w żadnym przypadku nie używaj rozpuszczalników ani środków czyszczących, które mogłyby uszkodzić tworzywo sztuczne. Należy dopilnować, by żadna ciecz nie dostała się do obudowy. W razie silniejszego zabrudzenia lekko zwilżyć szmatkę Polski
49 Rozwiązywanie problemów Wszystkie opisane funkcje są zależne od zakresu funkcji telefonu komórkowego. Nie wszystkie funkcje mogą być obsługiwane. Urządzenie głośnomówiące nie działa. Sprawdź, czy akumulator litowy jest naładowany. Ewentualnie naładuj akumulator. Sprawdź, czy urządzenie głośnomówiące jest włączone i czy połączenie z telefonem komórkowym jest nawiązane. Akumulator litowy nie jest ładowany. Sprawdź, czy ładowarka samochodowa jest właściwie włożona do gniazda. Sprawdź, czy wtyk USB ładowarki samochodowej jest poprawnie włożony do złącza ładowania USB (7) urządzenia głośnomówiącego. Włącz zapłon pojazdu, gdyż w niektórych pojazdach tylko przy włączonym zapłonie prąd dopływa do gniazda. Sprawdź, czy bezpiecznik ładowarki samochodowej nie jest uszkodzony; w razie potrzeby wymień go. W tym celu obróć końcówkę ładowarki ze stykiem w lewo. Wymień uszkodzony bezpiecznik na nowy takiego samego typu (patrz dane techniczne) i na koniec zamocuj końcówkę ze stykiem, obracając ją w prawo. Polski - 47
50 Wskazówki dotyczące ochrony środowiska i prawidłowego usuwania Urządzenia oznaczone tym symbolem podlegają przepisom dyrektywy europejskiej 2012/19/EU. Wszystkie urządzenia elektryczne i elektroniczne muszą być usuwane oddzielnie od odpadów domowych i oddawane do specjalnych punktów zbiórki. Prawidłowo usuwając zużyte urządzenie zapobiegasz zanieczyszczeniu środowiska i zagrożeniom dla zdrowia. Więcej informacji na temat usuwania zużytych urządzeń otrzymasz u lokalnych władz, w firmie zajmującej się wywozem odpadów lub u sprzedawcy produktu. Pomyśl o ochronie środowiska. Zużytych akumulatorów nie wolno wyrzucać razem z odpadami domowymi. Należy je oddać w punkcie zbiórki zużytych akumulatorów. Należy pamiętać, że akumulatory wolno umieszczać w pojemnikach na zużyte akumulatory tylko w stanie rozładowanym, zaś w przypadku akumulatorów niecałkowicie rozładowanych należy zastosować środki zapobiegające zwarciu. Zabezpiecz niecałkowicie rozładowany akumulator lub baterię przez owinięcie taśmą klejącą Polski
51 Także opakowanie należy usunąć w sposób przyjazny dla środowiska. Karton można oddać do ponownego przetworzenia w punkcie zbiórki makulatury lub w publicznym punkcie zbiórki. Folie i tworzywa sztuczne z dostawy są zbierane przez lokalne przedsiębiorstwo utylizacji odpadów, po czym są usuwane w sposób przyjazny dla środowiska. Deklaracja zgodności To urządzenie spełnia podstawowe wymagania i jest zgodne z odnośnymi wymogami i innymi ważnymi przepisami dyrektywy w sprawie urządzeń radiowych i końcowych urządzeń telekomunikacyjnych 1999/5/EC, dyrektywy w sprawie urządzeń niskonapięciowych 2006/95/EC, dyrektywy w sprawie zgodności elektromagnetycznej 2004/108/EC oraz dyrektywy RoHS 2011/65/EU. Przynależną deklarację zgodności można znaleźć na końcu tej instrukcji obsługi. Informacje na temat gwarancji i serwisowania Gwarancja firmy TARGA GmbH Niniejszy produkt jest objęty trzyletnią gwarancją od daty zakupu. Należy zachować oryginalny kwit kasowy jako dowód zakupu. Przed uruchomieniem produktu prosimy dokładnie zapoznać się z załączoną dokumentacją. W razie wystąpienia problemu, którego nie można rozwiązać w ten sposób, prosimy skontaktować się z naszą infolinią pomocy technicznej. Przy każdym kontakcie z infolinią pomocy technicznej należy mieć pod ręką numer artykułu lub numer seryjny, jeśli jest dostępny. W przypadku, gdy rozwiązanie problemu przez telefon nie będzie możliwe, w Polski - 49
52 zależności od przyczyny usterki nasza infolinia pomocy technicznej zorganizuje inną formę serwisowania. W razie stwierdzenia wad materiałowych lub produkcyjnych produktu, zostanie on bezpłatnie naprawiony lub wymieniony na nowy, wedle naszego swobodnego uznania. Naprawa lub wymiana produktu nie powoduje rozpoczęcia nowego okresu gwarancyjnego. Gwarancja nie obejmuje części zużywających się, jak baterie, akumulatory czy elementy oświetlenia. Gwarancja ta w niczym nie ogranicza ustawowych praw nabywcy w stosunku do sprzedawcy, które pozostają nienaruszone. Serwis Telefon: service.pl@targa-online.com IAN: Polski Producent TARGA GmbH Coesterweg SOEST GERMANY
Plantronics Explorer 50. Návod k obsluze
 Plantronics Explorer 50 Návod k obsluze Obsah Vítejte 3 Obsah balení 4 Přehled náhlavní soupravy 5 Buďte opatrní 5 Pair and Charge 6 Get Paired 6 Activate pair mode 6 Use two phones 6 Reconnect 6 Charge
USER'S MANUAL FAN MOTOR DRIVER FMD-02
 USER'S MANUAL FAN MOTOR DRIVER FMD-02 IMPORTANT NOTE: Read this manual carefully before installing or operating your new air conditioning unit. Make sure to save this manual for future reference. FMD Module
Plantronics Explorer 10. Návod k obsluze
 Plantronics Explorer 10 Návod k obsluze Obsah Vítejte 3 Obsah balení 4 Přehled náhlavní soupravy 5 Buďte opatrní 5 Pair and Charge 6 Get Paired 6 Activate pair mode 6 Use two phones 6 Reconnect 6 Charge
GUIDELINES FOR CONNECTION TO FTP SERVER TO TRANSFER PRINTING DATA
 GUIDELINES FOR CONNECTION TO FTP SERVER TO TRANSFER PRINTING DATA What is an FTP client and how to use it? FTP (File transport protocol) - A protocol used to transfer your printing data files to the MAFRAPRINT
UŽIVATELSKÁ PŘÍRUČKA
 UŽIVATELSKÁ PŘÍRUČKA Plni víry a naděje míříme kupředu. S odhodláním zlepšujeme své dovednosti. Zapomeňte na zklamání, ale nikoli na svůj nevyužitý potenciál. Touha překonat sám sebe a dosáhnout hranice
2N LiftIP. IO Extender. Communicator for Lifts. Version
 2N LiftIP Communicator for Lifts IO Extender Version 2.4.0 www.2n.cz Description The IO extender helps you extend 2N LiftIP with 1 input and 2 outputs. The purpose of the input is to cancel the rescue
Lenovo A5000. Quick Start Guide v1.0. English/Česky
 Lenovo A5000 Quick Start Guide v1.0 English/Česky English Read this guide carefully before using your smartphone. Learning more Getting support Electronic emission notices To learn more information about
2N Voice Alarm Station
 2N Voice Alarm Station 2N Lift1 Installation Manual Version 1.0.0 www.2n.cz EN Voice Alarm Station Description The 2N Voice Alarm Station extends the 2N Lift1/ 2N SingleTalk with an audio unit installed
2N LiftIP. Voice Alarm Station. Communicator for Lifts. Version
 2N LiftIP Communicator for Lifts Voice Alarm Station Version 2.4.0 www.2n.cz Description The 2N Voice Alarm Station is a switch that helps you extend 2N LiftIP with one or more audio units installed on
 [KLICK] GB Instruction Manual POWERLINE 4 LIGHT FOREWORD Dear Customer, Thank you for purchasing the POWERLINE 4 LIGHT charger. These operating instructions will help you to get the best from your charger.
UPM3 Hybrid Návod na ovládání Čerpadlo UPM3 Hybrid 2-5 Instruction Manual UPM3 Hybrid Circulation Pump 6-9
 www.regulus.cz UPM3 Hybrid Návod na ovládání Čerpadlo UPM3 Hybrid 2-5 Instruction Manual UPM3 Hybrid Circulation Pump 6-9 CZ EN UPM3 Hybrid 1. Úvod V továrním nastavení čerpadla UPM3 Hybrid je profil PWM
English... 2 Polski... 25 Slovenščina... 48 Česky... 72 Slovenčina... 95 Deutsch... 118 V 1.42
 English... 2 Polski... 25 Slovenščina... 48 Česky... 72 Slovenčina... 95 Deutsch... 118 V 1.42 Contents Information about trademarks... 4 Introduction... 4 Intended use... 4 Supplied items... 5 Technical
TAB-7830 QC TABLET 3G
 TAB-7830 QC TABLET 3G download user manual from : www.akai-atd.com TAB-7830 QC TABLET 3G A világhálóhoz Wifi vagy SIM kártya (3G) segítségével csatlakozhat. Használati útmutató:www.akai-atd.com TAB-7830
Litosil - application
 Litosil - application The series of Litosil is primarily determined for cut polished floors. The cut polished floors are supplied by some specialized firms which are fitted with the appropriate technical
Hi-Res Audio/DNC Headset MDR-NC750
 Uživatelská příručka Hi-Res Audio/DNC Headset MDR-NC750 Obsah Začínáme...3 Úvod...3 Přehled... 3 Základy práce...4 Nošení náhlavní soupravy...4 Připojení náhlavní soupravy k vašemu zařízení... 4 Nastavení
Uživatelská příručka. USB Charger UCH20
 Uživatelská příručka USB Charger UCH20 Obsah Úvod...3 USB Charger popis... 3 Používání nabíječky USB... 4 Nabíjení zařízení... 4 Právní informace... 5 Declaration of Conformity...6 2 Úvod USB Charger popis
Amp1.
 Amp1 www.evolveo.com Vážený zákazníku, děkujeme, že jste si vybral produkt EVOLVEO Amp 1. Adaptér: DC 5 V 550 ma AC 220-240 V Funkce zesilovače: Zesílení přijímaného signálu až o 20dB pro všechny pasivní
Tento materiál byl vytvořen v rámci projektu Operačního programu Vzdělávání pro konkurenceschopnost.
 Tento materiál byl vytvořen v rámci projektu Operačního programu Vzdělávání pro konkurenceschopnost. Projekt MŠMT ČR Číslo projektu Název projektu školy Klíčová aktivita III/2 EU PENÍZE ŠKOLÁM CZ.1.07/1.4.00/21.2146
:= = := :=.. := := := := ρ := := α := π α = α = := = :=
 := = := :=.. := := := := ρ := := α := π α = α = := = := := α := α := = := α := := α = = ρ ρ := := := = := = := := := + + := + + := + := := := := + + := + + := + = = = :=.. := η := η := := π = :=.. :=,
Lenovo A606. Quick Start Guide v1.0. English/Česky
 Lenovo A606 Quick Start Guide v1.0 English/Česky English Read this guide carefully before using your smartphone. Learning more Getting support Electronic emission notices To learn more information about
WL-5480USB. Quick Setup Guide
 Quick Setup Guide 1 Czech 7 Install Utility Software Note1: Before installing the utility software, DO NOT inserts the into your computer. If the adapter is inserted already, Windows will detect the adapter
PC/104, PC/104-Plus. 196 ept GmbH I Tel. +49 (0) / I Fax +49 (0) / I I
 / I Fax +49 (0) / I I") E L E C T R O N I C C O N N E C T O R S 196 ept GmbH I Tel. +49 (0) 88 61 / 25 01 0 I Fax +49 (0) 88 61 / 55 07 I E-Mail sales@ept.de I www.ept.de Contents Introduction 198 Overview 199 The Standard 200
E L E C T R O N I C C O N N E C T O R S 196 ept GmbH I Tel. +49 (0) 88 61 / 25 01 0 I Fax +49 (0) 88 61 / 55 07 I E-Mail sales@ept.de I www.ept.de Contents Introduction 198 Overview 199 The Standard 200
USER'S MANUAL FAN MOTOR DRIVER FMD-01, FMD-03
 USER'S MANUAL FAN MOTOR DRIVER FMD-01, FMD-03 IMPORTANT NOTE: Read this manual carefully before installing or operating your new air conditioning unit. Make sure to save this manual for future reference.
SPECIFICATION FOR ALDER LED
 SPECIFICATION FOR ALDER LED MODEL:AS-D75xxyy-C2LZ-H1-E 1 / 13 Absolute Maximum Ratings (Ta = 25 C) Parameter Symbol Absolute maximum Rating Unit Peak Forward Current I FP 500 ma Forward Current(DC) IF
 If there is any inconsistency of weather forecast between Local Weather Station and this unit, the Local Weather Station's forecast should prevail. The trend pointer displayed on the LCD indicates the
ADDRESS CONVERSION TABLE FOR MANUAL SETTING
 - (06-57) - ADDRESS CVERSI TABLE FOR MANUAL SETTING In the case of a multiple refrigerant system, each refrigerant system should be set an exclusive refrigerant. Conversion table of refrigerant and rotary
Mechanika Teplice, výrobní družstvo, závod Děčín TACHOGRAFY. Číslo Servisní Informace Mechanika: 5-2013
 Mechanika Teplice, výrobní družstvo, závod Děčín TACHOGRAFY Servisní Informace Datum vydání: 20.2.2013 Určeno pro : AMS, registrované subj.pro montáž st.měř. Na základě SI VDO č./datum: Není Mechanika
Vánoční sety Christmas sets
 Energy news 7 Inovace Innovations 1 Vánoční sety Christmas sets Na jaře tohoto roku jste byli informováni o připravované akci pro předvánoční období sety Pentagramu koncentrátů a Pentagramu krémů ve speciálních
MA251 (cz_en) Operating instructions. MA251 (cz_en) Montážní návod. Krimpovací kleště PV-CZM... pro MC3, MC4 a MC4-EVO 2
 Operating instructions. MA251 (cz_en) Montážní návod. Krimpovací kleště PV-CZM... pro MC3, MC4 a MC4-EVO 2") MA251 (cz_en) Montážní návod Krimpovací kleště PV-CZM... pro MC3, MC4 a MC4-EVO 2 MA251 (cz_en) Operating instructions Crimping pliers PV-CZM... for MC3, MC4 and MC4-EVO 2 Obsah Bezpečnostní pokyny...2
MA251 (cz_en) Montážní návod Krimpovací kleště PV-CZM... pro MC3, MC4 a MC4-EVO 2 MA251 (cz_en) Operating instructions Crimping pliers PV-CZM... for MC3, MC4 and MC4-EVO 2 Obsah Bezpečnostní pokyny...2
Návod k obsluze a montáži N129/R04 (10.03.14 ) SUŠÁK NA RUCE
 SUŠÁK NA RUCE") Návod k obsluze a montáži N129/R04 (10.03.14 ) SUŠÁK NA RUCE Čtěte prosím pozorně informace uvedené v tomto návodu, který obsahuje důležité pokyny pro bezpečnou montáž, použití a údržbu jednotky. Uchovávejte
Návod k obsluze a montáži N129/R04 (10.03.14 ) SUŠÁK NA RUCE Čtěte prosím pozorně informace uvedené v tomto návodu, který obsahuje důležité pokyny pro bezpečnou montáž, použití a údržbu jednotky. Uchovávejte
 11.12. 100 ΕΙΣΟΔΟΣ = E / ENTRANCE = E = = 1174 550 ΤΥΠΟΠΟΙΗΜΕΝΟ ΚΥ = 2000 (ΕΠΙΛΟΓΗ: 2100) / CH STANDARD = 2000 (OPTIONAL: 2100) 243 50 ΚΥ/CH + 293 ΚΥ/CH +103 100 ΚΥ /CH 6 11 6 20 100 0,25 ΚΑ (CO) + 45
Size / Světlost : DN 1/4 to 4 / DN 1/4 až 4
 Size / Světlost : 1/4 to 4 / 1/4 až 4 Ends / Konce : Threaded BSP / Závitové BSP Min. Temperature / Minimální teplota : -20 C Max. Temperature / Maximální teplota : +180 C Max. Pressure / Maximální tlak
EU PROHLÁŠENÍ O SHODĚ
 CZ EU PROHLÁŠENÍ O SHODĚ 1. Model výrobku/výrobek: E0311 (viz. příloha č.1) 2. Jméno a adresa výrobce nebo jeho zplnomocněného zástupce: EMOS spol. s. r. o. Šířava 295/17 750 02 Přerov I Město Czech Republic
EU PROHLÁŠENÍ O SHODĚ
 CZ EU PROHLÁŠENÍ O SHODĚ 1. Model výrobku/výrobek: E0311-1,5 (viz. příloha č.1) 2. Jméno a adresa výrobce nebo jeho zplnomocněného zástupce: EMOS spol. s. r. o. Šířava 295/17 750 02 Přerov I Město Czech
Uživatelská příručka. Xperia P TV Dock DK21
 Uživatelská příručka Xperia P TV Dock DK21 Obsah Úvod...3 Přehled zadní strany stanice TV Dock...3 Začínáme...4 Správce LiveWare...4 Upgradování aplikace Správce LiveWare...4 Použití stanice TV Dock...5
SERVISNÍ MANUÁL PEGAS 250 E CEL OVO SERVICE MANUAL PEGAS 250 E CEL OVO
 MG136-1 PEGAS 250 E CEL OVO SERVICE MANUAL page 1 SERVISNÍ MANUÁL PEGAS 250 E CEL OVO SERVICE MANUAL PEGAS 250 E CEL OVO 1. VAROVÁNÍ WARNING UPOZORNĚNÍ Pouze osoba splňující kvalifikaci danou zákonem je
Introduction to MS Dynamics NAV
 Introduction to MS Dynamics NAV (Item Charges) Ing.J.Skorkovský,CSc. MASARYK UNIVERSITY BRNO, Czech Republic Faculty of economics and business administration Department of corporate economy Item Charges
USB Charger. Battery charger/power supply via power socket (100-240V)
") USB Charger Battery charger/power supply via power socket (100-240V) Compact charger for devices chargeable via USB For example ipod, iphone, MP3 player, etc. Output voltage: 5V; up to 0.7A; short-circuit
USB Charger Battery charger/power supply via power socket (100-240V) Compact charger for devices chargeable via USB For example ipod, iphone, MP3 player, etc. Output voltage: 5V; up to 0.7A; short-circuit
Installation and Operation Manual Before operating the unit, please read this manual thoroughly and retain it for future reference!
 EN Wireless Analog Camera (ANL-01-BZ) Installation and Operation Manual Before operating the unit, please read this manual thoroughly and retain it for future reference! 1. Features 640 x 480 Video resolution
Quick Start Guide. Clear. Rychlý průvodce nastavením
 CZ EN Quick Start Guide Clear Rychlý průvodce nastavením Measurement Měření Před Fully prvním charge použitím the blood plně pressure dobijte monitor baterii before přístroje. first use. 1 Rest your bare
User manual SŘHV Online WEB interface for CUSTOMERS June 2017 version 14 VÍTKOVICE STEEL, a.s. vitkovicesteel.com
 1/ 11 User manual SŘHV Online WEB interface for CUSTOMERS June 2017 version 14 2/ 11 Contents 1. MINIMUM SYSTEM REQUIREMENTS... 3 2. SŘHV ON-LINE WEB INTERFACE... 4 3. LOGGING INTO SŘHV... 4 4. CONTRACT
Projekt: ŠKOLA RADOSTI, ŠKOLA KVALITY Registrační číslo projektu: CZ.1.07/1.4.00/21.3688 EU PENÍZE ŠKOLÁM
 ZÁKLADNÍ ŠKOLA OLOMOUC příspěvková organizace MOZARTOVA 48, 779 00 OLOMOUC tel.: 585 427 142, 775 116 442; fax: 585 422 713 email: kundrum@centrum.cz; www.zs-mozartova.cz Projekt: ŠKOLA RADOSTI, ŠKOLA
DATA SHEET. BC516 PNP Darlington transistor. technický list DISCRETE SEMICONDUCTORS Apr 23. Product specification Supersedes data of 1997 Apr 16
 zákaznická linka: 840 50 60 70 DISCRETE SEMICONDUCTORS DATA SHEET book, halfpage M3D186 Supersedes data of 1997 Apr 16 1999 Apr 23 str 1 Dodavatel: GM electronic, spol. s r.o., Křižíkova 77, 186 00 Praha
ROLZ-2. Portable AV/Conference Center. Assembly Instructions
 1 ROLZ-2 Portable AV/Conference Center Assembly Instructions Rolz-2 Portable AV/Conference Center Part Drawing Description Qty Part Drawing Description Qty Hardware List A 1 ½ Flat Head Screw 2 EA P-1
Switch on the appropriate breaker and verify that the light is working properly.
 Package contents Name: MONA WALL PC970 wall light 445 Components included with unit: glass shade with light source, 1x metal light body, 1x wall mount, 3x terminal connectors, 2x hex screws M5, 1x hex
1-AYKY. Instalační kabely s Al jádrem. Standard TP-KK-133/01, PNE 347659-3. Konstrukce. Použití. Vlastnosti. Installation cables with Al conductor
 Instalační kabely s Al jádrem Installation cables with Al conductor Standard TP-KK-133/01, PNE 347659-3 4 3 2 1 Konstrukce Construction 1 Hliníkové jádro Aluminium conductor 2 Izolace PVC 3 Výplňový obal
Get started Začínáme Začíname
 Get started Začínáme Začíname Get started Začínáme Začíname 1 Insert the included AA batteries before proceeding with the installation. Před zahájením instalace vložte přiložené baterie AA. Pred začatím
Gymnázium, Brno, Slovanské nám. 7 WORKBOOK. Mathematics. Teacher: Student:
 WORKBOOK Subject: Teacher: Student: Mathematics.... School year:../ Conic section The conic sections are the nondegenerate curves generated by the intersections of a plane with one or two nappes of a cone.
LED STANDARD 12V GU4, GU5.3, G53
 LED catalog/katalog OBSAH / CONTENT 3 LED STANDARD 12V GU4, GU5.3, G53 5 HIGH POWER LED 230V GU10 7 HIGH POWER LED 230V E14, E27 9 HIGH POWER LED 230V E27 11. HIGH POWER LED 230V GU10, E27 13. LED STANDARD
VOŠ, SPŠ automobilní a technická. Mgr. Marie Šíchová. At the railway station
 Název SŠ: Autor: Název: Tematická oblast: VOŠ, SPŠ automobilní a technická Mgr. Marie Šíchová At the railway station VOŠ, Provoz a ekonomika dopravy, cizí jazyk, angličtina B, odborné téma Železniční doprava
Název společnosti: VPK, s.r.o. Vypracováno kým: Ing. Michal Troščak Telefon: Datum:
 Pozice Počet Popis 1 SCALA2 3-45 A Datum: 2.7.217 Výrobní č.: 98562862 Grundfos SCALA2 is a fully integrated, self-priming, compact waterworks for pressure boosting in domestic applications. SCALA2 incorporates
TechoLED H A N D B O O K
 TechoLED HANDBOOK Světelné panely TechoLED Úvod TechoLED LED světelné zdroje jsou moderním a perspektivním zdrojem světla se širokými možnostmi použití. Umožňují plnohodnotnou náhradu žárovek, zářivkových
Presenter SNP6000. Register your product and get support at CS Příručka pro uživatele
 Register your product and get support at www.philips.com/welcome Presenter SNP6000 CS Příručka pro uživatele 1 a b c d e 2 3 4 Federal Communication Commission Interference Statement This equipment has
Výukový materiál zpracovaný v rámci operačního programu Vzdělávání pro konkurenceschopnost
 Výukový materiál zpracovaný v rámci operačního programu Vzdělávání pro konkurenceschopnost Registrační číslo: CZ.1.07/1. 5.00/34.0084 Šablona: II/2 Inovace a zkvalitnění výuky cizích jazyků na středních
VY_32_INOVACE_06_Předpřítomný čas_03. Škola: Základní škola Slušovice, okres Zlín, příspěvková organizace
 VY_32_INOVACE_06_Předpřítomný čas_03 Autor: Růžena Krupičková Škola: Základní škola Slušovice, okres Zlín, příspěvková organizace Název projektu: Zkvalitnění ICT ve slušovské škole Číslo projektu: CZ.1.07/1.4.00/21.2400
PITSTOP VY_22_INOVACE_26
 PITSTOP VY_22_INOVACE_26 Vzdělávací oblast: Jazyk a jazyková komunikace Vzdělávací obor: Anglický jazyk Ročník: 9. PITSTOP 1/ Try to complete the missing words. Then listen and check your ideas. Eight
Light (glass base with power cord and Ehmann dimmer, reflector, glass globe), light source, cotton gloves, installation manual
, light source, cotton gloves, installation manual") Package contents Name: BALLOONS PC858 Table light 607 850 Components included with unit: Light (glass base with power cord and Ehmann dimmer, reflector, glass globe), light source, cotton gloves, installation
Package contents Name: BALLOONS PC858 Table light 607 850 Components included with unit: Light (glass base with power cord and Ehmann dimmer, reflector, glass globe), light source, cotton gloves, installation
FIRE INVESTIGATION. Střední průmyslová škola Hranice. Mgr. Radka Vorlová. 19_Fire investigation CZ.1.07/1.5.00/
 FIRE INVESTIGATION Střední průmyslová škola Hranice Mgr. Radka Vorlová 19_Fire investigation CZ.1.07/1.5.00/34.0608 Výukový materiál Číslo projektu: CZ.1.07/1.5.00/21.34.0608 Šablona: III/2 Inovace a zkvalitnění
AIC ČESKÁ REPUBLIKA CZECH REPUBLIC
 ČESKÁ REPUBLIKA CZECH REPUBLIC ŘÍZENÍ LETOVÉHO PROVOZU ČR, s.p. Letecká informační služba AIR NAVIGATION SERVICES OF THE C.R. Aeronautical Information Service Navigační 787 252 61 Jeneč A 1/14 20 FEB +420
Od Czech POINTu k vnitřní integraci
 Od Czech POINTu k vnitřní integraci Radek Novák Direct Account Manager Co mají společné??? - Czech POINT - Datové schránky (ISDS) - Vnitřní integrace úřadu 2 Projekt Czech POINT - 28.3.2007 zahájen pilotní
harvia griffin COLOUR LIGHT Control unit Ridici jednotka
 harvia griffin COLOUR LIGHT Control unit Ridici jednotka 13082008 These instructions for installation and use are intended for owners of colour light units and control units and for electricians responsible
Czech Republic. EDUCAnet. Střední odborná škola Pardubice, s.r.o.
 Czech Republic EDUCAnet Střední odborná škola Pardubice, s.r.o. ACCESS TO MODERN TECHNOLOGIES Do modern technologies influence our behavior? Of course in positive and negative way as well Modern technologies
PAINTING SCHEMES CATALOGUE 2012
 Evektor-Aerotechnik a.s., Letecká č.p. 84, 686 04 Kunovice, Czech Republic Phone: +40 57 57 Fax: +40 57 57 90 E-mail: sales@evektor.cz Web site: www.evektoraircraft.com PAINTING SCHEMES CATALOGUE 0 Painting
S113 BT Welcome Guide
 www.arctic.ac S113 BT Welcome Guide EN DE FR ES... support.arctic.ac/s113bt Dear Customer, Thank you for choosing the ARCTIC S113 BT. This smart little box allows you to bring your music wherever you go.
SERVICE MANUAL PEGAS 250 E CEL SERVISNÍ MANUÁL PEGAS 250 E CEL
 MG-011-05 PEGAS 250 E CEL SERVICE MANUAL page 1 SERVISNÍ MANUÁL PEGAS 250 E CEL SERVICE MANUAL PEGAS 250 E CEL 1. VAROVÁNÍ WARNING UPOZORNĚNÍ Pouze osoba splňující kvalifikaci danou zákonem je oprávněna
INSTALAČNÍ NÁVOD OPERATING INSTRUCTION
 LED PRODISC II + LED PRODISC II MINI + LED PRODISC II MAXI INSTALAČNÍ NÁVOD OPERATING INSTRUCTION 4000944x 4000945x 4000940x 4000941x 4000946x 4000947x Prodisc II Mini Prodisc II Mini + MW senzor Prodisc
Standardní záruka. http://www.alliedtelesis.cz/support/warranty/signup.aspx
 Standardní záruka Standardní produkty (Enterprise)» Switches» Routers» Converters» NICs, SFPs Operátorské produkty (NSP)» imgs» imaps» 3rd party (Extricom) Bez registrace 2 roky od prodeje koncovému zákazníkovi
Název společnosti: VPK, s.r.o. Vypracováno kým: Ing. Michal Troščak Telefon: Datum:
 Počet 1 SCALA2 3-45 A Datum: 2.7.217 Výrobní č.: 98562862 Grundfos SCALA2 is a fully integrated, self-priming, compact waterworks for pressure boosting in domestic applications. SCALA2 incorporates integrated
Ecosun CH. Napětí V. 1096x155x115* 230 V 1N I IP 44 Ecosun CH x155x115*
 Návod k obsluze a montáži N631/R02 (06.08.14 ) Ecosun CH Sálavé panely do kostelních lavic 1. Použití Sálavé panely Ecosun CH jsou určeny k instalaci pod pevně připevněné kostelní lavice. Panely se instaluji
CCD 90 MV Cameras (Firewire) CCD 90 MV Cameras (GigE) CCD 90 MV Cameras (USB 2.0)
 CCD 90 MV Cameras (GigE) CCD 90 MV Cameras (USB 2.0)") CCD 90 MV Cameras (Firewire) PL-B952F-R PL-B953F-R PL-B954F-R PL-B954HF-R PL-B955F-R PL-B955HF-R PL-B956F-R PL-B957F-R PL-B958F-R PL-B959F-R CCD 90 MV Cameras (GigE) PL-B954G-R PL-B954HG-R PL-B955G-R PL-B955HG-R
CCD 90 MV Cameras (Firewire) PL-B952F-R PL-B953F-R PL-B954F-R PL-B954HF-R PL-B955F-R PL-B955HF-R PL-B956F-R PL-B957F-R PL-B958F-R PL-B959F-R CCD 90 MV Cameras (GigE) PL-B954G-R PL-B954HG-R PL-B955G-R PL-B955HG-R
obal manuálu, asi něco podobného jako u LC 100 asi by to chtělo lepší obrázek!!! FYTOSCOPE FS130 Instruction Guide
 obal manuálu, asi něco podobného jako u LC 100 asi by to chtělo lepší obrázek!!! FYTOSCOPE FS130 Instruction Guide možná tohle trochu zmenšit a dát sem i to varování LED RADIATION co je na další straně
Pokyny k použití. Model-300. Napájecí zdroj. Návod na obsluhu Operating Instructions. se systémem Aquacontrol Napájací zdroj
 Pokyny k použití Model-300 Návod na obsluhu Operating Instructions Napájecí zdroj se systémem Napájací zdroj so systémom Power Supply with System BK 0011900 / PC AQUACONTROL Kryt aquacontrol Kryt aquacontrol
Uživatelská příručka. Mono Bluetooth Headset MBH10
 Uživatelská příručka Mono Bluetooth Headset MBH10 Obsah Přehled funkcí...3 Přehled příslušenství...4 Základní postupy...5 Nabíjení baterie...5 Zapnutí a vypnutí náhlavní soupravy...5 Párování náhlavní
Mobilní počítač Dolphin TM 6100. Stručný návod k použití
 Mobilní počítač Dolphin TM 6100 Stručný návod k použití Mobilní počítač Dolphin 6100 Pro začátek Ověřte si, že balení obsahuje následující položky: Mobilní počítač Dolphin 6100 (terminál) Hlavní bateriový
Potřebujete mít vaše IS ve shodě s legislativou? Bc. Stanislava Birnerová
 Potřebujete mít vaše IS ve shodě s legislativou? Bc. Stanislava Birnerová Direct Account Manager sbirnerova@novell.com Komplexnost, Nátlak, Nulová tolerance Nařízení Business Continuity Interní hrozby
Buderus System Logatherm Wps K
 Buderus System Logatherm Wps K XV1100K(C)/XV1100SK(C) All rights reserverd. Any reprinting or unauthorized use wihout the written permission of Buderus System Logatherm Wps K Corporation, is expressly
Instalace Pokyny pro instalaci v operačním systému Windows XP / Vista / Win7 / Win8
 Instalace Pokyny pro instalaci v operačním systému Windows XP / Vista / Win7 / Win8 1. Stáhněte si instalační program HOST makro engine z oficiálního webu IABYTE. 2. Spusťte instalační program a postupujte
Postup objednávky Microsoft Action Pack Subscription
 Postup objednávky Microsoft Action Pack Subscription DŮLEŽITÉ: Pro objednání MAPS musíte být členem Microsoft Partner Programu na úrovni Registered Member. Postup registrace do Partnerského programu naleznete
English... 2. Čeština... 22. Deutsch... 41
 English... 2 Čeština... 22 Deutsch... 41 V 1.22 Table of Contents Trademarks... 4 Introduction... 4 Intended use... 4 Package contents... 5 Technical specifications... 5 Safety instructions... 6 Copyright...
CzechPOINT@office a konverze na úřadech Martin Řehořek
 CzechPOINT@office a konverze na úřadech Martin Řehořek Novell Professional Services ČR, s.r.o. mrehorek@novell.com Agenda CzechPOINT@office Lokální administrátor Autorizovaná konverze na žádost Autorizovaná
2N Lift8 Audio unit cabin universal
 2N Lift8 Audio unit cabin universal Brief Manual Version 2.0.0 www.2n.cz EN The user does not come into direct contact with this product. The control and indication elements depend on the specific installation.
Návod na použití, montáž a údržbu Třícestný zónový kulový ventil s pohonem VZK 3xx - 230-1P - 001
 ávod na použití, montáž a údržbu Třícestný zónový kulový ventil s pohonem VZK 3xx - 230-1P - 001 CZ verze 1.0 1 POUŽITÍ Ventily s pohonem řady VZK 3xx - 230-1P mohou být použity ve spojení s jakýmkoliv
Připojení internetového modulu econet300 Do regulátoru ecomax 810P3-L TOUCH.
 Připojení internetového modulu econet300 Do regulátoru ecomax 810P3-L TOUCH. Connection of econet300 internet module to ecomax 810P3-L TOUCH Controller. Prosím ověřte verzi softwaru vašeho modulu ecomax.
DC circuits with a single source
 Název projektu: utomatizace výrobních procesů ve strojírenství a řemeslech egistrační číslo: Z..07/..0/0.008 Příjemce: SPŠ strojnická a SOŠ profesora Švejcara Plzeň, Klatovská 09 Tento projekt je spolufinancován
PET ACTIVITY TRACKER USER MANUAL UŽIVATELSKÝ MANUÁL. Bedienungsanleitung * Mode d emploi * Manuale dell Utente Manual do Usuário * Manual * Käyttöohje
 PET ACTIVITY TRACKER USER MANUAL UŽIVATELSKÝ MANUÁL Bedienungsanleitung * Mode d emploi * Manuale dell Utente Manual do Usuário * Manual * Käyttöohje Tractive MOTION Tractive Activity MOTION tracker pro
English... 2. Čeština... 24. Deutsch... 46
 English... 2 Čeština... 24 Deutsch... 46 V 1.25 Table of Contents Trademarks... 4 Introduction... 4 Intended use... 4 Package contents... 5 Technical specifications... 6 Safety instructions... 7 Copyright...
EXACT DS OFFICE. The best lens for office work
 EXACT DS The best lens for office work EXACT DS When Your Glasses Are Not Enough Lenses with only a reading area provide clear vision of objects located close up, while progressive lenses only provide
MultiPort 1.
 MultiPort 1 www.evolveo.com CZ ÚVOD Děkujeme, že jste si zakoupili dokovací stanici USB-C EVOLVEO Multiport 1. Tento výrobek vám umožní připojit 2. monitor přímo přes HDMI nebo VGA konektor. Rozlišení
7 Distribution of advertisement
 Legal regulation relating to the text message advertisement: There are different conditions regarding the SMS advertisement for two groups of recipients. The first group consists of recipients who are
 - 1 2 1 2 3 4 3 4 5 5 For further information please contact your local Epson office or visit www.epson-europe.com EPSON Europe B.V. Otto-Hahn-Str. 4 D-40670 Meerbusch Tel. +49 (0)1805/377661 All features
Vypsání závodu / Notice of Race strana/page 1/5. Compotech Cup. v lodních třídách / in classes. D-One, 7P CTL 161315
 Vypsání závodu / Notice of Race strana/page 1/5 Compotech Cup v lodních třídách / in classes D-One, 7P CTL 161315 Datum / date: 04.06.2016 05.06.2016 místo konání : Kemp Jestřábí 1, Lipno Černá v Pošumaví
ZÓNOVÉ VENTILY S VRATNOU PRUŽINOU dvoucestné VZP 2XX 230 1P 001 třícestné VZP 3XX 230 1P 001
 Návod na instalaci a použití ZÓNOVÉ VENTILY S VRATNOU PRUŽINOU dvoucestné VZP 2XX 230 1P 001 třícestné VZP 3XX 230 1P 001 CZ verze 1.2 Popis: Zónové ventily s vratnou pružinou jsou určeny do hydraulických
WORKSHEET 1: LINEAR EQUATION 1
 WORKSHEET 1: LINEAR EQUATION 1 1. Write down the arithmetical problem according the dictation: 2. Translate the English words, you can use a dictionary: equations to solve solve inverse operation variable
Výukový materiál zpracovaný v rámci operačního programu Vzdělávání pro konkurenceschopnost
 Výukový materiál zpracovaný v rámci operačního programu Vzdělávání pro konkurenceschopnost Registrační číslo: CZ.1.07/1. 5.00/34.0084 Šablona: II/2 Inovace a zkvalitnění výuky cizích jazyků na středních
UŽIVATELSKÁ PŘÍRUČKA. Uninterruptible Power System. Line-Interactive Network UPS 400VA / 500VA / 600VA / 800VA. Obsah:
 Obsah: IMPORTANT SAFETY INSTRUCTIONS. CHYBA! ZÁLOŽKA NENÍ DEFINOVÁNA. Uninterruptible Power System INTRODUCTION... CHYBA! ZÁLOŽKA NENÍ DEFINOVÁNA. 1.PRESENTATION...3 2.INSTALLATION...4 3.OPERATION...4
Microsoft Lync WEB meeting
 User - documentation ENU and CZ version Microsoft Lync WEB meeting - Připojení k WEB meetingu prostřednictvím Microsoft Lync Date: 10. 5. 2013 Version: 0.2 ENU, CZ www.axiomprovis.cz Version description:
Byznys a obchodní záležitosti
 - Úvod Dear Mr. President, Dear Mr. President, Velmi formální, příjemce má speciální titul či status, který musí být použit v místě jejich jména Dear Sir, Formální, příjemce muž, jméno neznámé Dear Madam,
Informace o písemných přijímacích zkouškách. Doktorské studijní programy Matematika
 Informace o písemných přijímacích zkouškách (úplné zadání zkušebních otázek či příkladů, které jsou součástí přijímací zkoušky nebo její části, a u otázek s výběrem odpovědi správné řešení) Doktorské studijní
INSTALLATION MANUAL PD 0027.01
 INSTALLATION MANUAL PD 0027.01 OUTDOOR MOTOR DRIVE FOR MV DISCONNECTORS ISO 9001:2009 ISO 14001:2005 OHSAS 18001:2008 TYPE SUP a) STORAGE / SKLADOVÁNÍ The packed devices on wooden pallet it is not allowed
Injection Valve EV 14
 Bosch Injection Valve EV 14 Injection Valve EV 14 Conical spray or 2-spray Flow rate at 3 bar: up to 1,462 cm 3 /min Spray angle 15 to 85 With or without extension EV 14 injection valves are the latest