Lire le manuel avant d utiliser cette machine. Avis! Vêtir casque, visière et protège-oreilles. Danger! Attention aux rebonds!
|
|
|
- Petr Beran
- před 6 lety
- Počet zobrazení:
Transkript


1 TRE2042SO Avis! Let op! Warning! Upozornění! FR / TRONÇONNEUSE A CHAINE TRADUCTION DES INSTRUCTIONS D ORIGINE Lire le manuel avant d utiliser cette machine Avis! Vêtir casque, visière et protège-oreilles Lees veer het gebruik de gebruiksaanwijzing aandachtig door overtuig uzelf dat u de inhoud begrijpt Let op! Draag tijdens gebruik beschermmiddelen voor; ogen, oren en hoofd. Read all safety warnings and all instructions. Failure to follow the warnings and instructions may result in electric shock, fire and/or serious injury. Wear protective helmet, eye and ear protection! Před použitím si pečlivě přečtěte návod k obsluze. Při práci je třeba mít nasazenou ochrannou přilbu a náušníky! NL / KETTINGZAAG VERTALING VAN DE ORIGINELE INSTRUCTIES GB / CHAINSAW ORIGINAL INSTRUCTIONS CZ / ŘETĚZOVÁ PILA ORIGINÁLNÍ NÁVOD Danger! Attention aux rebonds! Ne pas couper avec la pointe du guide. La tronçonneuse doit être tenueà deux mains pendant le travail! Si-non risque de blessure! En cas de câble d'alimentation endommagé, débrancher la fiche électrique avant de procéder à un contrôle. Ne pas utiliser en présence de pluie ou d'humidité. Gevaar! Let op terugslag! De zaagbladtop niet gebrulken. Houd de kettingzaag tijdens het zagen met beide handen vast! Met één hand werken is ui-terst gevaarlijk! Indien de elektriciteitskabel beschadigd is, dient u de stekker uit het stopcontact te halen voordat u een en ander gaat controleren Niet gebruiken in geval van regen of vocht. CAUTION: Kickback! Do not cut with the tip of guide. Hold the saw with both hands while working! One-handed use is extremely hazardous! Remove the plug from the socket or mains immediately before carrying out any adjustments, servicing or aintenance or if the cable is damaged or cut. Do not use the machine in the rain or leave it outdoors when it is raining. Nebezpečí zpětného rázu! Neřezat ostřím přívodní šňůru! Držet pilu oběma rukama! V případě poškození přívodní šňůry je třeba zařízení vypnout ze zásuvky! Nepoužívat v dešti a při vysoké vlhkosti! S47 M11 Y2014 1


2 MAX MIN 5 2

3
4


5 5
6 6
7 FR / TRONÇONNEUSE UTILISATION Ce modèle est conçu pour des usages ponctuels par des propriétaires de maison individuelle, de chalet, des campeurs, et pour des utilisations telles que le nettoyage, l élagage, la coupe de bois à brûler, etc. Il n est pas conçu pour un usage prolongé. Cet outil n est pas destiné à un usage professionnel. AVERTISSEMENTS DE SECURITE GENERAUX POUR L OUTIL AVERTISSEMENT Lire tous les avertissements de sécurité et toutes les instructions. Ne pas suivre les avertissements et instructions peut donner lieu à un choc électrique, un incendie et/ou une blessure sérieuse. Conserver tous les avertissements et toutes les instructions pour pouvoir s y reporter ultérieurement. Le terme «outil» dans les avertissements fait référence à votre outil électrique alimenté par le secteur (avec cordon d alimentation) ou votre outil fonctionnant sur batterie (sans cordon d alimentation). 1) Sécurité de la zone de travail a) Conserver la zone de travail propre et bien éclairée. Les zones en désordre ou sombres sont propices aux accidents. b) Ne pas faire fonctionner les outils électriques en atmosphère explosive, par exemple en présence de liquides inflammables, de gaz ou de poussières. Les outils électriques produisent des étincelles qui peuvent enflammer les poussières ou les fumées. c) Maintenir les enfants et les personnes présentes à l écart pendant l utilisation de l outil. Les distractions peuvent vous faire perdre le contrôle de l outil. 2) Sécurité électrique a) Il faut que les fiches de l outil électrique soient adaptées au socle. Ne jamais modifier la fiche de quelque façon que ce soit. Ne pas utiliser d adaptateurs avec des outils à branchement de terre. Des fiches non modifiées et des socles adaptés réduiront le risque de choc électrique. b) Eviter tout contact du corps avec des surfaces reliées à la terre telles que les tuyaux, les radiateurs, les cuisinières et les réfrigérateurs. Il existe un risque accru de choc électrique si votre corps est relié à la terre. c) Ne pas exposer les outils à la pluie ou à des conditions humides. La pénétration d eau à l intérieur d un outil augmentera le risque de choc électrique. d) Ne pas maltraiter le cordon. Ne jamais utiliser le cordon pour porter, tirer ou débrancher l outil. Maintenir le cordon à l écart de la chaleur, du lubrifiant, des arêtes ou des parties en mouvement. Les cordons endommagés ou emmêlés augmentent le risque de choc électrique. e) Lorsqu on utilise un outil à l extérieur, utiliser un prolongateur adapté à l utilisation extérieure. L utilisation d un cordon adapté à l utilisation extérieure réduit le risque de choc électrique. f) Si l usage d un outil dans un emplacement humide est inévitable, utiliser une alimentation protégée par un dispositif à courant différentiel résiduel (RCD). L usage d un RCD réduit le risque de choc électrique. 3) Sécurité des personnes a) Rester vigilant, regarder ce que vous êtes en train de faire et faire preuve de bon sens dans l utilisation de l outil. Ne pas utiliser un outil lorsque vous êtes fatigué ou sous l emprise de drogues, d alcool ou de médicaments. Un moment d inattention en cours d utilisation d un outil peut entraîner des blessures graves des personnes. b) Utiliser un équipement de sécurité. Toujours porter une protection pour les yeux. Les équipements de sécurité tels que les masques contre les poussières, les chaussures de sécurité antidérapantes, les casques ou les protections acoustiques utilisés pour les conditions appropriées réduiront les blessures des personnes. c) Eviter tout démarrage intempestif. S assurer que l interrupteur est en position arrêt avant de brancher l outil au secteur et/ou au bloc de batteries, de le ramasser ou de le porter. Porter les outils en ayant le doigt sur l interrupteur ou brancher des outils dont l interrupteur est en position marche est source d accidents. d) Retirer toute clé de réglage avant de mettre l outil en marche. Une clé laissée fixée sur une partie tournante de l outil peut donner lieu à des blessures de personnes. e) Ne pas se précipiter. Garder une position et un équilibre adaptés à tout moment. Cela permet un meilleur contrôle de l outil dans des situations inattendues. f) S habiller de manière adaptée. Ne pas porter de vêtements amples ou de bijoux. Garder les cheveux, les vêtements et les gants à distance des parties en mouvement. Des vêtements amples, des bijoux ou les cheveux longs peuvent être pris dans des parties en mouvement. 7
8 g) Si des dispositifs sont fournis pour le raccordement d équipements pour l extraction et la récupération des poussières, s assurer qu ils sont connectés et correctement utilisés. Utiliser des collecteurs de poussière peut réduire les risques dus aux poussières. 4) Utilisation et entretien de l outil a) Ne pas forcer l outil. Utiliser l outil adapté à votre application. L outil adapté réalisera mieux le travail et de manière plus sûre au régime pour lequel il a été construit. b) Ne pas utiliser l outil si l interrupteur ne permet pas de passer de l état de marche à arrêt et vice versa. Tout outil qui ne peut pas être commandé par l interrupteur est dangereux et il faut le faire réparer. c) Débrancher la fiche de la source d alimentation en courant et/ou le bloc de batteries de l outil avant tout réglage, changement d accessoires ou avant de ranger l outil. De telles mesures de sécurité préventives réduisent le risque de démarrage accidentel de l outil. d) Conserver les outils à l arrêt hors de la portée des enfants et ne pas permettre à des personnes ne connaissant pas l outil ou les présentes instructions de le faire fonctionner. Les outils sont dangereux entre les mains d utilisateurs novices. e) Observer la maintenance de l outil. Vérifier qu il n y a pas de mauvais alignement ou de blocage des parties mobiles, des pièces cassées ou toute autre condition pouvant affecter le fonctionnement de l outil. En cas de dommages, faire réparer l outil avant de l utiliser. De nombreux accidents sont dus à des outils mal entretenus. f) Garder affûtés et propres les outils permettant de couper. Des outils destinés à couper correctement entretenus avec des pièces coupantes tranchantes sont moins susceptibles de bloquer et sont plus faciles à contrôler. g) Utiliser l outil, les accessoires et les lames etc., conformément à ces instructions, en tenant compte des conditions de travail et du travail à réaliser. L utili-sation de l outil pour des opérations différentes de celles prévues pourrait donner lieu à des situations dangereuses. 5) Maintenance et entretien a) Faire entretenir l outil par un réparateur qualifié utilisant uniquement des pièces de rechange identiques. Cela assurera que la sécurité de l outil est maintenue. AVERTISSEMENTS DE SECURITE DE LA SCIE A CHAINE N approchez aucune partie du corps de la chaîne coupante lorsque la scie à chaîne fonctionne. Avant de mettre en marche la scie à chaîne, s assurer que la chaîne coupante n est pas en contact avec quoi que ce soit. Un moment d inattention au cours de l utilisation des scies à chaîne peut provoquer l accrochage de votre vêtement ou d une partie du corps à la chaîne coupante. Tenir l outil uniquement par les surfaces de préhension isolées car la scie à chaîne peut entrer en contact avec le câblage non apparent ou le propre cordon d'alimentation de l outil. Les chaînes de scie entrant en contact avec un fil «sous tension» peuvent mettre «sous tension» les parties métalliques exposées de l outil électrique et provoquer un choc électrique sur l opérateur. Toujours tenir la poignée arrière de la scie à chaîne avec la main droite et la poignée avant avec la main gauche. Tenir la scie à chaîne en inversant les mains augmente le risque d accident corporel et il convient de ne jamais le faire. Porter des verres de sécurité et une protection auditive. Un équipement supplémentaire de protection pour la tête, les mains, les jambes et les pieds est recommandé. Un vêtement de protection approprié réduira les accidents corporels provoqués par des débris volants ou un contact accidentel avec la chaîne coupante. Ne pas faire fonctionner une scie à chaîne dans un arbre. La mise en marche d une scie à chaîne dans un arbre peut entraîner un accident corporel. Toujours maintenir une assise de pied appropriée et faire fonctionner la scie à chaîne uniquement en se tenant sur une surface fixe, sûre et de niveau. Des surfaces glissantes ou instables telles que des échelles peuvent provoquer une perte d équilibre ou de contrôle de la scie à chaîne. Lors de la coupe d une branche qui est sous contrainte être vigilant au risque de retour élastique. Lorsque la tension des fibres de bois est relâchée, la branche sous un effet ressort peut frapper l opérateur et/ou projeter la scie à chaîne hors de contrôle. Faire preuve d une extrême prudence lors de la coupe de broussailles et de jeunes arbustes. Les matériaux fins peuvent agripper la chaîne coupante et être projetés tel un fouet en votre direction, ou vous faire perdre l équilibre sous l effet de la traction. 8
9 Tenir la scie à chaîne par la poignée avant avec mise hors tension de la scie à chaîne et à distance des parties du corps. Pendant le transport ou l entreposage de la scie à chaîne, toujours la recouvrir du protecteur de chaîne. Une manipulation appropriée de la scie à chaîne réduira la probabilité du contact accidentel avec la chaîne coupante mobile. Suivre les instructions concernant les accessoires de lubrification, de tension et de changement de chaîne. Une chaîne dont la tension et la lubrification sont incorrectes peut soit rompre soit accroître le risque de rebond. Garder les poignées sèches, propres et dépourvues d huile et de graisse. Des poignées grasses, huileuses sont glissantes et provoquent ainsi une perte de contrôle. Couper uniquement du bois. Ne pas utiliser la scie à chaîne à des fins non prévues. Par exemple : ne pas utiliser la scie à chaîne pour couper des matériaux plastiques, de maçonnerie ou de construction autres que le bois. L utilisation de la scie à chaîne pour des opérations différentes de celles prévues peut provoquer des situations dangereuses. CAUSES DE REBONDS ET PREVENTION PAR L OPERATEUR : Le rebond peut se produire lorsque le bec ou l extrémité du guide-chaîne touche un objet, ou lorsque le bois se resserre et pince la chaîne coupante dans la section de coupe. Le contact de l extrémité peut dans certains cas provoquer une réaction inverse soudaine, en faisant rebondir le guide-chaîne vers le haut et l arrière vers l opérateur. Le pincement de la chaîne coupante sur la partie supérieure du guide-chaîne peut repousser brutalement le guide-chaîne vers l opérateur. L une ou l autre de ces réactions peut provoquer une perte de contrôle de la scie susceptible d entraîner un accident corporel grave. Ne pas compter exclusivement que sur les dispositifs de sécurité intégrés dans votre scie. En tant qu utilisateur de scie à chaîne, il convient de prendre toutes mesures pour éliminer le risque d accident ou de blessure lors de vos travaux de coupe. Le rebond résulte d un mauvais usage de l outil et/ou de procédures ou de conditions de fonctionnement incorrectes et peut être évité en prenant les précautions appropriées spécifiées ci-dessous : Maintenir la scie des deux mains fermement avec les pouces et les doigts encerclant les poignées de la scie et placer votre corps et vos bras pour vous permettre de résister aux forces de rebond. Les forces de rebond peuvent être maîtrisées par l opérateur, si des précautions appropriées sont prises. Ne pas laisser partir la scie à chaîne. Ne pas tendre le bras trop loin et ne pas couper au-dessus de la hauteur de l épaule. Cela contribue à empêcher les contacts d extrémité involontaires et permet un meilleur contrôle de la scie à chaîne dans des situations imprévues. N utiliser que les guides et les chaînes de rechange spécifiés par le fabricant. Des guides et chaînes de rechange incorrects peuvent provoquer une rupture de chaîne et/ou des rebonds. Suivre les instructions du fabricant concernant l affûtage et l entretien de la scie à chaîne. Une diminution du niveau du calibre de profondeur peut conduire à une augmentation de rebonds. Pour plus de sécurité, il est recommandé d utiliser un disjoncteur différentiel avec un courant de défaut de 30 ma maximum. Avant chaque utilisation de la machine, contrôler ce disjoncteur différentiel. Il est interdit aux enfants et aux adolescents d utiliser la scie à chaîne; les apprentis à partir de 16 ans ne peuvent l utiliser que sous surveillance. Ceci vaut également pour les personnes ne connaissant pas ou très peu le maniement de la scie à chaîne. Les instructions d utilisation devraient toujours se trouver à portée de main. Les personnes fatiguées ou fragiles physiquement, ne doivent pas utiliser la scie à chaîne. Avant d utiliser l appareil, s assurer que tous les dispositifs de protection et toutes les poignées sont bien montés. Ne jamais essayer de mettre en service un appareil incomplet ni sur lequel des modifications non autorisées ont été effectuées. Avant la première mise en service, il est recommandé à l utilisateur de se faire expliquer par un spécialiste expérimenté à l aide d essais pratiques le maniement de la scie à chaîne et l utilisation d équipement de protection. Il est recommandé de commencer par le sciage de troncs d arbres sur un chevalet de sciage ou sur un support. Avant de déposer l outil électroportatif, attendre que celui-ci soit complètement à l arrêt. L outil risque de se coincer, ce qui entraînerait une perte de contrôle de l outil électroportatif. 9
10 Ne jamais utiliser un outil électroportatif dont le câble est endommagé. Ne pas toucher à un câble endommagé et retirer la fiche du câble d alimentation de la prise de courant, au cas où le câble aurait été endommagé lors du travail. Un câble endommagé augmente le risque de choc électrique. Le câble d alimentation doit toujours se trouver derrière l opérateur. l arrière de la tronçonneuse. CONSIGNES DE SÉCURITÉ Il convient de respecter les consignes de sécurité lorsque vous utilisez la tronçonneuse. Pour votre propre sécurité et celle des personnes à proximité, lisez attentivement ces informations avant d utiliser la tronçonneuse et gardez-les dans un endroit sûr pour une consultation ultérieure. Utilisez la tronçonneuse uniquement pour scier du bois ou des objets en bois. Toute autre utilisation est à vos risques et peut être dangereuse. Le fabricant ne peut pas être tenu responsable des dommages entraînés par une utilisation inappropriée ou incorrecte. Consignes de sécurité et prévention des accidents Pour empêcher une manipulation incorrecte de la tronçonneuse, lisez entièrement les consignes d utilisation avant d utiliser la tronçonneuse pour la première fois. Toutes les informations sur la manipulation de la tronçonneuse concernent votre sécurité. Demandez à un professionnel de vous montrer comment utiliser la tronçonneuse. _ Avant de brancher la tronçonneuse, vérifiez que la fiche et le câble ne sont pas endommagés. En cas d endommagement, faites-le réparer immédiatement par un spécialiste. _ N utilisez jamais un câble, une connexion ou une fiche endommagé(e) ou un câble électrique non conforme aux exigences. Si le câble est endommagé ou coupé, débranchez le immédiatement. _ Mettez la tronçonneuse hors tension avant de relâcher le frein de chaîne. _ Portez toujours des lunettes et des gants de protection lorsque vous utilisez la tronçonneuse. _ Pour éviter les blessures, portez des vêtements bien ajustés et des bottes de sécurité. _ Pour empêcher toute lésion auditive, portez des cache-oreilles antibruit ; les casques avec visière sont particulièrement utiles. _ Veillez à garder une position stable lorsque vous utilisez la tronçonneuse. _ Maintenez votre espace de travail propre. _ Évitez tout contact avec les pièces mises à la terre pour éviter un choc électrique. _ Retirez toujours la fiche de la prise avant tout travail sur la tronçonneuse. _ Branchez la tronçonneuse uniquement lorsqu elle est hors tension. _ La tronçonneuse ne doit être utilisée que par une seule personne à la fois. Toutes les autres personnes doivent rester éloignées de la zone de va-et-vient de la tronçonneuse. Les enfants et les animaux domestiques en particulier doivent toujours rester à une distance suffisante. _ La tronçonneuse ne doit rien toucher lorsqu elle démarre. _ Tenez fermement la tronçonneuse à deux mains lorsque vous l utilisez. _ La tronçonneuse ne doit pas être utilisée par des enfants et des adolescents. La seule exception est pour les adolescents de plus de 16 ans qui peuvent l utiliser sous surveillance dans le cadre de leur apprentissage. Prêtez votre tronçonneuse uniquement aux personnes familiarisées avec ce type de tronçonneuse et son utilisation. Transmettez toujours les consignes d utilisation en même temps que la tronçonneuse. _ Vérifiez que la tronçonneuse est entreposée dans un endroit inaccessible aux enfants. _ La tronçonneuse ne peut être utilisée que par des personnes reposées et en bonne santé, c est-à-dire en bonne condition physique. Si vous vous sentez fatigué, faites une pause. La tronçonneuse ne doit pas être utilisée après avoir consommé de l alcool. _ N exposez jamais la tronçonneuse à la pluie ou au mauvais temps. Veillez à ce que le lieu de travail soit suffisamment éclairé. N utilisez pas d outils électriques à proximité de liquides ou gaz combustibles. _ Si la tronçonneuse n est pas utilisée pendant quelques temps, elle doit être mise de côté de manière à ce que personne ne soit en danger. _ Avant de démarrer la tronçonneuse et d effectuer une coupe, installez toujours la butée à griffes. _ Retirez la tronçonneuse du bois uniquement lorsque la chaîne tourne toujours. Toute personne qui scie sans butée peut être tirée vers l avant. _ N utilisez jamais la tronçonneuse si vous êtes sur une échelle, dans un arbre ou tout autre endroit instable. Ne sciez jamais à une main. _ Le câble d alimentation doit toujours se trouver derrière l opérateur. _ Le câble d alimentation doit toujours être tiré à l arrière de la tronçonneuse. _ Utilisez uniquement des accessoires d origine. _ Les tronçonneuses utilisées en extérieur doivent être raccordées à un disjoncteur de fuite à la terre. _ Ne surchargez pas vos outils électriques. Ils fonctionnent mieux et de manière plus sécurisée au niveau de puissance donné. _ Utilisez toujours l outil électrique approprié. N utilisez pas des tronçonneuses de faible puissance pour des travaux difficiles. _ Utilisez le câble uniquement pour l usage pour lequel il est prévu. Ne portez jamais l outil électrique par son câble. N utilisez pas le câble pour retirer la fiche de la prise. Protégez le câble de la chaleur, de l huile et des bords tranchants. _ Rallonges pour l extérieur : 10
11 _ Utilisez uniquement des rallonges agréées et étiquetées en conséquence pour les travaux en extérieur. _ Utilisez un support solide pour scier du bois débité et des branches fines (chevalet de sciage). N empilez pas le bois et ne le faites pas tenir par une deuxième personne ni à l aide de votre pied. _ Les billes de bois doivent être bien installées. _ Sur un sol en pente, travaillez toujours vers le haut. _ Lors de la découpe, installez toujours la butée à griffes contre le bois à scier _ Installez toujours la butée à griffes avant la découpe. Vous pouvez ensuite mettre la tronçonneuse sous tension et commencer à scier le bois. Tirez la tronçonneuse vers le haut à l arrière et dirigez-la à l aide de la poignée avant. Utilisez la butée à griffes comme point d appui. Pour repositionner la tronçonneuse pour une autre coupe, interrompez le processus de sciage et exercez une légère pression sur la poignée avant. Tirez la tronçonneuse légèrement vers l arrière, positionnez la butée à griffes vers le bas de la coupe et tirez la poignée arrière vers le haut. _ Retirez la tronçonneuse du bois uniquement lorsque la chaîne tourne. _ Si vous effectuez plusieurs coupes, mettez la tronçonneuse hors tension entre chaque coupe. _ Les coupes en plongée et les coupes horizontales ne peuvent être réalisées que par des professionnels (risque élevé de rebond). _ Pour les coupes horizontales, positionnez la tronçonneuse selon le plus petit angle possible. Cette opération demande une attention particulière étant donné que la butée à griffes ne peut pas être utilisée dans ce cas. _ Si la chaîne se coince en cas de sciage avec le côté supérieur, elle risque d être poussée vers l opérateur. Vous devez, par conséquent, scier le plus souvent possible avec le côté inférieur, étant donné que la tronçonneuse sera alors poussée loin de vous vers le bois. _ Faites particulièrement attention lorsque vous coupez du bois éclaté. Les morceaux de bois sciés risquent d être projetés dans une quelconque direction (risque de blessure!). _ N utilisez pas la tronçonneuse pour retirer des clous ou des objets similaires. _ Lors de l élagage, la tronçonneuse doit être soutenue si possible par le tronc. Ne coupez pas avec l extrémité du guide-chaîne (risque de rebond). _ Le travail d élagage doit être réalisé par du personnel formé. Risque de blessure! _ Faites particulièrement attention aux branches sous tension. Ne coupez pas depuis le dessous les branches qui pendent librement. _ Ne vous tenez jamais debout sur le tronc lors de l élagage. _ La tronçonneuse ne doit pas être utilisée pour des travaux forestiers, c est-à-dire l abattage d arbres et l élagage en forêt. En raison du raccordement du câble, l opérateur de la tronçonneuse n a pas la mobilité nécessaire et sa sécurité n est pas garantie. _ Restez toujours sur le côté par rapport à l arbre en cours d abattage. _ Lors de l abattage d un arbre, faites attention aux branches qui tombent lorsque vous reculez. _ Sur les pentes, l opérateur de la tronçonneuse doit se tenir plus haut que le tronc ou l arbre abattu ou à gauche ou à droite de ce dernier, jamais plus bas. _ Faites attention aux troncs qui roulent vers vous. Reculez! _ La tronçonneuse est susceptible de rebondir si l extrémité du guide-chaîne (en particulier le quart supérieur) touche accidentellement le bois ou tout autre objet solide. Il est alors impossible de contrôler le déplacement de la tronçonneuse qui est projetée vers l opérateur à pleine puissance (risque de blessure!). _ Lors de l utilisation de la tronçonneuse, il convient d utiliser des gants de protection, des chaussures adaptées, des protections pour les jambes, les yeux et les oreilles. _ Si le travail implique un risque quelconque de blessure à la tête, il convient de porter un casque de sécurité. Lors de l abattage d arbres et de la découpe de branches d arbres abattus ou tombés, il convient de porter également un dispositif de protection pour le visage. _ Tirez toujours la fiche de la prise avant toute tentative de contrôle ou de réglage de la chaîne ou tout dépannage, ainsi que lors d un déplacement d un lieu de travail vers un autre. _ Ne mettez la tronçonneuse sous tension que si vous tenez fermement l outil, si vous êtes bien en équilibre, et êtes sûr que le guide-chaîne et la tronçonneuse ne touchent rien. _ Tenez toujours la tronçonneuse à deux mains (main droite sur la poignée arrière, main gauche sur la poignée 2). _ Ne sciez jamais au-delà de votre hauteur d épaule si vous êtes sur une échelle, dans un arbre ou dans toute autre position instable. _ Lors du sciage de bois qui s est fendu, faites particulièrement attention que de petits morceaux de bois ne se rompent pas et soient projetés par la tronçonneuse. _ Pendant les pauses, la tronçonneuse doit reposer de manière à ne présenter aucun risque de blessure pour quiconque. _ La tronçonneuse ne doit jamais être prêtée ou mise entre les mains de personnes qui ne sont pas familiarisées avec son utilisation. Les consignes d utilisation doivent également être transmises avec la tronçonneuse. PRÉCAUTIONS DE SÉCURITÉ CONCERNANT LE REBOND Afin d empêcher le recul, respectez les consignes de sécurité suivantes : _ Ne commencez jamais à couper avec l extrémité du guide-chaîne! _ Ne coupez jamais avec l extrémité du guidechaîne! Faites attention lorsque vous continuez des découpes déjà commencées. _ Commencez toujours les découpes avec la tronçonneuse déjà en fonctionnement! 11

12 _ S assurez que la tronçonneuse est déjà correctement affûtée. _ Ne coupez jamais plus d une branche à la fois! Lors de l élagage, veillez à ne pas toucher aux autres branches. _ Lors du tronçonnage, faites attention aux troncs très proches les uns des autres. Utilisez, si possible un chevalet de sciage. TRANSPORT DE LA TRONÇONNEUSE Avant de transporter la tronçonneuse, retirez toujours la fiche de la prise et faites glisser la protection de la chaîne au-delà du rail et de la chaîne. Si plusieurs coupes doivent être réalisées à la tronçonneuse, celle-ci doit être mise hors tension entre les coupes. Les pictogrammes : Familiarisez-vous avec tous les éléments de contrôle avant de commencer le travail. Exercez-vous au maniement de la scie et renseignez vous sur ses fonctions, méthodes d utilisation et techniques de sciage auprès d un utilisateur expérimenté ou un spécialiste. Lisez est prenez note du manuel d utilisation de la machine! AVANT LE DÉMARRAGE _ La tension et l alimentation électrique doivent être conformes aux caractéristiques nominales de la plaque signalétique. _ Avant de commencer le travail, vérifiez toujours que la tronçonneuse fonctionne correctement et peut être utilisée en toute sécurité. _ Vérifiez également que le dispositif de graissage de la chaîne et la jauge d huile sont en bon état de marche. Lorsque le niveau d huile est d env. 5 mm au-dessus du repère inférieur, vous devez faire l appoint en huile. Lorsque le niveau d huile est supérieur, vous pouvez travailler sans crainte. _ Mettez la tronçonneuse sous tension et tenez-la au-dessus du sol. Veillez à ne pas laisser la tronçonneuse toucher le sol. Pour des questions de sécurité, il est recommandé de laisser un dégagement d au moins 20 cm. Si vous voyez des traces grandissantes d huile, ceci signifie que le système de graissage de la chaîne fonctionne correctement. En l absence totale de traces d huile, essayez de nettoyer l orifice d huile, l orifice de tensionnage de la chaîne supérieure et la conduite d huile, ou contactez votre service après-vente. _ Vérifiez la tension de la chaîne et retendez-la, si nécessaire. _ Vérifiez que le frein de chaîne fonctionne correctement PICTOGRAMMES Les symboles suivants sont utilisés dans ce mode d emploi et/ou sur la machine : Explication des symboles se trouvant sur le coupe-bordure Portez un équipement de protection personnelle. Portez surtout des lunettes de sécurité ou, mieux encore, une protection du visage, une protection des oreilles, un casque de sécurité, des vêtements de protection anti-coupe, des gants et bottes anti-coupe avec semelles anti-dérapage. Faites attention à la chute d objets. Eloignez les personnes présentes. Écartez l équipement des personnes à proximité. Eloignez les personnes présentes. N exposez pas la machine à la pluie. Ne laissez pas l équipement devenir mouillé ou ne l utilisez pas dans un environnement humide. Retirez la fiche mâle du secteur si le câble est endommagé ou coupé. Information sur le niveau de puissance acoustique L wa en db. Risque de lésion corporelle ou de dégâts matériels. Machine de la classe II Double isolation. 12
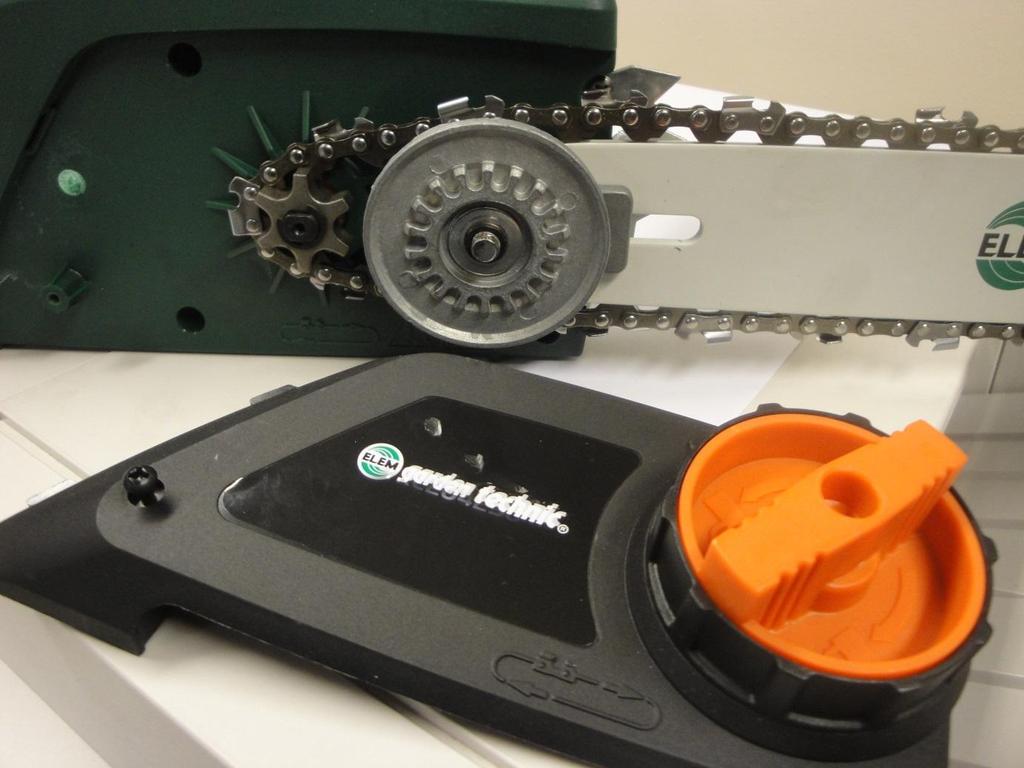
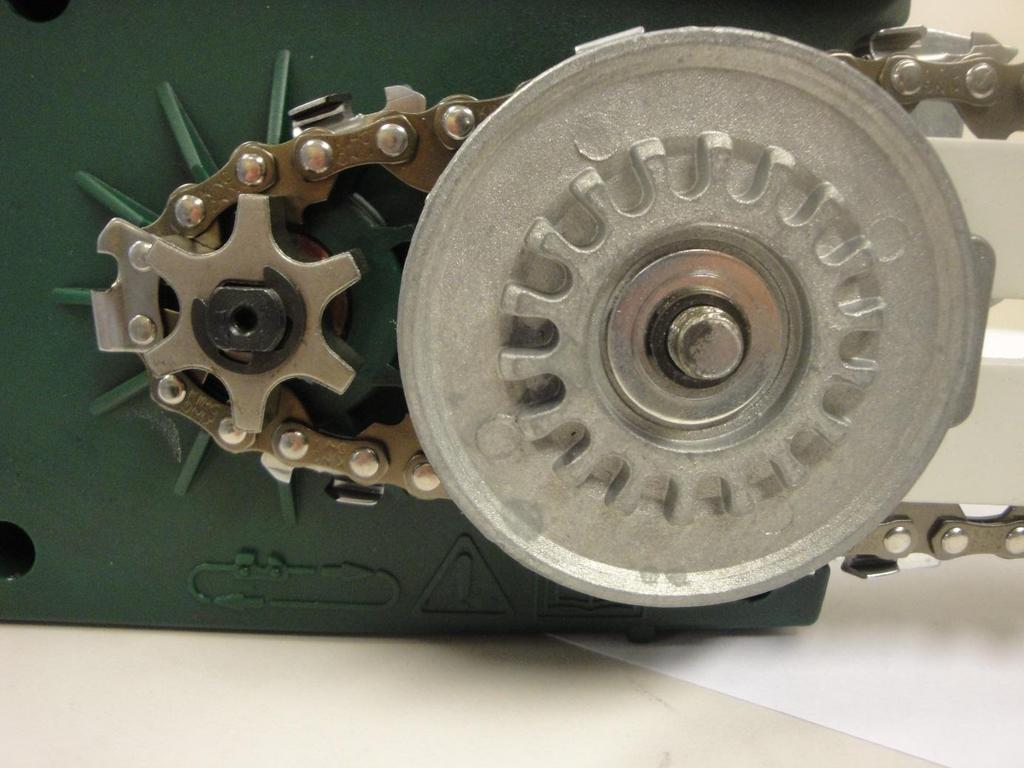
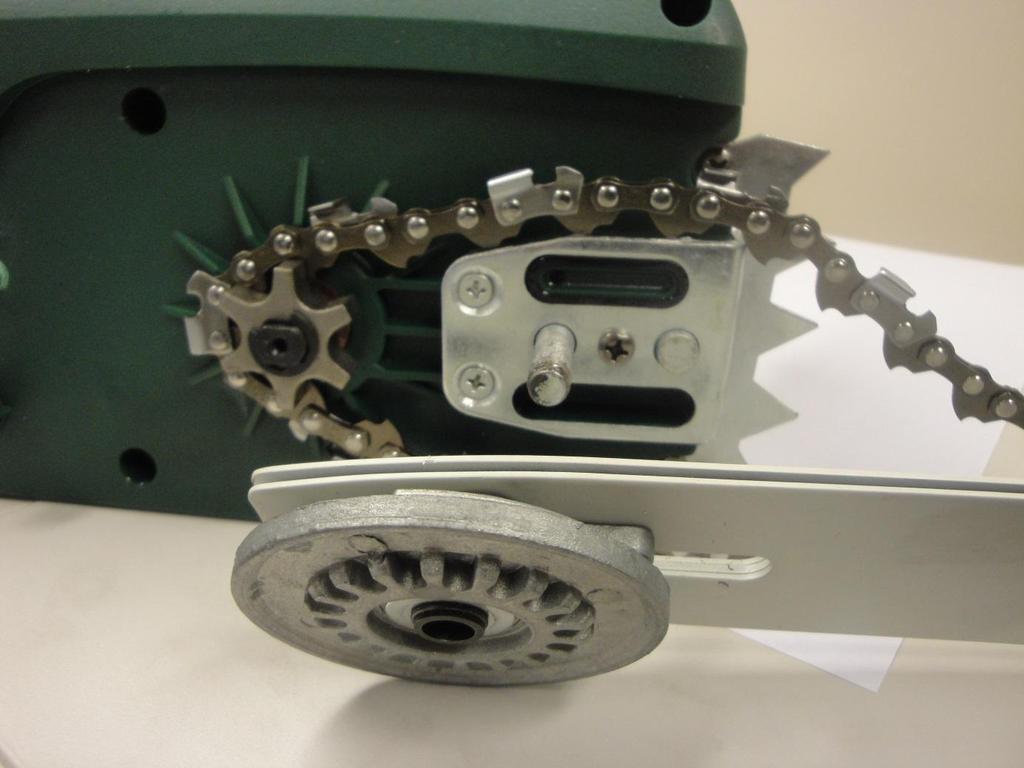
13 AVERTISSEMENT Les matériaux d emballage ne sont pas des jouets! Les enfants ne doivent pas jouer avec des sacs en plastique! Il existe un risque de suffocation! SÉCURITÉ ÉLECTRIQUE DESCRIPTION Vérifiez si le voltage mentionné sur la plaque signalétique de la machine correspond bien à la tension de secteur présente sur lieu. Ce modèle est conçu pour des usages ponctuels par des propriétaires de maison individuelle, de chalet, des campeurs, et pour des utilisations telles que le nettoyage, l élagage, la coupe de bois à brûler, etc. Il n est pas conçu pour un usage prolongé. Cet outil n est pas destiné à un usage professionnel. 1. Poignée arrière 2. Poignée avant 3. Protection avant pour les doigts/frein de chaîne 4. Chaîne 5. Système SDS 6. Capot du guide-chaîne 7. Guide-chaîne 8. Protection arrière pour les doigts 9. Câble d alimentation 10. Butée à griffes 11. Bouton de verrouillage de sécurité 12. Dispositif de retenue du cordon 13. Interrupteur marche/arrêt 14. Capot du réservoir d'huile 15. Jauge d huile 16. Roue de chaîne 17. Boulon de guidage MONTAGE DE LA CHAINE tensionnage de chaîne à l aide de la roue de chaîne (16). Pour empêcher toute blessure sur les bords tranchants, portez toujours des gants lors de l assemblage, du tensionnage et du contrôle de la chaîne. Avant d assembler le guide-chaîne et la chaîne, vérifiez le sens de coupe des dents! Le sens d entraînement est indiqué par une flèche sur le capot (6). Afin de déterminer le sens de la coupe, il peut être nécessaire de retourner la chaîne (4). Tenez le guide-chaîne (7) à la verticale avec l extrémité pointant vers le haut et installez la chaîne (4) en commençant par l extrémité du guide-chaîne. Assemblez ensuite le guide-chaîne et la chaîne comme suit : - Installez le guide-chaîne avec la chaîne sur la roue à chaîne (16) et le boulon de guidage (17). - Installez la chaîne autour de la roue à chaîne (16) et vérifiez qu elle est correctement montée. - Installez le capot (6) sur le dessus et serrez doucement à l aide du contre-écrou (5). La chaîne doit désormais être correctement tendue. CONTROLE ET REGLAGE DE LA TENSION DE CHAINE Retirez la fiche de la prise avant d effectuer tout travail sur la tronçonneuse! Portez des gants de protection! Si la tronçonneuse est déjà raccordée à l alimentation électrique : tirez la fiche de la prise murale. Portez des lunettes de protection lors de tout travail sur la tronçonneuse. Important : la protection avant pour les doigts (3) doit toujours être en position haute (verticale) Le guide-chaîne et la chaîne sont fournis séparément. Pour les assembler, dévissez d abord le contre-écrou (5) et retirez le capot du guidechaîne (6). Le boulon de guidage (17) doit se trouver au centre du guide. Si nécessaire, réglez le Vérifiez que la chaîne (4) est installée dans la rainure de guidage du guide-chaîne (7). Tournez le bouton externe dans le sens des aiguilles d une montre jusqu à ce que la chaîne soit correctement tendue, tournez ensuite le bouton interne (ensemble de 5 boutons) pour bloquer le guide-chaîne dans cette position. Lors du serrage du bouton interne, le guide-chaîne doit être poussé vers le haut. Vérifiez de nouveau la tension de la chaîne (voir Fig. 3). Ne tendez pas trop la chaîne. À froid, il doit être possible de soulever la chaîne au milieu du guide-chaîne d environ 5 mm. Serrez bien le contre-écrou (5). 13
14 À chaud, la chaîne se dilate et se relâche et elle risque de sortir complètement du rail. Retendez-la si nécessaire. Si la chaîne est retendue lorsqu elle est chaude, elle doit être desserrée de nouveau lorsque le travail de sciage est terminé. Dans le cas contraire, la contraction qui se produit lors du refroidissement de la chaîne entraînerait une très forte tension. Une chaîne neuve nécessite un temps de rodage d environ 5 minutes. Le graissage de la chaîne est très important à cette étape. Après le rodage, vérifiez de nouveau la tension de la chaîne et retendez-la si nécessaire. Avant de contrôler et de régler la tension de la chaîne, n oubliez jamais de débrancher l outil. APPOINT EN HUILE POUR CHAINE Pour empêcher l entrée de saleté dans le réservoir, nettoyez le bouchon du réservoir d huile (14) avant de l ouvrir. Vérifiez le contenu du réservoir d huile pendant le sciage en vérifiant la jauge d huile (15). Remettez en place le bouchon du réservoir d huile et serrez-le bien, puis essuyez toute huile répandue. FIXATION DE LA RALLONGE Utilisez uniquement des rallonges adaptées à une utilisation en extérieur. La section transversale du câble (longueur max. de la rallonge : 75 m) doit mesurer au moins 1,5 mm². Raccordez le cordon électrique de la tronçonneuse à la rallonge en insérant le câble de la rallonge dans l orifice de retenue du carter. Les câbles de rallonge mesurant plus de 30 m réduisent les performances de la tronçonneuse. GRAISSAGE DE LA CHAINE Pour empêcher une usure excessive, la chaîne et le guide-chaîne doivent être graissés de la même manière lors de leur utilisation. Le graissage est automatique. Ne travaillez jamais sans avoir graissé la chaîne. Si la chaîne sèche, l ensemble du dispositif de coupe sera rapidement et gravement endommagé. Il est, par conséquent, important de vérifier à la fois le graissage de la chaîne et la jauge d huile à chaque utilisation. N utilisez jamais la tronçonneuse lorsque le niveau d huile est inférieur au repère «Min.». Min. : lorsqu environ seulement 5 mm d huile sont visibles sur le rebord inférieur de la jauge d huile (15), vous devez faire l appoint en huile. Max. : Faites l appoint en huile jusqu à ce que la fenêtre soit pleine. VERIFICATION DU GRAISSAGE AUTOMATIQUE Avant de commencer à travailler, vérifiez le graissage automatique de la chaîne ainsi que la jauge d'huile. Mettez la tronçonneuse sous tension et tenez-la au-dessus du sol. Veillez à ne pas laisser la tronçonneuse toucher le sol. Pour des questions de sécurité, il est recommandé de laisser un dégagement d au moins 20 cm. Si vous voyez des traces grandissantes d huile, ceci signifie que le système de graissage de la chaîne fonctionne correctement. En l absence totale de traces d huile, essayez de nettoyer l orifice d huile, l orifice de tensionnage de la chaîne supérieure et la conduite d huile, ou contactez votre service après-vente. LUBRIFIANTS POUR CHAINE La durée de vie utile des chaînes de tronçonneuses et de guides-chaînes dépend dans une grande mesure de la qualité du lubrifiant utilisé. L huile usagée ne doit pas être utilisée! Utilisez uniquement un lubrifiant pour chaîne écologique. Entreposez le lubrifiant uniquement dans des récipients conformes aux réglementations. GUIDE-CHAINE Le guide-chaîne (7) est soumis à une usure particulièrement sévère au niveau de son extrémité avant et de sa partie inférieure. Pour éviter une usure d un seul côté, tournez le guide-chaîne à chaque affûtage de la chaîne. ROUE POUR CHAINE La roue pour chaîne (16) est soumise à une usure particulièrement sévère. Si vous notez des marques d usure particulièrement profondes sur les dents, la roue pour chaîne doit être remplacée. Une roue pour chaîne usée écourte la durée de vie utile de la chaîne pour tronçonneuse. Faites remplacer la roue pour chaîne par un revendeur spécialisé ou votre service après-vente. PROTECTION DE LA CHAINE La protection de la chaîne doit être fixée sur la chaîne et le guide-chaîne dès que le travail de sciage est terminé et dès que la tronçonneuse doit être transportée. FREIN DE CHAINE En cas de rebond, le frein de chaîne (3) sera actionné via la protection avant pour les doigts. La protection avant pour les doigts est poussée vers l avant par le dos de la main et ceci entraîne l arrêt par le frein de chaîne de la tronçonneuse ou plutôt du moteur, en 0,15 s. 14
15 DESSERRAGE DU FREIN DE CHAINE Afin de pouvoir utiliser de nouveau votre tronçonneuse, vous devez desserrer de nouveau la chaîne. Mettez d abord la tronçonneuse hors tension. Poussez ensuite la protection avant pour les doigts (3) vers l arrière en position verticale jusqu à son enclenchement. Le frein pour chaîne est de nouveau totalement opérationnel. AFFUTAGE DE LA CHAINE Vous pouvez faire affûter rapidement et correctement la chaîne de votre tronçonneuse par des revendeurs spécialisés, auprès desquels vous pouvez également vous procurer un dispositif d affûtage de chaîne qui vous permettra d affûter la chaîne vous-même. Respectez les consignes d utilisation correspondantes. Prenez soin de vos outils. Faites en sorte que vos outils restent affûtés et propres afin de pouvoir travailler correctement et en toute sécurité. Respectez les réglementations concernant l entretien et les consignes relatives au remplacement des outils. INSTRUCTIONS D EMPLOI Portez des lunettes de sécurité, des cache-oreilles antibruit, des gants de protection et des vêtements de travail résistants! Utilisez la tronçonneuse uniquement avec des rallonges homologuées, présentant les caractéristiques d isolation et de raccordement prescrites pour une utilisation en extérieur (câbles avec gaine en caoutchouc homologués), qui s adaptent à la fiche de la tronçonneuse. La tronçonneuse est équipée de deux interrupteurs de sécurité qui requièrent l utilisation des deux mains. La tronçonneuse ne fonctionne que lorsqu une main tient la poignée avant (2) et l autre main actionne l interrupteur sur la poignée arrière (1). Si la tronçonneuse ne fonctionne pas, le frein de chaîne doit être desserré au niveau de la protection avant pour les doigts (3). Veillez à lire les sections «Frein de chaîne» et «Desserrage du frein de chaîne» à ce sujet. Ne commencez jamais à scier avant que la machine ne fonctionne à plein régime et que la garde dentée ne touche le bois. Commencez toujours par une nouvelle trace de coupe. Ne commencez jamais à scier sur une trace de coupe existante. MISE HORS TENSION Relâchez l interrupteur marche/arrêt (13) situé sur la poignée arrière. Le relâchement de l interrupteur marche/arrêt entraîne l arrêt de la tronçonneuse dans la seconde qui suit et un nombre important d étincelles. Ceci est normal et sûr et indique un fonctionnement correct de la tronçonneuse. Après avoir utilisé la tronçonneuse, vous devez toujours : nettoyer la chaîne et le guide-chaîne et replacer la protection de la chaîne PROTECTION DE LA TRONÇONNEUSE N utilisez jamais la tronçonneuse sous la pluie ou dans des conditions humides. Si la rallonge est endommagée, retirez immédiatement la fiche de la prise. Ne travaillez jamais avec un câble endommagé. _ Vérifiez que la tronçonneuse n est pas endommagée. Avant d utiliser de nouveau votre outil, vérifiez les dispositifs de sécurité ou toute autre pièce légèrement endommagée afin de garantir qu ils sont en bon état de marche. _ Assurez-vous que les pièces mobiles fonctionnent correctement. _ Toutes les pièces doivent être correctement assemblées et satisfaire à toutes les conditions requises pour garantir que la tronçonneuse fonctionne correctement. _ Tout dispositif de sécurité et toute pièce endommagés doivent être correctement réparés ou remplacés immédiatement dans l atelier du service après-vente, sauf indication contraire dans les présentes consignes d utilisation. Après la mise hors tension, la tronçonneuse fonctionne immédiatement à plein régime. N utilisez pas la machine au dessus de la ligne des épaules Utilisez la machine uniquement sur du bois sec. Pour la première utilisation de cette machine, il est conseillé de travailler sur un chevalet de sciage. 15
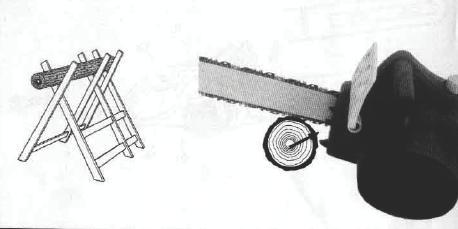
16 REMARQUES SUR LES PRATIQUES DE TRAVAIL Rebond Vous pouvez éviter des accidents en ne sciant pas avec l extrémité du guide-chaîne étant donné que cela peut entraîner un recul soudain de la tronçonneuse. Utilisez toujours l équipement de sécurité complet et les vêtements adaptés lorsque vous utilisez la tronçonneuse. Un rebond est un déplacement vers le haut et/ou l arrière du guide-chaîne qui peut se produire si la chaîne au niveau de l extrémité du guidechaîne rencontre un obstacle. Assurez-vous que votre pièce à travailler est bien fixée. Utilisez des brides pour arrêter le glissement de la pièce à travailler. Ceci facilite également l'utilisation de la tronçonneuse à deux mains. Le rebond entraîne un comportement incontrôlable de la tronçonneuse en raison du relâchement ou de l émoussement de la chaîne. Ne sciez jamais au-dessus de la hauteur d épaule. COMMENT TRAVAILLER AVEC LA TRONÇONNEUSE SCIAGE DE RONDINS Si possible, utilisez toujours un chevalet de sciage. Commencez toujours la coupe avec la Chaîne en mouvement et la garde dentée contre le bois. Faites pivoté la garde dentée contre le bois pour finaliser la coupe. La technique de sciage dépend de la façon dont le rondin est soutenu. SCIAGE D ARBRE Effectuez une coupe horizontale au tiers du diamètre du tronc. Ensuite, réalisez une coupe diagonale à un angle de 45 du haut en bas afin de faire une entaille. Effectuez une coupe de l autre côté tout en vous assurant de ne pas scier jusqu à l entaille. Placez un coin dans la coupe pour ouvrir le tronc et abattre l arbre. Les arbres en cours d abattage représentent un danger et requièrent de la pratique. Si vous êtes débutant ou inexpérimenté, n essayez pas d apprendre par vous-même, suivez plutôt une formation professionnelle NETTOYAGE ET ENTRETIEN Retirez toujours la fiche de la prise avant tout travail sur la tronçonneuse! carter moteur propres et dégagés en permanence. consignes d utilisation peut être réalisé. Tout autre travail d entretien doit être réalisé par notre service après-vente. étant donné que cela pourrait compromettre sa sécurité. malgré nos procédures de fabrication et d inspection, faites-la réparer par un atelier de service après-vente agréé. Soutien sur toute la longueur (le rondin est au sol) : Sciez verticalement vers le bas. Assurez-vous de ne pas toucher le sol. Soutien à chaque extrémité (le rondin est sur le chevalet de sciage) : Sciez verticalement vers le bas jusqu au tiers de la section longitudinale. Faites tourner le rondin et reposez-le sur le chevalet de sciage avec la trace de coupe dirigée vers le bas. Effectuez une seconde coupe en direction de la première coupe. Soutien à une extrémité (le rondin est sur le chevalet de sciage) : Sciez verticalement vers le bas. 16
17 SPÉCIFICATIONS TECHNIQUES Tension du réseau V Fréquence du réseau Hz 50 Puissance W 2000 W Vitesse moteur min Vitesse à vide m/sec 12.1 Longueur de guide de chaîne mm Longueur de coupe 355mm Délai de freinage de la chaîne ms < 0.12 sec Capacité du réservoir d huile ml 200 ml Poids kg 5 kg Valeurs des émissions sonores mesurées selon la norme applicable : Pression acoustique LpA 85.9 db(a) K = 3 db(a) Puissance acoustique LwA 105,9 db(a) K = 2.36 db(a) Garanti: LwA 112 db(a) ATTENTION! Lorsque la pression acoustique dépasse la valeur de 85 db(a), il est nécessaire de porter des dispositifs individuels de protection de l ouïe. Valeur quadratique moyenne pondérée de l'accélération selon la norme applicable : Poignée principale : m/s² Poignée auxiliaire : m/s² K = 1,5 m/s². La valeur totale de vibrations déclarée a été mesurée conformément à une méthode d'essai normalisée et peut être utilisée pour comparer un outil à un autre; l'indication du fait que la valeur totale de vibrations déclarée peut également être utilisée pour une évaluation préliminaire de l'exposition. L émission de vibration au cours de l'utilisation réelle de l'outil électrique peut différer de la valeur totale déclarée, selon les méthodes d'utilisation de l'outil; et signifiant la nécessité d identifier les mesures de sécurité visant à protéger l'opérateur, qui sont basées sur une estimation de l'exposition dans les conditions d'utilisation réelles (compte tenu de toutes les parties constituantes du cycle de fonctionnement, telles que les temps d'arrêt de l'outil et de fonctionnement au repos, en plus du temps de déclenchement). GARANTIE Pour les clauses de garantie, reportez-vous aux conditions de garantie ci-jointes. ENVIRONNEMENT Si, après un certain temps, vous décidez de remplacer votre machine, ne vous en débarrassez pas avec les ordures ménagères mais destinez-la à un traitement respectueux de l environnement SERVICE APRÈS-VENTE _ Un commutateur endommagé doit être remplacé dans nos ateliers du service aprèsvente. _ Si le remplacement du câble d alimentation est nécessaire, cela doit être réalisé par le fabricant ou son agent pour éviter un danger. SERVICE APRÈS-VENTE ET ASSISTANCE Notre Service Après-Vente répond à vos questions concernant la réparation et l entretien de votre produit et les pièces de rechange. Vous trouverez des vues éclatées ainsi que des informations concernant les pièces de rechange également sous : Les conseillers techniques et assistants ELEM GARDEN TECHNIC sont à votre disposition pour répondre à vos questions concernant nos produits et leurs accessoires : sav@ecorepa.com ENTREPOSAGE _ Nettoyez soigneusement toute la machine et ses accessoires. _ Entreposez-la hors de la portée des enfants, dans une position stable et sûre, dans un lieu sec et tempéré, évitez les températures trop hautes ou trop basses. _ Protégez-la du rayonnement direct du soleil. Tenez-la, si possible, dans le noir. _ Ne l enfermez pas dans des sacs en plastique car de l humidité pourrait s'y former. Fabriqué en Chine
18 NL / KETTINGZAAG TOEPASSINGSGEBIED Deze modellen zijn bedoeld voor niet al te frequent gebruik door huiseigenaren, bewoners van buitenhuisjes, kampeerders en voor algemene toepassingen zoals het vrij maken van een gebied, snoeiwerken of het zagen van brandhout. Ze zijn niet bedoeld voor langdurig gebruik. Het apparaat is niet voor industrieel gebruik bestemd. ALGEMENE VEILIGHEIDSWAARSCHUWINGEN VOOR ELEKTRISCHE GEREEDSCHAPPEN WAARSCHUWING Lees alle veiligheidswaarschuwingen en alle voorschriften. Als de waarschuwingen en voorschriften niet worden opgevolgd, kan dit een elektrische schok, brand of ernstig letsel tot gevolg hebben. Bewaar alle waarschuwingen en voorschriften voor toekomstig gebruik. Het in de waarschuwingen gebruikte begrip elektrisch gereedschap heeft betrekking op elektrische gereedschappen voor gebruik op het stroomnet (met netsnoer) en op elektrische gereedschappen voor gebruik met een accu (zonder netsnoer). beperken het risico van een elektrische schok. b) Voorkom aanraking van het lichaam met geaarde oppervlakken, bijvoorbeeld van buizen, verwarmingen, fornuizen en koelkasten. Er bestaat een verhoogd risico door een elektrische schok wanneer uw lichaam geaard is. c) Houd het gereedschap uit de buurt van regen en vocht. Het binnendringen van water in het elektrische gereedschap vergroot het risico van een elektrische schok. d) Gebruik de kabel niet voor een verkeerd doel, om het elektrische gereedschap te dragen of op te hangen of om de stekker uit het stopcontact te trekken. Houd de kabel uit de buurt van hitte, olie, scherpe randen en bewegende gereedschapdelen. Beschadigde of in de war geraakte kabels vergroten het risico van een elektrische schok. e) Wanneer u buitenshuis met elektrisch gereedschap werkt, dient u alleen verlengkabels te gebruiken die voor gebruik buitenshuis zijn goedgekeurd. Het gebruik van een voor gebruik buitenshuis geschikte verlengkabel beperkt het risico van een elektrische schok. f) Als het gebruik van het elektrische gereedschap in een vochtige omgeving onvermijdelijk is, dient u een aardlekschakelaar te gebruiken. Het gebruik van een aardlekschakelaar vermindert het risico van een elektrische schok. 1) Veiligheid van de werkomgeving a) Houd uw werkomgeving schoon en goed verlicht. Een rommelige of onverlichte werkomgeving kan tot ongevallen leiden. b)werk met het elektrische gereedschap niet in een omgeving met explosiegevaar waarin zich brandbare vloeistoffen, brandbare gassen of brandbaar stof bevinden. Elektrische gereedschappen veroorzaken vonken die het stof of de dampen tot ontsteking kunnen brengen. c) Houd kinderen en andere personen tijdens het gebruik van het elektrische gereedschap uit de buurt. Wanneer u wordt afgeleid, kunt u de controle over het gereedschap verliezen. 2) Elektrische veiligheid a) De aansluitstekker van het elektrische gereedschap moet in het stopcontact passen. De stekker mag in geen geval worden veranderd. Gebruik geen adapterstekkers in combinatie met geaarde elektrische gereedschappen. Onveranderde stekkers en passende stopcontacten 3) Veiligheid van personen a) Wees alert, let goed op wat u doet en ga met verstand te werk bij het gebruik van het elektrische gereedschap. Gebruik geen elektrisch gereedschap wanneer u moe bent of onder invloed staat van drugs, alcohol of medicijnen. Een moment van onoplettendheid bij het gebruik van het elektrische gereedschap kan tot ernstige verwondingen leiden. b) Draag persoonlijke beschermende uitrusting. Draag altijd een veiligheidsbril. Het dragen van persoonlijke beschermende uitrusting zoals een stofmasker, slipvaste werkschoenen, een veiligheidshelm of gehoorbescherming, afhankelijk van de aard en het gebruik van het elektrische gereedschap, vermindert het risico van verwondingen. c) Voorkom per ongeluk inschakelen. Controleer dat het elektrische gereedschap uitgeschakeld is voordat u de stekker in het stopcontact steekt of de accu aansluit en voordat u het gereedschap oppakt of draagt. Wanneer u bij het dragen van het elektrische gereedschap uw vinger aan de schakelaar hebt of wanneer u het gereedschap ingeschakeld op de 18
19 stroomvoorziening aansluit, kan dit tot ongevallen leiden. d) Verwijder instelgereedschappen of schroefsleutels voordat u het elektrische gereedschap inschakelt. Een instelgereedschap of sleutel in een draaiend deel van het gereedschap kan tot verwondingen leiden. e) Voorkom een onevenwichtige lichaamshouding. Zorg ervoor dat u stevig staat en steeds in evenwicht blijft. Daardoor kunt u het elektrische gereedschap in onverwachte situaties beter onder controle houden. f) Draag geschikte kleding. Draag geen loshangende kleding of sieraden. Houd haren, kleding en handschoenen uit de buurt van bewegende delen. Loshangende kleding, lange haren en sieraden kunnen door bewegende delen worden meegenomen. g) Wanneer stofafzuigings- of stofopvangvoorzieningen kunnen worden gemonteerd, dient u zich ervan te verzekeren dat deze zijn aangesloten en juist worden gebruikt. Het gebruik van een stofafzuiging beperkt het gevaar door stof. 4) Zorgvuldige omgang met en zorgvuldig gebruik van elektrische gereedschappen a) Overbelast het gereedschap niet. Gebruik voor uw werkzaamheden het daarvoor bestemde elektrische gereedschap. Met het passende elektrische gereedschap werkt u beter en veiliger binnen het aangegeven capaciteitsbereik. b) Gebruik geen elektrisch gereedschap waarvan de schakelaar defect is. Elektrisch gereedschap dat niet meer kan worden in- of uitgeschakeld, is gevaarlijk en moet worden gerepareerd. c) Trek de stekker uit het stopcontact of neem de accu uit het elektrische gereedschap voordat u het gereedschap instelt, toebehoren wisselt of het gereedschap weglegt. Deze voorzorgsmaatregel voorkomt onbedoeld starten van het elektrische gereedschap. d) Bewaar niet-gebruikte elektrische gereedschappen buiten bereik van kinderen. Laat het gereedschap niet gebruiken door personen die er niet mee vertrouwd zijn en deze aanwijzingen niet hebben gelezen. Elektrische gereedschappen zijn gevaarlijk wanneer deze door onervaren personen worden gebruikt. e) Verzorg het elektrische gereedschap zorgvuldig. Controleer of bewegende delen van het gereedschap correct functioneren en niet vastklemmen en of onderdelen zodanig gebroken of beschadigd zijn dat de werking van het elektrische gereedschap nadelig wordt beïnvloed. Laat deze beschadigde onderdelen voor het gebruik repareren. Veel ongevallen hebben hun oorzaak in slecht onderhouden elektrische gereedschappen. f) Houd snijdende inzetgereedschappen scherp en schoon. Zorgvuldig onderhouden snijdende inzetgereedschappen met scherpe snijkanten klemmen minder snel vast en zijn gemakkelijker te geleiden. g) Gebruik elektrisch gereedschap, toebehoren, inzetgereedschappen en dergelijke volgens deze aanwijzingen. Let daarbij op de arbeidsomstandigheden en de uit te voeren werkzaamheden. Het gebruik van elektrische gereedschappen voor andere dan de voorziene toepassingen kan tot gevaarlijke situaties leiden. 5) Service a) Laat het elektrische gereedschap alleen repareren door gekwalificeerd en vakkundig personeel en alleen met originele vervangingsonderdelen. Daarmee wordt gewaarborgd dat de veiligheid van het gereedschap in stand blijft. VEILIGHEIDSVOORSCHRIFTEN VOOR KETTINGZAGEN Houd bij een lopende zaag alle lichaamsdelen uit de buurt van de zaagketting. Controleer voor het starten van de zaag dat de zaagketting niets aanraakt. Bij werkzaamheden met een kettingzaag kan een moment van onoplettendheid ertoe leiden dat kleding of lichaamsdelen door de zaagketting worden meegenomen. Houd het elektrische gereedschap alleen aan de geïsoleerde greepvlakken vast, aangezien de zaagketting in aanraking met het netsnoer van het gereedschap kan komen. Contact van de zaagketting met een spanningvoerende leiding kan metalen delen van het gereedschap onder spanning zetten en tot een elektrische schok leiden. Houd de kettingzaag altijd met uw rechterhand aan de achterste greep en met uw linkerhand aan de voorste greep vast. Als u de kettingzaag omgekeerd vasthoudt, loopt u een hoger risico op letsel. Houd de kettingzaag daarom alleen zoals voorgeschreven vast. Draag een veiligheidsbril en gehoorbescherming. Overige beschermende uitrusting voor uw hoofd, handen, benen en voeten wordt aanbevolen. Passende beschermende kleding vermindert de kans op verwondingen door rondvliegend spaanmateriaal en toevallig aanraken van de zaagketting. Werk met de kettingzaag niet op een boom. Bij gebruik van een kettingzaag op een boom bestaat kans op verwondingen. Let er altijd op dat u stevig staat en gebruik de kettingzaag alleen als u op een stevige 19
20 en vlakke ondergrond staat. Een gladde ondergrond of instabiele posities, bijvoorbeeld op een ladder, kunnen tot evenwichtsverlies of verlies van de controle over de kettingzaag leiden. Houd er bij het afzagen van een onder spanning staande tak rekening mee dat deze terugveert. Als de spanning in de houtvezels vrijkomt, kan de gespannen tak de bediener raken, of kan deze de bediener de controle over de kettingzaag doen verliezen. Wees bijzonder voorzichtig bij het zagen van laag houtgewas en jonge bomen. Het dunne materiaal kan in de zaagketting blijven hangen en op u slaan of u uit het evenwicht brengen. Draag de kettingzaag aan de voorste greep in uitgeschakelde toestand, de zaagketting van uw lichaam afgewend. Breng altijd de veiligheidsafscherming aan voordat u de kettingzaag vervoert of opbergt. Een zorgvuldige omgang met de kettingzaag vermindert de kans op per ongeluk aanraken van de lopende zaagketting. Volg de aanwijzingen voor het smeren, de kettingspanning en het wisselen van toebehoren op. Een onjuist gespannen of gesmeerde ketting kan breken of het terugslagrisico verhogen. Houd grepen droog, schoon en vrij van olie en vet. Vettige grepen met olie zijn glad en leiden tot het verlies van de controle over de kettingzaag. Zaag alleen hout. Gebruik de kettingzaag niet voor werkzaamheden waarvoor deze niet bestemd is. Voorbeeld: Gebruik de kettingzaag niet voor het zagen van plastic, metselwerk of bouwmaterialen die niet van hout zijn. Het gebruik van de kettingzaag voor werkzaamheden waarvoor deze niet bestemd is, kan tot gevaarlijke situaties leiden. Oorzaken en voorkoming van een terugslag: Terugslag kan optreden als de punt van de geleidingsrail een voorwerp raakt of als het hout buigt en de zaagketting in de groef wordt vastgeklemd. Een aanraking met de punt van de kettinggeleider kan in veel gevallen tot een onverwachte en naar achteren gerichte actie leiden, waarbij de kettinggeleider omhoog en in de richting van de bediener wordt geslagen. Het vastklemmen van de zaagketting aan de bovenkant van de geleidingsrail kan de geleidingsrail snel in de richting van de bediener terugstoten. Elk van deze reacties kan ertoe leiden dat u de controle over de zaag verliest en u zich mogelijk ernstig verwondt. Vertrouw niet uitsluitend op de in de kettingzaag ingebouwde veiligheidsvoorzieningen. Als gebruiker van een kettingzaag dient u verschillende maatregelen te treffen om zonder ongevallen en zonder verwondingen te kunnen werken. Een terugslag is het gevolg van een verkeerd of onjuist gebruik van het elektrische gereedschap. Terugslag kan worden voorkomen door geschikte voorzorgsmaatregelen, zoals hieronder beschreven: Houd de zaag met beide handen vast, waarbij duim en vinger de grepen van de kettingzaag omsluiten. Neem een zodanige lichaamshouding in en houd uw armen in een zodanige positie, dat u stand kunt houden ten opzichte van de terugslagkrachten. Als geschikte maatregelen worden getroffen, kan de bediener de terugslagkrachten beheersen. Laat de kettingzaag nooit los. Voorkom een abnormale lichaamshouding en zaag niet boven schouderhoogte. Daardoor wordt per ongeluk aanraken met de punt van de kettinggeleider voorkomen en kan de kettingzaag in onverwachte situaties beter onder controle worden gehouden. Gebruik altijd de door de fabrikant voorgeschreven vervangende kettinggeleiders en zaagkettingen. Verkeerde vervangende kettinggeleiders en zaagkettingen kunnen tot kettingbreuk en terugslag leiden. Voor extra veiligheid wordt het gebruik van een aardlekschakelaar met een uitschakelstroom van maximaal 30 ma geadviseerd. De aardlekschakelaar moet vóór gebruik altijd worden gecontroleerd. Houd u aan de aanwijzingen van de fabrikant voor het slijpen en het onderhoud van de zaagketting. Te lage dieptebegrenzers verhogen de neiging tot terugslag. Kinderen en jongeren, met uitzondering van jongeren in opleiding van 16 jaar en ouder onder toezicht, mogen de kettingzaag niet bedienen. Hetzelfde geldt voor personen die niet of onvoldoende bekend zijn met de omgang met de kettingzaag. De gebruiksaanwijzing moet altijd binnen handbereik zijn. Personen die oververmoeid of niet lichamelijk belastbaar zijn, mogen de kettingzaag niet bedienen. Controleer of alle beschermingsvoorzieningen en grepen bij gebruik van het gereedschap gemonteerd zijn. Probeer nooit een onvolledig gemonteerd gereedschap of een gereedschap met niet-toegestane aanpassingen in gebruik te nemen. De gebruiker wordt geadviseerd om zich voor het eerste gebruik door een ervaren vakman aan de hand van praktische voorbeelden te laten instrueren over de bediening van de kettingzaag en het gebruik van beschermende uitrusting. Als eerste oefening dient het zagen van boomstammen op een zaagbok of onderstel plaats te vinden. Wacht tot het elektrische gereedschap tot stilstand is gekomen voordat u het neerlegt. Het inzetgereedschap kan vasthaken en dit kan tot het verlies van de controle over het elektrische gereedschap leiden. 20
21 Gebruik het elektrische gereedschap niet met een beschadigde kabel. Raak de beschadigde kabel niet aan en trek de stekker uit het stopcontact als de kabel tijdens de werkzaamheden wordt beschadigd. Beschadigde kabels vergroten het risico van een elektrische schok. Het snoer moet zich altijd achter de gebruiker bevinden. Het snoer moet altijd van de achterkant van de zaag weggeleid worden. VEILIGHEIDSINSTRUCTIES Tijdens het werken met de ketting moeten deze veiligheidsinstructies nageleefd worden. Lees, voor uw eigen veiligheid en die van anderen, deze informatie zorgvuldig door vóór u de kettingzaag gebruikt en bewaar ze op een veilige plek als referentie voor later. Gebruik de kettingzaag enkel voor het zagen van hout of houten voorwerpen. Het zagen van andere materialen is op uw eigen verantwoordelijkheid en kan gevaarlijk zijn. De fabrikant kan niet verantwoordelijk gesteld worden voor schade veroorzaak door oneigenlijk of verkeerdelijk gebruik. Veiligheidsinstructies en ongevallenpreventie Lees de gebruiksinstructies volledig door vóór u de kettingzaag voor het eerst gebruikt. Dit voorkomt verkeerd gebruik van de kettingzaag. Alle informatie over het werken met de kettingzaag is belangrijk voor uw persoonlijke veiligheid. Vraag aan een professional om u te tonen hoe u de zaag moet gebruiken! _ Controleer het snoer en de stekker vóór u de stekker op het stopcontact aansluit. Wanneer het snoer beschadigd is, laat het dan onmiddellijk door een specialist herstellen. _ Gebruik nooit een beschadigd snoer, aansluiting of stekker noch een snoer dat niet voldoet aan de normen. Haal de stekker onmiddellijk uit het stopcontact wanneer het snoer beschadigd of afgesneden raakt. _ Schakel de kettingzaag uit vóór u de kettingrem los zet. _ Draag altijd een veiligheidsbril en werkhandschoenen wanneer u met de kettingzaag werkt. _ Draag nauwaansluitende kledij en veiligheidsschoenen om verwondingen te voorkomen. _ Draag gehoorbescherming om gehoorschade te voorkomen; een helm met gelaatsscherm biedt bijkomende bescherming. _ Zorg dat u een stabiele houding aanneemt wanneer u met de kettingzaag werkt. _ Hou uw werkplek netjes. _ Vermijd contact met geaarde delen om een elektrische schok te voorkomen. _ Haal altijd de stekker uit het stopcontact vóór u aan de kettingzaag werkt. _ Stop enkel de stekker in het stopcontact wanneer de kettingzaag uitgeschakeld is. _ De kettingzaag mag maar door één persoon tegelijk gebruikt worden. Alle andere personen moeten uit de actieradius van de kettingzaag blijven. Vooral kinderen en huisdieren moeten te allen tijde goed uit de buurt worden gehouden. _ De zaag mag niets raken wanneer ze gestart wordt. _ Hou de kettingzaag tijdens het werken met beide handen stevig vast. _ De kettingzaag mag niet gebruikt worden door kinderen of jongeren. De enige uitzondering hierop vormen jongeren van minstens 16 jaar die de kettingzaag onder toezicht mogen gebruiken als onderdeel van hun opleiding. Leen de zaag enkel uit aan personen die vertrouwd zijn met dit type kettingzaag en weten hoe ze ermee om moeten gaan. Geeft altijd de gebruiksinstructies samen met de zaag mee. _ Zorg ervoor dat de zaag buiten het bereik van kinderen wordt opgeborgen. _ De zaag mag enkel gebruikt worden door personen die uitgerust zijn en in goede gezondheid verkeren, bv. in een goede fysieke toestand. Wanneer u vermoeidheid voelt opkomen, neem dan een rustpauze. U mag de kettingzaag niet gebruiken nadat u alcohol genuttigd heeft. _ Stel de kettingzaag nooit bloot aan regen of slecht weer. Zorg voor voldoende licht op de werkplek. Gebruik geen motorgereedschappen in de buurt van brandbare vloeistoffen of gassen. _ Wanneer de kettingzaag even niet gebruikt wordt, zet ze dan aan de kant op een manier die geen gevaar kan vormen voor anderen. _ Zet altijd de klauwaanslag tegen het werkstuk vóór u begint te zagen. _ Verwijder de zaag enkel uit het hout wanneer ze nog draait. Wie zaagt zonder gebruik te maken van de klauwaanslag kan voorwaarts getrokken worden. _ Gebruik de kettingzaag nooit wanneer u op een lader staat, in een boom zit of u op een andere onstabiele plek bevindt. Zaag niet met één hand. _ Het snoer moet zich altijd achter de gebruiker bevinden. _ Het snoer moet altijd van de achterkant van de zaag weggeleid worden. _ Gebruik enkel originele onderdelen. _ Kettingzagen die in de openlucht worden gebruikt moeten worden aangesloten op een verliesstroomschakelaar. _ Overbelast motorgereedschappen niet. Ze werken het best en het veiligst binnen hun opgegeven capaciteitsgrenzen. _ Gebruik altijd het juiste motorgereedschap. Gebruik geen lichte kettingzagen voor zware taken. _ Gebruik het snoer enkel waarvoor het dient. Draag elektrisch gereedschap nooit aan het snoer. Gebruik het snoer niet om de stekker uit het stopcontact te halen. Bescherm het snoer tegen hitte, olie en scherpe randen. _ Verlengsnoeren in de openlucht: _ Gebruik enkel verlengsnoeren die gekeurd zijn voor gebruik in de openlucht en die als dusdanig ook gemerkt zijn. _ Gebruik een stevige steun wanneer u timmerhout of dunne takken zaagt. 21
22 Stapel het hout niet, laat het niet door een andere persoon vasthouden en hou het ook niet uw voet op zijn plaats. _ Boomstammen moeten worden vastgezet. _ Werk op een hellende ondergrond altijd met uw gezicht naar de helling. _ Zet bij het doorzagen altijd de klauwaanslag tegen het hout dat u wilt zagen. _ Gebruik altijd de klauwaanslag vóór het doorzagen. Schakel pas dan de kettingzaag in en begin te zagen. Trek de kettingzaag aan haar achterkant naar boven en bepaal de richting met de voorste handgreep. Gebruik de klauwaanslag als steunpunt. Om de zaag opnieuw op haar plaats te positioneren om verder te zagen, onderbreekt u het zaagproces en oefent u een lichte druk uit op de voorste handgreep. Trek de zaag een beetje terug, zet de klauwaanslag dieper volgens de zaagsnede en trek de achterste handgreep naar omhoog. _ Haal de zaag enkel uit het hout wanneer ze nog draait. _ Schakel de zaag telkens uit wanneer u meerdere zaagsneden uitvoert. _ Het zagen van groeven (invalsneden) en horizontale sneden mag enkel uitgevoerd worden door professionals (groot gevaar voor terugslag). _ Stel de zaag voor het maken van horizontale sneden in onder kleinst mogelijke hoek. Dit vergt extreme voorzichtigheid omdat de klauwaanslag in dit geval niet gebruikt kan worden. _ Wanneer de ketting geklemd raakt tijdens het zagen met de bovenkant, dan kan ze naar de gebruiker worden teruggeslagen. Daarom moet u waar mogelijk altijd met de onderkant zagen omdat de kettingzaag dan weg van uw lichaam en naar het hout zal worden getrokken. _ Wees extra voorzichtig bij het zagen van gespleten hout. Afgezaagde stukken hout kunnen in alle richtingen worden weggeslingerd (gevaar voor verwondingen!). _ Gebruik de kettingzaag niet om nagels of dergelijke voorwerpen te verwijderen. _ Bij het afzagen van takken moet de kettingzaag wanneer mogelijk tegen de stam gesteund worden. Zaag niet met de punt van het zwaard (gevaar voor terugslag. _ Het verwijderen van takken mag enkel door opgeleide personen worden uitgevoerd. Gevaar voor verwondingen! _ Wees bijzonder voorzichtig met takken onder spanning. Zaag geen niet-ondersteunde takken langs onder. _ Ga niet op de stam staan wanneer u takken afzaagt. _ De kettingzaag mag niet gebruikt worden voor bosbeheer, zoals bv. het vellen van bomen of het afzagen van takken in een bos. Wegens de kabelverbinding beschikt de gebruiker niet over de nodige mobiliteit en is zijn veiligheid niet gegarandeerd! _ Ga altijd naast de boom staan die geveld moet worden. _ Wanneer de boom omvalt, let dan op voor gevallen takken wanneer u achteruit loopt. _ Op een hellende ondergrond moet de gebruiker aan de boven-, linker- of rechterkant van de boomstam of neerliggende boom staan, nooit aan de onderkant ervan. _ Let op voor stammen die naar u toe rollen. Terugslag! _ Er is een grote kans op terugslag wanneer de punt van de motorzaag (vooral het bovenste kwadrant) per ongeluk in contact komt met hout of andere vaste voorwerpen. In dit geval zal de zaag oncontroleerbaar zijn en met volle kracht terug worden geslagen naar de gebruiker (gevaar voor verwondingen!). _ Tijdens het werken met de zaag moet u werkhandschoenen, geschikte schoenen, beenbeschermers, een veiligheidsbril en gehoorbescherming dragen. _ Wanneer het werk gevaar voor hoofdletsel inhoudt, moet een veiligheidshelm worden gedragen. Bij het omzagen van bomen en het afzagen van takken van gevelde of omgevallen bomen moet bijkomend ook nog een gelaatsscherm worden gedragen. _ Haal altijd de stekker uit het stopcontact vóór u de zaag controleert of bijstelt, vóór u een bepaalde fout probeert op te lossen of vóór u ze van de ene plek naar de andere brengt. _ Schakel de zaag niet in vooraleer u ze stevig vast hebt, een stabiele houding hebt aangenomen en u er zeker van bent dat het zwaard noch de ketting iets raken. _ Hou de kettingzaag altijd met beide handen stevig vast (rechterhand op de achterste handgreep, linkerhand op handgreep 2). _ Zaag nooit boven schouderhoogte, wanneer u op een ladder staat, wanneer u in een boom zit of wanneer u zich in een andere onveilige positie bevindt. _ Wanneer u gespleten hout zaagt, zorg er dan extra goed voor dat er geen stukjes afbreken en door de zaag worden weggeslingerd. _ Tijdens rustpauzes moet de zaag worden neergelegd op een manier die ervoor zorgt dat niemand door de zaagketting verwond kan worden. _ De kettingzaag mag nooit worden uitgeleend of in de handen komen van personen die niet vertrouwd zijn met de werking van dergelijk gereedschap. De gebruiksinstructies moeten ook met de zaag worden meegegeven. TERUGSLAG Volg deze veiligheidsinstructies om terugslag te voorkomen: _ Begin nooit te zagen met de punt van het zwaard! _ Zaag nooit met de punt van het zwaard! Wees voorzichtig bij het verderzetten van zaagsneden waaraan u reeds heeft gewerkt! _ Begin altijd te zagen met een kettingzaag die reeds draait! _ Zorg ervoor dat de zaagketting altijd goed geslepen is. _ Zaag nooit meer andere takken raakt. _ Let bij het doorzagen een zaagbok. 22
23 DE KETTINGZAAG TRANSPORTEREN Haal altijd de stekker uit het stopcontact en breng de zwaardbeschermkap aan over het zwaard en de ketting vóór u de kettingzaag transporteert. Wanneer verschillende zaagsneden moeten worden uitgevoerd met de kettingzaag, schakel ze dan tussen twee zaagsneden uit. VÓÓR HET STARTEN _ De netspanning en stroomvoorziening moeten overeenstemmen met de waarden op het typeplaatje. _ Controleer altijd vóór het werken of de zaag correct werkt en ze veilig is om gebruikt te worden. _ Controleer ook of de kettingsmering en het oliepeil in orde zijn. Wanneer het oliepeil lager staat dan ongeveer 5 mm van het onderste merkteken, dan moet u olie bijvullen. Wanneer de olie zich nog boven dit merkteken bevindt dan kunt u gewoon verder werken. _ Schakel de kettingzaag in en hou ze boven de grond. Wees voorzichtig zodat de kettingzaag de grond niet raakt. Om veiligheidsredenen is het best om een afstand van minstens 20 cm te bewaren. Wanneer u nu oliesporen ziet ontstaan dan werkt de kettingsmering. Wanneer er geen oliesporen ontstaan, probeer dan de olie-uitgang de bovenste opening van de kettingspanner en het oliekanaal te reinigen of neem contact op met de Klantendienst. _ Controleer indien nodig de kettingspanning en de kettinghouder. _ Zorg ervoor dat de kettingrem correct werkt. TOELICHTING VAN DE SYMBOLEN Bewaar de gebruiksaanwijzing goed voor later gebruik. Verklaring van de symbolen op de gazontrimmer Gevaar voor lichamelijk letsel of materiële schade. Pictogrammen : Maak uzelf vertrouwd met alle bedieningselementen voor het eerste werk. Oefen het gebruik van de zaag en laat u de functies, werkingsmethodes en zaagtechnieken uitleggen door een ervaren gebruiker of specialist. Lees en houd rekening met de gebruikershandleiding die deze machine hoort! Draag persoonlijke beschermingsuitrusting. Draag zeker een veiligheidsbril, of nog beter gezichtsbescherming, oorbescherming, veiligheidshelm, werkkledij met snijbescherming, handschoenen met snijbescherming, en veiligheidslaarzen met snijbescherming en antislip zolen. Pas op voor vallende voorwerpen. Hou toeschouwers op een afstand. Hou de uitrusting weg van nabije personen. Hou toeschouwers op een afstand. Stel de machine niet bloot aan regen. Laat de uitrusting niet vochtig worden of gebruik ze niet in een vochtige omgeving. Voorzichtig! Verwijder dadelijk de stekker uit het stopcontact in geval van schade of doorsnijden van de voedingskabel. Informatie over het geluidsniveau LWA in db. Isolatieklasse II. De machine is dubbel geïsoleerd. 23
24 Machines horen niet bij huishoudelijk afval. WAARSCHUWING! Verpakkingsmateriaal is geen speelgoed! Kinderen mogen niet spelen met plastic zakken! Gevaar voor verstikking! ELEKTRISCHE VEILIGHEID BESCHRIJVING Controleer of de op het typeplaatje van de machine vermelde spanning overeenkomt met de ter plaatse beschikbare netspanning. Deze modellen zijn bedoeld voor niet al te frequent gebruik door huiseigenaren, bewoners van buitenhuisjes, kampeerders en voor algemene toepassingen zoals het vrij maken van een gebied, snoeiwerken of het zagen van brandhout. Ze zijn niet bedoeld voor langdurig gebruik. Het apparaat is niet voor industrieel gebruik bestemd. 1. Achterste handgreep 2. Voorste handgreep 3. Voorste vingerbeschermer / kettingrem 4. Ketting 5. SDS systeem 6. Zwaardbeschermer 7. Zwaard 8. Achterste vingerbeschermer 9. Netsnoer 10. Klauwaanslag 11. Knop van de veiligheidsontgrendeling 12. Kabelhouder/Trekontlasting 13. Aan/uit schakelaar 14. Deksel van de olietank 15. Oliepeilvenster 16. kettingwiel 17. Bout van het zwaard MONTEREN VAN DE KETTING Wanneer de kettingzaag al op het net is aangesloten: haal de stekker uit het stopcontact. Draag werkhandschoenen wanneer u aan de kettingzaag werkt. Belangrijk: de voorste vingerbeschermkap (3) moet altijd rechtop staan. Het zwaard en de ketting worden apart geleverd. Om het geheel te assembleren draait u eerst de vergrendelmoer (5) los en verwijdert u het zwaarddeksel (6). De bout van het zwaard (17) moet zich in het midden van het zwaard bevinden. Regel indien nodig de kettingspanning bij met het kettingwiel (16). Om verwondingen door scherpe snijranden te vermijden moet u altijd werkhandschoenen dragen tijdens het monteren, opspannen en controleren van de ketting. Controleer de snijrichting van de tanden vóór u de ketting op het zwaard aanbrengt. De draairichting wordt aangeduid met een pijl op het deksel (6). Het is mogelijk dat u de zaagketting (4) moet omdraaien om de snijrichting te bepalen. Hou het zwaard (7) verticaal met de punt naar boven en breng de zaagketting (4) aan, te beginnen vanaf de punt van het zwaard. Monteer dan het zwaard met de zaagketting als volgt: - Plaats het zwaard met zaagketting op het kettingwiel (16) en de bout van het zwaard (17). - Plaats de zaagketting rond het kettingwiel (16) en zorg ervoor dat het correct gemonteerd zit. - Plaats hierover het deksel en zet het voorzichtig vast met de vergrendelmoer (5). Nu moet de zaagketting correct opgespannen worden. CONTROLEREN EN AANPASSEN VAN DE KETTINGSPANNING Haal altijd de stekker uit het stopcontact vóór u aan de kettingzaag werkt! Draag werkhandschoenen! Zorg ervoor dat de zaagketting (4) in de geleidergleuf van het zwaard (7) loopt. Draai de buitenste knop in wijzerzin totdat de zaagketting correct is opgespannen en draai dan de binnenste knop (van 5) vast om het zwaard in deze stand vast te zetten. Het zwaard moet naar boven worden geduwd terwijl de binnenste knop wordt vastgezet. Controleer opnieuw de kettingspanning (zie Fig. 3). Span de ketting niet te hard aan. In koude toestand moet het mogelijk zijn om de ketting in het midden van het zwaard ongeveer 5 24
25 mm op te tillen. Zet de vergrendelmoer (5) stevig vast. In warme toestand zal de zaagketting uitzetten en uitslingeren waardoor er gevaar ontstaat dat ze van het zwaard loskomt. Span indien nodig op. Wanneer de zaagketting in warme toestand werd opgespannen, moet ze na het werken opnieuw losser worden gezet, anders kan het inkrimpen door de afkoeling voor een te hoge spanning zorgen. Een nieuwe zaagketting heeft een inlooptijd van ongeveer 5 minuten. In dit stadium is kettingsmering zeer belangrijk. Controleer na het inlopen de kettingspanning en span indien nodig de ketting terug op. Neem voor het controleren en aanpassen van de kettingspanning altijd eerst de stekker uit het stopcontact. BIJVULLEN VAN KETTINGOLIE Reinig de oliedop (14) vóór het openen; dit voorkomt dat er vuil in de tank raakt. Controleer tijdens het zagen de inhoud van de tank m.b.v. de oliepeilaanduiding (15). Draai de oliedop na het vullen terug goed vast en veeg gemorste olie weg VASTMAKEN VAN HET VERLENGSNOER Gebruik enkel verlengsnoeren die geschikt zijn voor gebruik in de openlucht. De sectie van de draden (max. lengte van het snoer: 75 m) moet minstens 1,5 mm² bedragen. Maak het korte snoer van de kettingzaag vast aan het verlengsnoer en stop het verlengsnoer doorheen de opening van de trekontlasting in de behuizing. Verlengsnoeren van meer dan 30 m verminderen de prestaties van de kettingzaag. KETTINGSMERING Om snelle slijtage te vermijden moeten de zaagketting en het zwaard tijdens het werken gelijkmatig worden gesmeerd. Deze smering gebeurt automatisch. Werk nooit zonder kettingsmering. Wanneer de ketting droog loopt zal het snijgeheel ernstig beschadigd raken. Daarom is het belangrijk om zowel de kettingsmering als het oliepeil te controleren bij elk gebruik. Gebruik de zaag nooit wanneer het oliepeil lager staat dan het Min. -teken. Min.: wanneer er slechts 5 mm olie zichtbaar is aan de onderkant van het oliepeilvenster (15), dan moet u olie bijvullen. Max.: vul olie bij tot het venster vol aanduidt. CONTROLE VAN DE AUTOMATISCHE SMERING Controleer vóór u begint te werken de automatische kettingsmering en het oliepeil. Start de kettingzaag en hou ze boven de grond. Wees voorzichtig dat de kettingzaag de grond niet raakt. Om veiligheidsredenen houdt u best een afstand van 20 cm aan. Wanneer u nu oliesporen ziet verschijnen, werkt het kettingsmeersysteem correct. Wanneer er geen oliesporen verschijnen, probeer dan om de olie-uitgang, de opening in de bovenkant van de kettingsmering en het oliekanaal te reinigen of neem contact op met de klantendienst. SMEERMIDDELEN VOOR DE KETTING De levensduur van zaagkettingen en zwaarden hangt in grote mate af van de kwaliteit van het gebruikte smeermiddel. Oude olie mag niet gebruikt worden! Gebruik milieuvriendelijke kettingolie. Bewaar kettingolie enkel in verpakkingen die voldoen aan de betreffende regelgeving. HET ZWAARD Het zwaard (7) wordt vooral op de punt en aan de onderkant blootgesteld aan sterke slijtage en veroudering. Draai het zwaard om telkens u de ketting slijpt om deze slijtage en veroudering aan één kant te vermijden. KETTINGWIEL Vooral ook het kettingwiel (16) wordt blootgesteld aan sterke veroudering en slijtage. Wanneer u ernstige slijtage ziet aan de tanden, vervang dan het kettingwiel. Een versleten kettingwiel verkort de levensduur van de zaagketting. Laat het kettingwiel door een gespecialiseerde dealer of de klantendienst vervangen. KETTINGBESCHERMER De kettingbeschermer moet op de ketting en het zwaard worden aangebracht zodra het werk is afgelopen en wanneer de kettingzaag getransporteerd moet worden. KETTINGREM In het geval van terugslag zal de kettingrem (3) via de voorste vingerbeschermkap worden geactiveerd. De voorste vingerbeschermkap wordt door de rug van de hand naar voor geduwd en dit zorgt ervoor dat de kettingrem de zaagketting, meer bepaald de motor, stopt binnen 0.15 s. 25
26 DE KETTINGREM LOS ZETTEN Om uw kettingzaag opnieuw te kunnen gebruiken moet u de kettingrem terug los zetten. Schakel eerst de kettingzaag uit. Duw dan de voorste vingerbeschermkap (3) terug in de verticale stand tot ze op haar plaats vast klikt. De kettingrem is nu opnieuw bruikbaar. SLIJPEN VAN DE ZAAGKETTING U kunt uw zaagketting snel en correct laten slijpen door gespecialiseerde dealers, waar u ook slijpgereedschap vindt om zelf uw ketting te slijpen. Volg de bijhorende gebruiksinstructies hiervoor. Draag zorg voor uw gereedschap. Hou uw gereedschap scherp en proper zodat u goed en veilig kunt werken. Volg de onderhoudsinstructies en de instructies voor het vervangen van gereedschap. AANWIJZINGEN VOOR GEBRUIK Draag altijd een veiligheidsbril, gehoorbescherming, werkhandschoenen en sterke werkkledij! Gebruik de zaag enkel met gekeurde verlengsnoeren met de voorgeschreven isolatie en connectoren ontworpen voor buitengebruik (gekeurde snoeren met rubberen mantel) die correct op de stekker van de kettingzaag passen. De kettingzaag is uitgerust met een dubbele veiligheidsschakelaar waarvoor u beide handen moet gebruiken. De kettingzaag werkt enkel wanneer een hand de voorste handgreep (2) vasthoudt en de andere de schakelaar op de achterste handgreep (1) bedient. Wanneer de kettingzaag niet draait, zet dan de kettingrem los m.b.v. de voorste vingerbeschermkap (3). Zorg ervoor dat u de paragrafen Kettingrem en Los zetten van de kettingrem hiervoor hebt gelezen. Na het inschakelen draait de kettingzaag onmiddellijk op hoge snelheid. Gebruik de machine niet boven schouderhoogte. Gebruik de machine uitsluitend voor het bewerken van droog hout. Indien u deze machine voor de eerste keer gebruikt, is het raadzaam de werkzaamheden op een zaagbok te verrichten. Begin nooit te zagen voordat de machine op volle toeren draait en de gekartelde stootrand het hout raakt. Maak altijd een nieuwe zaagsnede. Gebruik nooit een eerdere zaagsnede om verder te zagen. UITSCHAKELEN Laat ofwel de AAN/UIT schakelaar (13) op de achterste handgreep. Het loslaten van de AAN/UIT schakelaar zorgt ervoor dat de ketting binnen 1 s stopt en hevig ratelt. Dit is normaal en veilig voor de werking van de kettingzaag. Na het werken met de kettingzaag moet u altijd: de zaagketting en het zwaard reinigen en de kettingbeschermer aanbrengen. BEVEILIGING VAN DE KETTINGZAAG Gebruik de kettingzaag nooit in de regen of in vochtige omstandigheden. Wanneer het verlengsnoer beschadigd is, haal dan onmiddellijk de stekker uit het stopcontact. Werk nooit met een beschadigd snoer. _ Controleer de kettingzaag op schade. Controleer vóór u uw gereedschap opnieuw gebruikt de veiligheidsvoorzieningen en licht beschadigde onderdelen en zorg ervoor dat ze in een goede staat verkeren om mee te werken. _ Zorg ervoor dat alle bewegende delen correct werken. _ Alle onderdelen moeten correct geassembleerd zijn en aan alle nodige voorwaarden voldoen om ervoor te zorgen dat de kettingzaag correct werkt. _ Alle beschadigde veiligheidsvoorzieningen en onderdelen moeten onmiddellijk correct worden hersteld of vervangen door een werkplaats van de klantendienst, tenzij er in de gebruiksinstructies staat dat dit niet hoeft. OPMERKINGEN OVER WERKMETHODE Terugslag U kunt ongevallen vermijden door niet met de punt van het zwaard te zagen omdat dit ervoor kan zorgen dat de zaag plots naar boven terugslaat. Gebruik altijd een volledige veiligheidsuitrusting en kledij wanneer u met de zaag werkt. Terugslag is een opwaartse en/of achterwaartse beweging van het zwaard en kan optreden wanneer de punt van het zwaard een obstakel ontmoet. 26
27 Zorg ervoor dat uw werkstuk stevig is vastgeklemd. Gebruik klemmen om het doorslippen van een werkstuk te stoppen. Dit maakt het ook makkelijker om de zaag met beide handen te gebruiken. Terugslag zorgt ervoor dat de zaag oncontroleerbaar reageert en kan dus optreden met een loshangende of stompe ketting. Een slecht geslepen ketting verhoogt het gevaar voor terugslag. Zaag nooit boven schouderhoogte. GEBRUIK VAN DE ZAAG Blokken zagen _ Gebruik indien mogelijk steeds een zaagbok. _ Begin een zaagsnede altijd met een draaiende ketting en de gekartelde stootrand tegen het hout. _ Draai om een zaagsnede te voltooien de gekartelde stootrand tegen het hout. De manier van zagen is afhankelijk van de wijze waarop het blok wordt ondersteund. Ondersteuning over de volle lengte (het blok ligt op de grond): _ Maak een verticale zaagsnede omlaag. _ Zorg ervoor dat u de grond niet raakt. Ondersteuning aan beide uiteinden (het blok ligt op een zaagbok): _ Maak een verticale zaagsnede omlaag tot een derde van de lengtedoorsnede. _ Draai het blok om en leg het op de zaagbok met de zaagsnede beneden. _ Maak een tweede zaagsnede naar de eerste snede toe. Ondersteuning aan een uiteinde (het blok ligt op een zaagbok): _ Maak een verticale zaagsnede omlaag. Bomen zagen _ Maak een horizontale zaagsnede tot een derde van de stamdiameter. Maak vervolgens een diagonale zaagsnede onder een hoek van ca. 45 van boven naar beneden, zodat een inkeping ontstaat. _ Maak een zaagsnede aan de andere kant, maar zorg ervoor dat u niet door de inkeping zaagt. _ Plaats een wig in de zaagsnede om een opening te maken en de boom te laten vallen. Het vellen van bomen is gevaarlijk en vereist ervaring. Wanneer u een beginner bent of geen ervaring heeft, probeer dan niet om het zelf te leren maar zoek professioneel advies. REINIGING EN ONDER Haal altijd de stekker uit het stopcontact vóór u enig werk aan de kettingzaag uitvoert! Hou de koelsleuven in de motorbehuizing proper en altijd vrij. Enkel het onderhoudswerk beschreven in deze gebruiksinstructies mag uitgevoerd worden. Alle andere onderhoud moet door de klantendienst worden uitgevoerd. Breng geen wijzigingen aan de zaagmachine aan omdat dit haar veiligheid in het gedrang kan brengen. Als de kettingzaag ondanks onze nauwkeurige fabricatie en inspectieprocedures toch nog defect gaat, laat ze dan herstellen in een werkplaats die door de klantendienst erkend is. TECHNISCHE GEGEVENS Netspanning V Netfrequentie Hz 50 Vermogen W 2000w Toerental min Toerental (onbelast) m/sec 12.1 Lengte zwaard mm Zaaglengte 355mm Uitlooptijd ketting ms < 0.12 sec Capaciteit oliereservoir ml 200 ml Gewicht kg 5 kg Geluidsniveauwaarden gemeten volgens de van toepassing zijnde standaard : Lpa (Geluidsdrukniveau) LpA 85.9 db(a) K = 3 db(a) Lwa (Geluidsprestatieniveau LwA db(a) K = 2.36 db(a) Gegarandeerd: LWA 112 db (A) AANDACHT! Draag gehoorbeschermers wanneer het geluidsniveau 85dB(A) overschrijdt. Gewogen kwadratische gemiddelde waarde de van toepassing zijnde standaard : Belangrijkste Handvat: m / s ² Extra handgreep: m / s ² K = 1,5 m / s ². 27
28 SERVICEDIENST De aanduiding van het feit dat de aangegeven totale trillingenwaarde werd gemeten conform een genormaliseerde proefmethode en kan worden gebruikt om een instrument met een ander instrument te vergelijken; de aanduiding van het feit dat de aangegeven totale trillingenwaarde ook kan worden gebruikt voor een voorafgaande evaluatie van de blootstelling. Een waarschuwing die stipuleert dat de emissie van trilling in de loop van het werkelijke gebruik van het elektrische instrument kan verschillen van de aangegeven totale waarde, volgens de gebruiksmethodes van het instrument; door de noodzaak aan te geven de veiligheidsmaatregelen te identificeren met de bedoeling de operator te beschermen, welke gebaseerd zijn op een raming van de blootstelling in de werkelijke gebruiksomstandigheden (rekening houdend met alle bestanddelen van de werkingscyclus, zoals de stoptijden van het instrument en de werkingstijden in rust, naast de uitschakeltijd) _ Beschadigde schakelaars moeten in de werkplaats van onze klantendienst hersteld worden. _ Als de vervanging van de voedingskabel noodzakelijk is, moet dit plaatsvinden door de fabrikant of zijn agent om een gevaar te voorkomen. KLANTENSERVICE EN GEBRUIKSADVIEZEN Onze klantenservice beantwoordt uw vragen over reparatie en onderhoud van uw product en over vervangingsonderdelen. Explosietekeningen en informatie over vervangingsonderdelen vindt u ook op : Het ELEM GARDEN TECHNIC-team voor gebruiksadviezen helpt u graag bij vragen over onze producten en toebehoren : sav@ecorepa.com OPSLAG GARANTIE Voor de garantiebepalingen wordt verwezen naar de bijgevoegde garantievoorwaarden. AFDANKING Als uw machine na verloop van tijd aan vervanging toe is, geef hem dan niet met het huisvuil mee, maar zorg voor een milieuvriendelijke verwerking. toebehoren. kinderen, in een stabiele en veilige positie en op een droge plaats met een gematigde temperatuur. Vermijd te hoge en te lage temperaturen. licht. Bewaar ze, indien mogelijk, op een donkere plaats. Bewaar de machine niet in plastic of Nylon zakken om te vermijden dat er zich vocht ophoopt Vervaardigd in China
29 GB / CHAINSAW APPLIANCE This model is intended for infrequent use by homeowners, cottagers, and campers, and for such general applications as clearing, pruning, cutting firewood, etc. They are not intended for prolonged use. It is not designed for commercial use. GENERAL POWER TOOL SAFETY WARNINGS WARNING Read all safety warnings and all instructions. Failure to follow the warnings and instructions may result in electric shock, fire and/or serious injury. Save all warnings and instructions for future reference. The term power tool in the warnings refers to your mains-operated (corded) power tool or battery-operated (cordless) power tool. 1) Work area safety a) Keep work area clean and well lit. Cluttered or dark areas invite accidents. b) Do not operate power tools in explosive atmospheres, such as in the presence of flammable liquids, gases or dust. Power tools create sparks which may ignite the dust or fumes. c) Keep children and bystanders away while operating a power tool. Distractions can cause you to lose control. 2) Electrical safety a) Power tool plugs must match the outlet. Never modify the plug in any way. Do not use any adapter plugs with earthed (grounded) power tools. Unmodified plugs and matching outlets will reduce risk of electric shock. b) Avoid body contact with earthed or grounded surfaces, such as pipes, radiators, ranges and refrigerators. There is an increased risk of electric shock if your body is earthed or grounded. c) Do not expose power tools to rain or wet conditions. Water entering a power tool will increase the risk of electric shock. d) Do not abuse the cord. Never use the cord for carrying, pulling or unplugging the power tool. Keep cord away from heat, oil, sharp edges and moving parts. Damaged or entangled cords increase the risk of electric shock. e) When operating a power tool outdoors, use an extension cord suitable for outdoor use. Use of a cord suitable for outdoor use reduces the risk of electric shock. f) If operating a power tool in a damp location is unavoidable, use a residual current device (RCD) protected supply. Use of an RCD reduces the risk of electric shock. 3) Personal safety a) Stay alert, watch what you are doing and use common sense when operating a power tool. Do not use a power tool while you are tired or under the influence of drugs, alcohol or medication. A moment of inattention while operating power tools may result in serious personal injury. b) Use personal protective equipment. Always wear eye protection. Protective equipment such as dust mask, non-skid safety shoes, hard hat, or hearing protection used for appropriate conditions will reduce personal injuries. c) Prevent unintentional starting. Ensure the switch is in the off-position before connecting to power source and/or battery pack, picking up or carrying the tool. Carrying power tools with your finger on the switch or energising power tools that have the switch on invites accidents. d) Remove any adjusting key or wrench before turning the power tool on. A wrench or a key left attached to a rotating part of the power tool may result in personal injury. e) Do not overreach. Keep proper footing and balance at all times. This enables better control of the power tool in unexpected situations. f) Dress properly. Do not wear loose clothing or jewellery. Keep your hair, clothing and gloves away from moving parts. Loose clothes, jewellery or long hair can be caught in moving parts. g) If devices are provided for the connection of dust extraction and collection facilities, ensure these are connected and properly used. Use of dust collection can reduce dust-related hazards. 4) Power tool use and care a) Do not force the power tool. Use the correct power tool for your application. The correct power tool will do the job better and safer at the rate for which it was designed. b) Do not use the power tool if the switch does not turn it on and off. Any power tool that cannot be controlled with the switch is dangerous and must be repaired. 29
30 c) Disconnect the plug from the power source and/or the battery pack from the power tool before making any adjustments, changing accessories, or storing power tools. Such preventive safety measures reduce the risk of starting the power tool accidentally. d) Store idle power tools out of the reach of children and do not allow persons unfamiliar with the power tool or these instructions to operate the power tool. Power tools are dangerous in the hands of untrained users. e) Maintain power tools. Check for misalignment or binding of moving parts, breakage of parts and any other condition that may affect the power tool s operation. If damaged, have the power tool repaired before use. Many accidents are caused by poorly maintained power tools. f) Keep cutting tools sharp and clean. Properly maintained cutting tools with sharp cutting edges are less likely to bind and are easier to control. g) Use the power tool, accessories and tool bits etc. in accordance with these instructions, taking into account the working conditions and the work to be performed. Use of the power tool for operations different from those intended could result in a hazardous situation. 5) Service a) Have your power tool serviced by a qualified repair person using only identical replacement parts. This will ensure that the safety of the power tool is maintained. CHAIN SAW SAFETY WARNINGS Keep all parts of the body away from the saw chain when the motor is operating. Before you start the chain saw, make sure the saw chain is not contacting anything. A moment of inattention while operating chain saws may cause entanglement of your clothing or body with the saw chain. Hold the power tool by insulated gripping surfaces only, because the saw chain may contact hidden wiring or its own cord. Saw chains contacting a live wire may make exposed metal parts of the power tool live and could give the operator an electric shock. Always hold the chain saw with your right hand on the rear handle and your left hand on the front handle. Holding the chain saw with a reversed hand configuration increases the risk of personal injury and should never be done. Wear safety glasses and hearing protection. Further protective equipment for head, hands, legs and feet is recommended. Adequate protective clothing will reduce personal injury by flying debris or accidental contact with the saw chain. Do not operate a chain saw in a tree. Operation of a chain saw while up in a tree may result in personal injury. Always keep proper footing and operate the chain saw only when standing on fixed, secure and level surface. Slippery or unstable surfaces such as ladders may cause a loss of balance or control of the chain saw. When cutting a limb that is under tension be alert for spring back. When the tension in the wood fibres is released the spring loaded limb may strike the operator and/or throw the chain saw out of control. Use extreme caution when cutting brush and saplings. The slender material may catch the saw chain and be whipped toward you or pull you off balance. Carry the chain saw by the front handle with the chain saw switched off and away from your body. When transporting or storing the chain saw, always fit the guide bar cover. Proper handling of the chain saw will reduce the likelihood of accidental contact with the moving saw chain. Follow instructions for lubricating, chain tensioning and changing accessories. Improperly tensioned or lubricated chain may either break or increase the chance for kickback. Keep handles dry, clean, and free from oil and grease. Greasy, oily handles are slippery causing loss of control. Cut wood only. Don t use chain saw for purposes not intended. For example: do not use chain saw for cutting plastic, masonry or non-wood building materials. Use of the chain saw for operations different than intended could result in a hazardous situation. CAUSES AND OPERATOR PREVENTION OF KICKBACK: Kickback may occur when the nose or tip of the guide bar touches an object, or when the wood closes in and pinches the saw chain in the cut. Tip contact in some cases may cause a sudden reverse reaction, kicking the guide bar up and back towards the operator. Pinching the saw chain along the top of the guide bar may push the guide bar rapidly back towards the operator. Either of these reactions may cause you to lose control of the saw which could result in serious personal injury. Do not rely exclusively upon the safety devices built into your saw. As a chain saw user, you should take several steps to keep your cutting jobs free from accident or injury. Kickback is the result of tool misuse and/or incorrect operating procedures or conditions and can be avoided by taking proper precautions as given below: Maintain a firm grip, with thumbs and fingers encircling the chain saw handles, with both hands on the saw and position your body and arm to allow you to resist kickback 30
31 forces. Kickback forces can be controlled by the operator, if proper precautions are taken. Do not let go of the chain saw. Do not overreach and do not cut above shoulder height. This helps prevent unintended tip contact and enables better control of the chain saw in unexpected situations. Only use replacement bars and chains specified by the manufacturer. Incorrect replacement bars and chains may cause chain breakage and/or kickback. It is recommended for increased electrical safety to use a Residual Current Device (RCD) with a tripping current of not more than 30 ma. Always check your RCD every time you use it. Follow the manufacturer s sharpening and maintenance instructions for the saw chain. Decreasing the depth gauge height can lead to increased kickback. Children and juveniles, with the exception of apprentices older than 16 years and under supervision, may not operate the chain saw. The same applies for persons who do not or do not sufficiently know how to handle the chain saw. The operating instructions should always be ready to hand. Persons unfit or tired must not operate the chain saw. Always ensure all handles and guards are fitted when using the machine. Never attempt to use an incomplete machine or one fitted with an unauthorized modification. It is recommended that the first time user should have practical instruction in the use of the chainsaw and the protective equipment from an experienced operator. The initial practice should be cutting logs on a saw horse or cradle. Always wait until the machine has come to a complete stop before placing it down. The tool insert can jam and lead to loss of control over the power tool. Never use the machine with a damaged cable. Do not touch the damaged cable and pull the mains plug when the cable is damaged while working. Damaged cables increase the risk of an electric shock. The power cable must always be behind the saw operator. The power cable must always lead away from the rear of the chainsaw. SAFETY INSTRUCTIONS The safety instructions must be observed when using the chainsaw. For your own safety and the safety of others, please read this information carefully before using the chainsaw and keep it in a safe place for reference. Use the chain saw only to saw wood or objects made of wood. Any other types of use are at your own risk and could be dangerous. The manufacturer cannot be held liable for damage caused by improper or incorrect usage. Safety instructions and accident prevention To prevent the incorrect handling of the chainsaw, please read the operating instructions in their entirety before using the chainsaw for the first time. All the information on the handling of the chainsaw is relevant to your personal safety. Ask a professional to show you how to use the chainsaw! _ Before plugging in, check the plug and cable for damage. If damage is discovered, have it repaired by a specialist immediately. _ Never use a damaged cable, connection or plug or a power cable which does not comply with the requirements. If the cable is damaged or severed, unplug immediately. _ Switch the chainsaw off before releasing the chain brake. _ Always wear goggles and protective gloves when working with the chainsaw. _ To prevent injury, wear tight-fitting clothes and safety boots. _ To prevent damage to your hearing, wear earmuffs. Helmets with a visor are particularly advantageous. _ Make sure you have a firm footing when working with the chain saw. _ Keep your place of work tidy. _ To prevent electric shock, avoid contact with earthed parts. _ Always pull the plug out of the power socket before doing any work on the chainsaw. _ Only plug in when the chainsaw is switched off, _ The chainsaw must be used only by one person at a time. All other persons must stay clear of the chainsaw s area of swing. Children and pets in particular must be kept well away at all times. _ The saw must not be touching anything when it starts up. _ Hold the chainsaw firmly in both hands when working with it. _ The chain saw must not be operated by children and young people. The only exception to this prohibition are young persons of 16 years and over who can use the chain saw under supervision as part of their training. Lend the saw only to those persons who are familiar with this type of chainsaw and know how to handle it. Always pass on the operating instructions together with the chainsaw. _ Make sure the chain saw is stored in a place inaccessible to children. 31
32 _ The saw may be operated only by persons who are rested and in good health, i.e. in a good physical condition. If you start to tire, have a break in time. The chainsaw should not be used after the consumption of alcohol. _ Never expose the chainsaw to rain or bad weather. Make sure there is enough light at the place of work. Do not use power tools in the vicinity of combustible liquids or gases. _ If the chainsaw is not being used for a while, it must be set aside in such a way that no other person is endangered. _ Before making a cut, always set the claw stop before you start to saw. _ Remove the chainsaw from the wood only with the saw chain still running. Anyone who saws without a stop can be pulled forwards. _ Never use the chainsaw when standing on a ladder, in a tree or in any other instable places. Do not saw with one hand. _ The power cable must always be behind the saw operator. _ The power cable must always lead away from the rear of the chainsaw. _ Use only original accessories. _ Chainsaws used outdoors must be connected up to an earth-leakage circuit-breaker. _ Do not overload your power tools. They run best and safest within given range of capacity. _ Always use the correct power tool. Do not use low-powered chainsaws for heavy jobs. _ Use the cable only for its proper purpose. Never carry your electric tool by its cable. Do not use the cable to pull the plug out of the socket. Protect the cable from heat, oil and sharp edges. _ Extension cables out doors _ Use only authorized and accordingly labelled extension cables out of doors. _ Use a strong support when sawing converted timber and thin branches. Do not stack the timber and do not have it held by a second person or with your foot. _ Logs must be secured in position. _ On sloping ground, always work facing upwards. _ When cross-cutting always set the claw stop against the timber you want to saw. _ Always set the claw stop before cross-cutting. Only then switch on the chainsaw and start sawing into the wood. Pull the chainsaw upwards at the rear and lead the direction with the front grip. Use the claw stop as a fulcrum. To reposition for further cutting, interrupt the sawing process and exert a slight pressure on the front grip. Pull the saw back a little, position the claw stop further down the cut and pull up the rear grip. _ Pull the saw out of the wood only when the saw chain is running. _ If you carry out several cuts, switch off the chain saw in-between. _ Plunge cuts and horizontal cuts may only be carried out by professionals. _ For horizontal cuts, position the smallest possible angle. This requires extreme caution, as the claw stop can not be applied in this case. _ If the chain gets stuck when sawing with the upper side it may be thrust towards the operator. For this reason you should saw wherever possible with the bottom side, as the chainsaw will then be thrust away from the body towards the wood. _ Pay extra attention when cutting splintered wood. Sawed off pieces of wood may be catapulted in any direction (risk of injury!) _ Do not use the chainsaw to remove nails or similar objects. _ When lopping off branches, the chain saw should be supported wherever possible against the trunk, Do not cut with the tip of the guide bar. _ Leave branch lopping work should be carried out by trained personnel! Risk of injury! _ Pay special attention to branches under tension. Do not cut through freely suspended branches from underneath. _ Never stand on the trunk when loping off branches. _ The chainsaw should not be used for forest work, i.e. for felling and lopping off branches in the forest. Because of the cable connection the saw operator does not have the necessary mobility and his safety is not guaranteed! _ Always stand to the side of the tree being felled. _ When the tree is being felled, watch out for falling branches when stepping back. _ On slopes the saw operator should stand to the upper or left or right side the trunk or lying tree, never to the bottom side. _ Watch out for trunks rolling towards you. Kickback! _ The power saw is likely to recoil if the tip of the guide bar (especially the top quarter) accidentally touches wood or any other solid objects. In this case the saw will move uncontrolled and will be hurled towards the operator at full power (risk of injury!). _ When working with the chain saw, protective gloves, suitable shoes, leg protectors, eye protectors and ear protectors should be used. _ If the work involves any risk of head injury, a safety helmet must be worn When cutting down trees and cutting and cutting off branches of felled or fallen trees. in addition a face protector should be worn. _ Always pull the plug from the socket outlet before attempting to check or adjust the chain or to correct some fault and whenever moving one workplace to another. _ Never switch on the chain saw unless you have a firm hold of the tool. a secure footing and are sure that the guide bar and saw chain are not touching anything. _ Always hold the saw with both hands (right hand on rear handle, left hand on handle. _ Never saw above shoulder height, while standing on a ladder or In a tree or in any other insecure position. _ When sawing timber that has split, take particular care that no small pieces of wood are broken off and thrown by the saw chain. _ During breaks, the saw should be laid down in such a way that there Is no risk of injury to anyone from the saw chain. _ The chain saw should never be lent to or be allowed to come into the hands of persons who are not familiar with the use of such a tool. The operating Instructions should also go with the saw. 32
33 KICKBACK In order to prevent kick-back, please follow these safety instructions: _ Never start cutting with the tip of the guide bar! _ Never cut with the tip of the guide bar! Be careful, when continuing cuts you are already working on! _ Always start cuts with the chainsaw already running! _ Make sure that the saw chain is always properly sharpened. _ Never cut through more than one branch at a time! When lopping off branches, be careful not to touch any other branches. _ When cross-cutting, pay attention to trunks standing very close to each other. If possible use a saw-horse. TRANSPORTING THE CHAINSAW Before transporting the chainsaw, always remove the plug from the power socket and slide the chain guard over the rail and chain. If several cuts are to be performed with the chain saw, the saw must be switched off between cuts. SYMBOLS Please keep the instructions safe for later use. Explanation of symbols on the line trimmer Pictograms : Denotes risk of personal injury or damage to the tool. Make yourself familial with all control elements before any work. Practice handling the sax and have explained the functions, operating methids and sawing techniques by a practiced user or specialist. Read manual before usage BEFORE STARTING UP _ The voltage and current supply must comply with the ratings on the type plate. _ Before commencing work, always check that the chainsaw works properly and is safe to operate. _ Check also that the chain lubrication and the oil gauge are in good working order. When the oil lever is approx. 5 mm from the bottom mark, you must top up with oil. When the oil level is higher you can work without worry. _ Switch on the chain saw and hold it above the ground. Be careful not allow the chainsaw to touch the ground. For safety reasons it is best to keep a clearance of at least 20 cm. If you now see growing traces of oil, the chain lubrication system is working correctly. If there are no traces of oil at all, try cleaning the oil outlet, the upper chain tensioning borehole and the oil duct, or contact your Customer Service. _ Check the chain tension and retention, if necessary. _ Make sure the chain brake is working properly. Wear personal protective equipment. Basically, wear protective goggles or, even better, face protection, ear protection, safety helmet, cutprotection working clothes, cutprotection sfety boots with antislip soles. Beware of falling objects. Keep bystanders away Keep the equipment away from nearby people. Keep bystanders away Never operate the machine in the rain or in damp or wet conditions. Moisture is an electrical shock hazard. Remove plug from the mains immediately if the cable is damaged or cut. 33
34 Information of the acoustic power level LWA in db. Class. II -Double insulated Machine do not belong with domestic waste. WARNING: Packaging materials are not toys! Children must not play with plastic bags! Danger of suffocation! ELECTRICAL SAFETY DESCRIPTION Always check that the power supply corresponds to the voltage on the rating plate. This model is intended for infrequent use by homeowners, cottagers, and campers, and for such general applications as clearing, pruning, cutting firewood, etc. They are not intended for prolonged use. It is not designed for commercial use. 1. Rear grip 2. Front grip 3. Front finger guard / Chain break 4. Saw chain 5. SDS system 6. Guide bar cover 7. Guide bar 8. Rear finger guard 9. Power cable 10. Claw stop 11. Safety lock- button 12. Cable hook 13. ON/OFF switch 14. Oil tank cap 15. Oil gauge 16. Chain wheel 17. Guide bolt MOUNTING THE CHAIN If the chain saw is already connected to the power supply: Pull the plug from the socket outlet. Wear protective gloves whenever doing any work on the saw chain. Important: The front finger guard (3) must always be in the top (vertical) position. The guide bar and saw chain are supplied separately. To assemble, first unscrew the lock nut (5) and remove the guide bar cover (6). The guide bolt (17) must be in the centre of the guide. If necessary, adjust the chain tensioning with the chain wheel (16). To prevent injury on the sharp cutting edges, always wear gloves when assembling, tensioning and checking the chain. Before assembling the guide bar with the saw chain, check the cutting direction of the teeth! The running direction is marked with an arrow on the cover (6). To determine the direction of cut, it may be necessary to turn over the saw chain (4). Hold the guide bar (7) vertically with the tip pointing upwards and put on the saw chain (4, beginning at the tip of the bar. Then assemble the guide bar with the saw chain as follows: - Place the guide bar with the saw chain on the chain wheel (16) and guide bolt (17). - Place the saw chain round the chain wheel (16) and make sure it is correctly mounted. - Place the cover (6) on top and tighten gently with the lock nut (5). Now the saw chain has to be correctly tensioned. 34
35 TENSIONING THE SAW CHAIN Always pull the plug out of the power socket before doing any work on the chainsaw! Wear safety gloves! Turn the outer Knob clockwise until the saw chain is correctly tensioned, then rotate the inside knob (5) to block the guide bar in that position. While the inside knob is being tightened, the guide bar must then be pushed upwards. Check the chain tension again (see Fig. 3). Do not tension the chain too tightly. When cold, it should be possible to lift the chain in the middle of the guide bar approx. 5 mm. Tighten the lock nut (5) securely. When warm, the saw chain will expand and slacken and there is a danger of it jumping off the rail altogether. Re-tension if necessary. If the saw chain is re-tensioned when hot, it must be loosened again when the sawing work has been completed. Otherwise, the contraction which takes place as the chain cools would result in excessively high tension. A new saw chain requires a running-in period of approx.5 minutes. Chain lubrication is very important at this stage. After running in, check chain tension and re-tension if necessary. FILLING IN CHAIN OIL Before checking and adjusting the chain tension, never forget to unplug the tool. To prevent dirt getting inside the tank, clean the oil tank cap (21) before opening. Check the contents of the oil tank during sawing work by checking the oil gauge (15). Close the oil tank cap tightly and wipe away any spills. SECURING THE EXTENSION LEAD Only use extension leads suitable for outdoor use. The cross section of the cable (max. length of extension cord: 75m) must be at least 1,5 mm². secure the chainsaw flex to the extension lead by inserting the extension lead into the strain relief gap of the housing. Extension leads longer than 30 m will reduce the performance of the chainsaw. CHAIN LUBRICATION To prevent excessive wear, the saw chain and guide bar must be evenly lubricated during operation. Lubrication is automatic. Never work without chain lubrication. If the chain runs dry, the entire cutting apparatus will quickly become severely damaged. It is therefore important to check both chain lubrication and the oil gauge every use (Fig. 4). Never use the saw when the oil level is below the Min. mark. Min.: When only approx. 5 mm of oil is visible at the lower rim of the oil gauge (15), you must top up with oil. Max.: Top up with oil until the window is full. CHECKING THE AUTOMATIC LUBRICATION Before commencing work, check the automatic chain lubrication and oil gauge. Switch on the chain saw and hold it above the ground. Be careful not to allow the chain saw to touch the ground. For safety reasons it is best to keep a clearance of at least 20 cm. If you now see growing traces of oil, the chain lubrication system is working correctly. if there are no traces of oil at all, try cleaning the oil outlet, the upper chain tensioning borehole and the oil duct, or contact your Customer Service. CHAIN LUBRICANTS The service life of saw chains and guide bars depends to a large extent on the quality of the lubricant used. Old oil must not be used! Use only environment-friendly chain lubricant. Store chain lubricant only in containers which comply with the regulations. GUIDE BAR The guide bar (7) is subjected to especially severe wear and tear at the nose and the bottom. To avoid one-sided wear and tear, turn the guide bar over every time when you sharpen the chain. CHAIN WHEEL The chain wheel (16) is subjected to especially high wear and tear. If you notice deep wear marks on the teeth, the chain wheel must be replaced. A worn chain wheel curtails the service life of the saw chain. Have the chain wheel replaced by a specialist dealer or your Customer Service. 35
36 CHAIN GUARD The chain guard must be clipped onto the chain and sword as soon as the sawing work has been completed and whenever the chainsaw has to be transported. CHAIN BRAKE In the event of kick-back, the chain brake (3) will be actuated via the front finger guard. The front finger guard is pushed forwards by the back of the hand and this causes the chain brake to stop the chain saw, or rather the motor, within 0.15 s. RELEASING THE CHAIN BRAKE To be able to use your chain saw again, you must release the saw chain again. First switch off the chainsaw. Then push the front finger guard (3) back into the vertical position until it locks in place. The chain brake is now fully functional again. SHARPENING THE SAW CHAIN You can have your saw chain sharpened fast and correctly by specialist dealers, from whom you can also obtain chain sharpening equipment to enable you to sharpen the chain yourself. Please follow the corresponding operating instructions. Take care of your tools. Keep your tools sharp and clean to enable you to work well and safely. Follow the maintenance regulations and the instructions for changing tools INSTRUCTIONS FOR USE Always wear safety goggles, ear muffs, protective gloves and heavy-duty work clothes! Use the saw only with approved extension cables with the prescribed insulation and connections designed for outdoor use (approved rubbersheathed cables) which fit the chainsaw plug. The chain saw is equipped with two safety switches, requiring the use of both hand. The chainsaw works only when one hand holds the front grip (2) and the other hand actuates the switch on the rear grip (1). If the chainsaw does not run, the chain brake must be released at the front finger guard (3). Be sure to read the sections Chain brake and Releasing the chain brake on this point. After switching on, the chainsaw will run immediately at high speed. Do not use the machine above shoulder height. Only use the machine for working dry wood. If you use this machine for the first time, it is advisable to work on a saw horse. Never start sawing before the machine is running at full speed and the serrated fender touches the wood. Always make a new cut. Never use a previous cut to proceed sawing. SWITCHING ON AND OFF Release either the ON/OFF switch (13) on the rear The release of ON/OFF switch results the stop of the chainsaw within 1sec., and heavy sparkling. This is normal and safe for the proper operation of the chainsaw. After working with the chainsaw, you should always: Clean the saw chain and guide bar and replace the chain guard. CHAINSAW PROTECTION Never use the chainsaw in the rain or in damp conditions. If the extension cable is damaged, pull the plug out of the power socket immediately. Never work with a damaged cable. _ Check the chainsaw for damage. Before using your tool again, check the safety devices or any slightly damaged parts to ensure that they are in good working order. _ Make sure the moving parts are working correctly. _ All the parts must be correctly assembled and meet all the conditions required to ensure that the chainsaw works correctly. _ Any damaged safety devices and parts must be properly repaired or replaced immediately by a Customer Service workshop, unless there are instructions to the contrary in these operating instructions. NOTES ON WORKING PRACTICE Kick-back. You can avoid accidents by not sawing with the tip of the guide bar as this may cause the saw to rear up suddenly. Always use the complete safety equipment and clothes when working with the saw. Kick-back is an upward and/or backward movement of the guide bar which can occur if the saw chain at the tip of the guide bar encounters an obstruction. Make sure your work-piece is firmly secured. Use clamps to stop the work-piece slipping. This also makes it easier to operate the chainsaw with both hands. 36
37 Kick-back causes the saw to behave uncontrollably and thus brings with a slack or blunt chain. A poorly sharpened chain increases the risk of kickback. Never saw above shoulder height. OPERATION - TIPS ON CHAIN SAW USE Sawing blocks _ If possible, always use a saw horse. _ Always start a cut with the chain running and the serrated fender against the wood. _ Rotate the serrated fender against the wood to complete a cut. The way of sawing depends on the way the block is being supported. Full-length support (the block is on the ground): _ Make a vertical cut downwards. _ Make sure that you do not touch the ground. Support at both ends (the block is on the saw horse): _ Make a vertical cut downwards to one third of the longitudinal section. _ Rotate the block and lay it on the saw horse with the cut pointing downwards. _ Make a second cut towards the first cut. Support at one end (the block is on the saw horse): _ Make a vertical cut downwards. Sawing trees _ Make a horizontal cut to one third of the diameter of the trunk. Subsequently make a diagonal cut at a 45 angle from top to bottom so that a notch is created. _ Make a cut on the other side, but make sure that you do not saw through the notch. _ Place a wedge in the cut to make an opening and drop the tree. Felling trees is dangerous and requires practice. If you are a beginner or inexperienced, do not try to teach yourself but seek professional training. CLEANING AND MAINTENANCE Always pull the plug out of the power socket before doing any work on the chainsaw! Keep the cooling vents on the motor housing clean and unobstructed at all times. Only the maintenance work described in these operating instructions may be carried out. Any other maintenance work must be carried out by our Customer Service. Do not modify the power saw in any way as this could jeopardize its safety. Should the chainsaw fail despite our careful manufacturing and inspection procedures, have it repaired by an authorized Customer Service workshop. TECHNICAL DATA Mains voltage V Mains frequency Hz 50 Power input W 2000W Motor Speed min No load speed m/sec 12.1 Bar length mm cutting length 355mm Chain brake time ms Oil container capacity ml Weight kg < 0.12 sec 280ml 5kg Acoustic pressure level LpA 85.9 db(a) K = 3 db(a) Acoustic power level LwA 105,9 db(a) K = 2.36 db(a) Garantee : LwA 112 db(a) ATTENTION! The sound power pressure may exceed 85 db(a), in this case individual hearing protection must be worn. Weighted root mean square acceleration according to relevant standard. Main Handle: m / s ² Auxiliary handle: m / s ² K = 1.5 m / s ². 37
38 The declared vibration total value has been measured in accordance with a standard test method and may be used for comparing one tool with another that the declared vibration total value may also be used in a preliminary assessment of exposure. _ Protect it from exposure to direct sunlight. Keep it in the dark, if possible. _ Don t keep it in plastic bags to avoid humidity build-up. A warning that the vibration emission during actual use of the power tool can differ from the declared total value depending on the ways in which the tool is used and of the need to identify safety measures to protect the operator that are based on an estimation of exposure in the actual conditions of use (taking account of all parts of the operating cycle such as the times when the tool is switched off and when it is running idle in addition to the trigger time). GUARANTEE Refer to the enclosed guarantee conditions for the terms and conditions of guarantee. DISPOSAL Should your machine need replacement after extended use, do not put it in the domestic waste but dispose of it in an environmentally safe way. SERVICE DEPARTMENT _ Damaged switches must be replaced by our aftersales service department. _ If replacing the power cord is necessary, it should be done by the manufacturer or his agent to avoid a hazard. AFTER-SALES SERVICE AND APPLICATION SERVICE Our after-sales service responds to your questions concerning maintenance and repair of your product as well as spare parts. Exploded views and information on spare parts can also be found under: ELEM GARDEN TECHNIC application service team will gladly answer questions concerning our products and their accessories : sav@ecorepa.com STORAGE _ Thoroughly clean the whole machine and its accessories. _ Store it out of the reach of children, in a stable and secure position, in a cool and dry place, avoid too high and too low temperatures. Made in China
39 CZ / ŘETĚZOVÁ PILA ZAŘÍZENÍ Tento model je určen pro občasné použití pro majitele domů, chalupáře a táborníky, a pro takové všeobecné aplikace jako pročišťování, prořezávání stromů, řezání dříví, atd. Není určen pro dlouhodobé používání. Není určen pro komerční použití. OBECNÁ BEZPEČNOSTNÍ UPOZORNĚNÍ PŘI POUŽÍVÁNÍ VAROVÁNÍ Přečtěte si všechny bezpečnostní pokyny a všechny instrukce. Nedodržení varování a pokynů může způsobit úraz elektrickým proudem, požár a/nebo vážné zranění. Uchovejte veškeré bezpečnostní varování a pokyny pro budoucí použití. Termín "elektrické nářadí" ve všech upozorněních odkazuje na vaše nářadí napájené ze sítě (napájecím kabelem) nebo nářadí napájené baterií (bez napájecího kabelu). 1) Bezpečnost pracovního místa a) Udržujte pracoviště čistě a dobře osvětlené. Tmavá a nepřehledná pracoviště zvyšují riziko nehody. b) Neprovozujte elektrické nástroje v potenciálně výbušném prostředí, například v přítomnosti hořlavých kapalin, plynů nebo prachu. Elektrické nástroje produkují jiskry, které mohou prach nebo výpary zapálit. c) Při práci s elektrickým nástrojem udržujte děti a okolostojící osoby opodál. Mohou odvést vaši pozornost a ztratíte kontrolu nad nástrojem. 2) Electrická bezpečnost a) Vždy kontrolujte, zda přiváděné napětí odpovídá napětí uvedenému na typovém štítku. Zástrčky elektrického nástroje musejí odpovídat zásuvkám. Zástrčku nikdy nijak neupravujte. S uzemněnými elektrickými nástroji nepoužívejte nikdy rozvodné zástrčky. Riziko zasažení elektrickým proudem je menší u neupravovaných zástrček a kompatibilních zásuvek. b) Vyhýbejte se tělesnému kontaktu s uzemněnými povrchy například na trubkách, radiátorech, sporácích a ledničkách. Nebezpečí zasažení elektrickým proudem je větší, jestliže je vaše tělo uzemněné. c) Nevystavujte elektrické nástroje dešti nebo vlhkosti. Voda, která se dostane do elektrického nástroje, zvyšuje riziko zasažení elektrickým proudem. d) S kabelem zacházejte opatrně. Nikdy nástroj nenoste nebo netahejte na kabelu a nevytahujete zástrčku ze zásuvky tahem za kabel. Šňůru chraňte před teplem, olejem, ostrými hranami a pohybujícími se díly. Poškozené nebo zapletené kabely zvyšují riziko zasažení elektrickým proudem. e) Při práci s elektrickým nástrojem pod širým nebem používejte prodlužovací kabel vhodný k vnějšímu použití. Použití kabelu vhodného k vnějšímu použití zmenšuje riziko zasažení elektrickým proudem. f) Je-li práce s elektrickým nástrojem na vlhkém místě nevyhnutelná, použijte zdroj proudu chráněný spínačem proti zbytkovému proudu (RCD). Použití RCD zmenšuje riziko zasažení elektrickým proudem. 3) Osobní bezpečnost a) Při práci s elektrickým nástrojem buďte pozorní, sledujte, co děláte, a řiďte se zdravým rozumem. Nepracujte s elektrickým nástrojem, když jste unavení nebo pod vlivem drog, alkoholu nebo léků. Chvilková nepozornost při zacházení s elektrickým nástrojem může vést k vážnému osobnímu zranění. b) Používejte bezpečnostní vybavení. Vždy si chraňte zrak. Bezpečnostní vybavení, jakým je protiprašný respirátor, neklouzavá bezpečnostní obuv, ochranná přilba nebo chránič sluchu, které se použije, kdykoliv to okolnosti vyžadují, omezuje osobní zranění. c) Vyhýbejte se nahodilému spuštění. Před zasunutím zástrčky do zásuvky se ubezpečte, že je vypínač v poloze vypnuto. Nošení nástrojů s prstem na vypínači a připojování nástrojů k síti s vypínačem v poloze zapnuto zvyšuje riziko nehody. d) Před nastartováním nástroje odstraňte veškeré stavěcí klíny a klíče. Klín nebo klíč ponechaný v otáčivé části elektrického nástroje může způsobit úraz. e) Nesnažte se dosáhnout příliš daleko. Vždy si udržujte pevný postoj a rovnováhu. To vám umožní mít nástroj pod lepší kontrolou v neočekávaných situacích. f) Vhodně se oblékejte. Nenoste volné oblečení ani bižuterii. Udržujte své vlasy, oblečení a rukavice mimo dosah pohybujících se dílů. Volné oblečení, bižuterie nebo dlouhé vlasy se mohou zachytit v pohybujících se dílech. g) Jsou-li k dispozici mechanismy umožňující odvod a sběr prachu, zabezpečte jejich připojení a řádné používání. Použití těchto mechanismů snižuje rizika vyvolávaná prachem. 4) Použití elektrických strojů a jejich péče a) Neočekávejte od elektrického nástroje, co nemůže splnit. Používejte elektrický nástroj vhodný pro váš účel. Elektrický nástroj vykoná 39
40 svůj úkol lépe a bezpečněji, použije-li se tempem, pro které byl zkonstruován. b) Nepoužívejte elektrický nástroj, jestliže ho nelze vypínačem zapnout i vypnout. Každý elektrický nástroj, který nelze ovládat vypínačem, je nebezpečný a je třeba ho opravit. c) Před prováděním jakýchkoliv změn, výměnou příslušenství nebo ukládáním elektrických nástrojů odpojte zástrčku od zdroje energie. Taková preventivní bezpečnostní opatření snižují riziko náhodného zapnutí elektrického nástroje. d) Nepoužívané elektrické nástroje ukládejte mimo dosah dětí a nedovolte s nimi pracovat osobám, které nejsou obeznámeny s nástrojem ani s těmito pokyny. Elektrické nástroje jsou v rukách neškolených uživatelů nebezpečné. e) Provádějte údržbu elektrických nástrojů. Kontrolujte, zda nejsou pohyblivé díly nesprávně seřízené nebo zadřené, zda nejsou prasklé a zda na nich není patrné nic, co by se mohlo dotknout provozu elektrického nástroje. Při poškození dejte elektrický nástroj před použitím opravit. Mnoho nehod způsobují právě nedostatečně udržované elektrické nástroje. f) Řezné nástroje udržujte ostré a čisté. Je méně pravděpodobné, že by se řádně udržované řezné nástroje s ostrými břity někde zadrhly, a proto se ostré nástroje snáze ovládají. g) Používejte elektrický nástroj, příslušenství a nástrojové bity atd. v souladu s těmito pokyny a způsobem předepsaným pro konkrétní typ elektrického nástroje; přitom berte v úvahu pracovní podmínky a práci, již je třeba vykonat. Použití elektrického nástroje způsobem jiným, než pro který je určen, může vytvořit potenciálně nebezpečnou situaci. 5) Servis Servisní práce na přístroji přenechejte kvalifikovanému technikovi, který používá výhradně originální díly. Tak zajistíte bezpečnost Vašeho přístroje. BEZPEČNOSTNÍ VAROVÁNÍ Udržujte všechny části těla v dostatečné vzdálenosti od řetězu, pokud je motor v provozu. Předtím, než začnete pracovat s řetězovou pilu se ujistěte, že se řetěz ničeho nedotýká.moment nepozornosti při práci s pilou může vést k zapletení vašeho těla nebo oblečení do řetězu. Držte elektrické nářadí pouze za izolovanou rukojet, protože řetěz může přijít do kontaktu se skrytými vodiči nebo napájecím kabelem. Řetěz pily při kontaktu s "živým" vodičem udělá z nechráněné kovové části nářadí "živou" a mohlo by dojít k úrazu elektrickým proudem. Vždy držte pilu s pravou rukou na zadní rukojeti a levou rukou na přední rukojeti. Držení pily s obráceným pořadím zvyšuje riziko úrazu a nikdy by nemělo být provedeno. Používejte ochranné brýle a ochranu sluchu. Doporučuje se používat další ochranné pomůcky hlavy, rukou, nohou a chodidel. Adekvátní ochranný oděv sníží zranění způsobené letícími úlomky nebo náhodným kontaktem s pilovým řetězem. Nepoužívejte motorovou pilu na stromě. Provoz motorové pily v koruně stromu může způsobit zranění. Vždy mějte správný postoj a provozujte motorovou pilu pouze tehdy, když stojíte na pevném, bezpečném a rovném povrchu. Kluzké nebo nestabilní povrchy, jako jsou žebříky, mohou způsobit ztrátu rovnováhy nebo kontroly nad řetězovou pilou. Při řezání větví, které jsou v pnutí, dávejte pozor na zpětný ráz. Po uvolnění napětí ve vláknech dřeva napružené větve může tato zasáhnout provozovatele a/nebo můžete ztratit kontrolu nad pilou. Při řezání keřů a stromků buďte mimořádně opatrní. Štíhlý materiál může chytit řetěz a nechat se odmrštit směrem k vám nebo vás vyvést z rovnováhy. Držte řetězovou pilu za přední rukojeť s viditělně vypnutým řetězem a ve směru od vašeho těla. Při přepravě nebo skladování řetězové pily vždy nasaďte kryt vodicí lišty. Správná manipulace s řetězovou pilou sníží pravděpodobnost náhodného kontaktu s pohybujícím se řetězem pily. Dodržujte pokyny pro mazání, napínání řetězu a výměnu příslušenství. Nesprávně napnutý nebo namazaný řetěz se může přetrhnout nebo zvýšit riziko zpětného rázu. Udržujte rukojeti suché, čisté a bez oleje a tuku. Mastné rukojeti jsou kluzké a mohou způsobit ztrátu kontroly. Řezejte pouze dřevo. Nepoužívejte řetězovou pilu pro účely, pro které není určena. Například: nepoužívejte pilu pro řezání plastu, zdiva nebo nedřevěných stavebních materiálů. Použití řetězové pily pro jiný provoz, než k jakému je určena, může vést k nebezpečným situacím. PŘÍČINY A PREVENCE ZPĚTNÉHO RÁZU: Ke zpětnému rázu může dojít při dotyku nosu nebo hrotu vodicí lišty předmětu, nebo když se dřevo sevře a skřípne řetěz v řezu. V některých případech kontaktu může dojít k nečekanému kopání vodící lišty nahoru a dozadu směrem k obsluze. Sevření řetězu pily podél horní části lišty může tlačit na vodicí lištu rychle zpět směrem k obsluze. Každá z těchto reakcí může způsobit ztrátu kontroly nad pilou, která může mít za následek vážné zranění. Nespoléhejte se pouze na bezpečnostní prvky pily. Jako uživatel řetězové pily byste měli trvat na několika krocích, aby se snížil počt nehod nebo zranění. Zpětný ráz je důsledkem špatného použití a/nebo nesprávným pracovním postupem nebo podmínek a lze se mu vyhnout tím, že dodržíte néže uvedená příslušná opatření: Držte pevně, s palci a prsty obklopujícími rukojeť řetězové pily, s oběma rukama na pile a 40
41 mějte své tělo a paže v takové pozici, která vám umožní kompenzovat síly zpětného rázu. Síly zpětného rázu mohou být ovlivněny uživatelem, pokud jsou přijata příslušná bezpečnostní opatření. Nikdy nepouštějte řetězovou pilu. Nepřeceňujte se a neprovádětje řez nad úrovní ramen. To pomáhá zabránit nechtěnému kontaktu špičky a umožňuje lepší kontrolu nad motorovou pilou v neočekávaných situacích. Používejte pouze náhradní lišty a řetězy určené výrobcem. Nesprávné náhradní lišty a řetězy mohou způsobit přetržení řetězu a/nebo zpětný ráz. Doporučuje se, pro zvýšenou elektrickou bezpečnost, použít proudový chránič (RCD) s vypínacím proudem ne větším než 30 ma. Vždy zkontrolujte svůj proudový chránič při každém použití. Sledujte pokyny výrobce pro ostření a údržbu řetězu. Snížení hloubky řezné výšky může vést ke zvýšenému počtu zpětných rázů. Děti a mladiství, s výjimkou učňů pod dohledem starších než 16 let, nesmějí pracovat s pilou.totéž platí i pro osoby, které nevědí nebo nemají dostatečně znalosti o tom, jak zacházet s řetězovou pilu. Návod k obsluze musí být vždy po ruce. Osoby, které jsou nezpůsobilé nebo unavené, nesmí provozovat pilu. Vždy se ujistěte, že všechny jsou všechny rukojeti a kryty při používání stroje upevněné. Nikdy se nepokoušejte používat nekompletní stroj nebo stroj s neoprávněnou úpravou. Doporučuje se, aby byl poprvé uživatel poučen praktickou výukou používání pily a ochranných prostředků od zkušeného uživatele. Počáteční praxe by měla být pořez kulatiny. Vždy počkejte, až se stroj úplně zastaví, než jej odložíte. Řetěz nástroj se může vzpříčit a vést ke ztrátě kontroly nad elektrickým nářadím. Nikdy nepoužívejte stroj s poškozeným kabelem. Nedotýkejte se poškozeného kabelu a vytáhněte zástrčku ze zásuvky, když je kabel poškozen. Poškozené kabely zvyšují riziko úrazu elektrickým proudem. Napájecí kabel musí být vždy za obsluhou pily. Napájecí kabel musí vždy vést od zadní části pily. BEZPEČNOSTNÍ INSTRUKCE Tyto bezpečnostní pokyny je nutné při použití motorové pily dodržovat. Pro vlastní bezpečnost a bezpečnost ostatních, přečtěte si, prosím, tuto informaci pozorně před použitím motorové pily a uložte jej na bezpečném místě pro další použití. S motorovou pilou je možno řezat pouze dřevo nebo předměty vyrobené ze dřeva. Jakékoliv jiné typy použití jsou na vlastní nebezpečí a mohou být nebezpečné. Výrobce nenese zodpovědnost za škody způsobené nevhodným nebo nesprávným použitím. Bezpečnostní pokyny a předcházení nehodám Chcete-li zabránit nesprávné manipulaci s řetězovou pilou, prosím, před prvním použitím motorové pily si přečtěte návod k použití v plném rozsahu. Veškeré informace o manipulaci s motorovou pilou jsou relevantní pro vaši osobní bezpečnost. Zeptejte se odborníka, aby vám ukázat, jak používat motorovou pilu! _ Před připojením do zásuvky zkontrolujte konektor a kabel z hlediska poškození. Pokud je zjištěno poškození, nechte ho okamžitě opravit odborníkem. _ Nikdy nepoužívejte poškozený kabel, zásuvku, zástrčku, nebo napájecí kabel, který není v souladu s požadavky. Pokud je kabel poškozen nebo přerušen, okamžitě odpojte. _ Vypněte pilu vypněte před uvolněním brzdy řetězu. _ Při práci s motorovou pilou vždy používejte ochranné brýle a ochranné rukavice. _ Aby nedošlo ke zranění, noste přiléhavé oblečením a bezpečnostní obuv. _ Aby nedošlo k poškození sluchu, noste klapky na uši. Přilby s hledím jsou zvláště výhodné. _ Ujistěte se, že máte pevný postoj při práci s motorovou pilou. _ Udržujte pořádek na svém pracovním místě. _ Aby nedošlo k úrazu elektrickým proudem, vyhněte se kontaktu s uzemněnými částmi. _ Vždy vytáhněte zástrčku ze zásuvky před zahájením prací na motorové pile. _ Připojujte pouze tehdy, když je řetězová pila vypnuta. _ Motorová pila musí být používána najednou pouze jednou osobou. Všechny ostatní osoby se musí zdržovat mimo plochu dosahu motorové pily. Děti a zejména domácí zvířata musí být udržovány v dostatečné vzdálenosti za všech okolností. _ Při startu se pila nesmí ničeho dotýkat. _ Při práci držte pilu pevně oběma rukama. _ Řetězová pila se nesmí používat dětmi a mladými lidmi. Jedinou výjimkou z tohoto zákazu, jsou mladí lidé do 16 let věku, kteří mohou používat motorovou pilu pod dohledem jako součást jejich výcviku. Půjčujte pilu pouze těm osobám, kteří jsou obeznámeni s tímto typem řetězové pily a vědí, jak s ní zacházet. Vždy předejte návod k obsluze spolu s motorovou pilou. _ Ujistěte se, že řetězová pila je uložena na místě nepřístupném dětem. _ Pilu mohou obsluhovat pouze osoby, které jsou odpočinuté a v dobrém zdravotním stavu, tedy v dobré fyzické kondici. Pokud začnete být unaveni, 41
42 udělejte si dostatečnou přestávku. Motorová pila nesmí být používána po konzumaci alkoholu. _ Nevystavujte pilu dešti nebo špatnému počasí. Ujistěte se, že máte dostatek světla v místě výkonu práce. Nepoužívejte elektrické nářadí v blízkosti hořlavých kapalin nebo plynů. _ Pokud není motorová pila používána, je třeba zajistit, aby nebyla ohrožena žádná jiná osoba. _ Vyjměte pilu ze dřeva pouze tehdy, pokud řetěz ještě běží. _ Při stání na žebříku, na stromě nebo v jiných nestabilních místech nikdy nepoužívejte motorovou pilu. Nepoužívejte pilu pouze jednou rukou. _ Napájecí kabel musí být vždy za obsluhou pily. _ Napájecí kabel musí vždy vést od zadní části pily. _ Používejte pouze originální příslušenství. _ Pily pro venkovní použití musí být připojeny až do svodového jističe. _ Nepřetěžujte své elektrické nářadí. Pracuje nejlépe a nejbezpečněji v daném rozsahu kapacit. _ Vždy používejte správné nářadí. Nepoužívejte nízce poháněné pily pro těžká pracovní místa. _ Používejte kabel pouze k jeho účelu. Nikdy nenoste vaše elektrické nářadí za jeho kabel. Nepoužívejte kabel pro vytáhnutí zástrčky ze zásuvky. Chraňte kabel před horkem, olejem a ostrými hranami. _ Prodlužovací kabely pro venkovní použití. _ Používejte pouze povolené náležitě označené prodlužovací kabely pro venkovní použití. _ Při řezání nepevného dřeva a tenkých větví používejte silnou podporu. _ Klády a trámy musejí být v zajištěné poloze. _ Na svazích vždy pracujte směrem vzhůru. _ Při řezání vždy nastavte doraz s hroty proti dřevu, které chcete řezat. _ Vždy nastavte dráp zastávku před křížovým řezáním. Teprve pak se přepněte na motorovou pilu a začít řezat do dřeva. Vytáhněte pilu směrem nahoru na zadní straně a veďte směrem k přední rukojeti. Použijte doraz s hroty jako otočný bod. Pro další řezání přerušte proces řezání a vyvíjejte mírný tlak na přední rukojeť. Vytáhněte pilu dozadu trochu posuňte doraz s hroty dále po řezu a vytáhněte zadní rukojeť. _ Vytáhněte pilu ze dřeva, jen když je spuštěn řetěz. _Chcete-li provést několik řezů, vypněte mezi nimi pilu. _ Ponorné řezy a horizontální řezy mohou být prováděny pouze profesionály. _ Pro vodorovné řezy použijte co nejmenší úhel. To vyžaduje extrémní opatrnost, protože doraz s hroty nelze v tomto případě použít. _ V případě, že řetěz uvízne při řezání s horní stranou, může být vytažen směrem k obsluze. Z tohoto důvodu je třeba všude tam, kde je to možné, řezat spodní stranou pily - tah od těla směrem ke dřevu. _ Věnujte zvýšenou pozornost při řezání nepevného dřeva. Odřezané kusy dřeva mohou být odhazovány v libovolném směru (nebezpečí poranění!) _ Nepoužívejte pilu k odstranění hřebíků nebo podobných objektů. _ Při odvětvování by řetězová pila by měla být vedena, všude tam, kde je to možné, proti kmenu, nesmí řezat špičkou vodicí lišty. _ Odvětvovací práce by měla být provedena proškoleným personálem! Nebezpečí úrazu! _ Zvláštní pozornost věnujte větvím v tlaku. Neřezejte volně zavěšené větve zespodu. _ Nikdy nestůjte na kmeni, když provádíte odvětvování. _ Motorová pila by neměla být používán pro práci v lese, tedy pro kácení a odvětvování v lese. Vzhledem k připojení kabelu pily nemá uživatel potřebnou mobilitu a není zaručena jeho bezpečnost! _ Vždy stojí na straně stromu je je již pokáceno. _ Při kácení stromu dávejte pozor na padající větve. _ Na svahu by obsluha pily měla stát na horní nebo levé nebo pravé straně prostoru nebo káceného stromu, nikdy na spodní straně. _ Dejte si pozor na klády valící se směrem k vám. Nebezpečí úrazu! _ Při použití motorové pily je pravděpodobné, že nastane zpětný ráz, pokud se špička vodicí lišty (zejména horní čtvrtina) náhodně dotkne dřeva nebo jiného pevného předmětu. V tomto případě se bude pila pohybovat nekontrolovaně a bude odhozena k obsluze při plném výkonu (nebezpečí poranění!). _ Při práci s motorovou pilou by měly být používány ochranné rukavice, vhodná obuv, chrániče nohou, oční chrániče a chrániče sluchu. _ Pokud práce zahrnuje jakékoli riziko poranění hlavy, musí být použita bezpečnostní přilba při kácení stromů a řezání a odřezávání větví pokácených nebo padlých stromů. Kromě toho by měla být použita ochana tváře. _ Před pokusem o zkontrolu nebo úpravu řetězu nebo opravení nějaké chyby, a vždy, když přecházíte z jednoho pracoviště na druhé, vždy vytáhnout zástrčku ze zásuvky. _ Nikdy nezapínejte motorovou pilu, pokud nemáte pevné držení stroje, bezpečný postoj a nejste si jisti, že se vodicí lišta a řetěz ničeho nedotýkají. _ Vždy držte pilu oběma rukama (pravou ruku na zadní rukojeti, levou rukou na přední rukojeti). _ Nikdy neřežte nad úrovní ramen, pokud stojíte na žebříku nebo na stromě nebo v jiné nejisté pozici. _ Při řezání dřeva dejte pozor, aby se žádné malé kousky dřeva neodlomily a neohrozily řetězu. _ Během přestávek by měla být pila umístěna tak, aby neexistovalo nebezpečí zranění nikoho z okolí. _ Řetězová pila nesmí být zapůjčena nebo nesmí být umožněno, aby se dostala do rukou osob, které nejsou obeznámeny s použitím tohoto nástroje. ZPĚTNÝ RÁZ Aby se zabránilo nebezpečí zpětného rázu, prosím, dodržujte bezpečnostní pokyny: _ Nikdy nezačínejte řezání špičkou vodicí lišty! _ Nikdy neřezejte špičkou vodicí lišty! Buďte opatrní, když pokračujete na již uskutečněných řezech! _ Vždy začněte řezy s již běžící motorovou pilou! _ Ujistěte se, že řetěz je vždy řádně nabroušený. _ Nikdy neřezejte více než jednu větve najednou! Při odvětvování dávejte pozor, abyste se nedotkli žádné další větve. 42

43 _ Při průřezech dávejte pozor na kmeny stojí velmi blízko u sebe. Přečtěte si návod před použitím TRANSPORT MOTOROVÉ PILY Před přepravou motorové pily vždy vytáhněte zástrčku ze zásuvky a posuňte kryt řetězu přes lištu a řetěz. Jestliže je prováděno několik řezů motorovou pilou, musí být pila mezi řezy vypínána. PŘED SPUŠTĚNÍM _ Napětí a proud musí být v souladu s údaji na typovém štítku. _ Před zahájením práce vždy zkontrolujte, zda motorová pila funguje správně a bezpečně pracuje. _ Zkontrolujte také, že mazání řetězu a měrka oleje jsou v dobrém stavu. Pokud je hladina olej cca. 5 mm od spodního ochranné známky, je třeba doplnit olej. Pokud je hladina oleje vyšší, můžete pracovat bez obav. _ Zapněte řetězovou pilu a držte ji nad zemí. Dávejte pozor, aby se řetězová pila nedotýkala země. Z bezpečnostních důvodů je nejlepší, aby byl volný prostor alespoň 20 cm. Pokud jsou nyní vidět rostoucí stopy oleje, mazací systém řetězu pracuje správně. Pokud nejsou žádné stopy oleje vidět vůbec, zkuste vyčistit výstup oleje, horní napínání řetězu a olejové potrubí, nebo se obraťte na zákaznický servis. _ Zkontrolujte napnutí řetězu a utáhněte, pokud je to nutné. _ Ujistěte se, že brzda řetězu funguje správně. Používejte osobní ochranné pomůcky. V podstatě používejte ochranné brýle nebo ještě lépe obličejový štít, ochranu sluchu, ochrannou přilbu, ochranný pracovní oděv, ochrannou bezpečnostní obuv s protiskluzovou podrážkou. Dejte si pozor na odlétající předměty. Udržujte osoby v bezpečné vzdálenosti Udržujte zařízení mimo blízkost lidí. Udržujte osoby v bezpečné vzdálenosti Nikdy nepoužívejte stroj v dešti nebo ve vlhkém prostředí. Nebezpečí úrazu elektrickým proudem. Vyjměte zástrčku ze zásuvky ihned, pokud je kabel poškozen nebo přerušen. SYMBOLY Prosím, mějte pokyny bezpečně uložené pro pozdější použití. Vysvětlení symbolů na pile: Informace o hladině akustického výkonu LWA v db. Třída. II Dvojitá izolace Piktogramy: Upozorňuje na riziko poranění osob nebo poškození nářadí. Seznamte se se všemi ovládacími prvky před jakoukoli prací. Vyzkoušejte se manipulaci s pilou a objasněte si funkce, provozní metody a techniku řezání se zkušeným uživatelem nebo specialistou. Stroj nepatří do domácího odpadu. VAROVÁNÍ: Balicí materiály nejsou hračky! Děti nesmějí hrát s plastovými sáčky! Nebezpečí udušení! 43
44 ELECTRICKÁ BEZPEČNOST Vždy zkontrolujte napětí uvedené na typovém štítku nástroje, zda odpovídá napětí vaší sítě. Před montáží vodicí lišty s řetězem, zkontrolujte směr řezání zubů! Směr běhu je označen šipkou na krytu (6). Pro správný směr řezu může být nezbytné obrátit řetěz (4). Držte vodicí lištu (7) svisle špičkou směřující vzhůru a umístěte řetěz (4), začínejte na špičce lišty. POPIS PRODUKTU Tento model je určen pro občasné použití pro majitele domů, chalupáře a táborníky, a pro takové všeobecné aplikace jako pročišťování, prořezávání stromů, řezání dříví, atd. Není určen pro dlouhodobé používání. Není určen pro komerční použití. 1. Zadní rukojeť 2. Přední rukojeť 3. Přední chránič prstů / Brzda řetězu 4. Řetěz 5. SDS systém 6. Kryt vodící lišty 7. Vodící lišta 8. Zadní chránič prstů 9. Napájecí kabel 10. Doraz s hroty 11. Bezpečnostní tlačítko 12. Hák na kabel 13. ON/OFF vypínač 14. Víčko olejové nádrže 15. Měrka oleje 16. Řetězové kolo 17. Vodící kolo Poté namontujte vodicí lištu s řetězem následovně: - Umístěte vodící lištu s řetězem pily na řetězové kolo (16) a vodicí šroub (17). - Umístěte řetěz kolem řetězového kola (16) a ujistěte se, že je správně namontován. - Umístěte kryt (6) na vrchní stranu a lehce utáhněte pojistnou maticí (5). Nyní musí být pilový řetěz správně napnut. NAPNUTÍ ŘETĚZU Vždy vytáhněte zástrčku ze zásuvky před zahájením prací na motorové pile! MONTÁŽ ŘETĚZU V případě, že je již řetězová pila připojena k napájení: vytáhněte zástrčku ze zásuvky. Používejte ochranné rukavice při jakýchkoliv pracích na řetězu. Důležité: Přední chránič prstů (3) musí být vždy v poloze nahoře (vertikální). Vodící lišta a řetěz jsou dodávány samostatně. Při montáži vyšroubujte zajišťovací matici (5) a odstraňte kryt vodící lišty (6). Vodící čep (17) musí být ve středu vedení. Pokud je to nutné, upravte napnutí pomocí řetězového kola (16). Aby nedošlo ke zranění o ostré břity, vždy používejte rukavice při montáži, napínání a kontrole řetězu. Používejte ochranné rukavice! Otočte vnější ovladač po směru hodinových ručiček, dokud se řetěz správně nenapne, poté otočte vnitřní ovladač (5) a zablokujte vodicí lištu v této poloze. Zatímco je vnitřní ovladač utažen, vodící lišta musí být tlačena vzhůru. Znovu zkontrolujte napnutí řetězu (viz obr. 3). Nenapínejte řetěz příliš pevně. Za studena, by mělo být možné zvednout řetěz ve středu vodicí lišty o cca. 5 mm. Utáhněte bezpečně matici (5). Po zahřátí se řetěz roztáhne a trochu povolí. Je zde nebezpečí zklouznutí z vodící lišty. V případě potřeby upravne napnutí řetězu. V případě, že řetěz je znovu napnut za tepla, je nutné jej znovu uvolnit, když jsou řezací práce dokončeny. V opačném případě by stahování, které probíhá jako následek chladnutí, mělo za následek příliš vysoké napětí. 44
45 Nový řetěz vyžaduje záběh cca 0,5 minuty. Mazání řetězu je v této fázi velmi důležité. Po spuštění zkontrolujte napnutí řetězu a v případě potřeby upravte napnutí. Před kontrolou a napnutím řetězu nikdy nezapomeňte odpojit nářadí. PLNĚNÍ OLEJOVÉ NÁDRŽE Aby se zabránilo vniknutí nečistot do nádrže, očistěte víčko olejové nádrže (21) před otevřením. Kontrolujte obsah olejové nádrže v průběhu řezání kontrolou měrky oleje (15). Uzavřete víčko olejové nádrže pevně a setřete rozlití. ZAJIŠTĚNÍ PRODLUŽOVACÍHO KABELU Používejte pouze prodlužovací kabel určený pro venkovní použití. Průřez kabelu (maximální délka prodlužovacího kabelu max. 75 m) musí být minimálně 1,5 mm². Zabezpečte prodlužovací kabel motorové pily vložením prodlužovacího kabelu do háku pro kabel. Prodlužovací kabel delší než 30 m sníží výkon motorové pily. MAZÁNÍ ŘETĚZU Aby se zabránilo nadměrnému opotřebení, řetěz a vodící lišta musí být rovnoměrně mazány během provozu. Mazání je automatické. Nikdy nepracujte bez mazání řetězu. V případě, že řetěz vyschne, celá řezací zařízení může být rychle vážně poškozeno. Proto je důležité kontrolovat jak mazání řetězu, tak měrku oleje při každém použití (obr. 4). Nikdy nepoužívejte pilu, když je hladina oleje pod značkou "Min.". Min.: pokud je vidět pouze cca. 5 mm oleje na dolním okraji měrky oleje (15), je třeba doplnit olej. okénka. Max.: doplňte olejem do zaplnění KONTROLA AUTOMATICKÉHO MAZÁNÍ Před zahájením práce zkontrolujte automatické mazání řetězu a měrku oleje. Zapněte pilu a držte ji nad zemí. Dávejte pozor, aby se motorová pila nedotýkala země. Z bezpečnostních důvodů je nejlepší, aby byl volný prostor alespoň 20 cm. Pokud jsou nyní vidět rostoucí stopy oleje, mazací systém řetězu pracuje správně. V případě, že nejsou vidět vůbec žádné stopy oleje, zkuste vyčistit výstup oleje, horní napínání řetězu a olejové potrubí, nebo se obraťte na zákaznický servis. ŘETĚZOVÉ OLEJE Životnost pilových řetězů a vodících lišt závisí do značné míry na kvalitě použitého maziva. Nesmí se používat starý olej! Používejte pouze mazivo šetrné k životnímu prostředí. Obchodní řetězec mazivo pouze v nádobách, které jsou v souladu s předpisy. VODÍCÍ LIŠTA Vodicí lišta (7) je vystavena především těžkému opotřebení na špičku a dolní část. Aby se zabránilo jednostrannému opotřebení, otočte vodicí lištu pokaždé, když brousíte řetěz. ŘETĚZOVÉ KOLO Řetězové kolo (16) je vystaveno zvláště vysokému opotřebení. Pokud si všimnete hlubokých stop opotřebení na zubech, musí být řetězové kolo vyměněno. Opotřebované řetězové kolo zkracuje životnost řetězu. Nechte řetězové kolo vyměnit u odborného prodejce nebo v zákaznickém servisu. KRYT ŘETĚZU Kryt řetězu musí být umístěn na řetěz a vodící lištu vždy, jakmile jsou řezací práce dokončeny a vždy, když je motorová pila přepravována. BRZDA ŘETĚZU V případě zpětného rázu bude brzda řetězu (3) ovládána pomocí předního chrániče prstů. Přední chránič prstů je tlačen dopředu hřbetem ruky, a to způsobí, že brzda řetězu zastaví řetězovou pilu, nebo spíše motor, do 0,15 s. UVOLNĚNÍ BRZDY ŘETĚZU Aby bylo možné používat pilu znovu, musíte opět uvolnit řetězu. Nejprve vypněte pilu. Pak zatlačte přední chránič prstů (3) zpět do svislé polohy, dokud nezapadne na místo. Brzda řetězu je nyní opět plně funkční. BROUŠENÍ ŘETĚZU PILY Můžete mít svůj řetěz rychle a správně nabroušený u prodejců, u nichž si můžete také zakoupit zařízení pro broušení, které vám umožní nabrousit řetěz svépomocí. Prosím, dodržujte odpovídající návod k použití. Starejte se o své nástroje. Udržujte své nástroje ostré a čisté, které vám umožní dobře a bezpečně fungovat. Dodržujte předpisy pro údržbu a pokyny pro změnu nástroje. 45
46 NÁVOD K POUŽITÍ Vždy používejte ochranné brýle, chrániče sluchu, ochranné rukavice a vysokozátěžové pracovní oblečení! Používejte pilu pouze se schválenými prodlužovacími kabely s předepsanou izolaci a spoje určené pro venkovní použití (schválené gumové opláštění kabelů), které jsou vhodné pro zástrčku řetězové pily. Řetězová pila je vybavena dvěma bezpečnostními spínači, vyžadující použití obou rukou. Řetězová pila funguje jen tehdy, když jednou rukou držíte přední rukojeť (2) a druhou rukou ovládáte vypínač na zadní rukojeti (1). V případě, že motorová pila neběží, musí být brzda řetězu uvolněna na předním chrániči prstů (3). Nezapomeňte si přečíst sekce "BRZDA ŘETĚZU" a "UVOLNĚNÍ BRZDY ŘETĚZU" v tomto bodě. Po zapnutí začne řetězová pila běžet okamžitě při vysoké rychlosti. Nepoužívejte pilu nad úrovní ramen. Používejte zařízení pouze pro práci se suchým dřevem. Pokud používáte tento přístroj poprvé, je vhodné pracovat na řezacím koni. Nikdy nezačínejte řezání před tím, než stroj běží na plné obrátky a než se ozubený doraz dotkne dřeva. Vždy vytvořte nový řez. Nikdy nepoužívejte předchozí řez pro pokračování řezání. ZAPNUTÍ A VYPNUTÍ Uvolněte ON/OFF (13) vypínač na zadní straně. Uvolnění ON/OFF vypínače způsobí zastavení pily v 1 s. To je normální a bezpečné pro řádné fungování pily. Po práci s motorovou pilou byste měli vždy: vyčistit řetěz pily, vodící lištu a nasadit kryt řetězu. OCHRANA ŘETĚZOVÉ PILY Nikdy nepoužívejte pilu v dešti nebo ve vlhkých podmínkách. Je-li prodlužovací kabel poškozen, vytáhněte ihned zástrčku ze zásuvky. Nikdy nepracujte s poškozeným kabelem. _ Zkontrolujte poškození motorové pily. Před použitím nářadí znovu zkontrolujte bezpečnostní zařízení nebo jakékoliv mírně poškozené díly a ujistěte se, že jsou v dobrém stavu. _ Zkontrolujte, zda pohyblivé díly fungují správně. _ Všechny díly musí být správně sestaveny a splňovat všechny podmínky pro zajištění správného fungování motorové pily. _ Poškozené bezpečnostní zařízení a díly musí být ihned řádně opraveny nebo vyměněny v servisním středisku, nejsou-li opačné pokyny v návodu k obsluze. POKYNY PRO PRÁCI Zpětný ráz. Můžete se vyhnout nehodám tím, že nebudete řezat špičkou vodicí lišty, protože to může způsobit náhlý zpětný ráz pily. Při práci s pilou používejte vždy kompletní bezpečnostní vybavení a oblečení. Zpětný ráz je zpětný pohyb vodící lišty nahoru, který muže nastat v případě, že řetěz na špičce vodicí lišty narazí na překážku. Pro usnadnění práce držte řetězovou pilu oběma rukama. Špatně naostřený řetěz zvyšuje riziko zpětného rázu. Nikdy nepracujte nad úrovní ramen. TIPY PRO POUŽITÍ ŘETĚZOVÉ PILY Řezání bloků _Je-li to možné, vždy používejte řezacího koně. _ Vždy začínejte řez s běžícím řetězem a zoubkovaným dorazem proti dřevu. _ Otočte zoubkovaný doraz proti dřevu pro dokončení řezu. Způsob řezání závisí na způsobu uchycený řezaného bloku. Podpora v celé délce (blok je na zemi): _ Proveďte vertikální řez směrem dolů. _ Ujistěte se, že se nedotýkáte země. Podpora na obou koncích (blok je na řezacím koni): _ Provede kolmý řez směrem dolů do jedné třetiny v podélném řezu. _ Otočte blok a položte jej na koně řezem směrem dolů. _ Uskutečněte druhý řez směrem k prvnímu řez. Podpora na jednom konci (blok je na řezacím koni): _ Proveďte vertikální řez směrem dolů 46
47 Řezání stromů _ Proveďte vodorovný řez do jedné třetiny průměru kmene. Následně provést diagonální řez pod úhlem 45 od shora dolů, takže vytvoříte zářez. _ Proveďte řez na druhé straně, ale ujistěte se, že neproříznete zářez. _ Umístěte klín v řezu pro zvětšení otvoru a porazte strom. Kácení stromů je nebezpečné a vyžaduje praxi. Pokud jste začátečník nebo nezkušený, nesnažte se učit sami, ale vyhledejte odbornou pomoc. POZOR! Když akustický tlak překročí hodnotu 85 db (A), je nutné nosit osobní ochranné prostředky sluchu. Hladina vibrací do ruky/paže podle příslušné normy: Hlavní rukojeť: m / s ² Přídavná rukojeť: m / s ² K = 1.5 m / s ². ČIŠTĚNÍ A ÚDRŽBA Pozor! Před prací na zařízení, vytáhněte zástrčku ze zásuvky. Udržujte hladící otvory v krytu motoru čisté a nezakryté za všech okolností. Pouze údržbářské práce popsané v tomto návodu k obsluze mohou být provedeny. Jakékoli další údržbářské práce musí být prováděny naším servisem pro zákazníky. Neměňte motorovou pilou v žádném případě, protože to by mohlo ohrozit její bezpečnost. V případě, že motorová pila i přes naše pečlivé výrobní a kontrolní postupy porouchá, nechte ji opravit v našem servisním středisku. TECHNICKÁ DATA Jmenovité napětí V Jmenovitá frekvence 50 Hz Jmenovitý výkon 2000 W Otáčky 7000 min -1 Rychlost na prázdno 12.1 m/s Délka lišty mm Řezná délka 355 mm Zastavení řetězu Kapacita olejové nádržky Hmotnost < 0.12 sec 280 ml 5 kg Hladina akustického tlaku LpA 85.9 db(a) K = 3 db(a) Hladina akustického výkonu LwA 105,9 db(a) K = 2.36 db(a) Celková hodnota deklarovaných vibrací byla měřena podle standardní zkušební metody a může být použita pro srovnání jednoho nástroje do druhého; což znamená, že celková hodnota deklarovaných vibrací může být také použita k předběžnému stanovení hodnot. Otázka vibrací při aktuálním použití elektrického nářadí se může lišit od hodnoty vykázané způsoby použití nástroje; to znamená, že je třeba určit bezpečnostní opatření, která chrání obsluhu, které jsou založeny na odhadu hodnot v aktuálních podmínkách použití (s ohledem na všechny základní části pracovního cyklu, jako je výpadek provozu nástroje, a operací konajících se v době spouštění). ZÁRUKA Informace naleznete v přiložených záručních podmínkách. LIKVIDACE Pokud jste se rozhodli vyměnit zařízení, nevyhazujte jej s domácím odpadem, ale zlikvidujte ho v souladu k životnímu prostředí. SERVISNÍ INFORMACE _ Poškozený vypínač musí být nahrazena v našem servisním středisku. _ Chcete-li vyměnit napájecí kabel, je zapotřebí, aby toto být provedeno výrobcem nebo jeho zástupcem, aby nedošlo k úrazu. Garantovaná: LwA 112 db(a) 47
48 ZÁKAZNICKÝ SERVIS A PODPORA Náš zákaznický servis odpovídá na otázky týkající se opravy a údržby vašich částí výrobků a náhradních dílů. Další dotazy a informace na info@mataczech.cz SKLADOVÁNÍ _ Důkladně vyčistěte celý stroj a jeho příslušenství. _ Uložte ho z dosahu dětí, ve stabilní a bezpečné poloze, na chladném a suchém místě, vyhněte se příliš vysokým a příliš nízkým teplotám. _ Chraňte jej před vystavením přímému slunečnímu světlu. Uchovávejte ve tmě, pokud je to možné. _ Nenechávejte v igelitových pytlích, aby se zabránilo vlhkosti nahromadění. Vyrobeno v Číně
49 FR Ne jamais laisser un enfant ou une autre personne n ayant pas pris connaissance des instructions d utilisation se servir de la machine. Il est possible que les réglementations locales fixent une limite d âge minimum de l utilisateur. Gardez la machine non utilisée hors de la portée des enfants. Cet appareil n est pas prévu pour être utilisé par des personnes (y compris les enfants) dont les capacités physiques, sensorielles ou mentales sont réduites, ou des personnes dénuées d expérience ou de connaissance, sauf si elles ont pu bénéficier, par l intermédiaire d une personne responsable de leur sécurité, d une surveillance ou d instructions préalables concernant l utilisation de l appareil.». Il convient de surveiller les enfants pour s assurer qu ils ne jouent pas avec l appareil. Laat kinderen of personen die deze voorschriften niet gelezen hebben de machine nooit gebruiken. In uw land gelden eventueel voorschriften ten aanzien van de leeftijd van de bediener. Bewaar de machine buiten het bereik van kinderen wanneer deze niet wordt gebruikt. Dit gereedschap is er niet voor bestemd om te worden gebruikt door personen (inclusief kinderen) met beperkte fysieke, zintuigelijke of geestelijke vermogens of gebrekkige ervaring en/of gebrekkige kennis, tenzij zij onder toezicht staan van een voor hun veiligheid verantwoordelijke persoon, of zij van deze persoon instructies ontvangen ten aanzien van het gebruik van het gereedschap. Het moet toezicht houden op kinderen om ervoor te zorgen dat zij niet met het apparaat spelen. Never allow children or people unfamiliar with these instructions to use the machine. Local regulations may restrict the age of the operator. When not in use store the machine out of reach of children. This tool is not intended for use by persons (including children) with reduced physical, sensory or mental capabilities, or lack of experience and knowledge, unless they have been given supervision or instruction concerning use of the appliance by a person responsible for their safety. It should supervise children to ensure they do not play with the device. NL GB CZ Nikdy nedovolte, aby děti nebo osoby, které nejsou seznámeny s těmito pokyny, používali přístroj. Místní předpisy mohou omezovat věk obsluhy. Pokud ne, při použití umístěte přístroj mimo dosah dětí. Tento přístroj není určen pro použití osobami (včetně dětí) se sníženými fyzickými, smyslovými nebo duševními schopnostmi, nebo bez patřičných zkušeností a znalostí, pokud jim nebyl poskytnut dohled nebo instrukce týkající se použití výrobku osobou odpovědnou za jejich bezpečnost. Je třeba dohlížet na děti, aby se zajistilo, že si nebudou hrát se zařízením. 49
50 SN : :0001~ Date d arrivée: 15/01/2015 Année de production : 2014 FR Déclaration de conformité Nous «ELEM GARDEN TECHNIC» certifions par la présente que la machine spécifiée ci-après répond de par sa conception et son type de construction ainsi que de par la version que nous avons mise sur le marché aux prescriptions fondamentales stipulées en matière de sécurité et d hygiène par les directives européennes en vigueur. Toute modification apportée à la machine sans notre accord rend cette déclaration invalide. Produit: TRONCONNEUSE A CHAINE Type: TRE2042SO Directives européennes en vigueur : 2006/42/CEE 2004/108/CEE 2002/95/ CEE 2005/88/CEE Normes harmonisées appliquées : EN /A2:2011 EN /A2:2008 EN /A2:2009 EN :2000 EN /A11:2010 EN /A1:2010 Niveau de puissance acoustique db(a) Garanti : Lwa = 112 db (A) ELEM GARDEN TECHNIC, 81 rue de Gozée 6110 Montigny-le-Tilleul Belgique Belgique,Novembre 2014 Mr Joostens Pierre Président-Directeur Général ELEM GARDEN TECHNIC, rue de Gozée 81, 6110 Montigny-le-Tilleul, Belgique Tél : 0032 (0) Fax : 0032 (0) Dossier technique auprès de : info@eco-repa.com Caractéristiques techniques Produit: TRONCONNEUSE ELECTRIQUE Type: TRE2042SO Tension du réseau V Fréquence du réseau Hz 50 Puissance W 2000 Poids kg 5 Niveau de la pression sonore mesuré sur le lieu de travail : LpA (pression sonore) db(a) 85.9 K= 3 db(a) LWA (puissance sonore) db(a) K= 2.36 db(a) Valeur quadratique moyenne pondérée de l'accélération selon la norme applicable : Poignée principale : m/s² Poignée auxiliaire : m/s² K = 1.5 m/s² 50
51 SN : :0001~ Aankomstdatum: 15/01/2015 Productiejaar: 2014 NL EG-verklaring van overeenstemming Hierbij «ELEM GARDEN TECHNIC» verklaren wij dat de hierna vermelde machine door haar ontwerp en bouwwijze en in de door ons in de handel gebrachte uitvoering voldoet aan de betreffende fundamentele veiligheidsen gezondheidseisen, zoals vermeld in de desbetreffende EG-richtlijnen. Deze verklaring verliest haar geldigheid wanneer zonder overleg met ons veranderingen aan de machine worden aangebracht. Product: KETTINGZAAG Type : TRE2042SO Van toepassing zijnde EG-richtlijnen 2006/42/EEG 2004/108/ EEG 2002/95/ EEG 2005/88/EEG Toegepaste geharmoniseerde normen EN /A2:2011 EN /A2:2008 EN /A2:2009 EN :2000 EN /A11:2010 EN /A1:2010 Geluidsvermogensniveau db(a) Gegarandeerd: LwA 112 db(a) ELEM GARDEN TECHNIC 81 rue de Gozée 6110 Montigny-le-Tilleul Belgique België, November 2014 Mr Joostens Pierre Directeur ELEM GARDEN TECHNIC, rue de Gozée 81, 6110 Montigny-le-Tilleul, Belgique Tél : 0032 (0) Fax : 0032 (0) Technisch dossier bij: info@eco-repa.com Technische Daten Product: KETTINGZAAG Type : TRE2042SO Netspanning V Netfrequentie Hz 50 Vermogen W 2000 Gewicht kg 5 Niveau van de geluidsdruk op de werkplek: LpA (geluidsdruk) db(a) 85.9 K= 3 db(a) LWA (geluidsvermogen) db(a) K= 2.36 db(a) Geluidsdruk Belangrijkste Handvat: m / s ² Extra handgreep: m / s ² K= 1.5 m / s ² 51
52 SN : :0001~ Arrival date: 15/01/2015 Production year : 2014 GB Declaration of Conformity We ELEM GARDEN TECHNIC hereby declare that the machine described below complies with the relevant basic safety and health requirements of the EU Directives, both in its basic design and construction as well as in the version put into circulation by us. This declaration shall cease to be valid if the machine is modified without our prior approval. Product: CHAINSAW Type: TRE2042SO Relevant EU Directives 2006/42/EC 2004/108/EC 2002/95/ EC 2005/88/EC Applied harmonized standards EN /A2:2011 EN /A2:2008 EN /A2:2009 EN :2000 EN /A11:2010 EN /A1:2010 Sound power level db(a) Guaranteed : LwA 112 db(a) ELEM GARDEN TECHNIC 81 rue de Gozée 6110 Montigny-le-Tilleul Belgique Belgium, November 2014 Mr Joostens Pierre Director ELEM GARDEN TECHNIC, rue de Gozée 81, 6110 Montigny-le-Tilleul, Belgique Tél : 0032 (0) Fax : 0032 (0) Technical file at: info@eco-repa.com Technical Data Product: CHAINSAW Type: TRE2042SO Mains voltage V Mains frequency Hz 50 Power input W 2000 Weight kg 5 kg Level of sound pressure: LpA (sound pressure) db(a) 85.9 LWA (acoustic power) db(a) K= 3 db(a) K= 2.36 db(a) Measured vibration value : Main Handle: m / s ² Auxiliary handle: m / s ² K = 1,5 m/s². 52
53 SN : :0001~ Ankunftsdatum: 15/01/2015 Fertigungsjahr: 2014 DE EG-Konformitätserklärung Hiermit erklären wir «ELEM GARDEN TECHNIC», dass die nachfolgend bezeichnete Maschine aufgrund ihrer Konzipierung und Bauart sowie in der von uns in Verkehr gebrachten Ausführung den einschlägigen grundlegenden Sicherheits- und Gesundheitsanforderungen der EG-Richtlinien entspricht. Bei einer nicht mit uns abgestimmten Änderung der Maschine verliert diese Erklärung ihre Gültigkeit. Produkt : KETTENSÄGE Typ : TRE2042SO Einschlägige EG-Richtlinien 2006/42/EWG 2004/108/ EWG 2002/95/ EWG 2005/88/ EWG Angewandte harmonisierte Normen : EN /A2:2011 EN /A2:2008 EN /A2:2009 EN :2000 EN /A11:2010 EN /A1:2010 Schallleistungspegel db(a) Garantiert : LwA 112 db(a) ELEM GARDEN TECHNIC, 81 rue de Gozée 6110 Montigny-le-Tilleul Belgique Belgien, November 2014 Mr Joostens Pierre Direktor ELEM GARDEN TECHNIC, rue de Gozée 81, 6110 Montigny-le-Tilleul, Belgique Tél : 0032 (0) Fax : 0032 (0) Technische Unterlagen bei: info@eco-repa.com Technische Daten Produkt : KETTENSÄGE Typ : TRE2042SO Netzspannung V Netzfrequenz Hz 50 Leistungsaufnahme W 2000 Gewicht kg 5 Höhe des Schalldrucks: LpA (Schalldruck) db(a) 85.9 LWA (Schalleistung) db(a) K= 3 db(a) K= 2.36 db(a) Hand-Arm-Vibration Startseite Griff: m / s ² Zusatzhandgriff: 6002 m / s ² K = 1,5 m/s². 53

54 SN : :0001~ Datum dovozu: 15/01/2015 Rok výroby: 2014 CZ Prohlášení o shodě My "ELEM GARDEN TECHNIC" tímto prohlašujeme, že níže popsaný stroj je v souladu s příslušnými základními požadavky na bezpečnost a ochranu zdraví směrnic EU, a to jak ve své základní koncepce a konstrukci, tak stejně jako ve verzi námi dodávané do oběhu. Toto prohlášení pozbývá platnosti, pokud je přístroj upraven bez našeho předchozího souhlasu. Produkt: ŘETĚZOVÁ PILA Typ: TRE2042SO Příslušné směrnice EU 2006/42/EC 2004/108/EC 2002/95/ EC 2005/88/EC Použité harmonizované normy EN /A2:2011 EN /A2:2008 EN /A2:2009 EN :2000 EN /A11:2010 EN /A1:2010 Hladina akustického výkonu db(a) Garantovaná : LwA 112 db(a) ELEM GARDEN TECHNIC 81 rue de Gozée 6110 Montigny-le-Tilleul Belgique Belgie, Listopad 2014 Mr Joostens Pierre Ředitel ELEM GARDEN TECHNIC, rue de Gozée 81, 6110 Montigny-le-Tilleul, Belgique Tél : 0032 (0) Fax : 0032 (0) Technická dokumentace: info@mateczech.cz Technická Data Produkt: ŘETĚZOVÁ PILA Typ: TRE2042SO Jmenovité napětí: V Jmenovitá frekvence: 50 Hz Výkon: 2000 W Hmotnost: 5 kg Hladina akustického tlaku: LpA (akustický tlak) db(a) 85.9 LWA (akustický výkon) db(a) K= 3 db(a) K= 2.36 db(a) Hladina vibrací do ruky/paže: Hlavní rukojeť: m / s ² Přídavná rukojeť: m / s ² K = 1,5 m/s². 54
55 55
56 ZÁRUČNÍ LIST Na tento výrobek se vztahuje 24 měsíců záruka. Platný záruční list musí být správně vyplněn a odeslán s kopií faktury nebo pokladního bloku. ZÁRUČNÍ LIST Výrobek : ELEKTRICKÁ ŘETĚZOVÁ PILA Model: TRE2042SO Datum prodeje... Dodavatel: M.A.T.A. Czech s.r.o. Radlická Praha 5 info@mataczech.cz SERVIS : Tel: PM Servis Na barikádách Praha 9 56


57 81, rue de Gozée 6110 Montigny-le-Tilleul Belgique Tél : Fax : Made in China S.A.V sav@eco-repa.com Service Parts separated 32 / 71 / / 71 / Fabriqué en Chine - Vervaardigd in China - Made in China - Hergestellt in China Vyrobeno v Číně Sous réserve de modifications / Technische wijzigingen voorbehouden / Subject to technical modifications Technische Änderungen vorbehalten / Technické změny vyhrazeny 57
REFERENCE: MTF4 CODIC:
 MARQUE: PROLINE REFERENCE: MTF4 CODIC: 3523551 MTF4 AVERTISSEMENTS Cet appareil est destiné à un usage domestique uniquement. Toute utilisation autre que celle prévue pour cet appareil, ou pour une autre
TCNF 185 TCNF 185 IX NO-FROST FRIGORÍFICO
 TCNF 185 TCNF 185 IX NO-FROST FRIGORÍFICO ATTENTION Cet appareil est destiné à un usage domestique uniquement. Toute utilisation autre que celle prévue pour cet appareil, ou pour une autre application
Manuel d'utilisation 4 Pokyny pro uživatele 5
 Manuel d'utilisation 4 Pokyny pro uživatele 2 1 4 3 6 1 : Interrupteur marche / arrêt - Hlavní vypínač Zapnuto/Vypnuto L interrupteur principal de la S LAN permet la mise sous tension et l arrêt des prises.
Manuel d'utilisation 4 Pokyny pro uživatele 5
 Manuel d'utilisation 4 Pokyny pro uživatele 5 4 2 1 3 7 5 6 1 : Interrupteur marche / arrêt - Hlavní vypínač Zapnuto/Vypnuto L interrupteur principal de la S8 LAN TV permet la mise sous tension et l arrêt
Chemin Air Standard. Groupe motorisé DISTRIBUTION D AIR CHAUD ROZVOD TEPLÉHO VZDUCHU TKV
 Groupe motorisé Chemin Air Standard DISTRIBUTION D AIR CHAUD ROZVOD TEPLÉHO VZDUCHU TKV CZ Chemin Air Standard Groupe motorisé d Air chaud 1 m Groupe motorisé Evacuation des fumées Prise air chaud Niveau
Název: Suites récurrentes étude à l'aide d'une suite auxiliaire
 Název: Suites récurrentes étude à l'aide d'une suite auxiliaire Autor: Mgr. Jiří Bureš, Ph.D. Název školy: Gymnázium Jana Nerudy, škola hl. města Prahy Předmět, mezipředmětové vztahy: matematika a její
MARQUE: CANDY REFERENCE: CI 640 CB CODIC:
 MARQUE: CANDY REFERENCE: CI 640 CB CODIC: 4308867 NOTICE Instruction Manual For Induction Hob Table De Cuisson Induction Návod k použití pro indukní varnou desku Brugervejledning til induktionskogetop
Souminulý čas Imparfait Test
 VY_32_INOVACE_FJ_149 Souminulý čas Imparfait Test Mgr. Martina Šenkýřová Období vytvoření: únor 2013 Ročník: třetí a čtvrtý (opakování) SŠ Tematická oblast: Gramatika-morfologie: slovesné časy a způsoby
WS , WS , WS , WS , WS XE
 WS 10-115, WS 10-125, WS 12-115, WS 12-125, WS 13-125 XE Original instructions Originalbetriebsanleitung Notice originale Istruzioni originali Manual original Manual original Oorspronkelijke gebruiksaanwijzing
Název: Décomposition thermique de l hydrogénocarbonate de sodium (bilan de matière)
") Výukové materiály Název: Décomposition thermique de l hydrogénocarbonate de sodium (bilan de matière) Autor: RNDr. Markéta Bludská Název školy: Gymnázium Jana Nerudy, škola hl. města Prahy Předmět, mezipředmětové
Výukové materiály Název: Décomposition thermique de l hydrogénocarbonate de sodium (bilan de matière) Autor: RNDr. Markéta Bludská Název školy: Gymnázium Jana Nerudy, škola hl. města Prahy Předmět, mezipředmětové
Subjonctif Konjunktiv
 VY_32_INOVACE_FJ_157 Subjonctif Konjunktiv PRACOVNÍ LIST Mgr. Martina Šenkýřová Období vytvoření: duben 2013 Ročník: třetí a čtvrtý (opakování) SŠ Tematická oblast: Gramatika-morfologie: slovesné časy
Název: Etude de fonctions
 Název: Etude de fonctions Autor: Mgr. Jiří Bureš, Ph.D. Název školy: Gymnázium Jana Nerudy, škola hl. města Prahy Předmět, mezipředmětové vztahy: matematika a její aplikace Ročník: 5. (3. ročník vyššího
Výukový materiál zpracován v rámci projektu EU peníze školám
 Výukový materiál zpracován v rámci projektu EU peníze školám Registrační číslo projektu: CZ.1.07/1.5.00/34.0229 Šablona: III/2 č. materiálu: VY_32_INOVACE_126 Jméno autora: Třída/ročník: Mgr. Anna Fekiačová
Název: Komplexní čísla zobrazení v rovině
 Název: Komplexní čísla zobrazení v rovině Autor: Mgr. Jiří Bureš, Ph.D. Název školy: Gymnázium Jana Nerudy, škola hl. města Prahy Předmět, mezipředmětové vztahy: matematika a její aplikace Ročník: 6. (4.
Název: Le Nord et le Sud: les contrastes démographiques
 Název: Le Nord et le Sud: les contrastes démographiques Autor: RNDr. Marie Šantrůčková Název školy: Gymnázium Jana Nerudy, škola hl. města Prahy Předmět, mezipředmětové vztahy: zeměpis Ročník: 4. a 6.
Název školy: Gymnázium Jana Nerudy, škola hl. města Prahy. Předmět, mezipředmětové vztahy: matematika a její aplikace
 Název: Posloupnosti Autor: Mgr. Jiří Bureš, Ph.D. Název školy: Gymnázium Jana Nerudy, škola hl. města Prahy Předmět, mezipředmětové vztahy: matematika a její aplikace Ročník: 5. (3. ročník vyššího gymnázia,
ALABAMA-SUNNY - posuvné dveře do niky
 Montážní Návod / MONTÁŽNY NÁVOD / INSTALLATION MANUAL MODEL: ALABAMA-SUNNY - posuvné dveře do niky typ výrobku / type of product: posuvné dveře do niky - šířka 800 mm (instalace 77-790 mm) posuvné dvere
Présent Přítomný čas Pracovní list Mgr. Martina Šenkýřová
 VY_32_INOVACE_FJ_142 Présent Přítomný čas Pracovní list Mgr. Martina Šenkýřová Období vytvoření: únor 2013 Ročník: třetí a čtvrtý (opakování) SŠ Tematická oblast: Gramatika-morfologie: slovesné časy a
Z255 Z-Master avec tondeuse SFS 72 à éjection latérale
 Form No. 8-7 Z55 Z-Master avec tondeuse SFS 7 à éjection latérale Modèle Nº 747 Nº de série 000000 et suivants Manuel de l utilisateur French (F) Attention Les gaz d échappement de cette machine contiennent
Téma: Les boissons VY_32_INOVACE_292
 Téma: Les boissons Autor: Číslo projektu: Mgr. Michaela Bašná CZ.1.07/1.5.00/34.1072 Ročník: 2. 3. Obor vzdělávání: Vzdělávací oblast: Tematický okruh: hotelnictví jazykové vzdělávání odborná slovní zásoba
 20107 www.greenworkstools.com 10 8 10 9 11 2 1 2 11 23 3 FRANÇAIS (Traduction des instructions initiales) Utilisation Greenworkstools a été spécialement conçu pour couper les rameaux au sommet des arbres.
Přílohy. 1 Obrazová příloha. Obr.příloha č. 1 Třída ve škole v Pradet. Obr.příloha č. 2 Třída ve škole v La Garde
 Přílohy 1 Obrazová příloha Obr.příloha č. 1 Třída ve škole v Pradet Obr.příloha č. 2 Třída ve škole v La Garde 80 Obr.příloha č. 3 Místo před tabulí pro seskupení ţáků na rituál ve škole v Mions Obr.příloha
Z14 38 et Z16 42 TimeCutter Z avec tondeuse à éjection latérale
 Form No. 9 6 Z4 8 et Z6 4 TimeCutter Z avec tondeuse à éjection latérale Modèle Nº 7440 Nº de série 000000 et suivants Modèle Nº 7440 Nº de série 000000 et suivants Manuel de l utilisateur Français (F)
Immigration Logement. Logement - Location. Signifier que vous souhaitez louer un logement. Type de logement. un appartement Type de logement
 - Location français Je voudrais louer. Signifier que vous souhaitez louer un logement une chambre un appartement un studio une maison individuelle une maison jumelée une maison mitoyenne Combien coûte
Vis autoperçeuse S-MD 03 Z
 is autoperçeuse Applications Fixation de tôles d acier profilées sur ossatures acier légères à moyennes Avantages Pointe auto perceuse rapide et robuste grâce à la technologie Racing Tip Acier électrozingué
Francouzský jazyk. Voyages IIIcestování
 Francouzský jazyk Voyages IIIcestování III Operační program Vzdělávání pro konkurenceschopnost Název projektu: Inovace magisterského studijního programu Fakulty ekonomiky a managementu Registrační číslo
Z148 Z Master avec tondeuse à éjection latérale SFS 44
 Form No 9 85 Z48 Z Master avec tondeuse à éjection latérale SFS 44 Modèle Nº 7499 Nº de série 000000 et suivants Manuel de l utilisateur Français (F) Attention Les gaz d échappement de cette machine contiennent
Z147 Z Master avec tondeuse de 112 cm
 Form No. 7 76 Z47 Z Master avec tondeuse de cm Modèle Nº 7476TE Nº de série 000000 et suivants Manuel de l utilisateur French (F) Le système d allumage par étincelle est conforme à la norme canadienne
PASSÉ COMPOSÉ MINULÝ ČAS SLOŽENÝ prezentace
 VY_32_INOVACE_FJ_144 PASSÉ COMPOSÉ MINULÝ ČAS SLOŽENÝ prezentace Mgr. Martina Šenkýřová Obchodní akademie, Lysá nad Labem, Komenského 1534 Dostupné z www.oalysa.cz. Financováno z ESF a státního rozpočtu
Z147 Z Master avec tondeuse de 112 cm
 Form No. 5-69 Z47 Z Master avec tondeuse de cm Modèle Nº 7470 000000 et suivants Manuel de l utilisateur Français (F) Attention Les gaz d échappement de cette machine contiennent des substances chimiques
Z149 et Z153 Z Master avec tondeuse à éjection latérale SFS 52
 Form No. 9 54 Z49 et Z5 Z Master avec tondeuse à éjection latérale SFS 5 Modèle Nº 7479 Nº de série 000600 et suivants Modèle Nº 7498 Nº de série 000600 et suivants Manuel de l utilisateur French (F) Attention
Z350 Z-Master avec tondeuse de 122 cm et bac à herbe
 Form No. 6-96 Z50 Z-Master avec tondeuse de cm et bac à herbe Modèle Nº 780TE Nº de série 000000 et suivants Manuel de l utilisateur French (F) Le système d allumage par étincelle est conforme à la norme
Produkty. Naše společnost šije opony a další závěsy přímo na míru danému prostoru, přitom klademe velký důraz na přání zákazníka.
 Produkty Podrobnosti Šití Naše společnost šije opony a další závěsy přímo na míru danému prostoru, přitom klademe velký důraz na přání zákazníka. Akustické materiály Nabízíme řadu řešení pro odzvučení
GUIDE D UTILISATION NÁVOD K OBSLUZE KEZELÉSI ÉS ÜZEMBE HELYZÉSI ÚTMUTATÓ NÁVOD NA OBSLUHU BEDIENUNGSANLEITUNG
 GUIDE D UTILISATION NÁVOD K OBSLUZE KEZELÉSI ÉS ÜZEMBE HELYZÉSI ÚTMUTATÓ NÁVOD NA OBSLUHU BEDIENUNGSANLEITUNG FR CS 3 11 Dans le souci d une amélioration constante de nos produits, nous nous réservons
Název: Bilan de matière
 Název: Bilan de matière Výukové materiály Autor: RNDr. Markéta Bludská Název školy: Gymnázium Jana Nerudy, škola hl. města Prahy Předmět, mezipředmětové vztahy: chemie a její aplikace, matematika Ročník:
Le droit des affaires (des sociétés)
") Le droit des affaires (des sociétés) Le droit commercial est traditionnellement considéré comme régissant le droit privé du commerce comprenant les activités de distribution et celles de production. Dans
Le droit des affaires (des sociétés) Le droit commercial est traditionnellement considéré comme régissant le droit privé du commerce comprenant les activités de distribution et celles de production. Dans
Z350 Z-Master avec Tondeuse de 122 cm et bac à herbe
 Form No 5-686 Z50 Z-Master avec Tondeuse de cm et bac à herbe Modèle Nº 795 000000 et suivants Manuel de l utilisateur French (F) Warning Les gaz d échappement de cette machine contiennent des substances
PhDr. Jana Bros-Svobodová
 Autor: Tematický celek: Učivo (téma): Stručná charakteristika: PhDr. Jana Bros-Svobodová Konverzace Famille (Rodina) Pracovní list lze zařadit do hodin konverzace francouzského jazyka. Základem je poslechové
Budoucí čas jednoduchý a blízká budoucnost Futur simple et futur proche Pracovní list
 VY_32_INOVACE_FJ_151 Budoucí čas jednoduchý a blízká budoucnost Futur simple et futur proche Pracovní list Mgr. Martina Šenkýřová Období vytvoření: březen 2013 Ročník: třetí a čtvrtý (opakování) SŠ Tematická
Z555 Z Master avec tondeuse à éjection latérale TURBO FORCE 60 pouces
 Form No. 5 46 Z555 Z Master avec tondeuse à éjection latérale TURBO FORCE 60 pouces Modèle Nº 7445 Nº de série 400000 et suivants Manuel de l utilisateur Enregistrez votre produit sur www.toro.com Translation
Personnage principal du roman Bel-Ami vu par des différentes adaptations de théâtre Comparaison de deux versions, la tchèque et la française
 MASARYKOVA UNIVERZITA, FILOZOFICKA FAKULTA, USTAV ROMANSKÝCH JAZYKU A LITERATUR Personnage principal du roman Bel-Ami vu par des différentes adaptations de théâtre Comparaison de deux versions, la tchèque
Název: Equations de droites 2
 Název: Equations de droites 2 Autor: Mgr. Hana Černá Název školy: Gymnázium Jana Nerudy, škola hl. města Prahy Předmět, mezipředmětové vztahy: matematika a její aplikace Ročník: 3. a 4. ročník bilingvní
Z149 Z Master Avec tondeuse à éjection latérale SFS 44 pouces
 Form No. 5-690 Z49 Z Master Avec tondeuse à éjection latérale SFS 44 pouces Modèle Nº 744 Nº de série 5000000 et suivants Manuel de l utilisateur Enregistrez votre produit sur www.toro.com Traduction de
TONDEUSE A GAZON A ESSENCE
 TDTAC41T-CC99 FR TONDEUSE A GAZON A ESSENCE TRADUCTION DES INSTRUCTIONS D ORIGINE NL GRASMAAIER MET BENZINEMOTOR VERTALING VAN DE ORIGINELE INSTRUCTIES GB PETROL LAWN MOWER ORIGINAL INSTRUCTIONS CZ BENZINOVA
MARQUE: BOMPANI REFERENCE: BOTDF606VX CODIC:
 MARQUE: BOMPANI REFERENCE: BOTDF606VX CODIC: 4304942 NOTICE NOTICE D UTILISATION BOTDF606VW BOTDF606VX Conforme avec la directive CE Avant l installation ou l utilisation de l appareil lire attentivement
Budoucí čas jednoduchý a blízká budoucnost Futur simple et futur proche TEST
 VY_32_INOVACE_FJ_152 Budoucí čas jednoduchý a blízká budoucnost Futur simple et futur proche TEST Mgr. Martina Šenkýřová Období vytvoření: březen 2013 Ročník: třetí a čtvrtý (opakování) SŠ Tematická oblast:
DUM č. 15 v sadě. 3. Fj-1 Technika vyprávění
 projekt GML Brno Docens DUM č. 15 v sadě 3. Fj-1 Technika vyprávění Autor: Thierry Saint-Arnoult Datum: 12.03.2014 Ročník: 3AF Anotace DUMu: Rozbor vyprávění snu. Analýza použití jednotlivých minulých
NÁVOD K OBSLUZE A INSTALACI DEKORATIVNÍ KOMÍNOVÝ ODSAVAČ PAR AD1521
 NÁVOD K OBSLUZE A INSTALACI DEKORATIVNÍ KOMÍNOVÝ ODSAVAČ PAR AD1521 13 14 17 15 18 16 19 20A 23A 21A 24A 22A 22B 23B 26B 24B 27B 25B 28B effet.! Équiper la pièce de prises d'air pour éviter que la hotte
0-10 V Interface AM 4
 Montage instructie Assembly instructions Instructions de montage Návod k montáži 0-10 V Interface AM 4 Bergen Master Line 0-10 V Interface Montage instructie voor 0-10 V interface Fitting instruction for
Minulý čas složený Passé composé Pracovní list
 VY_32_INOVACE_FJ_145 Minulý čas složený Passé composé Pracovní list Mgr. Martina Šenkýřová Období vytvoření: únor 2013 Ročník: třetí a čtvrtý (opakování) SŠ Tematická oblast: Gramatika-morfologie: slovesné
Sylvain Levey: Dyť je to prdel, ne?
 Sylvain Levey: Dyť je to prdel, ne? Překlad Natálie Preslová (ukázka) 2 2: Koukni na něj. Co vidíš? 1: Muže na zemi. Klečí. 2: Třese se. 1: Možná je mu zima. 2: Možná. 1: Sklonil hlavu. 2: Stydí se. 1:
Règles du jeu : Le joueur le plus jeune commence, celui situé à sa gauche tire une carte et lui lit un des deux combos d affirmations de son choix.
 Règles du jeu : But du jeu : Sois le premier à obtenir 5 cartes en trouvant les bonnes réponses (ou choisis le nombre de cartes à obtenir pour gagner en début de partie). Jouer : Le joueur le plus jeune
Z148 Z Master avec tondeuse à éjection latérale SFS 44 pouces
 Form No. 9 876 Z48 Z Master avec tondeuse à éjection latérale SFS 44 pouces Modèle Nº 746 Nº de série 4000000 et suivants Manuel de l utilisateur Enregistrez votre produit sur le www.toro.com Traduction
francouzština Jméno, příjmení, tituly:...
 francouzština Jméno, příjmení, tituly:... Datum:... Hodnocení: Písemná:... Ústní:... Cvičení:... Projekt:... Výsledek: Způsob vyhodnocení: Při vyhodnocení budou započteny jen správné odpovědi. Blok otázek
L-force Drives. EDK84DGFCxxxx.O=I. Ä.O=Iä. Montážní návod motec. E84DGFCxxxx. Komunikační modul Communication unit
 EDK8DGFCxxxx.O=I Ä.O=Iä L-force Drives Montážní návod 800 motec E8DGFCxxxx Komunikační modul Communication unit 0 0.7 kw 7.kW E8DG0a E8DG0b EDK8DGFCxxxx CS.0 V Warnings! Operation of this equipment requires
Z147 Z Master avec tondeuse à éjection latérale SFS 44 pouces
 Form No. 9 859 Z47 Z Master avec tondeuse à éjection latérale SFS 44 pouces Modèle Nº 746 Nº de série 4000000 et suivants Manuel de l utilisateur Enregistrez votre produit sur le www.toro.com Traduction
Žádost o zápis narození Demande d enregistrement de la naissance (nécessaire pour l établissement de l acte de naissance tchèque)
") Žádost o zápis narození Demande d enregistrement de la naissance (nécessaire pour l établissement de l acte de naissance tchèque) do zvláštní matriky vedené Úřadem městské části Brna, Brno-střed, podle
Žádost o zápis narození Demande d enregistrement de la naissance (nécessaire pour l établissement de l acte de naissance tchèque) do zvláštní matriky vedené Úřadem městské části Brna, Brno-střed, podle
MARQUE: BRANDT REFERENCE: RADCD BCD200 K7 BK CODIC:
 MARQUE: BRANDT REFERENCE: RADCD BCD200 K7 BK CODIC: 1367579 EN FR NL ES IT CZ SK TR INSTRUCTION MANUAL MANUEL D UTILISATION GEBRUIKSAANWIJZING MANUAL DE INSTRUCCIONES MANUALE DI ISTRUZIONI NÁVOD K OBSLUZE
Subjonctif Konjunktiv
 VY_32_INOVACE_FJ_158 Subjonctif Konjunktiv TEST Mgr. Martina Šenkýřová Období vytvoření: duben 2013 Ročník: třetí a čtvrtý (opakování) SŠ Tematická oblast: Gramatika-morfologie: slovesné časy a způsoby
Conditionnel présent Podmiňovací způsob přítomný
 VY_32_INOVACE_FJ_154 Conditionnel présent Podmiňovací způsob přítomný PRACOVNÍ LIST Mgr. Martina Šenkýřová Období vytvoření: březen 2013 Ročník: třetí a čtvrtý (opakování) SŠ Tematická oblast: Gramatika-morfologie:
Název školy: Gymnázium Jana Nerudy, škola hl. města Prahy. Předmět, mezipředmětové vztahy: matematika a její aplikace
 Název: Kuželosečky Autor: Mgr. Jiří Bureš, Ph.D. Název školy: Gymnázium Jana Nerudy, škola hl. města Prahy Předmět, mezipředmětové vztahy: matematika a její aplikace Ročník: 5. (3. ročník vyššího gymnázia,
Mgr. Martina Šenkýřová Obchodní akademie, Lysá nad Labem, Komenského 1534
 VY_32_INOVACE_FJ_141 Mgr. Martina Šenkýřová Obchodní akademie, Lysá nad Labem, Komenského 1534 Dostupné z www.oalysa.cz. Financováno z ESF a státního rozpočtu ČR. Období vytvoření: únor 2013 Ročník: 3.
V Bruselu dne 10.12.2004 KOM(2004)794v konečném znění. Návrh NAŘÍZENÍ RADY
794v konečném znění. Návrh NAŘÍZENÍ RADY") "A - "A - KOMISE EVROPSKÝCH SPOLEČENSTVÍ V Bruselu dne 1.12.24 KOM(24)794v konečném znění Návrh NAŘÍZENÍ RADY kterým se mění nařízení (ES) č. 1255/96 o dočasném pozastavení všeobecných cel společného celního
"A - "A - KOMISE EVROPSKÝCH SPOLEČENSTVÍ V Bruselu dne 1.12.24 KOM(24)794v konečném znění Návrh NAŘÍZENÍ RADY kterým se mění nařízení (ES) č. 1255/96 o dočasném pozastavení všeobecných cel společného celního
ACIER INOXYDABLE UŠLECHTILÁ OCEL
 CIER INOXYDBLE UŠLECHTILÁ OCEL Solutions sur mesure en acier inoxydable Individuální řešení z ušlechtilé oceli Chez Wuppermann, nous vivons au quotidien notre passion de l acier pour répondre aux plus
Úvodní příručka. ThinkCentre
 ThinkCentre Úvodní příručka Uvnitř - důležité informace o bezpečnosti - záruka a upozornění - nastavení počítače - obnova softwaru - odstraňování problémů a diagnostika - podpora a servis IBM - nabídka
Table de cuisson à induction
 NZ63F3NM1AB Table de cuisson à induction Guide d'installation et d'utilisation Première marque sur la planète 100 % papier recyclé Ce guide est fait en papier 100% recyclé. Remerciement FRANCE Nous vous
Aldehyde, cetone ou autre?
 Výukové materiály Aldehyde, cetone ou autre? Autor: RNDr. Jana Parobková Název školy: Gymnázium Jana Nerudy, škola hl. města Prahy Předmět (mezipředmětové vztahy): Chimie Tematický celek: Dérivés oxygénés,
BEDIENUNGS- UND SICHERHEITSHINWEISE 3 OPERATION AND SAFETY NOTES 19 UNITÀ PRINCIPALE LP PLUS INDICAZIONI PER L USO E PER LA SICUREZZA 47
 DE LADEGERÄT LP PLUS BEDIENUNGS- UND SICHERHEITSHINWEISE 3 GB MAIN UNIT LP PLUS OPERATION AND SAFETY NOTES 19 FR UNITÉ PRINCIPALE LP PLUS INSTRUCTIONS D UTILISATION ET CONSIGNES DE SÉCURITÉ 33 IT UNITÀ
Présent Přítomný čas TEST
 VY_32_INOVACE_FJ_143 Présent Přítomný čas TEST Mgr. Martina Šenkýřová Období vytvoření: únor 2013 Ročník: třetí a čtvrtý (opakování) SŠ Tematická oblast: Gramatika-morfologie: slovesné časy a způsoby Předmět:
Registrace vašeho spotřebiče, kterou získáte lepší servis:
 EGT6345YOK...... CS VARNÁ DESKA NÁVOD K POUŽITÍ 2 FR TABLE DE CUISSON NOTICE D'UTILISATION 16 PT PLACA MANUAL DE INSTRUÇÕES 32 SK VARNÝ PANEL NÁVOD NA POUŽÍVANIE 47 ES PLACA DE COCCIÓN MANUAL DE INSTRUCCIONES
CBE25020 COUPE BORDURES TRADUCTION DES INSTRUCTIONS D ORIGINE GRASS TRIMMER VERTALING VAN DE ORIGINELE INSTRUCTIES
 CBE25020 FR COUPE BORDURES TRADUCTION DES INSTRUCTIONS D ORIGINE NL GRASTRIMMER VERTALING VAN DE ORIGINELE INSTRUCTIES GB GRASS TRIMMER ORIGINAL INSTRUCTIONS CZ STRUNOVÁ SEKAČKA ORIGINÁLNÍ NÁVOD S40 M10
Conditionnel présent Podmiňovací způsob přítomný
 VY_32_INOVACE_FJ_155 Podmiňovací způsob přítomný TEST Mgr. Martina Šenkýřová Období vytvoření: duben 2013 Ročník: třetí a čtvrtý (opakování) SŠ Tematická oblast: Gramatika-morfologie: slovesné časy a způsoby
Mode d emploi. Français. Thermostat d'immersion
 Français Mode d emploi Thermostat d'immersion MA 1.952.0332 01/11 JULABO Labortechnik GmbH 77960 Seelbach / Germany +49 (0) 7823 / 51-0 +49 (0) 7823 / 24 91 info@julabo.de www.julabo.de 19520332.doc Druck:
Název: Suivi d une réaction par conductimétrie
 Výukové materiály Název: Suivi d une réaction par conductimétrie Autor: RNDr. Markéta Bludská Název školy: Gymnázium Jana Nerudy, škola hl. města Prahy Předmět, mezipředmětové vztahy: chemie a její aplikace,
Voyage Général. Général - Bases. Général - Conversation. Demander de l'aide. Demander si une personne parle anglais
 - Bases Můžete mi pomoci, prosím? Demander de l'aide Mluvíte anglicky? Demander si une personne parle anglais Můžete mi pomoci, prosím? Mluvíte anglicky? Mluvíte _[language]_? Demander si une personne
Voyage Se débrouiller
 - Lieux Je suis perdu. Ne pas savoir où vous êtes Vous pouvez me montrer où c'est sur le plan? Demander un sur un plan Où puis-je trouver? Demander où se trouve une en particulier Ztratil(a) jsem se. Můžete/Můžeš
NÁVOD K OBSLUZE A INSTALACI. pračka BWT630F
 NÁVOD K OBSLUZE A INSTALACI pračka BWT630F v rozmezí od 1 do 19 hod. - Nastavení potvrďtte stisknutím tlačítka Start/Pauza F. 3 kontrolky průběhu pracího cyklu Dsvým problikáváním (ve směru zleva doprava
MARQUE: BRANDT REFERENCE: BCR 87 PW CODIC:
 MARQUE: BRANDT REFERENCE: BCR 87 PW CODIC: 3195619 Français INSTRUCTIONS DE SÉCURITÉ IMPORTANTES AVERTISSEMENTS AVERTISSEMENT: UN APPAREIL DE CONSTRUCTION DE CLASS I (AVEC CONNEXION A LA TERRE
Název: Titrage conductimétrique
 Název: Titrage conductimétrique Výukové materiály Autor: RNDr. Markéta Bludská Název školy: Gymnázium Jana Nerudy, škola hl. města Prahy Předmět, mezipředmětové vztahy: chemie a její aplikace, matematika,
MANUEL D INSTALLATION
 MANUEL D INSTALLATION Climatiseur avec inverseur à système FXDQ15P7VEB FXDQ20P7VEB FXDQ25P7VEB FXDQ32P7VEB FXDQ40P7VEB FXDQ50P7VEB FXDQ63P7VEB CE - ATITIKTIES-DEKLARACIJA CE - ATBILSTĪBAS-DEKLARĀCIJA CE
MIC440VVVVDEWDDFFFVVVV VTX MEC440TX
 MIC440VVVVDEWDDFFFVVVV VTX MEC440TX FOURS A MICRO-ONDES MANUEL D INSTRUCTIONS FR MIKROVLNNÁ TROUBA NÁVOD K OBSLUZE CZ MIKROAALTOUUNI OHJEKÄSIKIRJA FI FR Four à micro-ondes MANUEL D INSTRUCTIONS MODELE:
VOLTCRAFT SUR INTERNET http://www.voltcraft.de VOLTCRAFT NA INTERNETU http://www.voltcraft.de
 VOLTCRAFT SUR INTERNET http://www.voltcraft.de VOLTCRAFT NA INTERNETU http://www.voltcraft.de Informations /légales dans nos modes d'emploi Ce mode d'emploi est une publication de la société Voltcraft,
STEP 80, STEP 100, STEP 100 X
 STEP 80, STEP 100, STEP 100 X Original instructions Originalbetriebsanleitung Notice originale Istruzioni originali Manual original Manual original Oorspronkelijke gebruiksaanwijzing Original brugsanvisning
MARQUE: GIGASET REFERENCE: BOUTON ELEMENTS CODIC:
 MARQUE: GIGASET REFERENCE: BOUTON ELEMENTS CODIC: 4184149 NOTICE elements button Premiers pas První kroky Primi passi Issued by: Gigaset elements GmbH Hansaallee 299, D-40549 Düsseldorf Gigaset elements
Les modes d accueil collectif de la petite enfance en France. Céline Argenti-Dubourget, CAF des Bouches-du-Rhône
 Les modes d accueil collectif de la petite enfance en France Céline Argenti-Dubourget, CAF des Bouches-du-Rhône Formy kolektivní nerodinné péče o děti do 6 let ve Francii Céline Argenti-Dubourget, CAF
Turbo Lite 330/350 Turbo 400
 Turbo Lite 330/350 Turbo 400 GB D F NL N SF S DK E P I IMPORTANT INFORMATION Read before use and retain for future reference WICHTIGE INFORMATION Bitte vor dem Benutzen des Gerätes durchlesen und gut aufbewahren
N S. PowerMax 37 E Art PowerMax 42 E Art PowerMax 34 E Art. 4074
 FIN N DK S E I NL F GB D PowerMax 37 E Art. 4075 D GB F NL S DK N FIN I E P PL H CZ PowerMax 34 E Art. 4074 Betriebsanleitung Elektro-Rasenmäher Operating Instructions Electric Lawnmower Mode d emploi
LED ECODISC GEBRUIKSAANWIJZING OPERATING INSTRUCTION MODE D EMPLOI INSTALAČNÍ NÁVOD.
 LED ECODISC GEBRUIKSAANWIJZING OPERATING INSTRUCTION MODE D EMPLOI INSTALAČNÍ NÁVOD 4000990x 4000991x 4000992x Ecodisc Mini 10W Ecodisc 16W Ecodisc Maxi 21W ATTENTIE Lees de volgende instructies zorgvuldig
FRANCOUZSKO-ČESKÝ INSTITUT ŘÍZENÍ INSTITUT FRANCO-TCHÈQUE DE GESTION VYSOKÁ ŠKOLA EKONOMICKÁ V PRAZE UNIVERSITÉ D ECONOMIE DE PRAGUE
 Krok správným směrem FRANCOUZSKO-ČESKÝ INSTITUT ŘÍZENÍ INSTITUT FRANCO-TCHÈQUE DE GESTION VYSOKÁ ŠKOLA EKONOMICKÁ V PRAZE UNIVERSITÉ D ECONOMIE DE PRAGUE IFTG Francouzsko-český institut řízení (IFTG) je
RCM2000TL KERAMICKÝ OHŘÍVAČ ORIGINÁLNÍ NÁVOD
 RCM2000TL 220-240V~ 50Hz 2000W CZ KERAMICKÝ OHŘÍVAČ ORIGINÁLNÍ NÁVOD S11 M05 Y2016 1 CZ KERAMICKÝ OHŘÍVAČ Ujistěte se, že přívod vzduchu a výstupní otvory nejsou blokovány. Aby se zabránilo jakémukoli
SMLOUVA O SPOLUPRÁCI PŘI USKUTEČŇOVÁNÍ ODBORNÝCH STUDENTSKÝCH PRAXÍ CONTRAT DE COLLABORATION PENDANT LA RÉALISATION D UN STAGE ÉTUDIANT
 Centre français de recherche en sciences sociales (CEFRES) UMIFRE 13 CNRS-MAEDI USR 3138 Na Florenci 1420/3, CZ-110 00 Prague 1 Tél. : (+420) 224 921 400 e-mail : cefres@cefres.cz www.cefres.cz SMLOUVA
VENDRE prodat, prodávat
 impératif (rozkazovací způsob) finis finissons finissez skonči skončeme skončete VENDRE prodat, prodávat je vends tu vends il/elle vend présent (přítomný čas) prodávám prodáváš prodává passé composé (minulý
Souminulý čas Imparfait Pracovní list
 VY_32_INOVACE_FJ_148 Souminulý čas Imparfait Pracovní list Mgr. Martina Šenkýřová Období vytvoření: únor 2013 Ročník: třetí a čtvrtý (opakování) SŠ Tematická oblast: Gramatika-morfologie: slovesné časy
MTBE302T. Bineuse électrique TRADUCTION DES INSTRUCTIONS D ORIGINE NL. Elektrische bodemfrees VERTALING VAN DE ORIGINELE INSTRUCTIES GB
 MTBE302T FR Bineuse électrique TRADUCTION DES INSTRUCTIONS D ORIGINE NL Elektrische bodemfrees VERTALING VAN DE ORIGINELE INSTRUCTIES GB Electric Hoe ORIGINAL INSTRUCTIONS CZ Elektrický kultivátor ORIGINAL
návod k použití notice d'utilisation benutzerinformation használati útmutató instrukcja obsługi návod na používanie navodila za uporabo
 návod k použití notice d'utilisation benutzerinformation használati útmutató instrukcja obsługi návod na používanie navodila za uporabo Mraznička Congélateur Gefriergerät Fagyasztó Zamrażarka Mraznička
Très formel, le destinataire a un titre particulier qui doit être utilisé à la place de son nom
 - Ouverture français tchèque Monsieur le Président, Vážený pane prezidente, Très formel, le destinataire a un titre particulier qui doit être utilisé à la place de son nom Monsieur, Formel, destinataire
Přihláška Motivační dopis
 - Úvod Vážený pane, Formální, příjemce muž, jméno neznámé Vážená paní, Formální, příjemce žena, jméno neznámé Vážený pane / Vážená paní, Formální, jméno a pohlaví příjemce neznámé Monsieur, Madame, Madame,
HANDLEIDING MODE D EMPLOI GEBRAUCHSANLEITUNG INSTRUCTION BOOKLET MANUAL DE INSTRUCCIONES NÁVOD K POUŽITÍ
 HANDLEIDING MODE D EMPLOI GEBRAUCHSANLEITUNG INSTRUCTION BOOKLET MANUAL DE INSTRUCCIONES NÁVOD K POUŽITÍ MICROGOLFOVEN FOUR À MICRO-ONDES MIKROWELLE MICROWAVE OVEN MICROONDAS MIKROVLNNÁ TROUBA PRODUCT
VULSINI DREHTELLER MONTAGEANWEISUNG
 Die Lieferung beinhaltet folgende Teile: 1. Drehteller komplett 2. Rauchrohr- Drehstutzen 3. Arretierungsschraube 4. Handgriff (zum Drehen) 5. Unterlegstütze VULSINI DREHTELLER MONTAGEANWEISUNG DE FR CZ
NÁVOD K NOTICE D UTILISATION AV7XK AV18CDZ VESTAVNÉ VINOTÉKY AV7XK AV18CDZ
 NÁVOD K Cave de mise Cave en de température mise OBSLUZE en température sous A INSTALACI plan sous p Cave de mise en température sous plan NOTICE NOTICE D UTILISATION D UTILISATION AV7XK AV7XK AV18CD NOTICE