IAN STAINLESS STEEL MICROWAVE SMW 900 EDS B2. STAINLESS STEEL MICROWAVE Operating instructions. MIKROVLNNÁ TROUBA Návod k obsluze
|
|
|
- Hynek Říha
- před 9 lety
- Počet zobrazení:
Transkript
1 STAINLESS STEEL MICROWAVE SMW 900 EDS B2 STAINLESS STEEL MICROWAVE Operating instructions MIKROVLNNÁ RÚRA Z UŠĽACHTILEJ OCELE Návod na obsluhu MIKROVLNNÁ TROUBA Návod k obsluze EDELSTAHL-MIKROWELLE Bedienungsanleitung IAN 96324

2 Before reading, unfold the page containing the illustrations and familiarise yourself with all functions of the device. Před čtením si otevřete stranu s obrázky a potom se seznamte se všemi funkcemi přístroje. Pred čítaním si odklopte stranu s obrázkami a potom sa oboznámte so všetkými funkciami prístroja. Klappen Sie vor dem Lesen die Seite mit den Abbildungen aus und machen Sie sich anschließend mit allen Funktionen des Gerätes vertraut. GB Operating instructions Page 1 CZ Návod k obsluze Strana 27 SK Návod na obsluhu Strana 53 DE / AT / CH Bedienungsanleitung Seite 79

3 A B C
4 INDEX PAGE Introduction 3 Intended Usage 3 Scope of delivery 3 Appliance description 3 Technical details 3 Important safety instructions 4 Before you begin 10 Basic principles of microwave cookery...10 Use suitable cookware...10 Commissioning 11 Installation of the appliance...11 Preparing the appliance...11 Place the turntable 3 inside...12 Operation 12 Setting the Clock...12 Standby mode...12 Setting the kitchen timer...12 Child lock...13 Query functions...13 Interrupt/cancel cooking or defrosting processes...13 Heating and cooking 13 Microwave operation...13 Grill function...14 Combination cooking process "Grill"...15 Convection operation...16 Convection operation with preheating...17 Combination cooking process "Convection"...17 Auto menu 18 Starting the Auto menu...18 Baking pizza...20 Defrosting 21 Defrosting by weight...21 Defrosting by time

5 Recipes 23 Meat patty...23 Baking frozen ready-made bread rolls...23 Potato gratin...23 Muffins...24 Cleaning and Care 24 Troubleshooting 25 Disposal 26 Warranty and Service 26 Importer

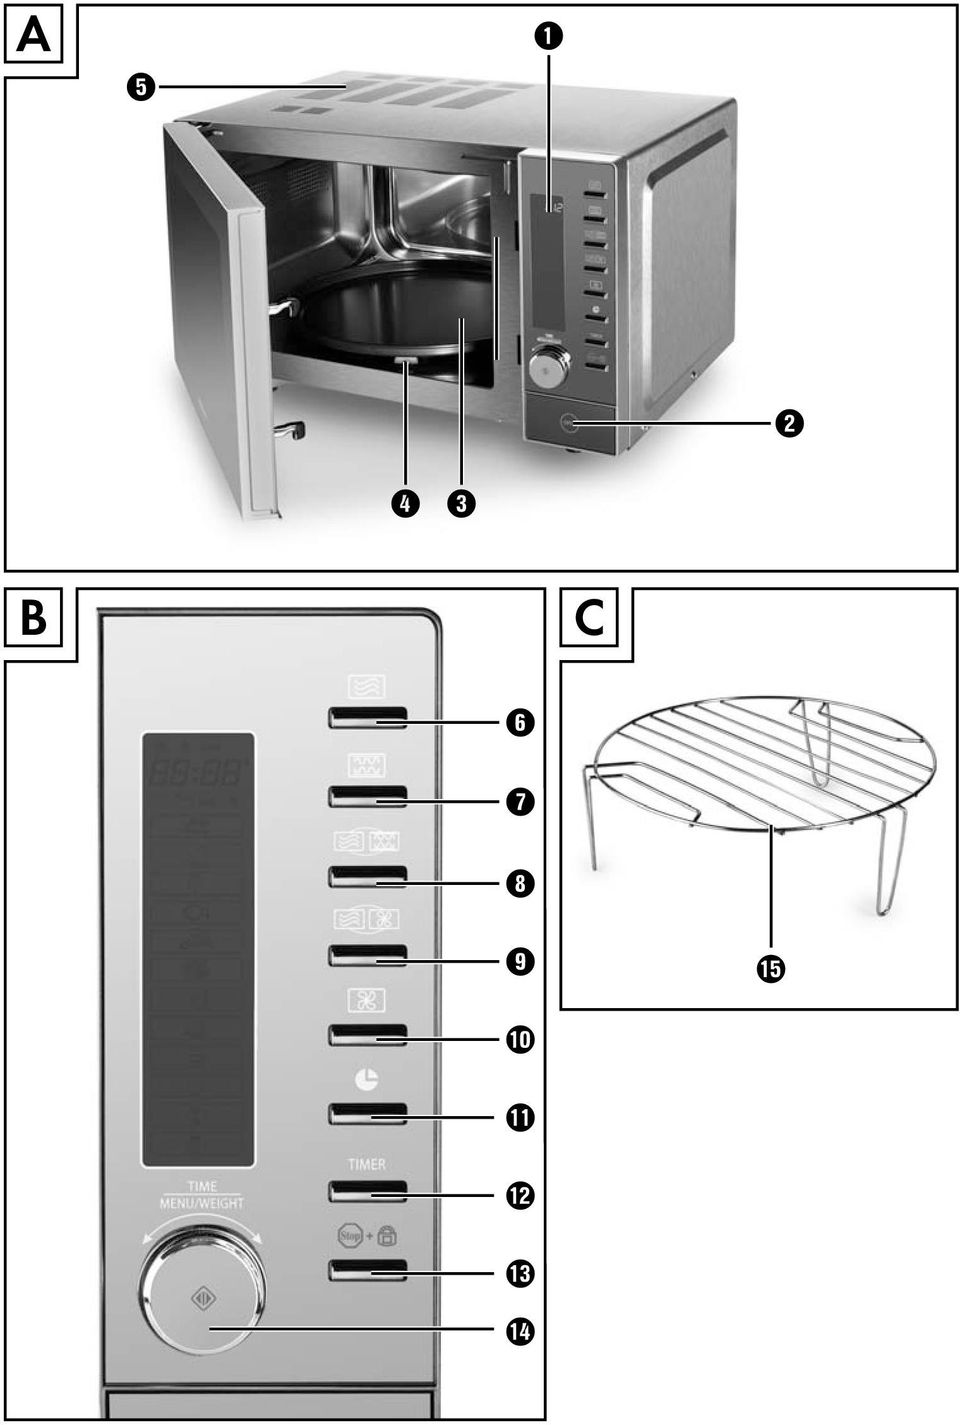
6 Stainless Steel Microwave Introduction Congratulations on the purchase of your new appliance. You have decided to purchase a high-quality product. The operating instructions are a constituent of this product. They contain important information regarding safety, use and disposal. Before using the product, familiarise yourself with all operating and safety instructions. Use this appliance only as described and only for the specified areas of application. Please also pass these operating instructions on to any future owner(s). Intended Usage This appliance is intended for the heating up and preparation of foods in accordance with the described procedures. Any modification to the appliance shall be deemed to be improper use and entails considerable accident hazards. The manufacturer accepts no responsibility for damages arising from usage contrary to the instructions specified below. This appliance is intended exclusively for use in domestic households! Do not use it in/for commercial, industrial or laboratory areas/applications! Scope of delivery Stainless Steel Microwave Turntable Grill stand Operating instructions Concise information (2 no.) Appliance description Figure A: 1 Display 2 Door opener button 3 Turntable 4 Rollers 5 Ventilation slot Figure B: 6 Microwave button 7 Grill button 8 Combination microwave - grill button 9 Combination microwave - convection button 0 Convection button q Clock button w TIMER button (kitchen timer) e Stop/child lock button r Rotary knob / Start/quick start button Figure C: t Grill stands Technical details Nominal voltage: V ~, 50 Hz Maximum power consumption Microwave: 1400 W Grill: 1500 W Convection: 1950 W Maximum power delivery Microwave: 900 W +/- 10% Microwave frequency: 2450 MHz - 3 -
.")
7 Important safety instructions Carefully read these safety and operating instructions before the first use and preserve them for future reference. Important! Warnings regarding damage to the appliance. Danger! / Risk of injury! Warning about physical injuries and electric shock! Risk of fire! Warning about risks of fire. Notice! Note Hints and tips for using the microwave. Safety precautions for the avoidance of excessive contact with microwave energy Do not try to operate the appliance while the door is open, as this can lead to you coming into contact with a potentially harmful dose of microwave radiation. It is also important not to break open or manipulate the safety locks. Do not jam anything between the front of the appliance and the door, and make sure that there is no residual food or cleaning agent on the seals. Risk of injury! If the door or the door seal is damaged, under no circumstances may you continue to use the appliance. Arrange for it to be repaired as soon as possible by qualified specialists. Never attempt to repair the appliance yourself. Removal of the appliance housing could cause the release of microwave energy. Arrange for the repair to be carried out only by qualified specialists. This appliance may be used by children of the age of 8 years or more and by persons with reduced physical, sensory or mental capabilities or lack of experience and/or knowledge if they are supervised or have been instructed how to use the appliance safely and have understood the potential risks. Children must not play with the appliance. Cleaning and user maintenance tasks should not be carried out by children, unless they are at least 8 years old or more and are constantly supervised

8 Children younger than 8 years of age are to be kept away from the appliance and the power cable. Only use this appliance for its intended purpose as described in this manual. Do not use any caustic chemicals or vapours in this appliance. This micro-wave oven is especially designed for heating, cooking, grilling, or drying foodstuffs. It is not intended for use in industrial applications or laboratories. Do not operate the microwave oven if the power cable or plug are damaged. To avoid injury, arrange for damaged power cables or plugs to be exchanged by qualified specialists before re-using the appliance. Keep children well away from the microwave oven when it is in use. Risk of Burns! Under no circumstances should you remove the microwave oven housing. Should the lamp in the interior of the microwave oven need replacing, arrange for this to be done by a qualified specialist. Never touch the microwave oven door, housing, ventilation openings, accessories or the dinnerware directly after the grill, combi or automatic menu process. The parts will be very hot. Allow them to cool down before cleaning them. Ensure that the plug is at all times easily accessible, so that it can be quickly removed in the event of an emergency. People fitted with a heart pacemaker should consult their doctor about the possible risks of using a microwave oven before taking one into use. Do not allow the power cable to hang from a table or work surface. Children could pull on it. After they have been warmed up, always open containers, popcorn-bags etc. with the opening pointing away from your body. Escaping steam could lead to scalds. Never stand directly against the microwave oven when opening the door. Escaping steam could lead to scalds. Do not fry in the microwave. Hot oil can damage parts of the appliance and utensils and even cause skin burns. Always shake-up or stir warmed up baby glasses or bottles! The contents could have heated up unevenly and the baby could be burned/scalded by them. At all events, check their temperature before feeding them to the baby! Do not modify the microwave oven

9 Microwave radiation is dangerous! Maintenance and repairs requiring the removal of access covers, which are intended for protection against contact with microwave radiation, are to be carried out by trained specialists only. Before consumption, check the temperature, so as to avoid a potentially life-threatening scalding for babies. Cooking utensils may become hot from the heat emitted by the food, so that you may require oven gloves to touch them. In this case, a check should also be made to ensure that the cooking utensils are suitable for use with the microwave oven. Attention! Hot surfaces! Risk of fire! Never leave the microwave oven unattended if you are heating foodstuffs packed in plastics or paper. Never place flammable materials close to the microwave oven or the ventilation openings. Remove ALL metallic closures from the packaging of the foodstuff that you intend to warm up. Risk of fire! When making popcorn, use only popcorn-bags suitable for microwave ovens. Do not use the microwave oven to warm up cushions filled with kernels, cherry stones or gels. Risk of fire! Do not use the microwave oven for storing foodstuffs or other objects. Do not exceed the cooking times detailed by the manufacturer. Do not place any objects on the microwave oven when it is in use. The ventilation openings would be blocked! Do not place the microwave oven adjacent to other appliances discharging heat, for example, an oven. Clean the microwave oven thoroughly after warming up greasy foods, especially if they were not covered. Allow the appliance to cool down completely before cleaning it. Residues such as fat or grease cannot be allowed to collect on the heating elements of the grill. They could possibly ignite. Do not thaw frozen fat or oil in the microwave oven. The fat or oil could ignite. Do not use an external timing switch or a separate remote control system to operate the appliance

10 This microwave is designed to be used for heating foods and drinks. Drying foods or clothing or the warming of heating pads, slippers, sponges, damp cloths or similar can lead to injuries, ignition of the material or fires. Important! Appliance Damage! Do not use the microwave oven when it is empty. The only exception is for the initial commissioning (see chapter "Commissioning"). Never insert foreign objects into the ventilation openings or the door safety locks. Do not use metallic utensils which reflect microwaves and lead to sparking. Do not place tins in the microwave oven. Do not place plastic containers in the microwave oven immediately after a grill, combi or automatic menu process. The plastic could melt. This microwave oven may not be located in areas with high humidity or where moisture could collect. Liquids and other foods must not be heated in airtight containers, as these may explode and damage the appliance. Do not lean on the microwave oven door. Insufficient cleanliness of the appliance could lead to the destruction of the upper surfaces, which themselves influence its useful lifespan and could possibly also lead to dangerous situations. Danger! Never submerse the appliance, the power cable or the plug in water or other fluids. Keep the power cable away from hot surfaces. Do not lead it in front of the appliance door. The heat could damage the cable. Never pour fluids into the ventilation openings or the safety locks. Should fluids ever enter them, immediately switch the appliance off and remove the plug from the mains power socket. Arrange for the appliance to be checked by qualified specialists

11 Safety tips To minimize the risk of fire in the appliance: When heating food in plastic or paper containers, always keep an eye on the appliance when it is in operation, as these materials can catch fire. When heating drinks in the appliance, bubbling may be delayed when the drink boils. Therefore, be careful when handling the container. To avoid sudden simmering: If possible, place a glass rod in the fluid for as long as it is being heated. To avoid an unexpected reboiling, leave the fluid to stand in the appliance oven for ca. 20 seconds after being warmed up. Puncture the skins of potatoes, sausages or similar. Otherwise, they could explode. Proceed with caution when warming up fluids. Use only open containers, so that any air bubbles produced can escape. If the appliance starts to give off smoke it should be switched off immediately or the plug removed from the mains and the door should be kept closed to smother any flames that might otherwise escape. Eggs in their shells and hard-boiled eggs should not be heated in the appliance as they could explode, even on completion of the heating process. Food with thick skins, such as potatoes, whole pumpkins, apples and chestnuts must be pricked before cooking. Do not transport the appliance when it is in use

12 Earthing information/correct installation This appliance must be earthed. This appliance is to be connected only to a correctly earthed power socket. An individual circuit, solely for the connection of the appliance, is recommended. Danger: Improper use of the earthing connector could increase the risk of an electric shock. Notice: Should you have any questions about earthing or about the instructions on the use of this electrical appliance given here, please consult an electrician or a maintenance technician. Neither the manufacturer nor the dealer can accept liability for damage to the appliance or injury to persons resulting from failure to comply with the instructions for electrical connection. Interference with other appliances The operation of the appliance may cause interference on your radio, television or similar appliances. If such interference should occur, they may be reduced or corrected by the following remedial measures: Clean the door and the seal of the appliance. Re-align the receiver antenna of your radio or television. Position the appliance in a different place to the receiver. Move the appliance away from the receiver. Plug the appliance into another wall socket. The appliance and the receiver should be connected to different circuits

13 Before you begin Basic principles of microwave cookery Arrange the food with consideration. The thickest parts near the edges. Pay attention to the cooking time. Select the shortest possible stated cooking time and increase as required. Food that is cooked too long can begin to smoke or catch fire. Cover the food during cooking with a lid suitable for microwave cookery. The lid prevents splashing and helps in the even cooking of the food. While cooking, turn the food in the microwave once so that items such as chicken or hamburgers are cooked more quickly. Large pieces of food, such as joints of meat, must be turned at least once. Completely re-arrange foods such as meatballs after half the cooking time. Turn them and move the meatballs from the middle of the cookware to the edge. Use suitable cookware The ideal material for a microwave oven is microwave-permeable, allowing the energy to penetrate the container to heat the food. Microwaves cannot permeate metal. For this reason metal containers and cookware may not be used. When using the microwave for heating do not use products made of recycled paper. These can contain minute fragments of metal, which can generate sparks and/or fires. We recommend the use of round/oval cookware instead of square or oblong containers, as food in corner areas tends to overcook. The following list provides general hints to assist you in selecting the correct cookware. Cookware Heat-resistant glass Combination Non-heatresistant glass Heat-resistant ceramics Plastic crockery suitable for microwave Microwave oven Grill Convection Yes Yes Yes Yes No No No No Yes Yes Yes Yes Yes No No No Kitchen roll Yes No No No Metal tray/plate No Yes Yes No Grill stand No Yes Yes No Alufoil & Foil containers No Yes Yes No

14 Risk of fire! NEVER use the grill stand or other metallic objects when you are using the appliance in the microwave mode or in the combination cooking process. Metals reflect the microwave radiation and it leads to the generation of sparks. This could cause a fire and irreparably damage the appliance! Commissioning Installation of the appliance Risk of fire! This microwave oven is not suitable for installation in a kitchen cabinet. In closed cabinets sufficient ventilation for the appliance cannot be assured. The appliance could be damaged and there would be the additional risk of a fire! Select an even surface offering sufficient space for the adequate ventilation of the appliance: Ensure that you maintain a minimum distance of 10 cm from neighbouring walls/surfaces. Make sure that the door of the microwave oven can be opened easily. Maintain a gap of at least 20 cm above the microwave oven. Ensure that the electrical plug is accessible without problem, so that in case of danger it can be easily reached and removed. Do not remove the pads underneath the microwave oven. Do not block the ventilation openings 5. If you do, it could cause damage to the appliance. Install the appliance as far away as possible from radios and televisions. The operation of the microwave oven can cause malfunctions of radio and televsision reception. Warning: Do not install the microwave above a cooker or any other appliance generating heat. Installation at such a location could cause damage to the appliance and thereby a subsequent lapse of the warranty provisions. Preparing the appliance Remove the packaging material and the protective film applied to the panel and the door opener button 2. Do not remove the light grey flimmer cover plate, which is mounted in the cooking compartment to protect the magnetron. Insert the plug into a mains power socket. Use a V ~, 50 Hz, mains power socket with a 16 A fuse. We recommend that the microwave is powered by its own mains circuit. If you are unsure about how to connect the microwave oven, consult a specialist. Before the first regular usage of the microwave oven the appliance must be heated up to remove any remaining production residues. Once you have plugged the plug into the socket, open the microwave door once by pressing the Door opener button 2. Switch the appliance on in grill operating mode without foods and without accessories (turntable 3 and grill stands t):

15 Press the Grill button 7. "Gr 1" will appear in the display. Turn the rotary knob r, as far as "Gr 3" and the and symbols appear in the display, then confirm the selection by pressing the Start/quick start button r. Use the rotary knob r to set a cooking time of 10 minutes. Press the Start/quick start button r to start the grill process. Note Light smoke generation and a slight smell can occur on first usage, this is due to production residues. These are not harmful. Provide sufficient ventilation. For example, open a window. After 10 minutes the appliance will switch itself off automatically. Wait until it has cooled down completely. Remove the plug from the mains power socket then, after cleaning the appliance with a moist cloth, dry it carefully. Place the turntable 3 inside Place the turntable 3 centrally over the axle in the cooking compartment. Ensure that it slides completely onto the axle and is firmly seated. Operation Setting the Clock After inserting the mains plug into the socket, open the microwave door once. The display 1 shows "1:00". Re-close the door. 1. Press the Clock button q. "Hr 12" appears in the display Select the required mode (Hr 24 or Hr 12) by turning the rotary knob r and then confirm your selection by pressing the Start/quick start button r. Note The time display will only appear once you turn the rotary knob r again, which enables you to set the hour. 3. Select the required hour by turning the rotary knob r and confirm your selection by pressing the Start/quick start button r. 4. Select the required minutes by turning the rotary knob r and confirm your selection by pressing the Start/quick start button r. The time display is now programmed. To read the current time while the microwave is in operation, press the Clock button q ; the time is then shown in the display 1 for a few seconds. Standby mode The microwave automatically switches over to standby mode, and the time is displayed, if no button is pressed for a longer period. The display illumination also dims a few seconds after switching over to standby mode. Setting the kitchen timer The microwave oven is provided with a kitchen timer which you can use independently of the microwave operation. 1. Press the TIMER button w while the appliance is in standby mode. "0:00" is shown in the display 1 along with symbol. 2. Now set the required time using the rotary knob r. You can select any time range from 10 seconds to 95 minutes

16 3. Press the Start/quick start button r. The appliance emits an acoustic signal. The countdown begins. After approx. 3 seconds the current time is shown once again. The kitchen timer will continue to run in the background. If you want to check the kitchen timer inbetween times, press the TIMER button w. The kitchen timer appears for a moment. As soon as the set time period has expired, signal tones sound. Child lock Engage this setting to prevent accidental activation by children and other persons not familiar with the operation of the appliance. The symbol for the child lock appears in the display 1, which means that the appliance cannot be operated as long as this function is activated. Press the Stop/child lock button e and hold it down until a signal tone is sounded and the symbol for the child lock appears in the display 1. The buttons and the control dial now no longer have a function. To deactivate the child lock, press the Stop/child lock button e and hold it down until a signal tone is sounded and the symbol for the child lock goes out. Query functions Query the time during operation During the cooking process, press the Clock button q. The time will appear for a few seconds in the display 1. Query the power level operation During the cooking process, press the Microwave button 6. The activated power level will appear for a few seconds in the display 1. Interrupt/cancel cooking or defrosting processes Press the Stop button e, once in order to interrupt a cooking or defrosting process. The appliance interrupts the process and stops countdown of the remaining time. Press the Start/quick start button r to continue the process. Press the Stop button e twice to cancel a cooking process. The appliance reverts to standby mode. Heating and cooking Note This microwave is equipped with a cooling function. This means that the machine fan continues running for about 3 minutes after a cooking or grill process which takes at least two minutes. This is not a malfunction of the appliance! The rapid cooling helps to prolong the life of the appliance. Microwave operation Note During the cooking process, drops of water can form on the oven door or on the housing. This is normal and is not an indication of a malfunction. When the appliance has cooled down, wipe the moisture off with a dry cloth. Fire hazard! NEVER use the grill stand t or other metallic objects when you are using the appliance in the microwave mode. Metals reflect the microwave radiation and it leads to the generation of sparks. This could cause a fire and irreparably damage the appliance!

17 Selecting the operation level 1. Press the Microwave button 6. "900" (900 W power) appears in the display Now set the required power level using the rotary knob r. 3. Press the Start/quick start button r to confirm the power level you have set. Programming the cooking time After you have selected the power level, programme in the desired cooking time: Turn the rotary knob r until the required cooking time has been set. The stages for the rotary knob r setting times are as follows: from 0 sec to 5 min: in 10 second increments from 5 to 10 min: in 30 second increments from 10 to 30 min: in 1 minute increments from 30 to 95 min: in 5 minute increments Aborting/stopping an input process Press the Stop button e once to cancel and exit an input process. The appliance reverts to standby mode. Starting the cooking process When you have set the power and cooking time, you can start the cooking process: Press the Start/quick start button r to start the cooking process. The symbol for microwave operation appears in the display 1. The set time will now count down backwards. Once the set time has expired, "End" and "Hot" are shown alternating in the display 1. A signal tone is heard repeatedly. Quick start 1 When in standby mode, turn the rotary knob r to the right and set the required cooking period. Start the cooking process with 900 W power by pressing the Start/quick start button r. Quick start 2 You can use this function to start cooking immediately for 30 seconds (or longer, up to 95 min) at 900 W power. Press the Start/quick start button r once. The symbol for microwave operation appears in the display 1 in addition to "00:30". The microwave starts the cooking process for 30 seconds. The countdown begins. If you want to cook for longer than 30 seconds, press the Start/quick start button r several times until the required time has been set. The time levels are apportioned as follows: from 30 sec to 5 min: in 30 second increments from 5 min to 95 min: in 1 minute increments Grill function Note Always use the grill stands t when grilling. This achieves an optimal grilling result. Always placed the grill stands t on the turntable 3. Fire hazard! When using the grill functions, under no circumstances should you use any form of covering or cookware that is not heat-resistant, as these could melt or ignite themselves!

18 3 grill functions are available: "Top heat" grill function (Gr 1): With this function, the heat only comes from above. Only the top grill is activated. This grill function is therefore suitable for grilled sandwiches and gratins. "Bottom heat" grill function (Gr 2): With this function, the heat only comes from below. Only the bottom grill is activated. This grill function is therefore suitable for meals or foods which need to be cooked or grilled from below. "Top and bottom heat" grill function (Gr 3): With this function, the heat comes from above and below. The top and the bottom grills are activated. This grill function is therefore suitable for thin slices of meat, steaks, hamburgers, sausages or chicken pieces. 1. Press the Grill button 7 once to activate the grill function. The symbol for the "Top heat" grill function appears in the display 1 along with "Gr 1". 2. Now set the required grill function using the rotary knob r : "Gr 1" for top heat, "Gr 2" for bottom heat, "Gr 3" for top and bottom heat. Confirm your selection by pressing the Start/quick start button r. 3. Now set the required cooking time using the rotary knob r. The maximum possible cooking time setting is 95 minutes. 4. To start grill function, press the Start/quick start button r. The symbol for the selected grill function / / appears in the display 1. The set time will now count down backwards. Once the set time has expired, "End" and "Hot" are shown alternating in the display 1. A signal tone is heard repeatedly. Combination cooking process "Grill" This function combines the grill function and the normal microwave operation. During the combination mode, a certain amount of time for cooking and the remaining time for grilling is carried out automatically and in one process. You may notice a quiet clicking noise when the oven is switching between modes. Fire hazard! Never use the grill stand t or other metallic objects when you are using the microwave for combined cooking processes. Metals reflect the microwave radiation and it leads to the generation of sparks. This could cause a fire and irreparably damage the appliance! When using the "Grill" combined cooking functions, under no circumstances should you use any form of covering or cookware that is not heat-resistant, as these could melt or ignite themselves! 4 combinations are available: Combination 1 (C 1): For Combination 1, the microwave power is 30% and the grill power is 70% of the cooking time. This is suitable for fish or gratins, for example. The microwave function and the grill function "top heat" are used. Combination 2 (C 2): For Combination 2, the microwave power is 55% and the grill power is 45% of the cooking time. This is suitable for puddings, omelets or lasagne, for example. The microwave function and the "top heat" grill function are used. Combination 3 (C 3): For Combination 3, the microwave power is 30% and the grill power is 70% of the cooking time. This is suitable for potatoes, for example. The microwave function and the grill functions "top and bottom heat" are used
: With this function, the heat comes from above and below. The top and the bottom grills are activated.")
19 Combination 4 (C 4): For Combination 4, the microwave power is 55% and the grill power is 45% of the cooking time. This is suitable for poultry dishes, for example. The microwave function and the grill functions "top and bottom heat" are used. 1. Press the Combination microwave-grill button 8 once to activate Combination 1 (C 1).,, and "C 1" are shown in the display Now set the required combination using the rotary knob r : "C 1" for combination 1, "C 2" for combination 2, "C 3" for combination 3, "C 4" for combination 4. Confirm your selection by pressing the Start/quick start button r. 3. Now set the required cooking time using the rotary knob r. The maximum possible cooking time setting is 95 minutes. 4. Press the Start/quick start button r to start the process. The symbols of the cooking process being used,, appear on the screen 1. The programmed time counts backwards. Once the set time has expired, "End" and "Hot" are shown alternating in the display 1. A signal tone is heard repeatedly. Convection operation When cooking with convection, hot air circulates in the cooking compartment. Convection is especially recommended for cooking souffles or crunchy foods. You can set a temperature of between 110 C and 200 C and a duration of max. 95 min. 1. Press the Convection button 0. "200C" (= 200 C) appears in the display along with the symbol for convection operation. 2. Use the rotary knob r to set the required temperature and confirm your selection by pressing the Start/quick start button r. 3. Now set the required cooking time using the rotary knob r. 4. Press the Start/quick start button r to start the cooking process. The symbol for convection operation appears in the display 1. The programmed time counts backwards. Once the set time has expired, "End" and "Hot" are shown alternating in the display 1. A signal tone is heard repeatedly

20 Convection operation with preheating You can also preheat your microwave before you start a cooking process: 1. Select the required temperature by pressing the Convection button 0 and use the rotary knob r to set the temperature. You do NOT need to confirm this setting by pressing the Start/quick start button r. 2. To start preheating, press the Convection button 0. "30:00" appears in the display 1 and the symbol for convection operation flashes. The countdown begins. Assumes the set temperature is reached, signal tones will sound and the time will stop. 3. Open the door and place the foods to be cooked inside. 4. Turn the rotary knob r to set the temperature and confirm the temperature by pressing the Start/quick start button r. 5. Now set the required cooking time using the rotary knob r. The maximum possible cooking time setting is 95 minutes. 6. Press the Start/quick start button r to start the process. The symbol for convection operation appears in the display 1 permanently. The programmed time counts backwards. Once the set time has expired, "End" and "Hot" are shown alternating in the display 1. A signal tone is heard repeatedly. Combination cooking process "Convection" This function combines the convection function with the normal microwave operation. With this, for example, meat is juicy and tender but still crisp. Fire hazard! Never use the grill stand t or other metallic objects when you are using the microwave for combined cooking processes. Metals reflect the microwave radiation and it leads to the generation of sparks. This could cause a fire and irreparably damage the appliance! 1. Press the Combination microwave-convection button 9. The preset temperature "200C" and the symbols and appear in the display Now set the required temperature using the rotary knob r : 110 C, 140 C, 170 C or 200 C. Confirm your selection by pressing the Start/quick start button r. 3. Now set the required cooking time using the rotary knob r. The maximum cooking time is 95 minutes. Press the Start/quick start button r to confirm the set cooking time. The combination process starts. The symbols for the combination cooking process "Convection", appear on the screen 1. The programmed time counts backwards. Once the set time has expired, "End" and "Hot" are shown alternating in the display 1. A signal tone is heard repeatedly

21 Auto menu For foods to be prepared in automatic menu mode, it is not necessary to enter the cooking time or power setting. It is quite sufficient to enter which type of food is to be cooked/boiled, and its weight. Fire hazard! Under NO circumstances may you use covers or non-heat-resistant dishes for programmes with enabled Grill function (A-01, A-02, A-03, A-04, A-05), as they can melt or catch fire! Note The microwave will calculate the time/power level for fresh foods. Deep-frozen foods will not be cooked properly using the times specified by the microwave (with the exception of the "Pizza" automatic programme). If needs be, defrost frozen foods with the defrost programme beforehand (see section "Defrosting"). Starting the Auto menu 1. Turn the rotary knob r (in standby mode) slowly to the left to call up the automatic menu mode. A number (e.g. "A - 02" for automatic programme 2 (pork)) and the "Pork" symbol appear in the display 1. Turn the rotary knob r to select the appropriate automatic menu for your food. Note If you have entered automatic menu mode by turning the rotary knob r to the left, you can turn the rotary knob to the right afterwards to select the automatic menus in the sequence of A01, A02, A Display Symbol Food Weight A-01 Beef g A-02 Pork g A-03 Poultry g A-04 Fish g A-05 Pizza A-06 Fruit/ vegetables *P g P g P g g A-07 Potatoes g A-08 Warming g A-09 Beverages ml A-10 Entrees 300 / 500 g A-11 Defrosting by weight - A-12 Defrosting by time - *Please refer to the chapter entitled "Baking pizzas" for more information on the pizza programme
22 2. Confirm your selection by pressing the Start/quick start button r. 3. Turn the rotary knob r to set the weight, and then confirm this by pressing the Start/quick start button r. The cooking process is started and the calculated time will countdown backwards. The cooking process starts. The symbols for the cooking and grill functions that are being used for the selected automatic programme appear on the display. Microwave function, grill function Top heat, grill function Bottom heat. The calculated time starts running down. Note To obtain uniform warming or cooking, some foods should be turned after 2/3 of the cooking process duration. The microwave automatically stops after this time, 4 signal tones sound and "Turn" appears in the display 1. Display Symbol Food A-01 Beef A-02 Pork A-03 Poultry A-04 Fish Turn over after... 2/3 of the time 2/3 of the time 2/3 of the time 2/3 of the time Turn the food over. Proceed cautiously with food which may already be hot. Press the Start/quick start button r to continue the cooking process. Note If you do not want to turn the food, just wait for the signal tones to stop. The appliance will automatically continue the cooking process. We recommend that you do turn the food. This will ensure even cooking. Note If the meal is not completely cooked after the automatic menu has finished, proceed as follows: Use the cooking process stated in the table for re-cooking. Start this process for a few minutes, and check the cooking result. When re-cooking a pizza using automatic menu "P2", interrupt the cooking process by pressing the Stop/child lock button as soon as the pizza has been cooked enough. Display Symbol Food A-01 Beef A-02 Pork A-03 Poultry A-04 Fish A-05 Pizza A-06 Fruit/ vegetables Re-cook with... "Grill" combination cooking process - C 3 "Grill" combination cooking process - C 3 "Grill" combination cooking process - C 3 "Grill" combination cooking process - C 3 "Pizza" automatic menu - P2 Microwave operation with 900 W power
23 A-07 Potatoes A-08 Warming A-09 Beverages A-10 Entrees A-11 A-12 Risk of injury! The turntable 3 is always very hot after a cooking process using the grill! You should therefore always use an oven cloth or heat-resistant oven gloves when removing it from the cooking compartment. Note Defrosting by weight Defrosting by time Microwave operation with 900 W power Microwave operation with 900 W power Microwave operation with 900 W power Microwave operation with 900 W power Microwave operation with 100 W power Microwave operation with 100 W power Please note that the size, shape and the type of foodstuff determines the result of the cooking process. Example 1: Proceed as follows to cook 400 g vegetables or fruit: 1. Turn the rotary knob r to the left (when in standby mode) until "A-06" appears in the display 1 and then confirm your selection by pressing the Start/quick start button r. 2. Now set a weight of "400" using the rotary knob r. 3. Press the Start/quick start button r to start the cooking process. Example 2: To heat 300 ml water, proceed as follows: 1. Turn the rotary knob r to the left (when in standby mode) until "A-09" appears in the display 1 and then confirm your selection by pressing the Start/quick start button r. 2. Now set a weight of "300" using the rotary knob r. 3. Press the Start/quick start button r to start the cooking process. Example 3: To heat 300 g of appetizers, proceed as follows: 1. Turn the rotary knob r to the left (when in standby mode) until "A-10" appears in the display 1 and then confirm your selection by pressing the Start/quick start button r. 2. Since "300" is always the first selection in the display, press the Start/quick start button r to start the cooking process. Baking pizza With the automatic programme "Pizza" you can prepare delicious pizzas in the microwave. In this case you can select between pizza programmes "P-01" (deep-frozen pizza), "P-02" (refrigerated pizza) and "P-03" (fresh pizza). 1. Turn the rotary knob r slowly to the left (when in standby mode) until "A-05" appears in the display Press the Start/quick start button r. 3. Now set the required pizza programme using the rotary knob r :
24 "P-01" for deep-frozen pizza, temperature approx. -18, weight 150g 450g ("P-01" appears in the display 1). "P-02" for refrigerated pizza, temperature approx. 5, weight 150g 450g ("P-02" appears in the display 1). "P-03" for fresh pizza, temperature approx. 20, weight 150g 450g ("P-03" appears in the display 1). 4. Confirm your selection by pressing the Start/quick start button r. 5. Turn the rotary knob r to set the required weight, and then confirm this by pressing the Start/quick start button r. The cooking process starts. Note If you are cooking pizza, you can place this directly on the turntable 3. It will be very crispy. Ensure that the edge of the pizza does not extend up to the walls of the cooking compartment during cooking. Example: Proceed as follows to cook a deep-frozen pizza weighing 450 g: 1. Turn the rotary knob r slowly to the left (when in standby mode) until "A-05" appears in the display Press the Start/quick start button r. 3. Now set the programme "P-01" using the rotary knob r : 4. Press the Start/quick start button r. 5. Now set a weight of "450" using the rotary knob r. 6. Press the Start/quick start button r to start the cooking process. The appliance calculates the time required automatically. Defrosting Defrosting by weight Note Always place the food to be defrosted on dishes suitable for use in a microwave oven. Never place it directly on the turntable 3! You can use this function to defrost. The defrosting time and the power level are calculated and set automatically once you have entered the weight. 1. When in standby mode, turn the rotary knob r anticlockwise until "A-11" appears in the display 1 and flashes (see chapter "Automatic menu"). 2. Press the Start/quick start button r. 3. Now select the food to be defrosted by turning the rotary knob r. The following appears in the display 1 : "d-01" and "d-02" and "d-03" and "d-04" and "d-05" and "d-06" and "d-07" and for "beef" for "pork" for "poultry" for "fish" for "pizza" for "fruit/vegetables" for "potatoes" 4. When the required food appears in the display 1, press the Start/quick start button r. 5. Turn the rotary knob r to set the weight
25 The following weights can be set: "d-01"/ / "beef" g "d-02"/ / "pork" g "d-03"/ / "poultry" g "d-04"/ / "fish" g "d-05"/ / "pizza" g "d-06"/ /"fruit/vegetables " g "d-07"/ / "potatoes" g 5. When the required weight appears in the display 1, press the Start/quick start button r. The appliance will then automatically calculate the required defrosting time. Note To ensure optimum defrosting, it is necessary to turn the food during the defrosting process. The appliance will remind you to turn the food over by sounding a signal tone and showing "turn" in the display 1. Open the appliance door, turn the food and then reclose the door. Press the Start/quick start button r to continue the defrosting process. If you do not want to turn the food, just wait for the signal tones to stop. The appliance will automatically continue the defrosting process. We recommend that you do turn the food. This will ensure even defrosting. Defrosting by time Note Always place the food to be defrosted on dishes suitable for use in a microwave oven. Never place it directly on the turntable 3! 1. When in standby mode, turn the rotary knob r anticlockwise until 1 "A-12" and appear in the display. 2. Press the Start/quick start button r. 3. Now set the required time using the rotary knob r. 4. Press the Start/quick start button r to start the defrosting process. The countdown begins. Note To ensure optimum defrosting, it is necessary to turn the food during the defrosting process. The appliance will remind you to turn the food over by sounding a signal tone and showing "turn" in the display 1. Open the appliance door, turn the food and then reclose the door. Press the Start/quick start button r to continue the defrosting process. If you do not want to turn the food, just wait for the signal tones to stop. The appliance will automatically continue the defrosting process. We recommend that you do turn the food. This will ensure an even defrosting
26 Recipes Meat patty Use around 125 g of minced beef to form each patty (diameter approx. 75 mm, height approx. 35mm). Distribute the patties evenly around the turntable 3. Preparation You will achieve the best results if you alternate between the convection and microwave functions. Always wait until the set cooking process has completed before setting the next process. 1. Convection 200 C, 4:00 min. 2. Microwave 900 W power, 5:30 min. 3. Convection 200 C, 2:00 min. (depending on personal taste, a time of up to 4:00 min can also be used). Baking frozen ready-made bread rolls Select the convection function to bake bread rolls. Place 3-4 bread rolls on the turntable 3. Pre-heating of the microwave is not required. Select the following settings for the baking process: Convection 170 C, duration: 12 minutes If you wish to bake additional rolls directly afterwards, shorten the baking time for these by about 1-2 minutes, as the appliance is now already preheated. Potato gratin Ingredients 750 g waxy potatoes, peeled 300 g cream 100 g grated cheese with a fat content of 25% to 30 % fat in dry matter. Spices to taste (e.g., salt/pepper) Use a microwave-proof, round dish with a lid, height 5-6 cm and a diameter of about 22 cm. Preparation Cut the potatoes into slices around 3-4 mm thick. Place around half of the potato slices in the baking dish in "roofing tile" formation. Sprinkle the potatoes with around half of the cheese. Add half of the spices in addition to approx. 150 g of cream. Now place the rest of the potato slices in "roofing tile" formation over the first layer. Sprinkle the rest of the cheese over the potatoes and pour the rest of the cream over this. Sprinkle the remaining spices over the gratin. Cover the dish with the cover and place it in the centre of the turntable 3. Preparation You will achieve the best results if you alternate between the convection and microwave functions. Always wait until the set cooking process has completed before setting the next process. 1. Microwave 900 W power, 10:00 min. 2. Convection 200 C, 13:00 min. 3. Microwave 900 W power, 10:00 min. Pre-heating is not required
27 Muffins Ingredients This recipe yields 10 to 20 muffins. Baking margarine (80% fat content) or salted butter 170 g granulated sugar (up to 0.3 mm grain size) 3 eggs (55-60 g with shell/size M) 225 g wheat flour 7 g baking powder 0,25 g salt Preparation Mix all ingredients well. Fill the muffin pastry into commercial paper baking cases (diameter 45 mm, height 28 mm) Preheat the oven with the convection function to 170 C. Note Should, due to the number of muffins, multiple baking operations be necessary, preheating is required only once. Distribute the muffins evenly on the turntable 3. Select the following settings for the baking process: Convection 170 C, Duration: 12 Minutes Cleaning and Care Risk of injury! Before cleaning, switch the microwave oven off and remove the plug from the mains power socket. Otherwise, there is the great risk of receiving an electric shock! UNDER NO CIRCUMSTANCES should you immerse the appliance in water or other liquids. This could result in you receiving a fatal electric shock and the appliance could be damaged. Always keep the interior of the microwave oven clean. If splashes of food or spilt liquids stick to the walls of the microwave, wipe them off with a damp cloth. Use a mild detergent if the microwave is more heavily soiled. Avoid using cleaning sprays and other aggressive cleaning agents, as they can cause stains, stripes or a blurring of the door surface. Clean the external walls with a damp cloth. To avoid damage to the functional components in the interior of the microwave, do not let liquids to seep in through the ventilation slits 5. Regularly remove splashes or contaminants. Clean the door, both sides of the viewing window, door seals and adjacent components with a damp cloth. Do not use abrasive cleaning agents. Should steam collect on or around the outside of the appliance door, wipe it off with a soft towel. This can happen if the microwave is operated in extremely humid conditions
28 Clean the turntable 3 regularly. Clean the plate in warm soapy water. Clean the grill stand t in warm dishwater and dry it well. Regularly eliminate odours. Place a deep microwave bowl with a cup of water and the juice and peel of a lemon into the microwave oven. Heat it up for 5 minutes. Wipe off thoroughly and rub dry with a cloth. Should replacement of the bulb in the microwave be necessary, arrange for it to be exchanged by a dealer or consult our Service Department. Troubleshooting The display 1 indicates nothing. The plug is not inserted into a power socket. Check the plug. The mains power socket is defective. Try another mains power socket. The display 1 is defective. Contact our Customer Services Department. The appliance does not respond to pressing the buttons. The Child safety facility is activated. Deactivate the Child safety facility (see chapter "Operation ). The appliance does not start the cooking/ warming process. The door is not properly closed. Close the door correctly. The turntable 3 generates loud noise when revolving. The turntable 3 is not correctly positioned on the axle. Insert the turntable 3 correctly into the cooking area. The small rollers 4 and/or the floor of the cooking area are unclean. Clean the rollers 4 and the floor of the cooking area. The display 1 indicates "E01" and signal tones sound. The microwave is overheated. Terminate the current programme immediately. Remove the plug from the mains power socket, open the microwave door and allow the appliance to cool down. The display 1 indicates "E02" and signal tones sound. There is an error on the sensor. Interrupt the programme and let the appliance cool down. Then restart the microwave. If the error occurs again, contact Customer Support. There is an error during the heating up of the appliance. Interrupt the programme and let the appliance cool down. Then restart the microwave. If the error occurs again, contact Customer Support. The display 1 indicates "E03" and signal tones sound. Due to a short circuit or open circuit voltage, the microwave has switched into fault protection. Stop the programme and remove the power plug. If possible, eliminate the problem, e.g. metals in the cooking area, which can lead to the above problem when using the microwave function. Otherwise, please contact our Customer Support
29 Disposal Do not dispose of this appliance in your normal domestic waste. This product is subject to the provisions of European Directive 2012/19/EU. Dispose of the appliance through an approved disposal centre or at your community waste facility. Observe the currently applicable regulations. In case of doubt, please contact your waste disposal centre. Dispose of all packaging materials in an environmentally friendly manner. The warranty period is not extended by repairs effected under warranty. This applies also to replaced and repaired parts. Damages or defects discovered after purchase are to be reported directly after unpacking, at the latest two days after the purchase date. Repairs carried out after lapse of the warranty period are subject to charge. Service Great Britain Tel.: ( 0.10/Min.) kompernass@lidl.co.uk IAN Hotline availability: Monday to Friday 08:00-20:00 (CET) Warranty and Service You receive a 3-year warranty for this appliance as of the purchase date. This appliance has been manufactured with care and meticulously examined before delivery. Please retain your receipt as proof of purchase. In the case of a warranty claim, please make contact by telephone with our service department. Only in this way can a post-free despatch for your goods be assured. The warranty covers only claims for material and manufacturing defects, not for transport damages, worn parts or for damage to fragile components, e.g. buttons or batteries. This product is for private use only and is not intended for commercial applications. In the event of misuse and improper handling, use of force and interference not carried out by our authorized service branch, the warranty will become void.. Your statutory rights are not restricted in any way by this warranty. Importer KOMPERNASS HANDELS GMBH BURGSTRASSE BOCHUM GERMANY
GUIDELINES FOR CONNECTION TO FTP SERVER TO TRANSFER PRINTING DATA
 GUIDELINES FOR CONNECTION TO FTP SERVER TO TRANSFER PRINTING DATA What is an FTP client and how to use it? FTP (File transport protocol) - A protocol used to transfer your printing data files to the MAFRAPRINT
UŽIVATELSKÁ PŘÍRUČKA
 UŽIVATELSKÁ PŘÍRUČKA Plni víry a naděje míříme kupředu. S odhodláním zlepšujeme své dovednosti. Zapomeňte na zklamání, ale nikoli na svůj nevyužitý potenciál. Touha překonat sám sebe a dosáhnout hranice
Litosil - application
 Litosil - application The series of Litosil is primarily determined for cut polished floors. The cut polished floors are supplied by some specialized firms which are fitted with the appropriate technical
ROLZ-2. Portable AV/Conference Center. Assembly Instructions
 1 ROLZ-2 Portable AV/Conference Center Assembly Instructions Rolz-2 Portable AV/Conference Center Part Drawing Description Qty Part Drawing Description Qty Hardware List A 1 ½ Flat Head Screw 2 EA P-1
USER'S MANUAL FAN MOTOR DRIVER FMD-02
 USER'S MANUAL FAN MOTOR DRIVER FMD-02 IMPORTANT NOTE: Read this manual carefully before installing or operating your new air conditioning unit. Make sure to save this manual for future reference. FMD Module
UPM3 Hybrid Návod na ovládání Čerpadlo UPM3 Hybrid 2-5 Instruction Manual UPM3 Hybrid Circulation Pump 6-9
 www.regulus.cz UPM3 Hybrid Návod na ovládání Čerpadlo UPM3 Hybrid 2-5 Instruction Manual UPM3 Hybrid Circulation Pump 6-9 CZ EN UPM3 Hybrid 1. Úvod V továrním nastavení čerpadla UPM3 Hybrid je profil PWM
ADDRESS CONVERSION TABLE FOR MANUAL SETTING
 - (06-57) - ADDRESS CVERSI TABLE FOR MANUAL SETTING In the case of a multiple refrigerant system, each refrigerant system should be set an exclusive refrigerant. Conversion table of refrigerant and rotary
User manual SŘHV Online WEB interface for CUSTOMERS June 2017 version 14 VÍTKOVICE STEEL, a.s. vitkovicesteel.com
 1/ 11 User manual SŘHV Online WEB interface for CUSTOMERS June 2017 version 14 2/ 11 Contents 1. MINIMUM SYSTEM REQUIREMENTS... 3 2. SŘHV ON-LINE WEB INTERFACE... 4 3. LOGGING INTO SŘHV... 4 4. CONTRACT
PC/104, PC/104-Plus. 196 ept GmbH I Tel. +49 (0) / I Fax +49 (0) / I I
 / I Fax +49 (0) / I I") E L E C T R O N I C C O N N E C T O R S 196 ept GmbH I Tel. +49 (0) 88 61 / 25 01 0 I Fax +49 (0) 88 61 / 55 07 I E-Mail sales@ept.de I www.ept.de Contents Introduction 198 Overview 199 The Standard 200
E L E C T R O N I C C O N N E C T O R S 196 ept GmbH I Tel. +49 (0) 88 61 / 25 01 0 I Fax +49 (0) 88 61 / 55 07 I E-Mail sales@ept.de I www.ept.de Contents Introduction 198 Overview 199 The Standard 200
2N Voice Alarm Station
 2N Voice Alarm Station 2N Lift1 Installation Manual Version 1.0.0 www.2n.cz EN Voice Alarm Station Description The 2N Voice Alarm Station extends the 2N Lift1/ 2N SingleTalk with an audio unit installed
SERVISNÍ MANUÁL PEGAS 250 E CEL OVO SERVICE MANUAL PEGAS 250 E CEL OVO
 MG136-1 PEGAS 250 E CEL OVO SERVICE MANUAL page 1 SERVISNÍ MANUÁL PEGAS 250 E CEL OVO SERVICE MANUAL PEGAS 250 E CEL OVO 1. VAROVÁNÍ WARNING UPOZORNĚNÍ Pouze osoba splňující kvalifikaci danou zákonem je
SPECIFICATION FOR ALDER LED
 SPECIFICATION FOR ALDER LED MODEL:AS-D75xxyy-C2LZ-H1-E 1 / 13 Absolute Maximum Ratings (Ta = 25 C) Parameter Symbol Absolute maximum Rating Unit Peak Forward Current I FP 500 ma Forward Current(DC) IF
MA251 (cz_en) Operating instructions. MA251 (cz_en) Montážní návod. Krimpovací kleště PV-CZM... pro MC3, MC4 a MC4-EVO 2
 Operating instructions. MA251 (cz_en) Montážní návod. Krimpovací kleště PV-CZM... pro MC3, MC4 a MC4-EVO 2") MA251 (cz_en) Montážní návod Krimpovací kleště PV-CZM... pro MC3, MC4 a MC4-EVO 2 MA251 (cz_en) Operating instructions Crimping pliers PV-CZM... for MC3, MC4 and MC4-EVO 2 Obsah Bezpečnostní pokyny...2
MA251 (cz_en) Montážní návod Krimpovací kleště PV-CZM... pro MC3, MC4 a MC4-EVO 2 MA251 (cz_en) Operating instructions Crimping pliers PV-CZM... for MC3, MC4 and MC4-EVO 2 Obsah Bezpečnostní pokyny...2
FIRE INVESTIGATION. Střední průmyslová škola Hranice. Mgr. Radka Vorlová. 19_Fire investigation CZ.1.07/1.5.00/
 FIRE INVESTIGATION Střední průmyslová škola Hranice Mgr. Radka Vorlová 19_Fire investigation CZ.1.07/1.5.00/34.0608 Výukový materiál Číslo projektu: CZ.1.07/1.5.00/21.34.0608 Šablona: III/2 Inovace a zkvalitnění
 If there is any inconsistency of weather forecast between Local Weather Station and this unit, the Local Weather Station's forecast should prevail. The trend pointer displayed on the LCD indicates the
ROLZ-2. Portable AV/Conference Center. Assembly Instructions
 1 ROLZ-2 Portable AV/Conference Center Assembly Instructions Rolz-2 Portable AV/Conference Center Part Drawing Description Qty Part Drawing Description Qty Hardware List A 1 ½ Flat Head Screw 2 EA P-1
WL-5480USB. Quick Setup Guide
 Quick Setup Guide 1 Czech 7 Install Utility Software Note1: Before installing the utility software, DO NOT inserts the into your computer. If the adapter is inserted already, Windows will detect the adapter
Gymnázium, Brno, Slovanské nám. 7 WORKBOOK. Mathematics. Teacher: Student:
 WORKBOOK Subject: Teacher: Student: Mathematics.... School year:../ Conic section The conic sections are the nondegenerate curves generated by the intersections of a plane with one or two nappes of a cone.
2N LiftIP. IO Extender. Communicator for Lifts. Version
 2N LiftIP Communicator for Lifts IO Extender Version 2.4.0 www.2n.cz Description The IO extender helps you extend 2N LiftIP with 1 input and 2 outputs. The purpose of the input is to cancel the rescue
CZ.1.07/1.5.00/34.0527
 Projekt: Příjemce: Digitální učební materiály ve škole, registrační číslo projektu CZ.1.07/1.5.00/34.0527 Střední zdravotnická škola a Vyšší odborná škola zdravotnická, Husova 3, 371 60 České Budějovice
Uživatelská příručka. Xperia P TV Dock DK21
 Uživatelská příručka Xperia P TV Dock DK21 Obsah Úvod...3 Přehled zadní strany stanice TV Dock...3 Začínáme...4 Správce LiveWare...4 Upgradování aplikace Správce LiveWare...4 Použití stanice TV Dock...5
PMD 20 BiX MICROWAVE OVEN USER'S MANUAL
 PMD 20 BiX MICROWAVE OVEN USER'S MANUAL Dear customer, Thank you for buying a PHILCO brand product. So that your appliance serves you well, please read all the instructions in this user's manual. CONTENTS
Anotace Mgr. Filip Soviš (Autor) Angličtina, čeština Speciální vzdělávací potřeby - žádné -
 Angličtina, čeština Speciální vzdělávací potřeby - žádné -") Anotace Autor Jazyk Očekávaný výstup Speciální vzdělávací potřeby Klíčová slova Druh učebního materiálu Druh interaktivity Cílová skupina Stupeň a typ vzdělávání Typická věková skupina Vazby na ostatní
Anotace Autor Jazyk Očekávaný výstup Speciální vzdělávací potřeby Klíčová slova Druh učebního materiálu Druh interaktivity Cílová skupina Stupeň a typ vzdělávání Typická věková skupina Vazby na ostatní
Uživatelská příručka. USB Charger UCH20
 Uživatelská příručka USB Charger UCH20 Obsah Úvod...3 USB Charger popis... 3 Používání nabíječky USB... 4 Nabíjení zařízení... 4 Právní informace... 5 Declaration of Conformity...6 2 Úvod USB Charger popis
Hi-Res Audio/DNC Headset MDR-NC750
 Uživatelská příručka Hi-Res Audio/DNC Headset MDR-NC750 Obsah Začínáme...3 Úvod...3 Přehled... 3 Základy práce...4 Nošení náhlavní soupravy...4 Připojení náhlavní soupravy k vašemu zařízení... 4 Nastavení
Ecosun CH. Napětí V. 1096x155x115* 230 V 1N I IP 44 Ecosun CH x155x115*
 Návod k obsluze a montáži N631/R02 (06.08.14 ) Ecosun CH Sálavé panely do kostelních lavic 1. Použití Sálavé panely Ecosun CH jsou určeny k instalaci pod pevně připevněné kostelní lavice. Panely se instaluji
2N LiftIP. Voice Alarm Station. Communicator for Lifts. Version
 2N LiftIP Communicator for Lifts Voice Alarm Station Version 2.4.0 www.2n.cz Description The 2N Voice Alarm Station is a switch that helps you extend 2N LiftIP with one or more audio units installed on
Size / Světlost : DN 1/4 to 4 / DN 1/4 až 4
 Size / Světlost : 1/4 to 4 / 1/4 až 4 Ends / Konce : Threaded BSP / Závitové BSP Min. Temperature / Minimální teplota : -20 C Max. Temperature / Maximální teplota : +180 C Max. Pressure / Maximální tlak
Návod k obsluze a montáži N129/R04 (10.03.14 ) SUŠÁK NA RUCE
 SUŠÁK NA RUCE") Návod k obsluze a montáži N129/R04 (10.03.14 ) SUŠÁK NA RUCE Čtěte prosím pozorně informace uvedené v tomto návodu, který obsahuje důležité pokyny pro bezpečnou montáž, použití a údržbu jednotky. Uchovávejte
Návod k obsluze a montáži N129/R04 (10.03.14 ) SUŠÁK NA RUCE Čtěte prosím pozorně informace uvedené v tomto návodu, který obsahuje důležité pokyny pro bezpečnou montáž, použití a údržbu jednotky. Uchovávejte
POC 828 OVEN USER'S MANUAL
 POC 828 OVEN USER'S MANUAL Dear customer, Thank you for buying a PHILCO brand product. So that your appliance serves you well, please read all the instructions in this user's manual. CONTENTS PART 1: IMPORTANT
Mechanika Teplice, výrobní družstvo, závod Děčín TACHOGRAFY. Číslo Servisní Informace Mechanika: 5-2013
 Mechanika Teplice, výrobní družstvo, závod Děčín TACHOGRAFY Servisní Informace Datum vydání: 20.2.2013 Určeno pro : AMS, registrované subj.pro montáž st.měř. Na základě SI VDO č./datum: Není Mechanika
Quick Start Guide. Clear. Rychlý průvodce nastavením
 CZ EN Quick Start Guide Clear Rychlý průvodce nastavením Measurement Měření Před Fully prvním charge použitím the blood plně pressure dobijte monitor baterii before přístroje. first use. 1 Rest your bare
DATA SHEET. BC516 PNP Darlington transistor. technický list DISCRETE SEMICONDUCTORS Apr 23. Product specification Supersedes data of 1997 Apr 16
 zákaznická linka: 840 50 60 70 DISCRETE SEMICONDUCTORS DATA SHEET book, halfpage M3D186 Supersedes data of 1997 Apr 16 1999 Apr 23 str 1 Dodavatel: GM electronic, spol. s r.o., Křižíkova 77, 186 00 Praha
TechoLED H A N D B O O K
 TechoLED HANDBOOK Světelné panely TechoLED Úvod TechoLED LED světelné zdroje jsou moderním a perspektivním zdrojem světla se širokými možnostmi použití. Umožňují plnohodnotnou náhradu žárovek, zářivkových
Izolační manipulační tyče typ IMT IMT Type Insulated Handling Rod
 KATALOG CATALOGUE 024/09/2011 IZOLAČNÍ MANIPULAČNÍ TYČ INSULATED HANDLING ROD TYP IMT KOVOVÁ MANIPULAČNÍ TYČ METALLIC HANDLING ROD TYP KMT ISO 9001:2009 ISO 14001:2005 Izolační manipulační tyče typ IMT
2N Lift8 Audio unit machine room
 2N Lift8 Audio unit machine room Brief Manual Version 3.0.0 www.2n.cz The machine room audio unit is intended for installation in the machine room or as an intercom solution located in the reception.
Introduction to MS Dynamics NAV
 Introduction to MS Dynamics NAV (Item Charges) Ing.J.Skorkovský,CSc. MASARYK UNIVERSITY BRNO, Czech Republic Faculty of economics and business administration Department of corporate economy Item Charges
Light (glass base with power cord and Ehmann dimmer, reflector, glass globe), light source, cotton gloves, installation manual
, light source, cotton gloves, installation manual") Package contents Name: BALLOONS PC858 Table light 607 850 Components included with unit: Light (glass base with power cord and Ehmann dimmer, reflector, glass globe), light source, cotton gloves, installation
Package contents Name: BALLOONS PC858 Table light 607 850 Components included with unit: Light (glass base with power cord and Ehmann dimmer, reflector, glass globe), light source, cotton gloves, installation
 [KLICK] GB Instruction Manual POWERLINE 4 LIGHT FOREWORD Dear Customer, Thank you for purchasing the POWERLINE 4 LIGHT charger. These operating instructions will help you to get the best from your charger.
POB 321 POB 420 POB 417 OVEN USER'S MANUAL
 POB 321 POB 420 POB 417 OVEN USER'S MANUAL Dear customer, Thank you for buying a PHILCO brand product. So that your appliance serves you well, please read all the instructions in this user's manual. CONTENTS
LOGOMANUÁL / LOGOMANUAL
 LOGOMANUÁL / LOGOMANUAL OBSAH / CONTENTS 1 LOGOTYP 1.1 základní provedení logotypu s claimem 1.2 základní provedení logotypu bez claimu 1.3 zjednodušené provedení logotypu 1.4 jednobarevné a inverzní provedení
RIMINI. Samozavírací hydraulické závěsy Self-closing hydraulic hinges
 3 RIMINI Samozavírací hydraulické závěsy Self-closing hydraulic hinges Bartosini s.r.o. Kancelář: Karvinská 1897, 737 01 Český Těšín tel.: +420 602 322 276; e-mail: bartosini@bartosini.cz WWW.BARTOSINI.CZ
SERVICE MANUAL PEGAS 250 E CEL SERVISNÍ MANUÁL PEGAS 250 E CEL
 MG-011-05 PEGAS 250 E CEL SERVICE MANUAL page 1 SERVISNÍ MANUÁL PEGAS 250 E CEL SERVICE MANUAL PEGAS 250 E CEL 1. VAROVÁNÍ WARNING UPOZORNĚNÍ Pouze osoba splňující kvalifikaci danou zákonem je oprávněna
:= = := :=.. := := := := ρ := := α := π α = α = := = :=
 := = := :=.. := := := := ρ := := α := π α = α = := = := := α := α := = := α := := α = = ρ ρ := := := = := = := := := + + := + + := + := := := := + + := + + := + = = = :=.. := η := η := := π = :=.. :=,
INSTALAČNÍ NÁVOD OPERATING INSTRUCTION
 LED PRODISC II + LED PRODISC II MINI + LED PRODISC II MAXI INSTALAČNÍ NÁVOD OPERATING INSTRUCTION 4000944x 4000945x 4000940x 4000941x 4000946x 4000947x Prodisc II Mini Prodisc II Mini + MW senzor Prodisc
Tento materiál byl vytvořen v rámci projektu Operačního programu Vzdělávání pro konkurenceschopnost.
 Tento materiál byl vytvořen v rámci projektu Operačního programu Vzdělávání pro konkurenceschopnost. Projekt MŠMT ČR Číslo projektu Název projektu školy Klíčová aktivita III/2 EU PENÍZE ŠKOLÁM CZ.1.07/1.4.00/21.2146
ZÓNOVÉ VENTILY S VRATNOU PRUŽINOU dvoucestné VZP 2XX 230 1P 001 třícestné VZP 3XX 230 1P 001
 Návod na instalaci a použití ZÓNOVÉ VENTILY S VRATNOU PRUŽINOU dvoucestné VZP 2XX 230 1P 001 třícestné VZP 3XX 230 1P 001 CZ verze 1.2 Popis: Zónové ventily s vratnou pružinou jsou určeny do hydraulických
IAN 74208/74209 4 IAN 74208/74209
 Before reading, unfold the page containing the illustrations and familiarise yourself with all functions of the device. Před čtením si otevřete stranu s obrázky a potom se seznamte se všemi funkcemi přístroje.
USER'S MANUAL FAN MOTOR DRIVER FMD-01, FMD-03
 USER'S MANUAL FAN MOTOR DRIVER FMD-01, FMD-03 IMPORTANT NOTE: Read this manual carefully before installing or operating your new air conditioning unit. Make sure to save this manual for future reference.
VY_32_INOVACE_06_Předpřítomný čas_03. Škola: Základní škola Slušovice, okres Zlín, příspěvková organizace
 VY_32_INOVACE_06_Předpřítomný čas_03 Autor: Růžena Krupičková Škola: Základní škola Slušovice, okres Zlín, příspěvková organizace Název projektu: Zkvalitnění ICT ve slušovské škole Číslo projektu: CZ.1.07/1.4.00/21.2400
Pokyny k použití. Model-300. Napájecí zdroj. Návod na obsluhu Operating Instructions. se systémem Aquacontrol Napájací zdroj
 Pokyny k použití Model-300 Návod na obsluhu Operating Instructions Napájecí zdroj se systémem Napájací zdroj so systémom Power Supply with System BK 0011900 / PC AQUACONTROL Kryt aquacontrol Kryt aquacontrol
Presenter SNP6000. Register your product and get support at CS Příručka pro uživatele
 Register your product and get support at www.philips.com/welcome Presenter SNP6000 CS Příručka pro uživatele 1 a b c d e 2 3 4 Federal Communication Commission Interference Statement This equipment has
CH2000B TURBO ELEKTRICKÝ KONVEKTOR ELECTRIC CONVECTOR
 N119/R05(23.02.09) CH2000B TURBO ELEKTRICKÝ KONVEKTOR ELECTRIC CONVECTOR CZ GB www.fenixgroup.cz Pokyny pro uživatele User instructions ELEKTRICKÝ KONVEKTOR CH2000B-TURBO TECHNICKÉ VLASTNOSTI MODEL: CH2000B-TURBO
Název společnosti: VPK, s.r.o. Vypracováno kým: Ing. Michal Troščak Telefon: Datum:
 Pozice Počet Popis 1 SCALA2 3-45 A Datum: 2.7.217 Výrobní č.: 98562862 Grundfos SCALA2 is a fully integrated, self-priming, compact waterworks for pressure boosting in domestic applications. SCALA2 incorporates
DC circuits with a single source
 Název projektu: utomatizace výrobních procesů ve strojírenství a řemeslech egistrační číslo: Z..07/..0/0.008 Příjemce: SPŠ strojnická a SOŠ profesora Švejcara Plzeň, Klatovská 09 Tento projekt je spolufinancován
EXACT DS OFFICE. The best lens for office work
 EXACT DS The best lens for office work EXACT DS When Your Glasses Are Not Enough Lenses with only a reading area provide clear vision of objects located close up, while progressive lenses only provide
Lenovo A5000. Quick Start Guide v1.0. English/Česky
 Lenovo A5000 Quick Start Guide v1.0 English/Česky English Read this guide carefully before using your smartphone. Learning more Getting support Electronic emission notices To learn more information about
obal manuálu, asi něco podobného jako u LC 100 asi by to chtělo lepší obrázek!!! FYTOSCOPE FS130 Instruction Guide
 obal manuálu, asi něco podobného jako u LC 100 asi by to chtělo lepší obrázek!!! FYTOSCOPE FS130 Instruction Guide možná tohle trochu zmenšit a dát sem i to varování LED RADIATION co je na další straně
 11.12. 100 ΕΙΣΟΔΟΣ = E / ENTRANCE = E = = 1174 550 ΤΥΠΟΠΟΙΗΜΕΝΟ ΚΥ = 2000 (ΕΠΙΛΟΓΗ: 2100) / CH STANDARD = 2000 (OPTIONAL: 2100) 243 50 ΚΥ/CH + 293 ΚΥ/CH +103 100 ΚΥ /CH 6 11 6 20 100 0,25 ΚΑ (CO) + 45
georgia Smart and stylish solution ENG
 georgia Smart and stylish solution CZ ENG georgia CZ ENG Ideální pro cukrárny GEORGIA je vitrína určená pro prezentaci a prodej cukrářských výrobků. Všechny police včetně spodní výstavní desky jsou chlazené
By David Cameron VE7LTD
 By David Cameron VE7LTD Introduction to Speaker RF Cavity Filter Types Why Does a Repeater Need a Duplexer Types of Duplexers Hybrid Pass/Reject Duplexer Detail Finding a Duplexer for Ham Use Questions?
Progressive loyalty V1.0. Copyright 2017 TALENTHUT
 Progressive loyalty Copyright 2017 TALENTHUT www.talenthut.io 1. Welcome The Progressive Loyalty Siberian CMS module will allow you to launch a loyalty program and reward your customers as they buy from
Instalace Pokyny pro instalaci v operačním systému Windows XP / Vista / Win7 / Win8
 Instalace Pokyny pro instalaci v operačním systému Windows XP / Vista / Win7 / Win8 1. Stáhněte si instalační program HOST makro engine z oficiálního webu IABYTE. 2. Spusťte instalační program a postupujte
Postup objednávky Microsoft Action Pack Subscription
 Postup objednávky Microsoft Action Pack Subscription DŮLEŽITÉ: Pro objednání MAPS musíte být členem Microsoft Partner Programu na úrovni Registered Member. Postup registrace do Partnerského programu naleznete
Připojení internetového modulu econet300 Do regulátoru ecomax 810P3-L TOUCH.
 Připojení internetového modulu econet300 Do regulátoru ecomax 810P3-L TOUCH. Connection of econet300 internet module to ecomax 810P3-L TOUCH Controller. Prosím ověřte verzi softwaru vašeho modulu ecomax.
Technical data Supply voltage: 230V 50/60Hz 120V AC 24V AC/DC
 LEXIC Time switch MicroRex D11 NT 29 17 97 02 GB Operating instructions afty notes Technical data 037 00 037 93 94 41 07 upply voltage: 230V 50/60Hz 120V AC 24V AC/DC Consumption: ca. 1W Contact rating:
AUTOMATICKÝ DÁVKOVAČ Harvia. Návod na instalaci a použití instructions for installation and Use
 AUTOMATICKÝ DÁVKOVAČ Harvia Návod na instalaci a použití instructions for installation and Use 15122011 CZ EN 1. OBECNÉ INFORMACE 1. GENEraL Účelem Harvia automatického dávkovače je aplikovat vodu a směs
PMD 2501 BiX MICROWAVE OVEN USER'S MANUAL
 PMD 2501 BiX MICROWAVE OVEN USER'S MANUAL Dear customer, Thank you for buying a PHILCO brand product. So that your appliance serves you well, please read all the instructions in this user's manual. CONTENTS
Zelené potraviny v nových obalech Green foods in a new packaging
 Energy News1 1 Zelené potraviny v nových obalech Green foods in a new packaging Již v minulém roce jsme Vás informovali, že dojde k přebalení všech tří zelených potravin do nových papírových obalů, které
RGCML Zpráva o hřišti Ochranná přikrývka greenu 14 Stuart Burridge, přel P.S.
 RGCML Zpráva o hřišti Ochranná přikrývka greenu 14 Stuart Burridge, přel P.S. Koncem minulé sezony bylo rozhodnuto vyzkoušet jednu ochrannou přikrývku na green. Princip greenové přikrývky je jednoduchý.
Číslo materiálu: VY 32 INOVACE 25/12. Název materiálu: Anatomy 2 - Senses Číslo projektu: CZ.1.07/1.4.00/
 Číslo materiálu: Název materiálu: Anatomy 2 - Senses Číslo projektu: CZ.1.07/1.4.00/21.1486 Zpracoval: Jana Jourová Anatomy 2 - Senses 1. Before you watch the videos, try to answer the questions. How many
2N Helios Vario departure switch
 Description 2N Helios Vario departure switch Order no. 9135251E The purpose of this module is to extend the 2N Helios Vario door communicator with another switch, e.g., for switching the electric door
Název společnosti: VPK, s.r.o. Vypracováno kým: Ing. Michal Troščak Telefon: Datum:
 Počet 1 SCALA2 3-45 A Datum: 2.7.217 Výrobní č.: 98562862 Grundfos SCALA2 is a fully integrated, self-priming, compact waterworks for pressure boosting in domestic applications. SCALA2 incorporates integrated
GLASS CERAMIC INDUCTION COOKTOP
 PHD 6415R GLASS CERAMIC INDUCTION COOKTOP USER'S MANUAL Dear customer, Thank you for buying a PHILCO brand product. So that your appliance serves you well, please read all the instructions in this user's
Informace o písemných přijímacích zkouškách. Doktorské studijní programy Matematika
 Informace o písemných přijímacích zkouškách (úplné zadání zkušebních otázek či příkladů, které jsou součástí přijímací zkoušky nebo její části, a u otázek s výběrem odpovědi správné řešení) Doktorské studijní
IAN / MICROWAVE SMW 800 C3. MICROWAVE Operating instructions. MIKROHULLÁMÚ SÜTŐ Használati utasítás. MIKROVLNNÁ TROUBA Návod k obsluze
 MICROWAVE MICROWAVE Operating instructions MIKROHULLÁMÚ SÜTŐ Használati utasítás MIKROVALOVNA PEČICA Navodila za uporabo MIKROVLNNÁ TROUBA Návod k obsluze MIKROWELLE Bedienungsanleitung IAN 279041/279042
Střední odborná škola a Střední odborné učiliště, Chrudim, Čáslavská 205 20.
 Klíčová slova: 20. Text: Keywords: sparkling wine, champagne, glasses, service Service of sparkling wines 1. The Inventory for sparkling wine service - Wine cooler it cools the beverage; ice, water and
Switch on the appropriate breaker and verify that the light is working properly.
 Package contents Name: MONA WALL PC970 wall light 445 Components included with unit: glass shade with light source, 1x metal light body, 1x wall mount, 3x terminal connectors, 2x hex screws M5, 1x hex
Projekt: ŠKOLA RADOSTI, ŠKOLA KVALITY Registrační číslo projektu: CZ.1.07/1.4.00/21.3688 EU PENÍZE ŠKOLÁM
 ZÁKLADNÍ ŠKOLA OLOMOUC příspěvková organizace MOZARTOVA 48, 779 00 OLOMOUC tel.: 585 427 142, 775 116 442; fax: 585 422 713 email: kundrum@centrum.cz; www.zs-mozartova.cz Projekt: ŠKOLA RADOSTI, ŠKOLA
GLASS CERAMIC INDUCTION COOKTOP
 PHD 64 S GLASS CERAMIC INDUCTION COOKTOP USER'S MANUAL Dear customer, Thank you for buying a PHILCO brand product. So that your appliance serves you well, please read all the instructions in this user's
Buderus System Logatherm Wps K
 Buderus System Logatherm Wps K XV1100K(C)/XV1100SK(C) All rights reserverd. Any reprinting or unauthorized use wihout the written permission of Buderus System Logatherm Wps K Corporation, is expressly
SERVICE ADVISORY SA-5A
 V510 PROPELLER TYPE SERIES REPLACEMENT OF BLADE BEARING SEAL VRTULE TYPOVÉ ŘADY V510 VÝMĚNA TĚSNÍCÍ MANŽETY ULOŽENÍ LISTU 1. GENERAL A. This document provides disassembly and assembly procedure in the
ALFA 300. TECHO a.s. SIDE montážní desk návod stolu. přísedové stoly 2 DETAIL 1 DETAIL 2. www.interier-ricany.cz. U Továren 770/1b.
 ALFA 00 přísedové stoly SIDE montážní desk návod stolu DETAIL ALFA 00 ALFA 00 montážní návod montážní stolu návod stolu U Továren 770/b 0 TECHO 00 Praha 0 a.s. U Továren 770/b 0 00 Praha 0 A A B C B C
20 Litre Stainless Steel Microwave with Grill
 20 Litre Stainless Steel Microwave with Grill Instruction Manual L20GSS11E 20 Litre Stainless Steel Microwave with Grill Instruction ManuaL Mikrovlnná trouba z nerez oceli s grilem, objem 20 litrů Pøíruèka
TECHNICKÝ LIST řada mechanických odvaděčů kondenzátu AUTODRAIN TECHNICAL DATA SHEET for mechanical autodrain equipment AUTODRAIN
 Popis: Nádoba s mechanickým plovákem k odstraňování pevných nečistot, vody, aerosolů, uhlovodíků, prachu oddělených separátory KING AIR se systémem stlačeného vzduchu. Rozdělení dle využití instalace:
HandiClamp. Single Band Repair Clamp Jednodílný Opravný Třmen INSTALLATION INSTRUCTIONS
 HandiClamp Single Band Repair Clamp Jednodílný Opravný Třmen INSTALLATION INSTRUCTIONS Montážní návod GB CZ Pioneers in pipe solutions INSTALLATION INSTRUCTIONS - English Single Band Repair Clamp 1 2 3
STORAGE, TRANSPORTATION, HANDLING MANUAL D0141.STHM.01
 STORAGE, TRANSPORTATION, HANDLING MANUAL GENERÁTOROVÉ ROZVÁDĚCÍ SKŘÍNĚ VN - PRIMÁRNÍ ROZVOD, VNITŘNÍ / VENKOVNÍ PROVEDENÍ GENERATOR MV SWITCHGEAR PRIMARY DISTRIBUTION, INDOOR / OUTDOOR DESIGN ISO 9001:2009
2N Lift8 Audio unit shaft
 2N Lift8 Audio unit shaft Brief Manual Version 3.0.0 www.2n.cz This audio unit is designed for installation on the lift shaft bottom or lift cabin roof, or wherever it is necessary to communicate (during
AIC ČESKÁ REPUBLIKA CZECH REPUBLIC
 ČESKÁ REPUBLIKA CZECH REPUBLIC ŘÍZENÍ LETOVÉHO PROVOZU ČR, s.p. Letecká informační služba AIR NAVIGATION SERVICES OF THE C.R. Aeronautical Information Service Navigační 787 252 61 Jeneč A 1/14 20 FEB +420
Zubní pasty v pozměněném složení a novém designu
 Energy news4 Energy News 04/2010 Inovace 1 Zubní pasty v pozměněném složení a novém designu Od října tohoto roku se začnete setkávat s našimi zubními pastami v pozměněném složení a ve zcela novém designu.
III/ 2- Inovace a zkvalitnění výuky prostřednictvím ICT. VY_32_INOVACE_795_ be healthy- keep fit_pwp. Mgr. Smékalová Dagmar
 Název školy: STŘEDNÍ ODBORNÁ ŠKOLA a STŘEDNÍ ODBORNÉ UČILIŠTĚ, Česká Lípa, 28. října 2707, příspěvková organizace Číslo a název projektu: CZ.1.07/1.5.00/34.0880 Digitální učební materiály www.skolalipa.cz
GLASS CERAMIC INDUCTION COOKTOP
 PHD 32 BP GLASS CERAMIC INDUCTION COOKTOP USER'S MANUAL Dear customer, Thank you for buying a PHILCO brand product. So that your appliance serves you well, please read all the instructions in this user's
BEDIENUNGS- UND SICHERHEITSHINWEISE 3 OPERATION AND SAFETY NOTES 19 UNITÀ PRINCIPALE LP PLUS INDICAZIONI PER L USO E PER LA SICUREZZA 47
 DE LADEGERÄT LP PLUS BEDIENUNGS- UND SICHERHEITSHINWEISE 3 GB MAIN UNIT LP PLUS OPERATION AND SAFETY NOTES 19 FR UNITÉ PRINCIPALE LP PLUS INSTRUCTIONS D UTILISATION ET CONSIGNES DE SÉCURITÉ 33 IT UNITÀ
Výukový materiál zpracovaný v rámci operačního programu Vzdělávání pro konkurenceschopnost
 Výukový materiál zpracovaný v rámci operačního programu Vzdělávání pro konkurenceschopnost Registrační číslo: CZ.1.07/1. 5.00/34.0084 Šablona: II/2 Inovace a zkvalitnění výuky cizích jazyků na středních
1-AYKY. Instalační kabely s Al jádrem. Standard TP-KK-133/01, PNE 347659-3. Konstrukce. Použití. Vlastnosti. Installation cables with Al conductor
 Instalační kabely s Al jádrem Installation cables with Al conductor Standard TP-KK-133/01, PNE 347659-3 4 3 2 1 Konstrukce Construction 1 Hliníkové jádro Aluminium conductor 2 Izolace PVC 3 Výplňový obal
Invitation to ON-ARRIVAL TRAINING COURSE for EVS volunteers
 Invitation to ON-ARRIVAL TRAINING COURSE for EVS volunteers (český text pro hostitelské organizace následuje na str. 3) 6.11. 11.11. 2015 Hotel Kaskáda, Ledeč nad Sázavou Husovo nám. 17, 584 01 Ledeč nad
USER MANUAL EMS2320X
 USER MANUAL EMS2320X electrolux 3 Welcome to the world of Electrolux You ve chosen a first class product from Electrolux, which hopefully will provide you with lots of pleasure in the future. Electrolux
Čtvrtý Pentagram The fourth Pentagram
 Energy News 4 1 Čtvrtý Pentagram The fourth Pentagram Na jaře příštího roku nabídneme našim zákazníkům již čtvrtý Pentagram a to Pentagram šamponů. K zavedení tohoto Pentagramu jsme se rozhodli na základě
EDF Jet He 162. Manual He 162 www.freeair.cz Page nr..: 1 / 4
 EDF Jet He 162 Vážený zákazníku, blahopřejeme Vám ke koupi modelu z řady EDF Jet He 162. Abyste si co nejvíc užili stavbu a létání s tímto novým modelem, důkladně si před stavbou přečtěte stavební návod
CERAMIC GLASS COOKTOP
 PHS 641 P PHS 642 FP CERAMIC GLASS COOKTOP USER'S MANUAL Dear customer, Thank you for buying a PHILCO brand product. So that your appliance serves you well, please read all the instructions in this user's