HANDLEIDING MODE D EMPLOI GEBRAUCHSANLEITUNG INSTRUCTION BOOKLET MANUAL DE INSTRUCCIONES NÁVOD K POUŽITÍ NÁVOD NA POUŽITIE
|
|
|
- Eva Matějková
- před 6 lety
- Počet zobrazení:
Transkript

1 HANDLEIDING MODE D EMPLOI GEBRAUCHSANLEITUNG INSTRUCTION BOOKLET MANUAL DE INSTRUCCIONES NÁVOD K POUŽITÍ NÁVOD NA POUŽITIE KOELKAST RÉFRIDGÉRATEUR KÜHLSCHRANK REFRIGERATOR FRIGORÍFICO LEDNICE CHLADNIČKA PRODUCT OF
2 GARANTIEVOORWAARDEN Wij hanteren een garantietermijn van 2 jaar vanaf de datum van aankoop. Gedurende de garantieperiode zal de distributeur volledige verantwoording op zich nemen voor gebreken, die aanwijsbaar berusten op materiaal- of constructiefouten. Wanneer dergelijke gebreken voorkomen, zal het apparaat indien nodig vervangen of gerepareerd worden. Het recht op garantie vervalt wanneer de gebreken zijn ontstaan door hardhandig gebruik, het niet in acht nemen van de gebruiksaanwijzing of ingreep door derden. De garantie wordt verleend op basis van het originele kassaticket. Alle onderdelen die aan slijtage onderhevig zijn, vallen buiten de garantie. Indien je apparaat defect is binnen de garantietermijn van 2 jaar, dan mag je het toestel samen met het originele kassaticket binnenbrengen in de winkel waar je het toestel hebt aangekocht. CONDITIONS DE GARANTIE Nous accordons une garantie de 2 ans sur ce produit à partir de la date d achat. Pendant la durée de la garantie, le distributeur prendra à sa charge la réparation des vices de fabrication ou de matières, en se réservant le droit de décider si certaines pièces doivent être réparées ou échangées, ou si l appareil lui-même doit être échangé. Les dommages occasionnés par une utilisation inadéquate (branchement continu, erreur de voltage, prise inappropriée, choc, etc...), l usure normale ne portant préjudice ni au bon fonctionnement ni à la valeur de l appareil, excluent toute prétention à la garantie. La garantie devient caduque si des réparations ont été effectuées par des personnes non agréées. La garantie est accordée sur la base du ticket de caisse original.toutes les pièces détachées non résistantes et par conséquent sujettes à l usure, ne sont pas sous garantie. Dans le cas où votre appareil est défectueux pendant la période de garantie de 2 ans, vous pouvez ramener votre appareil, ainsi que votre ticket de caisse, au magasin où vous l avez acheté. GARANTIE Die Garantie für dieses Gerät beträgt 2 Jahre ab dem Kaufdatum. Während dieser zweijährigen Garantie trägt der Verteiler die Verantwortung für Mängel, die eindeutig auf Material- oder Konstruktionsfehler zurückzuführen sind. Wenn es solche Mängel gibt, wird das Gerät, wenn notwendig, ersetzt oder repariert. Das Recht auf Garantie erlischt, wenn die Mängel auf eine unangemessene Anwendung, die Nichtbefolgung der Gebrauchsanleitungen oder eine Reparatur von einer dritten Partei zurückzuführen sind. Die Garantie wird auf der Grundlage des originalen Kassenbons gewährt. Alle Teile, dem Verschleiß ausgesetzt sein, sind nicht in der Garantie eingeschlossen. Wenn Ihr Gerät innerhalb der Garantiefrist von zwei Jahren defekt ist, können Sie das Gerät zusammen mit Ihrem Kassenbon in das Geschäft zurückbringen, in dem Sie es gekauft haben. WARRANTY This appliance has a two year warranty period. During this period the manufacturer is responsible for any failures that are the direct result of construction failure. When these failures occur the appliance will be repaired or replaced if necessary. The warranty will not be valid when the damage to the appliance is caused by wrong use, not following the instructions or repairs executed by a third party. The guarantee is issued with the original till receipt. All parts, which are subject to wear, are excluded from the warranty. LINEA Dompel Herentals Belgium - Tel 014/ Fax : 014/
3 If your device breaks down within the 2-year warranty period, you can return the device together with your receipt to the shop where you purchased it. CONDICIONES DE GARANTÍA Este aparato tiene un término de garantía de 2 años, desde la fecha de la compra. Durante el período de garantía, el suministrador asumirá la entera responsabilidad en cuanto a defectos debidos a errores de material o de fabricación. En caso de tales defectos, el aparato será reemplazado o reparado, cuando sea necesario. La garantía perderá su vigencia en caso de defectos causados por mal uso, no cumplimiento del manual de instrucciones o intervención por una tercera persona. La garantía se concede sobre la base del recibo de caja. La garantía no cubre piezas expuestas al desgaste. Si el producto está defectuoso dentro del período de garantía de 2 años, puede traer su recibo de caja junto con el teléfono a la tienda donde adquirió la unidad. ZÁRUKA Pro záruku začínající dnem prodeje spotřebiče platí na území ČR tyto podmínky: 1. trvání záruky: 2 roky 2. poskytování záruky: a) záruční opravu provedeme podle našeho zvážení opravou nebo výměnou vadných dílů, jestliže tyto závady vznikly prokazatelně vadou materiálu nebo chybou při výrobě b) záruční oprava bude provedena jen při předložení tohoto záručního listu a dokladu o zaplacení c) jestliže dojde k opravě nebo výměně spotřebiče v záruční době, záruční doba se prodlužuje 3. záruka se nevztahuje a) na mechanické poškození b) nesprávné používání v rozporu s návodem k použití 1. záruka zaniká: - při použití spotřebiče jinak než v domácnosti - při provádění opravy nebo změny na spotřebiči osobou jinou než pověřenou naším servisem Na tento spotřebič poskytujeme záruku na nedostatky, které jsou označeny jako výrobní chyby nebo chyby materiálu. Záruční doba začíná dnem prodeje a je uznána po předložení potvrzeného tohoto záručního listu nebo orig.dokladu o zaplacení + tento nepotvrzený, ale vyplněný ZL pro záznam opravy. Případné reklamace můžete uplatnit v místě nákupu tohoto přístroje nebo v servisním středisku firmy: Domo-elektro s.r.o. Hluboká 147, Kdyně viz tel nebo na servis@domo-elektro.cz, tel LINEA Dompel Herentals Belgium - Tel 014/ Fax : 014/
4 ZÁRUKA Pre záruku začínajúcich dňom predaja spotrebiča platí na území SR tieto podmienky: 1. trvania záruky: 2 roky 2. poskytovanie záruky: a) záručnú opravu vykonáme podľa nášho zvážení opravou alebo výmenou chybných dielov, ak tieto závady vznikli preukázateľne chybou materiálu alebo chybou pri výrobe b) záručná oprava bude vykonaná len pri predložení tohto záručného listu a dokladu o zaplatenie c) ak dôjde k oprave alebo výmene spotrebiča v záručnej dobe, záručná doba sa predlžuje. 3. záruka sa nevzťahuje a) na mechanické poškodenie b) nesprávne používanie v rozpore s návodom na použitie 1. záruka zaniká: - Pri použití spotrebiča inak ako v domácnosti - Pri vykonávaní opravy alebo zmeny na spotrebiči osobou inou ako poverenou naším servisom Na tento spotrebič poskytujeme záruku na nedostatky, ktoré sú označené ako výrobné chyby alebo chyby materiálu. Záručná doba začína dňom predaja a je uznaná po predložení potvrdeného tohoto záručného listu alebo orig.dokladu o zaplatení + tento nepotvrdený, ale vyplnený ZL pre záznam opravy. Prípadné reklamácie môžete uplatniť v mieste nákupu tohto prístroja alebo v servisnom stredisku firmy: Domo-elektro s.r.o. Hluboká 147, Kdyně pozri tel alebo na servis@domo-elektro.cz, tel
5 Type nr. apparaat N de modèle de l appareil Typ Nr. des Gerätes Type nr. of appliance N de modelo del aparato Model Naam Nom... Name Nombre Jméno Adres Adresse... Address Dirección Adresa Aankoopdatum Date d achat... Kaufdatum Date of purchase Fecha de compra Datum nákupu,podpis a razítko Tel.:... * Jméno kupujícího, adresu a tel.spojení je nutno vyplnit pokud si zákazník přeje zaslání opraveného přístroje domů. Bez úplného vyplnění všech ostatních údajů v záručním listu nebude možno Vaši reklamaci včas vyřídit. 5
6 REKLAMACE/REKLAMÁCIE : (VYPLNÍ ZÁKAZNÍK NEBO OBCHOD) Popis vady 1. reklamace (reklamácie) / Datum uplatnění reklamace (Dátum uplatnenia reklamácie): Popis vady 2. reklamace (reklamácie) / Datum uplatnění reklamace (Dátum uplatnenia reklamácie): Popis vady 3. reklamace (reklamácie) / Datum uplatnění reklamace (Dátum uplatnenia reklamácie): Záznamy servisu : 1.reklamace (datum přijetí/odeslání/ číslo reklamačního dokladu) (dátum prijatia / odoslania / číslo reklamačného dokladu) 2.reklamace (datum přijetí/odeslání/ číslo reklamačního dokladu) (dátum prijatia / odoslania / číslo reklamačného dokladu) 3.reklamace (datum přijetí/odeslání/ číslo reklamačního dokladu) (dátum prijatia / odoslania / číslo reklamačného dokladu) * Jméno kupujícího, adresu a tel.spojení je nutno vyplnit pokud si zákazník přeje zaslání opraveného přístroje domů. Bez úplného vyplnění všech ostatních údajů v záručním listu nebude možno Vaši reklamaci včas vyřídit. * Meno kupujúceho, adresu a tel.spojení je nutné vyplniť ak si zákazník praje zaslanie opraveného prístroja domov. Bez vyplnenia všetkých ostatných údajov v záručnom liste nebude možné Vašu reklamáciu včas vybaviť. 6
7 RECYCLAGE-INFORMATIE Dit symbool op het product of op de verpakking wijst erop dat dit product niet als huishoudafval mag worden behandeld. Het moet naar een plaats worden gebracht waar elektrische en elektronische apparatuur wordt gerecycleerd. Als u ervoor zorgt dat dit product op de correcte manier wordt verwijderd, voorkomt u mogelijk voor mens en milieu negatieve gevolgen die zich zouden kunnen voordoen in geval van verkeerde afvalbehandeling. Voor meer details in verband met het recycleren van dit product, neemt u best contact op met de gemeentelijke instanties, het bedrijf of de dienst belast met de verwijdering van huishoudafval of de winkel waar u het product hebt gekocht. Het verpakkingsmateriaal is recycleerbaar. Behandel de verpakking milieubewust. INFORMATION DE RECYCLAGE Ce symbole sur le produit ou son emballage indique que ce produit ne peut être traité comme déchet ménager. Il doit plutôt être remis au point de ramassage concerné, se chargeant du recyclage du matériel électrique et électronique. En vous assurant que ce produit est éliminé correctement, vous favorisez la prévention des conséquences négatives pour l environnement et la santé humaine qui, sinon, seraient le résulat d un traitement inapproprié des déchets de ce produit. Pour obtenir plus de détails sur le recyclage de ce produit, veuillez prendre contact avec le bureau municipal de votre région, votre service d éliminiation des déchets ménagers ou le magasin où vous avez acheté le produit. L emballage est recyclable. Traitez l emballage écologiquement. RECYCLING INFORMATIONEN Dieses Symbol auf dem Produkt oder seiner Verpackung weist darauf hin, dass dieses Produkt nicht als normaler Haushaltsabfall zu behandeln ist, sondern an einem Sammelpunkt für das Recyling von elektrischen und elektronischen Geräten abgegeben werden muss. Durch Ihren Beitrag zum korrekten Entsorgen dieses Produkts schützen Sie die Umwelt und die Gesundheit Ihrer Mitmenschen. Umwelt und Gesundheit werden durch falsches Entsorgen gefährdet. Weitere Informationen über das Recycling dieses Produkts erhalten Sie von Ihren Rathaus, Ihrer Müllabfuhr oder dem Geschäft, in dem Sie das Produkt gekauft haben. Das Verpackungsmaterial ist wiederverwertbar. Entsorgen Sie die Verpackung umweltgerecht und führen Sie sie der Wertstoffsammlung zu. 7


8 RECYCLING INFORMATION This symbol on the product or on its packaging indicates that this product may not be treated as household waste. Instead it must be brought to the applicable collection point for recycling of electrical and electronic equipment. By ensuring this product is disposed of correctly, you will help prevent potential negative consequences for the environment and human health, which could otherwise be caused by inappropriate waste handling of this product. For more detailed information about recycling of this product, please contact your local city office, your household waste disposal service or the shop where you purchased the product. The packaging is recyclable. Please treat the packaging ecologically. INFORMACIÓN DE RECICLAJE El símbolo en el producto o el embalaje indica que este producto no puede ser tratado como residuo doméstico. Los residuos de aparatos tienen que ser depositados en un punto de recogida destinado al reciclaje de aparatos eléctricos y electrónicos. Eliminando este producto de manera correcta, se puede evitar las consecuencias negativas posibles para el hombre y el medio ambiente en caso de un tratamiento de residuos incorrecto. Si desea obtener más información sobre el reciclaje de este producto, pónganse en contacto con la oficina municipal, la empresa o el servicio de recogida de residuos domésticos correspondiente o con el establecimiento dónde ha adquirido el producto. El material de embalaje es reciclable. Trate el embalaje de manera ecológica. INFORMACE O RECYKLACI ODPADU Symbol na přístroji či na jeho obalu znamená, že s tímto výrobkem není možno nakládat jako s běžným domovním odpadem, nýbrž musí být odevzdán na místech určených ke sběru a likvidaci elektrických a elektronických zařízení. Dodržením tohoto doporučení chráníte životní prostředí a zdraví spoluobčanů. Více informací o možnostech likvidace nebezpečného odpadu obdržíte na obecních nebo městských úřadech, sběrných dvorech nebo v prodejně, kde jste přístroj zakoupili. Obalové materiály jsou recyklovatelné, nakládejte s nimi podle předpisů pro životní prostředí. INFORMÁCIE O RECYKLÁCIU ODPADU Symbol na prístroji alebo na jeho obale znamená, že s týmto výrobkom nie je možné nakladať ako s domovým odpadom, ale musí byť odovzdaný na miestach určených na zber a likvidáciu elektrických a elektronických zariadení. Dodržaním tohto odporúčania chránite životné prostredie a zdravie spoluobčanov. Viac informácií o možnostiach likvidácie nebezpečného odpadu obdržíte na obecných alebo mestských úradoch, zberných dvoroch alebo v predajni, kde ste prístroj zakúpili. Obalové materiály sú recyklovateľné, nakladajte s nimi podľa predpisov pre životné prostredie. 8
9 WEBSHOP NL Accessoires en onderdelen van Domo-toestellen kunnen vanaf nu ook online besteld worden via de webshop van Domo*: De webshop is ook te bereiken via de Domo-website: Hiernaast zijn de accessoires en onderdelen ook nog altijd te verkrijgen in de winkel waar u het toestel heeft aangekocht. FR Les accessoires et pièces détachées de Domo sont à présent disponibles en ligne sur le webshop*: Le webshop est aussi accessible via le site internet de Domo: Vous pouvez toujours vous procurer les accessoires et pièces détachées au point de vente dont provient votre appareil. DE Zubehör und Ersatzteile von Domo-Geräten können ab jetzt auch online im Domo-Webshop bestellt werden*: Zum Domo-Webshop gelangen Sie auch über die Domo-Internetseite: Außerdem können Sie nach wie vor Domo-Zubehör und -Ersatzteile in Geschäften bekommen, wo Domo-Gerät verkauft werden. EN From now on, accessories and parts of Domo appliances can also be ordered online from the Domo webshop*: You can reach the webshop through the Domo website as well: The accessories and parts can also still be obtained at the store where you bought the appliance. CZ Nyní je možné nakupovat originální příslušenství i náhradní díly online přes internetový obchod: (platí pouze pro Českou a Slovenskou republiku) Příslušenství i náhradní díly je možné objednat i přes obchod, kde jste zakoupili vás spotřebič. * Enkel in België, Nederland, Luxemburg, Frankrijk en Duitsland. * Seulement dans la Belgique, le Pays-Bas, le Luxembourg, la France et l Allemagne. * Nur in Belgien, die Niederlande, Luxemburg, Frankreich und Deutschland. * Only in Belgium, the Netherlands, Luxemburg, France and Germany. 9
10 Als de voedingskabel beschadigd is, moet hij vervangen worden door de fabrikant, zijn dienst na verkoop of een gelijkaardig gekwalificeerd persoon, om ongelukken te voorkomen. Si le cordon d alimentation est endommagé, il doit être remplacé par le fabricant, son service après-vente ou toute autre personne qualifiée, pour éviter tout accident. Wenn das Stromzuführungskabel beschädigt ist, muss es vom Hersteller, dessen Kundendienst oder einer gleichartig geschulten Person ersetzt werden, um Unfälle zu verhindern. If the power supply cord is damaged, it must be replaced by the manufacturer, its service agent or a similarly qualified person in order to avoid a hazard. Cuando el cable de alimentación está dañado, tiene que ser reemplazado por el fabricante, el servicio posventa o una persona similarmente calificada, para evitar accidentes. Jestliže je poškozený přívodní kabel, musí být neprodleně vyměněn v odborném servisu nebo oprávněnou osobou. Jinak hrozí nebezpečí úrazu! Ak je poškodený prívodný kábel, musí byť bezodkladne vymenený v odbornom servise alebo oprávnenou osobou. Inak hrozí nebezpečenstvo úrazu! 10
11 VEILIGHEIDSINSTRUCTIES Dit toestel mag gebruikt worden door kinderen vanaf 16 jaar en ouder, en door personen met een fysieke of sensoriële beperking of mensen met een beperkte mentale capaciteit of gebrek aan ervaring of kennis, op voorwaarde dat deze personen toezicht krijgen of instructies hebben gekregen over het gebruik van het toestel op een veilige manier en dat ze ook de gevaren kennen bij het gebruik van het toestel. Kinderen mogen niet met het toestel spelen. Onderhoud en reiniging van het toestel mogen niet gebeuren door kinderen, tenzij ze ouder zijn dan 16 jaar en toezicht krijgen. Hou het toestel en het snoer buiten het bereik van kinderen jonger dan 16 jaar. Dit toestel is geschikt om te gebruiken in de huishoudelijke omgeving en in gelijkaardige omgevingen zoals: Keukenhoek voor personeel van winkels, kantoren en andere gelijkaardige professionele omgevingen Boerderijen Hotel- en motelkamers en andere omgevingen met een residentieel karakter Gastenkamers, of gelijkaardige Opgelet: het toestel mag niet gebruikt worden met een 11
12 externe timer of een aparte afstandsbediening. Lees alle instructies voor gebruik. Kijk voor gebruik na of het voltage vermeld op het toestel overeenkomt met het voltage van het elektriciteitsnet. Laat het snoer niet op een heet oppervlak of over de rand van een tafel of aanrecht hangen. Gebruik het toestel nooit wanneer het snoer of de stekker beschadigd is, na een slechte werking van het toestel of wanneer het toestel beschadigd is. Breng het toestel dan naar het dichtsbijzijnde gekwalificeerde service center voor nazicht en reparatie. Streng toezicht is noodzakelijk wanneer het toestel door of in de buurt van kinderen gebruikt wordt. Het gebruik van accessoires die niet aanbevolen of verkocht worden door de fabrikant, kan brand, elektrische schokken of verwondingen veroorzaken. Trek de stekker uit het stopcontact wanneer het toestel niet in gebruik is, vooraleer onderdelen te monteren of demonteren en vooraleer het toestel te reinigen. Zet eerst alle knoppen in de uit -stand en trek de stekker bij de stekker zelf uit het stopcontact. Trek nooit aan het snoer om de stekker uit het stopcontact te trekken. Zet dit toestel nooit op of in de buurt van een gasvuur of elektrisch vuur of op een plaats waar het in contact zou kunnen komen met een warm toestel. Gebruik het toestel niet buiten. Gebruik het toestel enkel voor het doel waarvoor het bestemd is. 12
13 13 Gebruik het toestel altijd op een stevig, droog, effen oppervlak. Gebruik het toestel alleen voor huishoudelijk gebruik. De fabrikant is niet verantwoordelijk voor ongelukken die een gevolg zijn van verkeerd gebruik van het toestel, of het niet naleven van de regels zoals ze vermeld zijn in deze handleiding. Alle herstellingen, buiten het gewone onderhoud van het toestel, moeten uitgevoerd worden door de fabrikant of zijn dienst na verkoop. Probeer het toestel nooit zelf te repareren. Dompel het toestel, het elektrisch snoer of de stekker nooit onder in water of een andere vloeistof. Zorg ervoor dat kinderen het elektrisch snoer niet kunnen aanraken. Hou het snoer uit de buurt van scherpe randen en hete onderdelen of andere warmtebronnen. Verwijder voor het eerste gebruik alle verpakkingsmaterialen en eventuele promotionele stickers. Hou de ventilatie-openingen vrij, zorg ervoor dat ze niet versperd of belemmerd zijn. Gebruik geen mechanische of andere hulpmiddelen om het ontdooiingsproces te versnellen. Gebruik geen andere elektrische toestellen in de koelkast, tenzij ze voor dit doel zijn goedgekeurd door de fabrikant. Raak de lamp niet aan als ze lang heeft gebrand. Dit kan heel heet zijn.
14 De lamp is enkel bedoeld voor dit toestel. Gebruik ze nooit als interieurverlichting. Bewaar geen explosieve stoffen in het toestel, zoals bijvoorbeeld spuitbussen met brandbaar drijfgas. Zorg ervoor dat het koelcircuit niet beschadigd raakt, bv. tijdens transport of installatie. Zorg ervoor dat de stekker niet geplet wordt of beschadigd raakt door de achterkant van het toestel. Dit kan oververhitting en bijgevolg brand veroorzaken. Zorg ervoor dat je toegang hebt tot de stekker van het toestel. Trek niet aan het snoer. Als het stopcontact los zit, steek de stekker dan niet in het stopcontact. (risico op elektrische schok of brand) Gebruik het toestel niet zonder de lamp. Dit toestel is zwaar. Wees voorzichtig tijdens het verplaatsen ervan. Raak geen zaken in het diepvriesvak aan met vochtige of natte handen. Dit kan (brand)wonden aan de huid veroorzaken. Vermijd lange blootstelling aan zonlicht. 14
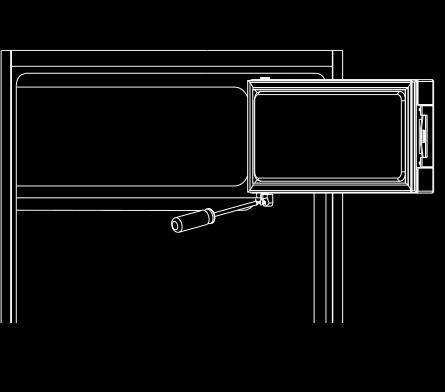
15 ONDERDELEN 1. Diepvriesvak 2. Thermostaat en lamp 3. Glazen legger 4. Groenteschuif 5. Deurrek 6. Verstelbare voetjes OMKEREN VAN DE DEUR Opgelet: Zorg ervoor dat het toestel leeg is en niet aangesloten op het elektriciteitsnet. Om de deur om te keren, 4 5 is het nodig om het toestel 6 naar achter te kantelen. Zorg ervoor dat het toestel op iets stevigs kan rusten, zodat het niet wegschuift tijdens het omkeren van de deur. Alle verwijderde voorwerpen moeten bewaard worden om de deur opnieuw te kunnen installeren. Leg het toestel niet plat, dit kan het koelingssysteem beschadigen. Het is aangeraden om de montage met 2 personen uit te voeren. 1. Verwijder twee schroeven aan de achterzijde van het bovendeksel. 2. Verwijder het bovendeksel en zet het opzij. 3. Schroef de bovenste scharnier los, verwijder de deur en zet ze op een zachte ondergrond om krassen te vermijden. 4. Schroef de onderste scharnier van de diepvriezerdeur los. Verwijder dan de deur en zet ze op een zachte ondergrond om krassen te vermijden. 5. Verplaats de deurvergrendeling van links naar rechts. Verplaats de twee middelste afdekkingen van de openingen van de ene kant naar de andere. 6. Verplaats de afdekking van de scharnieropening van rechts naar links. 7. Draai de diepvriezerdeur en plaats de scharnierzijde aan de linkerkant. Zet de deur dan vast met de houder. 8. Schroef de onderste scharnier los. Verwijder dan de verstelbare voetjes langs weerszijden. 9. Schroef de onderste scharnierpen los, verwijder deze, draai de steun om en zet de pen terug. 10. Zet de steun nu aan de linkse kant en monteer daarbij de onderste scharnierpen. Zet beide verstelbare voetjes terug. 11. Zet de deur terug. Zorg ervoor dat de deur horizontaal en verticaal uitgelijnd is, zodat de dichtingen gesloten zijn langs alle kanten, alvorens de bovenste scharnier definitief vast te zetten. 12. Zet het bovendeksel erop en zet dit vast met 2 schroeven achteraan. 15


16
17 INSTALLATIE Opgelet: Pak het toestel uit en kijk na of er geen beschadigingen zijn opgelopen. Sluit het toestel niet aan op het stopcontact wanneer het beschadigd is. Het is aan te raden om minstens 4 uur te wachten alvorens het toestel op het stopcontact aan te sluiten, zodat de olie kan terugvloeien naar de compressor. Rond het toestel moet voldoende lucht kunnen circuleren, zodat het niet oververhit geraakt. Zet het toestel niet dicht in de buurt van een radiator of fornuis. Zorg ervoor dat je na installatie nog toegang hebt tot de stekker. Plaats het toestel in een kamertemperatuur die varieert tussen 16 C en 32 C. 1. Schroef de afstandshouders op de aansluitingen aan de achterkant van de koelkast. 2. Zorg ervoor dat de deur genoeg plaats heeft om open te zwaaien. Laat minstens een spatie van 5 cm aan beide zijkanten van de koelkast. Laat minstens een spatie van 10 cm tussen de bovenkant van het toestel en eventuele overhangende muurelementen. Let wel op, het is beter dat er zich niets boven het toestel bevindt. 3. Zorg ervoor dat het toestel recht staat. Hiervoor kan je de voetjes onderaan het toestel verstellen. VOOR HET EERSTE GEBRUIK Maak de binnenkant van het toestel en alle accessoires schoon met lauw water en wat neutrale zeep en droog zorgvuldig alvorens het toestel voor de eerste keer te gebruiken. Gebruik zeker geen detergenten of schurende poeders, aangezien deze de afwerking kunnen beschadigen. GEBRUIK Opgelet: Zet geen hete voorwerpen op de plastic onderdelen in het toestel. Plaats niets vlak tegen de achterste wand in het toestel. Bevroren voedsel mag niet terug ingevroren worden wanneer het ontdooid is geweest. Zet geen bruisende of sprankelende dranken in het diepvriesvak. Dit veroorzaakt druk en kan tot ontploffing leiden. 17
18 Temperatuurinstelling Steek de stekker in het stopcontact. De temperatuur kan ingesteld worden met de thermostaatknop. Er zijn 8 instellingen. 1 is de warmste instelling, 7 is de koudste. Bij 0 is de koelkast uitgeschakeld. Diepvries Het vriesproces duurt 24 uur. Voeg tijdens deze periode geen ander voedsel toe dat moet bevroren worden. Wanneer de diepvries een periode niet gebruikt is geweest en hierna terug wordt opgestart, moet het toestel minstens 2 uur aan staan vooraleer je in te vriezen producten in de diepvries kan stoppen. Belangrijk: als de diepvries per ongeluk ontdooit - bijvoorbeeld in geval van een elektriciteitspanne - moet het bevroren voedsel snel geconsumeerd of onmiddellijk klaargemaakt worden. Accessoires 1. Het toestel is uitgerust met een verplaatsbare, glazen legger. De legger kan op verschillende hoogtes geplaatst worden. 2. De deurrekken kunnen op verschillende hoogtes in de deur worden gehangen. Til hiervoor de deurrekken geleidelijk aan naar boven en schuif ze weer vast op de gewenste positie. Energiebesparingstips Zet geen heet voedsel in het toestel. Zet de verschillende voorwerpen niet te dicht tegen mekaar, aangezien dit de luchtcirculatie belemmert. Zorg ervoor dat er niets tegen de achterste wand in het toestel staat. Als de elektriciteit wegvalt, houd de deuren dan gesloten. Open de deuren niet te vaak. Open de deuren niet te lang. Zet de thermostaat niet op te koude temperaturen. REINIGING EN ONDERHOUD Zet het toestel uit en trek de stekker uit het stopcontact vooraleer het toestel te reinigen. Maak het toestel regelmatig schoon. Maak het toestel niet schoon met metalen voorwerpen. Gebruik geen agressieve schoonmaakproducten. Haal het voedsel uit de diepvries en bewaar het, goed afgedekt, op een koele plaats. Maak het toestel en de accessoires schoon met een doek en lauw water. Wrijf nog eens na met proper water en maak zorgvuldig droog. 18
19 Kijk regelmatig de afvoer in de koelkast na. Deze bevindt zich achterin, tegen de achterste wand, achter de onderste legger. Maak deze afvoer schoon indien nodig. Als de afvoer geblokkeerd is, zal er namelijk dooiwater komen te staan in de koelkast. De diepvries ontdooien Overtollig ijs in de diepvries moet verwijderd worden. Gebruik geen scherpe voorwerpen om het ijs te verwijderen. Gebruik een plastic schraper. Als het ijs te dik is om weg te schrapen, ontdooi de diepvries dan als volgt: 1. Trek de stekker uit het stopcontact. 2. Verwijder al het voedsel uit de diepvries. Opgelet: eens het voedsel ontdooid is, mag het niet opnieuw ingevroren worden. 3. Laat de deur van de diepvries open staan en zet een opvangbak onder het toestel om het dooiwater in op te vangen. 4. Maak het toestel volledig droog wanneer het ontdooien voltooid is. 5. Steek de stekker terug in het stopcontact, zodat het toestel terug kan werken. De lamp vervangen Opgelet: trek zeker de stekker uit het stopcontact alvorens de lamp te vervangen! De specificaties van de lamp zijn terug te vinden op het typeplaatje op het toestel. Om de lamp te vervangen: 1. Zet de thermostaatknop op 0 om het toestel uit te schakelen. 2. Trek de stekker uit het stopcontact. 3. Verwijder de schroef uit het afdekplaatje van de lamp en verwijder het plaatje. 4. Draai de lamp los. 5. Plaats een nieuwe lamp en plaats het afdekplaatje weer terug met behulp van de schroef. 6. Steek de stekker weer in het stopcontact. 19
20 PRÉCAUTIONS Cet appareil peut être utilisé par des enfants âgés d au moins 16 ans et par des personnes ayant des capacités physiques, sensorielles ou mentales réduites ou dénuées d expérience ou de connaissance, s ils (si elles) sont correctement surveillé(e)s ou si des instructions relatives à l utilisation de l appareil en toute sécurité leur ont été données et si les risques encourus ont été appréhendés. Veillez à ce que les enfants ne puissent pas jouer avec l appareil. L entretien et le nettoyage de l appareil ne peuvent pas s effectuer par des enfants, à moins qu ils aient plus de 16 ans et qu ils soient sous surveillance. Gardez l appareil et le cordon hors de la portée d enfants de moins de 16 ans. Cet appareil est destiné à un usage domestique ou à d autres usages comme: Dans la cuisine du personnel dans des magasins, des bureaux ou d autres lieux mis en rapport avec l environnement de travail. Dans les fermes. Dans les chambres d hôtels, de motels et d autres lieux avec un caractère résidentiel. Dans les chambres d hôtes ou similaires. Attention: l appareil ne peut pas être utilisé avec une minuterie externe ou une commande à distance séparée. 20
21 21 Veuillez lire toutes les instructions avant d utiliser l appareil. Vérifiez avant usage si la tension indiquée sur l appareil correspond à la tension du réseau électrique de votre domicile. Ne laissez pas le cordon pendre sur une surface chaude ou sur le rebord d une table. N utilisez jamais l appareil lorsque le cordon ou la fiche sont endommagés, après un mauvais fonctionnement de l appareil ou lorsque l appareil est endommagé. Amenez alors l appareil au centre de services le plus proche pour contrôle et réparation. Soyez très attentif lorsque l appareil est utilisé par des enfants ou à proximité d enfants. L utilisation d accessoires non préconisés par le fabricant peut provoquer un incendie, une électrocution ou des blessures. Retirez la fiche de la prise lorsque l appareil n est pas utilisé, avant d installer ou d enlever des pièces et avant de nettoyer l appareil. Mettez tous les boutons en position «arrêt» et retirez la fiche de la prise. Ne tirez jamais sur le câble pour retirer la fiche de la prise. Ne laissez jamais un appareil en service sans surveillance. Ne placez jamais cet appareil sur ou à proximité d un feu au gaz ou d un feu électrique où il pourrait entrer en contact avec un appareil chaud. N utilisez pas l appareil à l extérieur. Utilisez l appareil uniquement dans le but auquel il est
22 destiné. Utilisez toujours l appareil sur une surface solide, sèche et plane. Cet appareil ne convient qu à un usage domestique. Le fabricant décline toute responsabilité pour des accidents qui découleraient d un mauvais usage de l appareil ou du non-respect des instructions fournies dans ce manuel. Toutes les réparations, en dehors de l entretien ordinaire de l appareil, doivent être réalisées par le fabricant ou son service après-vente. N immergez jamais le cordon électrique, la fiche ou l appareil lui-même dans l eau ou tout autre milieu liquide. Veillez à ce que les enfants ne puissent pas toucher à l appareil ou au cordon électrique. Tenez le cordon éloigné de rebords tranchants et de pièces brûlantes ou d autres sources de chaleur. Avant la première utilisation, enlevez tous les éléments d emballage et les éventuels autocollants promotionnels. Gardez les orifices de ventilation dégagés, veillez à ce qu ils ne soient ni encombrés ni entravés. Ne recourez à aucun moyen mécanique ou autre pour accélérer le processus de dégivrage. N utilisez aucun autre appareil électrique dans le réfrigérateur, sauf s il est agréé à cette fin par le fabricant. Ne touchez pas la lampe, si celle-ci est restée 22
23 longtemps allumée. Elle peut en effet être brûlante. La lampe n est destinée qu à cet appareil. Ne l utilisez jamais comme éclairage d intérieur. Ne conservez jamais de matière explosive dans l appareil, comme p.ex. des aérosols à gaz propulseur inflammable. Veillez à ne pas endommager le circuit de refroidissement, p.ex. lors du transport ou de l installation. Veillez à ce que le cordon d alimentation ne soit ni écrasé ni endommagé par l arrière de l appareil. Ceci pourrait provoquer une surchauffe et par conséquent un incendie. Veillez à avoir accès à la fiche de l appareil. Ne tirez pas sur le cordon. Si la prise électrique n est pas bien fixée, ne branchez pas l appareil (risque de choc électrique ou d incendie). N utilisez pas l appareil sans la lampe. Cet appareil est lourd. Soyez prudent en le déplaçant. Ne touchez pas le contenu du compartiment congélateur lorsque vous avez les mains humides ou mouillées. Ceci peut provoquer des blessures ou des brûlures à la peau. Évitez une exposition prolongée à la lumière solaire. 23
24 ÉLÉMENTS 1. Compartiment congélateur 2. Thermostat et lampe 3. Tablette en verre 4. Tiroir à légumes 5. Balconnet de porte 6. Pieds ajustables INVERSION DU SENS D OUVERTURE DES PORTES Attention : Veillez à ce que l appareil soit vide et non raccordé au 4 5 réseau électrique. 6 Pour inverser le sens d ouverture de la porte, basculez l appareil vers l arrière. Veillez à ce que l appareil s appuie sur quelque chose de ferme, de manière à ce qu il ne glisse pas pendant l inversion de la porte. Conservez tous les éléments démontés, pour pouvoir replacer la porte. Ne couchez pas l appareil à plat, cela pourrait endommager le système de refroidissement. Il est recommandé d effectuer le montage à 2 personnes. 1. Retirez les deux vis à l arrière du cache supérieur. 2. Retirez le cache supérieur et mettez-le de côté. 3. Dévissez la charnière supérieure, puis retirez la porte et posez-la sur une surface douce pour éviter de la rayer. 4. Dévissez la charnière inférieure de la porte du congélateur. Puis retirez la porte et posez-la sur une surface douce pour éviter de la rayer. 5. Déplacez le boucle de porte du côté gauche vers le côté droit. Déplacez les deux cache-trous centraux d un côté vers l autre. 6. Déplacez le cache-trou de charnière du côté droit vers le côté gauche. 7. Retournez la porte du congélateur et placez le côté charnière du côté gauche. Puis fixez la porte sur le support. 8. Dévissez la charnière inférieure. Puis retirez les pieds réglables des deux côtés. 9. Dévissez et retirez la broche de la charnière inférieure, retournez le support et replacez-le. 10. Montez le support sur le côté gauche et montez les charnières inférieure. Replacez les deux pieds réglables. 11. Replacez la porte. Assurez-vous que la porte est bien alignée horizontalement et verticalement, afin que les joints soient bien fermés sur tous les côtés, et terminez en serrant la charnière supérieure. 12. Replacez le cache supérieur et refixez-le par l arrière à l aide de ses deux vis. 24
25
26 INSTALLATION Attention : Déballez l appareil et vérifiez qu il n a pas subi de dégâts. Si c est le cas, ne branchez pas l appareil. Il est recommandé d attendre au moins 4 heures avant de le brancher, de manière à ce que le fluide puisse retourner au compresseur. La circulation d air autour de l appareil doit être suffisante pour éviter toute surchauffe. Ne placez pas l appareil à proximité d un radiateur ou d une cuisinière. Veillez à avoir encore accès à la fiche électrique, après l avoir installé. Installez l appareil dans un local dont la température ambiante est comprise entre 16 C et 32 C. 1. Vissez les entretoises sur leurs raccords situés à l arrière du réfrigérateur. 2. Veillez à ce que la porte ait suffisamment de place pour pouvoir s ouvrir. Laissez au minimum 5 cm de libre de part et d autre du réfrigérateur. Laissez au minimum 10 cm de libre entre le sommet de l appareil et d éventuels éléments muraux en surplomb. Notez qu il est préférable qu il n y ait rien audessus de l appareil. 3. Assurez-vous que l appareil soit bien droit. Vous pouvez, à cette fin, régler les pieds de l appareil. AVANT LA PREMIÈRE UTILISATION Nettoyez l intérieur de l appareil, ainsi que l ensemble des accessoires, à l eau tiède et un peu de savon neutre, et séchez soigneusement le tout avant d utiliser l appareil pour la première fois. N utilisez surtout pas de détergents ni de poudres abrasives, qui pourraient abîmer le revêtement. UTILISATION Attention : Ne placez aucun objet brûlant sur les parties en plastique de l appareil. Ne placez rien au contact de la paroi arrière de l appareil. Les aliments ne peuvent plus être recongelés une fois qu ils ont été décongelés. Ne placez pas de boissons gazeuses ou pétillantes dans le compartiment congélateur. Ceci induirait de la pression et pourrait conduire à une explosion. 26
27 Réglage de la température Branchez l appareil. La température peut être réglée au moyen du bouton du thermostat. Huit réglages sont possibles. 1 correspond au réglage le moins froid, 7 au réglage le plus froid. Au 0, le réfrigérateur est arrêté. Congélateur Le processus de congélation dure 24 heures. N ajoutez aucun autre aliment à congeler pendant ce délai. Lorsque le congélateur n a pas été utilisé pendant un certain laps de temps et est redémarré ensuite, l appareil doit rester branché pendant au moins 2 heures avant que vous ne puissiez placer des produits à congeler dans le congélateur. Important : si le congélateur se dégivre accidentellement - par exemple en cas de panne d électricité - la nourriture décongelée doit être immédiatement consommée ou préparée. Accessoires 1. L appareil comporte une tablette de verre amovible. La tablette peut être placée à différentes hauteurs. 2. Les balconnets de porte peuvent être accrochés à différentes hauteurs dans la porte. Pour ce faire, soulevez progressivement les balconnets et reglissez-les à l endroit désiré. Conseils d économie d énergie Ne placez pas de nourriture chaude dans l appareil. Ne placez pas les différents objets trop près les uns des autres, cela gênerait la circulation d air. Veillez à ce que rien n entre en contact avec la paroi arrière de l appareil. Si l électricité est coupée, gardez les portes fermées. N ouvrez pas trop souvent les portes. N ouvrez pas trop longtemps les portes. Ne réglez pas le thermostat sur des températures trop froides. NETTOYAGE ET MAINTENANCE Éteignez l appareil et débranchez-le avant de le nettoyer. Nettoyez régulièrement l appareil. Ne nettoyez pas l appareil avec des objets métalliques. N utilisez pas de produits de nettoyage agressifs. Retirez la nourriture du congélateur et conservez-la, bien recouverte, dans un endroit frais. Nettoyez l appareil et les accessoires au moyen d un linge et d eau tiède. Rincez encore à l eau propre et séchez soigneusement. Contrôlez régulièrement l évacuation dans le réfrigérateur. Vous trouverez celle- 27
28 ci à l arrière, contre la paroi arrière, derrière la tablette du dessous. Nettoyez cette évacuation, si nécessaire. Si l évacuation est bouchée, de l eau de dégel apparaîtra dans le réfrigérateur. Dégivrer le congélateur Enlevez la glace excédentaire dans le congélateur. N utilisez pas d objets tranchants pour enlever la glace. Utilisez un grattoir en plastique. Si la glace est trop épaisse pour être grattée, dégivrez le congélateur comme suit : 1. Débranchez l appareil. 2. Retirez toute la nourriture du congélateur. Attention : si la nourriture se décongèle, elle ne peut plus être recongelée. 3. Laissez la porte du congélateur ouverte et placez un bac de recueil sous l appareil pour recueillir l eau de dégel. 4. Séchez entièrement l appareil lorsqu il est totalement dégivré. 5. Rebranchez l appareil, de manière à ce qu il puisse à nouveau fonctionner. Remplacer la lampe Attention : débranchez certainement l appareil avant de remplacer la lampe! Les spécifications de la lampe figurent sur la plaquette renseignant le type de l appareil. Pour remplacer la lampe : 1. Réglez le thermostat sur 0, pour éteindre l appareil. 2. Débranchez l appareil. 3. Enlevez la vis du cache de protection de la lampe et retirez cette plaquette. 4. Dévissez la lampe. 5. Placez une nouvelle lampe et remettez le cache de protection à nouveau en place, à l aide de la vis. 6. Rebranchez l appareil. 28
29 SICHERHEITSHINWEISE Dieses Gerät darf von Kindern ab 16 Jahren oder älter gebraucht werden. Ebenso dürfen Personen mit körperlicher bzw. leichter geistiger Behinderung sowie Personen mit eingeschränkter Erfahrung das Gerät betätigen. Dies unter der Voraussetzung, dass diese Personen ausreichende Anweisungen sowohl zum Gebrauch des Gerätes, als auch zu den hiermit verbundenen Gefahren erhalten haben. Kinder dürfen nicht mit dem Gerät spielen. Die Pflege und Wartung des Gerätes darf nicht von Kindern ausgeführt werden, es sei denn, dass dies unter Aufsicht passiert und es sich um Kinder handelt, die älter als 16 Jahre sind und im Voraus ausreichend über den Gebrauch/die Wartung informiert worden sind. Sorgen Sie dafür, dass sich das Gerät nicht in Anwesenheit von Kindern unter 16 Jahren befindet. Dieses Gerät eignet sich zum Gebrauch im Haushalt oder ähnlichen Umgebungen, wie z.b.: Küchenzeile für Personal in Geschäften, Büros oder anderen professionellen Umgebungen Bauernhöfe Hotel-/Motel-/Gästezimmer u.ä. Achtung: das Gerät darf nicht mit einer externen Zeitschaltuhr oder Fernbedienung gebraucht werden. Bitte alle Anweisungen vor dem Gebrauch durchlesen. Vor der Benutzung prüfen, ob die Spannung, die auf 29
30 dem Gerät angegeben ist, mit der Spannung Ihres Stromnetzes übereinstimmt. Lassen Sie das Netzkabel nicht über den Tisch oder die Anrichte hängen, oder in Kontakt mit heißen Oberflächen kommen. Benutzen Sie das Gerät niemals, wenn die Kabelschnur oder der Stecker beschädigt ist, nach beeinträchtigtem Funktionieren des Gerätes, oder wenn das Gerät beschädigt ist. Bringen Sie in solchen Fällen das Gerät zur nächsten qualifizierten Servicestelle zur Überprüfung und/oder Reparatur. Beim Einsatz des Gerätes in Anwesenheit von Kindern ist strenge Aufsicht geboten. Die Verwendung von Zubehör, das nicht vom Hersteller empfohlen oder verkauft wird, besteht die Gefahr von Brand, elektrischen Schlages oder von Verletzungen. Ziehen Sie den Stecker aus der Steckdose, wenn das Gerät nicht im Einsatz ist, Einzelteile montiert oder demontiert werden, oder das Gerät gereinigt wird. Ziehen Sie den Stecker direkt am Stecker selber und nicht an der Kabelschnur aus der Steckdose. Lassen Sie das im Betrieb befindliche Gerät nicht unbeaufsichtigt. Stellen Sie das Gerät nicht in der Nähe oder auf einer Gasflamme, einer elektrischen Platte oder an einer Stelle ab, auf der es in Kontakt mit einem Elektroofen oder einem anderen heißen Geräten kommen kann. Benutzen Sie das Gerät nicht im Freien. Benutzen Sie das Gerät ausschließlich für den Zweck, 30
31 für den es gedacht ist. Stellen Sie das Gerät immer auf eine stabile, flache und trockene Oberfläche. Das Gerät ist nur auf den privaten Gebrauch ausgelegt. Der Hersteller ist nicht verantwortlich für Unfälle, die als Folge von unsachgemäßem Gebrauch des Geräts oder Nichtbefolgen der in dieser Anleitung aufgeführten Regeln entstehen. Sämtliche Reparaturen, abgesehen von der gewöhnlichen Pflege, sind durch den Hersteller oder dessen Kundendienst zu übernehmen. Das Gerät, das Kabel oder den Stecker niemals in Wasser oder in andere Flüssigkeiten tauchen. Sorgen Sie dafür, dass Kinder das Netzkabel oder das Gerät nicht berühren können. Netzkabel vor scharfen Kanten, heißen Gegen-ständen oder anderen Wärmequellen schützen. Beim ersten Gebrauch Verpackungsmaterial und mögliche Werbeaufkleber komplett entfernen. Halten Sie die Lüftungsöffnungen frei und sorgen Sie dafür, dass diese nicht verstopft oder behindert werden. Verwenden Sie keine mechanischen Geräte oder andere Hilfsmittel, um den Abtauprozess zu beschleunigen. Verwenden Sie keine anderen elektrischen Geräte im Kühlschrank, außer wenn sie vom Hersteller für diesen Zweck zugelassen wurden. Fassen Sie die Lampe nicht an, wenn diese lange gebrannt hat. Sie kann sehr heiß sein. 31
32 Die Lampe ist nur für dieses Gerät bestimmt. Verwenden Sie diese nie als Innenraumbeleuchtung. Bewahren Sie keine explosiven Stoffe im Gerät, wie beispielsweise Sprühflaschen mit brennbarem Triebmittel. Sorgen Sie dafür, dass der Kühlkreislauf nicht beschädigt wird, z.b. während des Transports oder bei der Montage. Achten Sie darauf, dass das Kabel nicht durch die Rückseite des Gerätes platt gedrückt oder beschädigt wird. Dies kann Überhitzung oder Feuer verursachen. Achten Sie darauf, dass Sie Zugang zum Stecker des Gerätes haben. Ziehen Sie nicht am Kabel. Wenn die Steckdose lose ist, stecken Sie den Stecker nicht in diese Steckdose. (Risiko eines Stromschlags oder Brandgefahr) Verwenden Sie das Gerät nicht ohne Lampe. Dieses Gerät ist schwer. Seien Sie beim Transport vorsichtig. Berühren Sie Lebensmittel im Tiefkühlfach nicht mit feuchten oder nassen Händen. Dies kann zu (Gefrierbrand-)wunden der Haut führen. Vermeiden Sie eine lange Exposition gegenüber Sonnenlicht. 32
33 BESTANDTEILE 1. Tiefkühlfach 2. Thermostat und Lampe 3. Einlegeboden aus Glas 4. Gemüsefach 5. Türregal 6. Verstellbare Füße ÜRANSCHLAG ÄNDERN Achtung: Sorgen Sie dafür, dass das Gerät leer und nicht an das Stromnetz angeschlossenen ist. 4 5 Um den Türanschlag zu 6 ändern, ist es notwendig, das Gerät nach hinten zu kippen. Sorgen Sie dafür, dass das Gerät stabil liegt, sodass es während der Änderung des Türanschlags nicht verrutscht. Alle demontierten Teile müssen aufbewahrt werden, um die Tür erneut montieren zu können. Legen Sie das Gerät nicht flach ab. Dies könnte das Kühlsystem beschädigen. Es wird empfohlen, die Montage mit 2 Personen durchzuführen. 1. Zwei Schrauben hinten an der Oberabdeckung entfernen. 2. Oberabdeckung entfernen und beiseite legen. 3. Oberes Scharnier losschrauben und Tür entfernen. Auf weiche Unterlage legen, um Kratzer zu vermeiden. 4. Unteres Scharnier der Tiefkühlschranktür lösen. Tür entfernen und auf weiche Unterlage legen, um Kratzer zu vermeiden. 5. Montieren Sie das Türschloss von links nach rechts. Die beiden mittleren Lochabdeckungen von einer Seite zur anderen wechseln. 6. Scharnierlochabdeckung von rechts nach links wechseln. 7. Tiefkühlschranktür drehen und Scharnier links anbringen. Tür mittels Halterung fixieren. 8. Unteres Scharnier lösen. Verstellbare Füßchen auf beiden Seiten entfernen. 9. Untere Scharnierstifte lösen und entfernen. Montagewinkel umdrehen und ersetzen. 10. Setzen Sie die Stütze anschliessend auf die linken des Gerätes und montieren Sie den unteren Scharnierbolzen. 11. Tür erneut anbringen. Vor dem Anziehen des oberen Scharniers überprüfen, ob die Tür horizontal und vertikal passend montiert ist, sodass die Dichtungen auf allen Seiten gut schließen. 12. Obere Abdeckung erneut anbringen und mit den zwei hinteren Schrauben fixieren. 33
34
35 35 AUFSTELLEN Achtung: Packen Sie das Gerät aus und schauen Sie nach, dass keine Beschädigungen aufgetreten sind. Schließen Sie das Gerät nicht an die Steckdose an, wenn es beschädigt ist. Es ist empfehlenswert, mindestens 4 Stunden zu warten, bevor das Gerät an die Steckdose angeschlossen wird. Das Öl kann dann in den Kompressor zurücklaufen. Rund um das Gerät muss ausreichend Luft zirkulieren, sodass es nicht überhitzt. Stellen Sie das Gerät nicht in der Nähe eines Heizkörpers oder Herdes auf. Achten Sie darauf, dass Sie nach dem Aufstellen noch Zugang zum Stecker haben. Stellen Sie das Gerät bei einer Zimmertemperatur zwischen 16 C und 32 C auf. 1. Schrauben Sie die Abstandhalter auf die Anschlüsse an der Rückseite des Kühlschrankes. 2. Sorgen Sie dafür, dass noch genügend Platz für die Öffnung der Tür vorhanden ist. Lassen Sie an beiden Seiten des Kühlschranks mindestens einen Freiraum von 5 cm. Lassen Sie zwischen der Oberseite des Geräts und eventuell überstehenden Wandelementen mindestens einen Freiraum von 10 cm. Beachten Sie jedoch, dass es besser ist, wenn sich nichts über dem Gerät befindet. 3. Sorgen Sie dafür, dass das Gerät gerade steht. Dazu können Sie die Füße unter dem Gerät verstellen. VOR DER ERSTEN INBETRIEBNAHME Reinigen Sie die Innenseite des Geräts und alle Zubehörteile mit lauwarmem Wasser und etwas neutralem Spülmittel und trocken Sie alles sorgfältig, bevor Sie das Gerät erstmals verwenden. Verwenden Sie keine Wasch- und Reinigungsmittel oder scheuernde Pulver, da diese die Verarbeitung beschädigen können. GEBRAUCH Achtung: Stellen Sie keine heißen Gegenstände auf die Plastikteile des Geräts. Stellen Sie nichts an die Rückwand des Geräts. Gefrorene Lebensmittel dürfen nicht erneut eingefroren werden, nachdem sie aufgetaut waren. Stellen Sie keine kohlensäurehaltigen Getränke in das Tiefkühlfach. Dies verursacht Druck und kann zu einer Explosion führen.
36 Temperatureinstellung Stecken Sie den Stecker in die Steckdose. Die Temperatur kann mit dem Thermostatknopf eingestellt werden. Es gibt 8 Einstellungen. 1 ist die wärmste und 7 die kälteste Einstellung. Bei 0 ist der Kühlschrank ausgeschaltet. Tiefkühlfach Der Tiefkühlprozess dauert 24 Stunden. Geben Sie während dieses Zeitraums keine weiteren Lebensmittel hinzu, die eingefroren werden müssen. Wenn das Tiefkühlfach über einen längeren Zeitraum nicht verwendet wurde und erneut eingeschaltet wird, muss das Gerät mindestens 2 Stunden in Betrieb sein, bevor Sie einzufrierende Produkte in das Tiefkühlfach legen können. Wichtig: Wenn das Tiefkühlfach versehentlich auftaut - beispielsweise im Falle eines Stromausfalls - muss das Tiefkühlgut unmittelbar konsumiert oder zubereitet werden. Zubehör 1. Das Gerät ist mit ein versetzbaren Einlegeboden aus Glas ausgestattet. Diese Einlegeboden kann in verschiedenen Höhen eingelegt werden. 2. Die Türregale können auf verschiedenen Höhen in der Tür aufgehangen werden. Heben Sie die Türregale dazu gleichmäßig an und schieben Sie diese in die gewünschte Position. Tipps zur Energieeinsparung Stellen Sie keine heißen Lebensmittel in das Gerät. Stellen Sie verschiedene Gegenstände nicht zu nah zusammen, da dies die Luftzirkulation behindert. Sorgen Sie dafür, dass nichts an der Rückwand des Geräts steht. Halten Sie die Türen geschlossenen, wenn der Strom ausfällt. Öffnen Sie die Türen nicht zu oft. Öffnen Sie die Türen nicht zu lange. Stellen Sie den Thermostat nicht auf zu kalte Temperaturen ein. REINIGUNG UND PFLEGE Schalten Sie das Gerät aus und ziehen Sie den Stecker aus der Steckdose, bevor Sie mit der Reinigung des Geräts beginnen. Reinigen Sie das Gerät regelmäßig. Reinigen Sie das Gerät nicht mit Gegenständen aus Metall. Verwenden Sie keine aggressiven Reinigungsmittel. Entnehmen Sie die Lebensmittel aus dem Tiefkühlfach und bewahren Sie diese, gut abgedeckt, an einem kalten Ort auf. Reinigen Sie das Gerät und die Zubehörteile mit einem Tuch und lauwarmem 36
37 Wasser. Wischen Sie mit sauberem Wasser noch einmal nach und trocken Sie alles sorgfältig. Überprüfen Sie den Abfluss des Kühlschranks regelmäßig. Dieser befindet sich auf der Rückseite an der Rückwand, hinter dem untersten Einlegeboden. Reinigen Sie diesen Abfluss nach Bedarf. Wenn der Abfluss blockiert ist, bleibt das Tauwasser im Kühlschrank stehen. Tiefkühlfach abtauen Überflüssiges Eis im Tiefkühlfach muss entfernt werden. Verwenden Sie zur Entfernung des Eises keine scharfen Gegenstände. Verwenden Sie einen Plastikschaber. Wenn das Eis zu stark zum Abschaben ist, tauen Sie das Gefrierfach wie folgt ab: 1. Ziehen Sie den Stecker aus der Steckdose. 2. Entfernen Sie sämtliche Lebensmittel aus dem Tiefkühlfach. Achtung: Wenn die Lebensmittel aufgetaut sind, dürfen sie nicht erneut eingefroren werden. 3. Lassen Sie die Tür des Gefrierfaches offen stehen und stellen Sie einen Behälter unter das Gerät, um das Tauwasser aufzufangen. 4. Trocknen Sie das Gerät vollständig, nachdem das Abtauen abgeschlossen ist. 5. Stecken Sie den Stecker wieder in die Steckdose, sodass das Gerät wieder funktioniert. Austausch der Lampe Achtung: Ziehen Sie den Stecker aus der Steckdose, bevor Sie die Lampe austauschen. Die Spezifikationen der Lampe sind auf dem Typenschild des Geräts zu finden. Zum Austausch der Lampe: 1. Stellen Sie den Thermostatknopf auf 0, um das Gerät auszuschalten. 2. Ziehen Sie den Stecker aus der Steckdose. 3. Entfernen Sie die Schraube aus der Abdeckung der Lampe und entfernen Sie die Abdeckung. 4. Drehen Sie die Lampe heraus. 5. Schrauben Sie eine neue Lampe ein und montieren Sie die Abdeckung mithilfe der Schraube. 6. Stecken Sie den Stecker wieder in die Steckdose. 37
38 SAFETY INSTRUCTIONS This appliance may be used by children from the age of 16 and up, and also by persons with a physical or sensorly limitation, as well as mentally limited persons or persons with a lack of experience and knowledge. But only on the condition that these persons have received the necessary instructions on how to use this appliance in a safe way and know the dangers that can occur by using this appliance. Children cannot be allowed to play with the appliance. Maintenance and cleaning of the appliance may not be done by children, unless they are older than 16 years old and are under supervision. Keep the appliance out of reach of children younger than 16 years old. This appliance is suitable to be used in a household environment and in similar surroundings such as: Kitchen for personnel of shops, offices or other similar professional surroundings Farms Hotel or motel rooms and other surroundings with a residential character Guest rooms or similar Attention: This appliance cannot be used with an external timer or a separate remote control. 38
39 39 Read all instructions before use. Before use, check if the voltage stated on the appliance corresponds with the voltage of the power net at your home. Do not let the cord hang on a hot surface or on the edge of a table or counter top. Never use the appliance when the cord or plug is damaged, after malfunction or when the appliance itself is damaged. In that case, take the appliance to the nearest qualified service center for check-up and repair. Close supervision is necessary when the appliance is used near or by children. The use of accessories that are not recommended or sold by the manufacturer can cause fire, electrical shock or injuries. Unplug the appliance when it is not in use, before assembling or disassembling any parts and before cleaning the appliance. Put all buttons and knobs into the off position and unplug the appliance by grasping the plug. Never unplug by pulling the cord. Do not leave a working appliance unattended. Never place this appliance near a gas stove or electrical stove or in a place where it may come into contact with a warm appliance. Do not use the appliance outdoors. Only use the appliance for its intended use. Always use the appliance on a steady, dry and level surface.
40 Only use the appliance for domestic use. The manufacturer can not be held responsible for accidents that result from improper use of the appliance or not following the instructions described in this manual. All repairs should be carried out by the manufacturer or its aftersales service. Never immerse the appliance, the cord or the plug in water or any other liquid. Make sure that children do not touch the cord or appliance. Keep the cord away from sharp edges and hot parts or other heat sources. Before use, remove all packaging materials and any promotional stickers. Keep the ventilation openings free of obstructions. Do not use any mechanical or other devices to speed up the defrosting process. Do not use any other electrical appliance inside the fridge, unless they are approved for this purpose by the manufacturer. Do not touch the light bulb if it has been lit for a long time. This could be very hot. The light bulb is only suited for this appliance. Never use it as decorative lighting. Do not keep any explosive substances inside the appliance, like for instance aerosol cans with a flammable propellant. Make sure that the refrigerant circuit does not get damaged, for instance during transportation or 40
41 installation. Make sure that the plug does not get squashed or damaged by the back of the appliance. A squashed or damaged power plug may overheat and cause fire. Make sure that you have access to the plug of the appliance. Do not pull the cord. If the socket is loose, do not plug in the appliance. (risk of electric shock or fire) Do not use the appliance without the light bulb installed. This is a heavy appliance. Be careful when moving it. Do not touch anything that comes out of the freezer with damp or wet hands. This could cause skin burns. Avoid long exposure to direct sunlight. 41
42 PARTS 1. Freezer compartment 2. Thermostat and light 3. Glass shelf 4. Vegetable drawer 5. Door balcony 6. Levelling feet REVERSING THE DOOR Caution: Make sure that the appliance is empty and disconnected from the power net. To reverse the door, you need to tip the appliance backwards. Make sure that the appliance can lean on something firm and stable, so that it does not slip away while reversing the door. All removed objects are still needed to reinstall the reversed door. Do not lay the appliance flat, this could damage the cooling system. It is recommended to execute the assembly with 2 people. 1. Remove two screws at rear side of top cover. 2. Remove top cover and place it aside. 3. Unscrew top hinge and then remove door and place it on a soft pad to avoid scratch. 4. Unscrew bottom hinge of freezer door. Then remove the door and place it on a soft pad to avoid scratch. 5. Move door lock from left side to right side. Move the two middle hole covers from the one side to the other. 6. Move hinge hole cover from right side to left side. 7. Rotate freezer door and place hinge side at left side. And then fix the door by holder. 8. Unscrew bottom hinge. Then remove the adjustable feet from both side. 9. Unscrew and remove the bottom hinge pin, turn the bracket over and replace it. 10. Fit the bracket fitting on the left side and install the bottom hinge pin. Replace both adjustable feet. 11. Place the door back on. Ensure the door is aligned horizontally and vertically, so that the seals are closed on all sides before finally tightening the top hinge. 12. Put the top cover and fix it with 2 screws on the back. 42 6
43
44 INSTALLATION Caution: Unpack the appliance and check whether the appliance has suffered any damages. Do not connect the appliance to the power net if it is damaged. It is recommended to wait 4 hours before connecting the appliance to a socket, so that the oil can flow back to the compressor. There should be adequate air circulation around the appliance, so that it does not overheat. Do not place the appliance too close to a radiator or stove. Make sure that after installation, you still have access to the power plug. Place the appliance in an area with an ambient temperature between 16 C and 32 C. 1. Screw the spacers onto the connections at the back of the appliance. 2. Make sure that there is enough room to swing open te door. Leave a space of at least 5 cm at both sides of the appliance. Leave a space of at least 10 cm between the top of the appliance and any overhanging wall units. Caution: it is better not to have any overhanging wall units above the appliance. 3. Make sure that the appliance stands up straight. Use the levelling feet at the bottom of the appliance to adjust. BEFORE THE FIRST USE Clean the inside of the appliance and all the accessories with lukewarm water and some neutral soap. Dry thoroughly before using the appliance for the first time. Do not use any detergents or abrasive powders as they may damage the finish. USE Caution: Do not place any hot objects onto the plastic parts of the appliance. Do not place anything directly against the rear wall inside the appliance. Frozen foods should not be frozen again once they have been thawed. Do not place any sparkling or fizzy drinks inside the freezer. This causes pressure and may cause the container to explode. Temperature setting Plug in the appliance. The temperature can be set with the thermostat knob. There are 8 settings. 1 is the warmest setting, 7 is the coldest. When it is set to 0, the appliance is switched off. 44
45 Freezer The freezing process takes 24 hours. During this period, do not add any other foods that need to be frozen. If the freezer has not been used for a longer period of time and is started up again, it should be operational for at least 2 hours before you can place food inside the freezer that needs to be frozen. Important: if the freezer thaws by accident - for example in case of a power outage - the frozen foods need to be consumed quickly or cooked immediately. Accessories 1. The appliance is equipped with a removable, glass shelf. The shelf can be placed at different heights. 2. The door balconies can be placed at different heights inside the door. Gradually lift the balconies to remove them and slide them back into the desired position. Energy saving tips Do not place any warm foods inside the appliance. Do not place the different objects too close together, as this restricts the air circulation. Make sure that there is nothing placed directly against the rear wall. If the electricity should be cut off, keep the doors closed. Do not open the doors too often. Do not open the doors too long. Do not set the thermostat to temperatures that are too cold. CLEANING AND MAINTENANCE Switch off and unplug the appliance before cleaning it. Regularly clean the appliance. Do not clean the appliance with any metal objects. Do not use any agressive or abrasive cleaners. Remove the food from the freezer and preserve it - well covered - in a cool place. Clean the appliance and the accessories with a cloth and lukewarm water. Wipe again with fresh water and dry thoroughly. Check the drain of the appliance regularly. You can find the drain opening inside the fridge, at the rear wall, behind the lower shelf. Clean the drain when needed. If the drain is blocked, thaw water will flow into the refrigerator. Thawing the freezer Excessive ice inside the freezer should be removed. Do not use any sharp objects to remove the ice. Use a plastic scraper. If the ice is too thick to be 45
46 scraped off, then thaw the freezer as follows: 1. Unplug the appliance. 2. Remove all the food from the freezer. Caution: once the food is defrosted, you can not freeze it again. 3. Leave the door of the freezer open and place a container at the bottom of the appliance to catch the thaw water. 4. Dry the appliance thoroughly when the defrosting process is finished. 5. Plug in the appliance, so that the appliance can start working again. Replacing the light bulb Caution: unplug the appliance before replacing the light bulb! The specifications of the light can be found on the rating label on the appliance. To replace the light bulb: 1. Set the thermostat knob to 0 to switch off the appliance. 2. Unplug the appliance. 3. Remove the screw from the lamp cover and remove the cover. 4. Unscrew the light bulb. 5. Screw in a new light bulb and place back the cover with the screw. 6. Plug in the appliance. 46
47 PRECAUCIONES IMPORTANTES Este aparato está diseñado para ser utilizado por niños a partir de 16 años de edad y por personas con discapacidades físicas, sensoriales o mentales, o por personas que no dispongan de suficiente experiencia y conocimientos, a no ser que sean supervisados o instruidos inicialmente en la utilización segura del aparato y los posibles peligros. Los niños deben estar siempre bajo supervisión, para asegurar que no juegan con el aparato. El mantenimiento y la limpieza del aparato no pueden efectuarse por niños, a no ser que tengan más de 16 años de edad y sean supervisados. Mantenga el aparato y el cordón eléctrico fuera del alcance de niños menores de 16 años. Este aparato está diseñado para ser utilizado en un entorno doméstico y en entornos similares como: En la cocina para el personal de tiendas, oficinas y otros entornos profesionales similares. En las fincas. En las habitaciones de hoteles y moteles y otros entornos con un carácter residencial. En los cuartos de huéspedes o similares. Atención: el aparato no puede ser utilizado con un temporizador externo o un mando a distancia separado. 47
48 Lea todas las instrucciones antes del uso. Antes de utilizarlo, compruebe si el voltaje indicado en el aparato corresponde al voltaje de la electricidad de su casa. No permita que el cable cuelgue sobre una superficie o el borde de una mesa o encimera. No utilice nunca el aparato si el cable o el enchufe están dañados, después de un mal funcionamiento de la unidad o si están dañados. Lleve el aparato al distribuidor autorizado más cercano centro para la inspección y reparación. Se requiere supervisión cuando el aparato es usado por o cerca de niños. El uso de accesorios no recomendados o vendidos por el fabricante puede causar incendios, descargas eléctricas o lesiones. Desenchufe la toma de corriente cuando no se usa, para montar o desmontar piezas y antes de limpiarlo. Ponga todos los botones en posición desconectado ( off ) y desconecte el enchufe de la toma de corriente. Nunca tire del cable para desenchufarlo. No deje que el aparato funcione sin supervisión. No encienda nunca el aparato cerca de una estufa de gas o eléctrica, ni en un lugar donde pueda entrar en contacto con un horno eléctrico o con otro aparato caliente. No utilice el aparato en el exterior. Utilice el aparato sólo para el fin para el que se ha 48
49 fabricado. Coloque siempre el aparato sobre una superficie firme, horizontal y seca. Utilice el aparato sólo para uso doméstico. El fabricante no es responsable de los accidentes que resulten del uso incorrecto del aparato, ni del incumplimiento de las normas establecidas en este manual. Todas las reparaciones aparte del mantenimiento ordinario de la unidad deben ser efectuadas por el fabricante o por su servicio post-venta. No sumerja nunca el aparato, el cable o el enchufe en agua o cualquier otro líquido. Asegúrese de que los niños no puedan tocar el cable eléctrico o el aparato. Mantenga el cable alejado de bordes afilados y piezas calientes u otras fuentes de calor. Antes del primer uso retire todos los materiales de embalaje y etiquetas de promoción. Mantenga las ranuras de ventilación libres y asegúrese de que no están bloqueadas u obstruidas. No utilice instrumentos mecánicos o de otro tipo para acelerar el proceso de descongelación. No utilice ningún otro aparato eléctrico en el interior del frigorífico, a menos que el mismo esté aprobado para este fin por el fabricante. No toque la lámpara si esta ha estado encendida durante mucho tiempo. Podría estar muy caliente. La lámpara solo debe ser utilizada en esta unidad. 49
50 Nunca la debe utilizar como iluminación interior. Nunca almacene materiales explosivos en el aparato como, por ejemplo, aerosoles con gas propulsor inflamable. Asegúrese de que el circuito de refrigeración no se daña, por ejemplo, durante el transporte o la instalación. Asegúrese de que el cable no quede aplastado o dañado por la parte trasera de la unidad. Esto puede causar sobrecalentamiento y, en consecuencia, se podría producir un incendio. Asegúrese de tener acceso al enchufe del aparato. No tire del cable. Si la toma de corriente está suelta, no inserte el enchufe en la toma de corriente (riesgo de descarga eléctrica o incendio). No utilice el aparato sin la lámpara. Este aparato es pesado. Tenga cuidado al desplazarlo. No toque ningún objeto que se encuentre en el congelador con las manos mojadas. Esto puede ocasionar heridas (quemaduras) en la piel. Evite una exposición prolongada a la luz solar. 50
51 PIEZAS 1. Congelador 2. Termostato y lámpara 3. Estante de cristal 4. Cajón de verduras 5. Estante de la puerta 6. Patas ajustables DAR LA VUELTA A LA PUERTA Atención: Asegúrese de que el aparato está vacío y de que no está conectado a la red eléctrica. 4 5 Para dar la vuelta a la 6 puerta es necesario inclinar el aparato hacia atrás. Asegúrese de que el aparato se puede apoyar sobre algo sólido, de manera que no se pueda deslizar al dar la vuelta a la puerta. Todos los elementos retirados se deben conservar para poder volver a instalar la puerta. No coloque el aparato plano, ya que esto podría dañar el sistema de refrigeración. Se recomienda que se ocupen del montaje dos personas. 1. Retire los dos tornillos en el lado posterior de la cubierta superior. 2. Retire la cubierta superior y póngala a un lado. 3. Desatornille la bisagra superior y, a continuación, retire la puerta y lo colóquela sobre una almohadilla suave para evitar arañazos. 4. Desatornille la bisagra inferior de la puerta del congelador. A continuación, retire la puerta y colóquela sobre una almohadilla suave para evitar arañazos. 5. Mueva el cierro puerta de la izquierda a la derecha. Mueva las dos tapas huecas centrales de un lado al otro. 6. Mueva la tapa hueca de la bisagra del lado derecho al lado izquierdo. 7. Rote la puerta del congelador y sitúe el lado de la bisagra en el lado izquierdo. A continuación, fije la puerta con el retenedor. 8. Desatornille la bisagra inferior. A continuación, retire las patas ajustables de ambos lados. 9. Desatornille y retire el pasador de bisagra inferior, gire el soporte sobre este y sustitúyalo. 10. Ponga el soporte ahora en la izquierda y monte el perno inferior. Sustituya ambas patas ajustables. 11. Vuelva a colocar la puerta. Asegúrese de que la puerta se alinea horizontal y verticalmente, de manera que las juntas estén cerradas en todos los lados antes de, por último, apretar la bisagra superior. 12. Ponga la cubierta superior y fíjela con 2 tornillos en la parte posterior. 51
52
53 53 INSTALACIÓN Atención: Desembale el aparato y compruebe la presencia de algún tipo de daño. No conecte el aparato a una toma de corriente cuando esté dañado. Es aconsejable esperar al menos 4 horas antes de conectar el enchufe a la toma de corriente, para que el aceite pueda fluir de nuevo al compresor. Debe poder circular suficiente aire alrededor del aparato, de manera que no se pueda sobrecalentar. No coloque el aparato cerca de un radiador o cocina. Asegúrese de que todavía tiene acceso al enchufe después de la instalación. Coloque el aparato a una temperatura ambiente comprendida entre los 16 C y los 32 C. 1. Atornille los espaciadores en los conectores que se encuentran en la parte posterior del frigorífico. 2. Asegúrese de que la puerta dispone de suficiente espacio para abrirse. Deje al menos un espacio de 5 cm a ambos lados del frigorífico. Mantenga un espacio mínimo de 10 cm entre la parte superior del aparato y los posibles elementos que sobresalen de la pared. Tenga en cuenta que es mejor que no haya nada encima del aparato. 3. Asegúrese de que el aparato está recto. Para ello puede ajustar las patas en la parte inferior del aparato. ANTES DEL PRIMER USO Limpie el interior del aparato y todos los accesorios con agua tibia y jabón neutro, y seque bien antes de usar el dispositivo por primera vez. Nunca se deben utilizar detergentes o polvos abrasivos, ya que pueden dañar el acabado. USO Atención: No coloque objetos calientes sobre las partes de plástico del aparato. No coloque nada cerca de la pared posterior del aparato. Los alimentos que se han descongelado no se deben volver a congelar. No coloque bebidas efervescentes o carbonatadas en el compartimiento congelador. Estas bebidas ocasionan presión y podrían provocar una explosión. Ajuste de la temperatura Introduzca el enchufe en la toma de corriente. La temperatura se puede ajustar con el botón del termostato. Hay disponibles ocho
54 configuraciones. 1 es el valor más caliente, 7 es el más frío. A 0, el frigorífico está apagado. Congelador El proceso de congelación dura 24 horas. Durante este período no se debe añadir ningún otro alimento que se deba congelar. Si el congelador no se ha utilizado durante un largo período de tiempo y después se pone en marcha de nuevo, el aparato debe estar encendido durante al menos 2 horas antes de que se puedan introducir productos en el congelador para congelarlos. Importante: si el congelador se descongela accidentalmente - por ejemplo, en el caso de un apagón de electricidad - los alimentos congelados deben ser consumidos o cocinados inmediatamente. Accesorios 1. El aparato está equipado con un estante de cristal desplazable. Se puede colocar el estante a diferentes alturas. 2. Los estantes de la puerta se pueden colgar en la puerta a diferentes alturas. Para ello levante los estantes de puerta poco a poco hacia arriba y fíjelos en la posición deseada. Consejos para ahorrar energía No coloque alimentos calientes en el aparato. Ponga los diferentes objetos no demasiado cerca unos de otros, ya que esto restringe el flujo de aire. Asegúrese de que no hay nada apoyado en la pared del fondo del aparato. Si la electricidad falla, mantenga las puertas cerradas. No abra las puertas con demasiada frecuencia. No abra las puertas durante demasiado tiempo. No ajuste el termostato a temperaturas demasiado frías. LIMPIEZA Y MANTENIMIENTO Apague el aparato y desenchúfelo de la toma de corriente antes de limpiarlo. Limpie regularmente el aparato. No limpie el aparato con objetos metálicos. No utilice productos de limpieza agresivos. Retire los alimentos del congelador y guárdelos, bien cubiertos, en un lugar fresco. Limpie el aparato y los accesorios con un paño y agua tibia. Vuelva a frotar con agua limpia y seque con cuidado. Compruebe regularmente el desagüe del frigorífico. Este se encuentra en la parte de atrás, en la pared trasera, detrás del estante inferior. 54
55 Limpie el desagüe cuando sea necesario. Si el desagüe está obstruido, se filtrará agua de descongelación en el frigorífico. Descongelar el congelador Se debe eliminar el exceso de hielo en el congelador. No utilice objetos afilados para eliminar el hielo. Use una espátula de plástico. Si el hielo es demasiado grueso para raspar, descongele el congelador de la siguiente manera: 1. Desconecte el enchufe de la toma de corriente. 2. Retire todos los alimentos del congelador. Atención: una vez que la comida se ha descongelado no se debe volver a congelar. 3. Deje la puerta del congelador abierta y coloque un recipiente debajo del aparato para recoger el agua del deshielo. 4. Limpie el aparato y séquelo completamente cuando se haya completado el proceso de descongelación. 5. Vuelva a introducir el enchufe en la toma de corriente para que el aparato pueda volver a funcionar. Sustitución de la lámpara Atención: saque el enchufe de la toma de corriente antes de cambiar la lámpara! Las especificaciones de la lámpara se pueden encontrar en la placa de identificación del aparato. Para sustituir la lámpara: 1. Ajuste el botón del termostato a 0 para apagar el aparato. 2. Desconecte el enchufe de la toma de corriente. 3. Retire el tornillo de la placa protectora de la lámpara y retire la placa. 4. Desenrosque la bombilla. 5. Coloque una nueva lámpara y vuelva a colocar la placa protectora con ayuda del tornillo. 6. Vuelva a conectar el enchufe en la toma de corriente. 55
56 DŮLEŽITÉ Přečtěte si pečlivě tento návod k použití a uschovejte si jej pro pozdější nahlédnutí a radu. Tento přístroj byl vyroben pouze pro využití v domácnosti a smí být používán výhradně podle pokynů uvedených níže. Tento přístroj nesmí být samostatně obsluhován osobami s mentální nebo motorickou poruchou a také lidmi bez základních zkušeností pro obsluhu. Obsluhu je nutno řádně proškolit, seznámit ji s možnými riziky nebo nechat pracovat pod dozorem. Zvláště dětem není dovoleno si s přístrojem hrát nebo jej samostatně obsluhovat. Údržbu a čištění přístroje nesmí provádět děti mladší 16 let. Přístroj nesmí být používán po extrémně dlouhou dobu jako profesionální přístroje. Je určen zvláště do kuchyněk pracovních kolektivů, kanceláří, hotelových pokojů nebo podobných zařízení pro nárazové použití. Pozor: Tento přístroj je zakázáno používat s externím časovačem nebo jiným dálkovým ovládáním. Před prvním použitím si pečlivě přečtěte všechny pokyny k používání. Před použitím si ověřte, zda napětí Vaší elektrické sítě odpovídá parametrům přístroje uvedeným na jeho výrobním štítku. Nenechávejte viset elektrický kabel přístroje přes hranu stolu, nebo pracovního pultu a nedovolte, aby 56
57 kabel přišel do styku s horkými plochami. Nikdy nepoužívejte přístroj s poškozeným kabelem, nebo zástrčkou, nebo pokud je přístroj poškozený a nepracuje správně. V takovém případě předejte přístroj do nejbližšího odborného servisu ke kontrole a opravě. Dbejte zvýšené opatrnosti, pokud se kolem přístroje pohybují děti. Použitím příslušenství, které nebylo dodáno výrobcem, může dojít až ke vzniku požáru, úrazu elektrickým proudem, nebo jinému zranění. Přístroj vždy odpojte od elektrické sítě pokud jej nepoužíváte, před demontáží, či montáží částí přístroje a před čištěním. Nastavte všechny přepínače a ovladače na polohy vypnuto a tažením za zástrčku přístroj odpojte od sítě. Nikdy zástrčku nevytahujte ze zásuvky tažením za kabel. Nenechávejte přístroj běžet bez dozoru. Nikdy neumisťujte přístroj v blízkosti plynového, nebo elektrického sporáku, či trouby, nebo do blízkosti jiného přístroje produkujícího teplo. Nepoužívejte přístroj venku. Přístroj používejte pouze k účelům, ke kterým je určený. Přístroj vždy používejte pouze na stabilním, suchém rovném místě. Přístroj je určený pouze pro použití v domácnostech. Výrobce nemůže ručit za škody a nehody způsobené nevhodným použitím přístroje, nebo nedodržením zde popsaných bezpečnostních instrukcí. 57
58 Veškeré opravy přístroje smí provádět pouze výrobce, nebo autorizovaný servis. Nikdy neponořujte přístroj, elektrický kabel a zástrčku do vody, ani jiných tekutin. Ujistěte se, že se děti nemohou dotýkat elektrického kabelu, nebo přístroje. Dbejte na to, aby nebyl elektrický kabel ohnutý přes ostré rohy a nedotýkal se horkých částí přístroje, nebo nebyl v blízkosti jiných zdrojů tepla. Před prvním použitím odstraňte veškeré obalové materiály a samolepky. Udržujte ventilační otvory přístroje čisté a průchodné. Nepoužívejte žádné mechanické nástroje, nebo jiné přístroje pro urychlení procesu odmrazování. Uvnitř lednice nepoužívejte žádné další elektrické přístroje, pokud nejsou pro toto použití přímo schválené výrobcem. Nedotýkejte se žárovky, pokud svítila delší dobu. Mohla by být velmi horká. Žárovka instalovaná v přístroji je určena pouze pro tento přístroj. Nikdy ji nepoužívejte do světel běžného osvětlení. Neskladujte uvnitř přístroje žádné výbušné látky, jako například spreje naplněné hořlavým plynem. Po převozu a instalaci přístroje se vždy ujistěte, že není nijak poškozen chladící okruh. Ujistěte se, že nedošlo zadní částí přístroje k poškození, či zmáčknutí elektrické zástrčky. Zmáčknutá, nebo jinak poškozená zástrčka se může 58
59 přehřát a způsobit požár. Ujistěte se, že máte k zástrčce volný přístup. Nikdy netahejte za samotný kabel. Nikdy nepřipojujte přístroj do uvolněné zásuvky (riskujete úraz elektrickým proudem, nebo požár). Nepoužívejte přístroj bez funkční žárovky. Tento přístroj je těžký. Pokud s přístrojem manipulujete, dbejte zvýšené opatrnosti. Na zmražené věci, ani na vnitřní části mrazáku nikdy nesahejte mokrýma, ani vlhkýma rukama. Mohlo by dojít až k popálení kůže. Nevystavujte přístroj na delší dobu přímému slunečnímu záření. 59
60 POPIS PŘÍSTROJE 1. Vnitřní mrazák 2. Termostat s osvětlením 3. Skleněná police 4. Zásuvka na zeleninu 5. Přihrádky 6. Nastavitelné nožičky PŘEHOZENÍ DVEŘÍ Upozornění: Ujistěte se, že je lednice prázdná a vypojena z el. sítě. 6 Chcete-li dveře prohodit, nakloňte lednici směrem dozadu. Ujistěte se, že je přístroj stabilně opřen o zadní stěnu. Musí to být natolik stabilní, aby při demontáži nehrozilo přepadnutí nebo podklouznutí. Veškeré odmontované součásti budou potřeba na opětovné složení. Nic nevyhazujte. Lednici nepokládejte, mohl by se poškodit chladící systém. Celý proces montáže je doporučeno dělat ve dvou lidech. 1. Odšroubujte šroubky na zadní straně horního krytu. 2. Horní kryt sundejte a postavte stranou. 3. Odšroubujte horní pant a vysaďte větší dveře lednice. Dveře postavte stranou na měkký povrch a dejte pozor ať je nepoškrábete. 4. Odšroubujte spodní držák dveří na mrazáku a dveře postavte stranou na měkký povrch, aby se nepoškrábaly. 5. Přesuňte zámek dveří z levé strany na pravou stranu. Přemístěte i proužek k zakrytí 2 otvorů pod dvířkami. 6. Otvor po pantech zakryjte krytkou z druhé strany, kde již není potřeba. 7. Dveře mrazáčku otočte a nasaďte do držáku, následně upevněte pantem. 8. Odšroubujte spodní držák dveří lednice a potom obě přední nastavitelné nožičky. 9. Ze spodního držáku dveří vyndejte čep, držák otočte a čep nasaďte zpět. 10. Držadlo namontujte na levou stranu dveří a nasaďte na spodní čep. 11. Dveře nasaďte zpět na své místo (na druhou stranu). Zkontrolujte, zda dveře správně těsní po celém svém obvodu, až potom upevněte pantem 12. Na přístroj položte kryt a dotáhněte ho 2 šrouby. 60
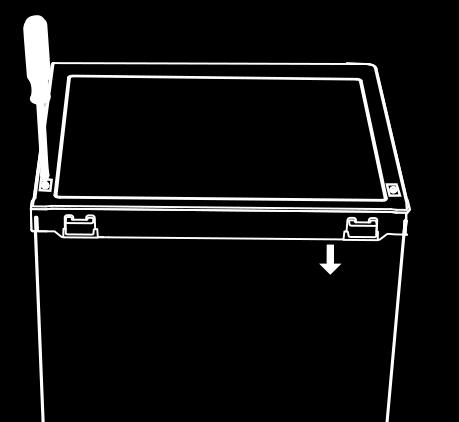

61
62 SESTAVENÍ Upozornění: Přístroj vybalte a zkontrolujte, zda není viditelně poškozen přepravou. Pokud je přístroj jakkoli poškozen, nezapojujte ho do el. sítě. Po doručení/stěhování je doporučeno nechat lednici nejméně 4 hodiny stát, tak aby případně mohl stéct olej zpět do kompresoru. Okolo lednice musí být dostačující prostor pro cirkulaci vzduchu, tak aby se nepřehřívala. Nestavte lednici do blízkosti topení, sporáku ani jiných zdrojů tepla. Postavte lednici tak, aby i po finálním umístěním byl dobrý přístup k zástrčce. Lednice je určena do prostor s průměrnou teplotou C. 1. Přiložené dorazy našroubujte na zadní stěnu. 2. Ujistěte se, že po stranách je dostatečné místo pro otevření dveří. Nechte alespoň 5 cm na každé straně lednice a alespoň 10 cm mezi horejškem lednice a stropem.upozornění: Je lepší nad lednicí nemít žádné překrytí. 3. Lednici postavte rovně. Do stabilní a rovné polohy ji vyrovnáte pomocí nastavitelných nožiček. PŘED PRVNÍM POUŽITÍM Vnitřek lednice a všechny komponenty očistěte vlažnou vodou s jemným saponátem. Nepoužívejte žádná agresivní ani hrubá čistidla, která by poškodila povrch. Vnitřek nechte důkladně vyschnout. POUŽITÍ Upozornění: Na lednici, ani dovnitř, nestavte žádné horké předměty. Nepokládejte nic přímo k vnitřní zadní stěně (nesmí se dotýkat). Zmražené suroviny po rozmražení znovu již nezamražujte. Do mrazáku nevkládejte žádné perlivé nápoje ani uzavřené lahve. Takové předměty by mohly v mrazáku explodovat. Nastavení teploty Lednici zapojte. Požadovanou teplotu nastavte pomocí otočného ovladače, kde můžete nastavit jednu z 8 poloh. Poloha 1 je nejteplejší až poloha 7 je nastavení nejchladnější teploty. Pokud nastavíte polohu 0, lednice je vypnuta. 62
63 63 Mrazák Proces zamražení potravin může trvat až 24 hodin. Během procesu zamražování dovnitř nevkládejte žádné jiné potraviny a zbytečně neotevírejte dvířka. Pokud nebyl mrazák delší dobu používán a následně je opět spuštěn. Nechte ho alespoň 2 hodiny zapnutý a až poté vkládejte potraviny POZOR: pokud obsah mrazáku omylem roztaje (např. výpadek proudu), tak musí být všechny suroviny co nejdříve spotřebovány, nebo převařeny. Příslušenství: 1. V lednici je skleněná police, kteou můžete vyndat a přemístit do libovolné výšky. 2. Přihrádky na vnitřku dveří mohou být také umístěny v libovolné výšce. Stačí je sundat a přemístit na požadovanou výšku. TIPY na úsporu energie Do lednice nevkládejte žádné teplé potraviny/jídlo Nepokládejte předměty příliš přes sebe, omezuje to cirkulaci vzduchu. Ujistěte se, ze nic není postaveno přímo u zadní stěny (nesmí se dotýkat). Pokud očekáváte výpadek proudu, tak nechte dveře zavřené co nejdéle. Otevírejte dveře co nejméně. Nenechávejte dlouho otevřené dveře. Nenastavujte zbytečně nízkou chladící teplotu než je nutné. ČISTĚNÍ A ÚDRŽBA Před čištěním přístroj vypněte a vypojte. Lednici čistěte pravidelně. Nikdy na čištění nepoužívejte kovové (ani ostré) předměty. Nepoužívejte agresivní čistidla. Před čištěním vyjměte všechno z mrazáku a zmrzlé potraviny po dobu čištění uchovejte v mrazu. Vnitřek lednice čistěte vlhkým hadrem a saponátem. Poté všechny plochy omyjte čistou vodou a osušte suchým hadrem. Pravidelně kontrolujte odtokový kanálek uvnitř lednice. Najdete ho u zadní stěny u spodní police. Pokud by byl odtok zacpaný, zkondenzovaná voda by vtékala do prostoru lednice. Odmražování mrazáku Ve chvíli, kdy je na stěnách mrazáku vrstva ledu, je potřeba tento led odstranit. Nepoužívejte žádné ostré předměty. Používejte jen plastové škrabky. Pokud je vrstva
64 ledu příliš silná a nelze ji bezpečně odstranit, nechte vrstvu odtát dle následujícího pořadí: 1. Přístroj odpojte z el. sítě 2. Vyjměte všechny suroviny z mrazáku. POZOR: rozmražené suroviny již znovu nezamražujte. 3. Nechte dveře otevřené a pod přístroj umístěte nádobu na odtávající vodu. 4. Po odtátí veškerého ledu vnitřek dostatečně vysušte. 5. Přístroj zapojte a opět zapněte. Výměna vnitřního osvětlení Pozor: Lednice musí být během výměny žárovky odpojena z el. sítě. Typ žárovky je napsaný na štítku lednice. Výměna: 1. Termostat nastavte do polohy 0, tím lednici vypnete. 2. Vypojte přístroj z el. sítě. 3. Vyšroubujte šroub z krytu žárovky a zákrytku odejměte. 4. Vyšroubujte žárovku. 5. Vložte novou žárovku a vraťte kryt (včetně přišroubování). 6. Přístroj opět zapojte a můžete i zapnout. 64
65 DÔLEŽITÉ Prečítajte si pozorne tento návod na použitie a uschovajte si ho pre neskoršie nahliadnutie a radu. Tento prístroj bol vyrobený iba pre využitie v domácnosti a môže sa používať výhradne podľa pokynov uvedených nižšie. Tento prístroj nesmie byť samostatne obsluhovaný osobami s mentálnou alebo motorickou poruchou a tiež ľuďmi bez základných skúseností pre obsluhu. Obsluhu je nutné riadne preškoliť, zoznámiť ju s možnými rizikami alebo nechať pracovať pod dozorom. Zvlášť deťom nie je dovolené si s prístrojom hrať alebo ho samostatne obsluhovať. Údržbu a čistenie prístroja nesmie vykonávať deti mladšie ako 16 rokov. Prístroj nesmie byť používaný po extrémne dlhú dobu ako profesionálne prístroje. Je určený najmä do kuchyniek pracovných kolektívov, kancelárií, hotelových izieb alebo podobných zariadení pre nárazové použitie. Pozor: Tento prístroj je zakázané používať s externým časovačom alebo iným diaľkovým ovládaním. Pred prvým použitím si pozorne prečítajte všetky pokyny na používanie. Pred použitím si overte, či napätie vašej elektrickej siete zodpovedá parametrom prístroja uvedeným na jeho výrobnom štítku. Nenechávajte visieť elektrický kábel prístroja cez hranu stola, alebo pracovného pultu a nedovoľte, aby kábel prišiel do styku s horúcimi plochami. Nikdy nepoužívajte prístroj s poškodeným káblom, alebo 65
66 zástrčkou, alebo ak je prístroj poškodený a nepracuje správne. V takom prípade odovzdajte prístroj do najbližšieho odborného servisu na kontrolu a opravu. Dbajte na zvýšenú opatrnosť, pokiaľ sa okolo prístroja pohybujú deti. Použitím príslušenstva, ktoré nebolo dodané výrobcom, môže dôjsť až k vzniku požiaru, úrazu elektrickým prúdom, alebo inému zraneniu. Prístroj vždy odpojte od elektrickej siete pokiaľ ho nepoužívate, pred demontážou, či montážou častí a pred čistením. Nastavte všetky prepínače a ovládače na polohy vypnuté a ťahaním za zástrčku prístroj odpojte od siete. Nikdy zástrčku nevyťahujte zo zásuvky ťahaním za kábel. Nenechávajte prístroj bežať bez dozoru. Nikdy neumiestňujte prístroj v blízkosti plynového, alebo elektrického sporáka, či rúry, alebo do blízkosti iného prístroja produkujúceho teplo. Nepoužívajte prístroj vonku. Používajte prístroj iba na účely, na ktoré je určený. Prístroj vždy používajte iba na stabilnom, suchom rovnom mieste. Prístroj je určený len na použitie v domácnostiach. Výrobca nemôže ručiť za škody a nehody spôsobené nevhodným použitím prístroja, alebo nedodržaním tu popísaných bezpečnostných inštrukcií. Všetky opravy prístroja smie vykonávať len výrobca, alebo autorizovaný servis. Nikdy neponárajte prístroj, elektrický kábel a zástrčku do vody, ani iných tekutín. Uistite sa, že sa deti nemôžu dotýkať elektrického kábla, alebo prístroje. 66
67 67 Dbajte na to, aby nebol elektrický kábel ohnutý cez ostré rohy a nedotýkal sa horúcich častí prístroja, alebo nebol v blízkosti iných zdrojov tepla. Pred prvým použitím odstráňte všetky obalové materiály a samolepky. Udržujte ventilačné otvory prístroja čisté a priechodné. Nepoužívajte žiadne mechanické nástroje, alebo iné prístroje na urýchlenie procesu odmrazovania. Vnútri chladničky nepoužívajte žiadne ďalšie elektrické prístroje, pokiaľ nie sú na toto použitie priamo schválené výrobcom. Nedotýkajte sa žiarovky, ak svietila dlhšiu dobu. Mohla by byť veľmi horúca. Žiarovka inštalovaná v prístroji je určená len pre tento prístroj. Nikdy ju nepoužívajte do svetiel bežného osvetlenia. Neskladujte vo vnútri prístroja žiadne výbušné látky, ako napríklad spreje naplnené horľavým plynom. Po prevoze a inštalácii prístroja sa vždy uistite, že nie je nijako poškodený chladiaci okruh. Uistite sa, že nedošlo zadnou časťou prístroja k poškodeniu, či stlačení elektrickej zástrčky. Stlačená, alebo inak poškodená zástrčka sa môže prehriať a spôsobiť požiar. Uistite sa, že máte k zástrčke voľný prístup. Nikdy neťahajte za samotný kábel. Nikdy nepripájajte prístroj do uvoľnenej zásuvky (riskujete úraz elektrickým prúdom, alebo požiar). Nepoužívajte prístroj bez funkčnej žiarovky. Tento prístroj je ťažký. Pokiaľ s prístrojom manipulujete, dbajte na zvýšenú opatrnosť.
68 Na zmrazené veci, ani na vnútornej časti mrazničky nikdy nesiahajte mokrými, ani vlhkými rukami. Mohlo by dôjsť až k popáleniu pokožky. Nevystavujte prístroj na dlhšiu dobu priamemu slnečnému žiareniu. 68
69 POPIS PŘÍSTROJE 1. Vnutorná mraznička 2. Termostat s osvetlením 3. Sklenená polica 4. Zásuvka na zeleninu 5. Priehradky 6. Nastaviteľné nožičky PREHODENIE DVERÍ Upozornenie: Uistite sa, že je chladnička prázdna a vypojená z el. siete. 6 Ak chcete dvere prehodiť, nakloňte chladničku smerom dozadu. Uistite sa, že je prístroj stabilne opretý o zadnú stenu. Musí to byť natoľko stabilné, aby pri demontáži nehrozilo prepadnutiu alebo podkĺznutiu. Akékoľvek odmontované súčasti budú potrebné na opätovné zloženie. Nič nevyhadzujte. Chladničku neklaďte, mohol by sa poškodiť chladiaci systém. Celý proces montáže sa odporúča robiť v dvoch ľuďoch. 1. Vyberte skrutky na zadnej strane horného krytu. 2. Horný kryt zložte a postavte bokom. 3. Odskrutkujte horný pánt a vysaďte väčšie dvere chladničky. Dvere postavte stranou na mäkký povrch a dajte pozor nech je nepoškriabete. 4. Odskrutkujte spodný držiak dverí na mrazničky a dvere postavte stranou na mäkký povrch, aby sa predišlo poškriabaniu. 5. Presuňte zámok dverí z ľavej strany na pravú stranu. Premiestnite aj prúžok na zakrytie 2 otvorov pod dvierkami. 6. Otvor po pántoch zakryte krytkou z druhej strany, kde už nie je potrebné. 7. Dvere mrazničky otočte a nasaďte do držiaka, následne upevnite pántom. 8. Odskrutkujte spodný držiak dverí chladničky a potom obe predné nastaviteľné nožičky. 9. Zo spodného držiaka dverí vyberte čap, držiak otočte a čap nasaďte späť. 10. Držadlo namontujte na ľavú stranu dverí a nasaďte na spodnej čap. 11. Dvere nasaďte späť na svoje miesto (na druhú stranu). Skontrolujte, či dvere správne tesnia po celom svojom obvode, až potom upevnite pántom 12. Na prístroj položte kryt a dotiahnite ho 2 skrutkami. 69
70
71 71 ZOSTAVENIE Upozornenie: Prístroj vybaľte a skontrolujte, či nie je viditeľne poškodený prepravou. Ak je prístroj akokoľvek poškodený, nezapájajte ho do el. siete. Po doručení / sťahovanie sa odporúča nechať chladničke najmenej 4 hodiny stáť, tak aby prípadne mohol stiecť olej späť do kompresora. Okolo chladničky musí byť dostačujúci priestor pre cirkuláciu vzduchu, tak aby sa neprehrievala. Nestavajte chladničku do blízkosti kúrenia, sporáku ani iných zdrojov tepla. Postavte chladničku tak, aby aj po finálnom umiestnením bol dobrý prístup k zástrčke. Chladnička je určená do priestorov s priemernou teplotou C. 1. Priložené dorazy naskrutkujte na zadnú stenu. 2. Uistite sa, že po stranách je dostatočné miesto pre otvorenie dverí. Nechajte aspoň 5 cm na každej strane chladničky a aspoň 10 cm medzi Chorejov chladničky a stropom. Upozornenie: Je lepšie nad chladničkou nemať žiadne prekrytie. 3. Chladničku postavte rovno. Do stabilnej a rovnej polohy ju vyrovnáte pomocou nastaviteľných nožičiek. PRED PRVÝM POUŽITÍM Vnútro chladničky a všetky komponenty očistite vlažnou vodou s jemným saponátom. Nepoužívajte žiadne agresívne ani hrubá čistidlá, ktorá by poškodila povrch. Vnútro nechajte dôkladne vyschnúť. POUŽITIE Upozornenie: Na chladničku, ani dnu, nestavajte žiadne horúce predmety. Neklaďte nič priamo k vnútornej zadnej stene (nesmie sa dotýkať). Zmrazené suroviny po rozmrazení znovu už nezmrazujte. Do mrazničky nevkladajte žiadne perlivé nápoje ani uzavreté fľaše. Takéto predmety by mohli v mrazničke explodovať. Nastavenie teploty Chladničku zapojte. Požadovanú teplotu nastavte pomocou otočného ovládača, kde môžete nastaviť jednu z 8 polôh. Poloha 1 je najteplejšie až poloha 7 je nastavenie
72 najchladnejšie teploty. Ak nastavíte polohu 0, chladnička je vypnutá. Mraznička Proces zamrazenie potravín môže trvať až 24 hodín. Počas procesu Mrazenie dovnútra nevkladajte žiadne iné potraviny a zbytočne neotvárajte dvierka. Ak nebol mraznička dlhšiu dobu používaný a následne ich opäť spustený. Nechajte ho aspoň 2 hodiny zapnutý a až potom vkladajte potraviny POZOR: ak obsah mrazničky omylom roztopí (napr. Výpadok prúdu), tak musia byť všetky suroviny čo najskôr spotrebované, alebo prevarení. Príslušenstvo: 1. V chladničke je sklenená polica, kteou môžete vybrať a premiestniť do ľubovoľnej výšky. 2. Priehradky na vnútrajšku dverí môžu byť tiež umiestnené v ľubovoľnej výške. Stačí ich zložiť a premiestniť na požadovanú výšku. TIPY na úsporu energie Do chladničky nevkladajte žiadne teplé potraviny / jedlo Neklaďte predmety príliš cez seba, obmedzuje to cirkuláciu vzduchu. Uistite sa, ze nic nie je postavené priamo pri zadnej steny (nesmie sa dotýkať). Ak očakávate výpadok prúdu, tak nechajte dvere zatvorené čo najdlhšie. Otvárajte dvere čo najmenej. Nenechávajte dlho otvorené dvere. Nenastavujte zbytočne nízku chladiacu teplotu než je nutné. ČISTENIE A ÚDRŽBA Pred čistením prístroj vypnite a vypojte. Chladničku čistite pravidelne. Nikdy na čistenie nepoužívajte kovové (ani ostré) predmety. Nepoužívajte agresívne čistidlá. Pred čistením vyberte všetko z mrazničky a zmrznuté potraviny po dobu čistenia uchovajte v mraze. Vnútro chladničky čistite vlhkou handrou a saponátom. Potom všetky plochy umyte čistou vodou a osušte suchou handrou. Pravidelne kontrolujte odtokový kanálik vnútri chladničky. Nájdete ho pri zadnej steny pri spodnej police. Pokiaľ by bol odtok upchatý, roztopená voda by vtekala do priestoru chladničky. 72
73 Odmrazovanie mrazničky Vo chvíli, kedy je na stenách mrazničky vrstva ľadu, je potrebné tento ľad odstrániť. Nepoužívajte žiadne ostré predmety. Používajte len plastové škrabky. Ak je vrstva ľadu príliš silná a nemožno ju bezpečne odstrániť, nechajte vrstvu Rozmrazenú podľa nasledujúceho poradia: 1. Prístroj odpojte z el. siete 2. Vyberte všetky suroviny z mrazničky. POZOR: rozmrazené suroviny už znovu nezmrazujte. 3. Nechajte dvere otvorené a pod prístroj umiestnite nádobu na topiacej vodu. 4. Po Rozmrazenú všetkého ľadu vnútro dostatočne vysušte. 5. Prístroj zapojte a opäť zapnite. Výmena vnútorného osvetlenia Pozor: Chladnička musí byť počas výmeny žiarovky odpojená z el. siete. Typ žiarovky je napísaný na štítku chladničky. Výmena žiarovky: 1. Termostat nastavte do polohy 0, tým chladničku vypnete. 2. Vypojte prístroj z el. siete. 3. Vyberte skrutku z krytu žiarovky a zákrytku odoberte. 4. Vyskrutkujte žiarovku. 5. Vložte novú žiarovku a vráťte kryt (vrátane priskrutkovanie). 73


74 Webshop BESTEL de originele Domo-accessoires en -onderdelen online via: COMMANDEZ d authentiques accessoires et pièces Domo en ligne sur: BESTELLEN SIE die Domo Original-Zubehör und -Ersatzteile online über: ORDER the original Domo accessories and parts online at: webshop.domo-elektro.be of scan hier: ou scannez ici: oder hier scannen: or scan here: LINEA Dompel Herentals - Belgium - Tel: Fax:
TCNF 185 TCNF 185 IX NO-FROST FRIGORÍFICO
 TCNF 185 TCNF 185 IX NO-FROST FRIGORÍFICO ATTENTION Cet appareil est destiné à un usage domestique uniquement. Toute utilisation autre que celle prévue pour cet appareil, ou pour une autre application
REFERENCE: MTF4 CODIC:
 MARQUE: PROLINE REFERENCE: MTF4 CODIC: 3523551 MTF4 AVERTISSEMENTS Cet appareil est destiné à un usage domestique uniquement. Toute utilisation autre que celle prévue pour cet appareil, ou pour une autre
HANDLEIDING MODE D EMPLOI GEBRAUCHSANLEITUNG INSTRUCTION BOOKLET MANUAL DE INSTRUCCIONES NÁVOD K POUŽITÍ
 HANDLEIDING MODE D EMPLOI GEBRAUCHSANLEITUNG INSTRUCTION BOOKLET MANUAL DE INSTRUCCIONES NÁVOD K POUŽITÍ KOELKAST MET DIEPVRIES RÉFRIGÉRATEUR AVEC CONGÉLATEUR KÜHLSCHRANK MIT GEFRIERFACH REFRIGERATOR WITH
BEDIENUNGS- UND SICHERHEITSHINWEISE 3 OPERATION AND SAFETY NOTES 19 UNITÀ PRINCIPALE LP PLUS INDICAZIONI PER L USO E PER LA SICUREZZA 47
 DE LADEGERÄT LP PLUS BEDIENUNGS- UND SICHERHEITSHINWEISE 3 GB MAIN UNIT LP PLUS OPERATION AND SAFETY NOTES 19 FR UNITÉ PRINCIPALE LP PLUS INSTRUCTIONS D UTILISATION ET CONSIGNES DE SÉCURITÉ 33 IT UNITÀ
HANDLEIDING MODE D EMPLOI GEBRAUCHANLEITUNG INSTRUCTION BOOKLET Návod k použití WOK PARTY SET DO8706W PRODUCT OF
 HANDLEIDING MODE D EMPLOI GEBRAUCHANLEITUNG INSTRUCTION BOOKLET Návod k použití WOK PARTY SET DO8706W PRODUCT OF GARANTIEVOORWAARDEN Dit apparaat heeft een garantietermijn van 2 jaar vanaf de datum van
DO923K. Návod na použitie PRODUCT OF
 Handleiding Mode d emploi Gebrauchsanleitung Instruction booklet Manual de instrucciones Návod k použití Návod na použitie Koelkast Réfridgérateur Kühlschrank Refrigerator Frigorífico Lednice Chladnička
HANDLEIDING MODE D EMPLOI GEBRAUCHSANLEITUNG INSTRUCTION BOOKLET MANUAL DE INSTRUCCIONES NÁVOD K POUŽITÍ NÁVOD NA POUŽITIE
 HANDLEIDING MODE D EMPLOI GEBRAUCHSANLEITUNG INSTRUCTION BOOKLET MANUAL DE INSTRUCCIONES NÁVOD K POUŽITÍ NÁVOD NA POUŽITIE WIJNKOELER CAVE À VIN WEINKÜHLER WINE-CHILLER REFRIGERADOR DE VINOS VINOTÉKA VINOTÉKA
Stříkací pistole. Striekacia pištoľ 10.25-007
 Stříkací pistole Profi-Farbpistole Striekacia pištoľ 10.25-007 CZ 7 6 2 4 5 3 1 1) rychloupínací konektor 2) regulace množství barvy 3) regulace množství vzduchu 4) nastavení stříkacího modulu 5) spoušť
Easy-6 Pivottür mit Seitenwand / Otočné dveře s boční stěnou
 Easy-6 Pivottür mit Seitenwand / Otočné dveře s boční stěnou Lesen Sie die Bedienungsanleitung sorgfältig durch und bewahren Sie diese für den späteren Gebrauch auf. Wir empfehlen die Montage unseres Produktes
VULSINI DREHTELLER MONTAGEANWEISUNG
 Die Lieferung beinhaltet folgende Teile: 1. Drehteller komplett 2. Rauchrohr- Drehstutzen 3. Arretierungsschraube 4. Handgriff (zum Drehen) 5. Unterlegstütze VULSINI DREHTELLER MONTAGEANWEISUNG DE FR CZ
Qualität aus erster Hand! Sie haben sich für ein Markenprodukt der Firma Zangenberg entschieden.
 Qualität aus erster Hand! Sie haben sich für ein Markenprodukt der Firma Zangenberg entschieden. Bitte lesen Sie die Anleitung vor der ersten Benutzung aufmerksam durch. Sie erhalten wichtige Hinweise
0-10 V Interface AM 4
 Montage instructie Assembly instructions Instructions de montage Návod k montáži 0-10 V Interface AM 4 Bergen Master Line 0-10 V Interface Montage instructie voor 0-10 V interface Fitting instruction for
DO917GDK PRODUCT OF. Downloaded from Handleiding. Mode d emploi. Gebrauchsanleitung. Instruction booklet. Manual de instrucciones
 Handleiding Mode d emploi Gebrauchsanleitung Instruction booklet Manual de instrucciones Drank koelkast met glasdeur voor commercieel gebruik Réfrigérateur à boissons avec porte en verre pour un usage
HANDLEIDING MODE D EMPLOI GEBRAUCHSANLEITUNG INSTRUCTION BOOKLET MANUAL DE INSTRUCCIONES NÁVOD K POUŽITÍ
 HANDLEIDING MODE D EMPLOI GEBRAUCHSANLEITUNG INSTRUCTION BOOKLET MANUAL DE INSTRUCCIONES NÁVOD K POUŽITÍ MICROGOLFOVEN FOUR À MICRO-ONDES MIKROWELLE MICROWAVE OVEN MICROONDAS MIKROVLNNÁ TROUBA PRODUCT
Herzlichen Glückwunsch! Sie haben sich für ein Qualitätsprodukt der Firma Zangenberg entschieden.
 Herzlichen Glückwunsch! Sie haben sich für ein Qualitätsprodukt der Firma Zangenberg entschieden. Bitte lesen Sie die Anleitung vor der ersten Benutzung aufmerksam durch. Sie erhalten wichtige Hinweise
WICHTIG - FÜR SPÄTERE VERWENDUNG AUFBEWAHREN - SORGFÄLTIG LESEN.
 WICHTIG - FÜR SPÄTERE VERWENDUNG AUFBEWAHREN - SORGFÄLTIG LESEN. Ignorierung der Warnungen und Hinweise in der Gebrauchsanleitung können zu ernsten Verletzungen und Todesfällen führen. Achtung: Zur Vermeidung
DO906K/A++ Návod na použitie PRODUCT OF
 Handleiding Mode d emploi Gebrauchsanleitung Instruction booklet Manual de instrucciones Návod k použití Návod na použitie Koelkast Réfrigérateur Kühlschrank Refridgerator Frigorífico Lednice Chladnička
HANDLEIDING MODE D EMPLOI GEBRAUCHSANLEITUNG INSTRUCTION BOOKLET MANUAL DE INSTRUCCIONES NÁVOD K POUŽITÍ NÁVOD NA POUŽITIE
 HANDLEIDING MODE D EMPLOI GEBRAUCHSANLEITUNG INSTRUCTION BOOKLET MANUAL DE INSTRUCCIONES NÁVOD K POUŽITÍ NÁVOD NA POUŽITIE MICROGOLFOVEN FOUR À MICRO-ONDES MIKROWELLE MICROWAVE OVEN MICROONDAS MIKROVLNNÁ
HANDLEIDING MODE D EMPLOI GEBRAUCHSANLEITUNG INSTRUCTION BOOKLET NÁVOD K POUŽITÍ
 HANDLEIDING MODE D EMPLOI GEBRAUCHSANLEITUNG INSTRUCTION BOOKLET NÁVOD K POUŽITÍ STAAFMIXER MIXEUR PLONGEUR STABSET STICK MIXER PONORNÝ MIXÉR DO9026M PRODUCT OF GARANTIEVOORWAARDEN Dit apparaat heeft een
HANDLEIDING MODE D EMPLOI GEBRAUCHSANLEITUNG INSTRUCTION BOOKLET MANUAL DE INSTRUCCIONES NÁVOD K POUŽITÍ NÁVOD NA POUŽITIE
 HANDLEIDING MODE D EMPLOI GEBRAUCHSANLEITUNG INSTRUCTION BOOKLET MANUAL DE INSTRUCCIONES NÁVOD K POUŽITÍ NÁVOD NA POUŽITIE MICROGOLFOVEN FOUR À MICRO-ONDES MIKROWELLE MICROWAVE OVEN MICROONDAS MIKROVLNNÁ
HANDLEIDING MODE D EMPLOI GEBRAUCHSANLEITUNG INSTRUCTION BOOKLET NÁVOD K POUŽITÍ
 HANDLEIDING MODE D EMPLOI GEBRAUCHSANLEITUNG INSTRUCTION BOOKLET NÁVOD K POUŽITÍ KOLOM VENTILATOR VENTILATEUR COLONNE SAULEN VENTILATOR TOWER FAN VENTILÁTOR DO8121 PRODUCT OF GARANTIEVOORWAARDEN Dit apparaat
DO982RKB. Réfrigérateur avec congélateur PRODUCT OF
 Handleiding Mode d emploi Gebrauchsanleitung Instruction booklet Manual de instrucciones Návod k použití Návod na použitie Koelkast met diepvriezer Réfrigérateur avec congélateur Kühlschrank und Gefrierschrank
SANTO Z 9 18 02-4i. Downloaded from Fridge-Manual.com Manuals
 SANTO Z 9 18 02-4i Návod k použití Gebruiksaanwijzing User manual Benutzerinformation Chladnička Koelkast Fridge Kühlschrank 2 Obsah Děkujeme, že jste si vybrali jeden z našich vysoce kvalitních výrobků.
HANDLEIDING MODE D EMPLOI GEBRAUCHSANLEITUNG INSTRUCTION BOOKLET MANUAL DE INSTRUCCIONES NÁVOD K POUŽITÍ
 HANDLEIDING MODE D EMPLOI GEBRAUCHSANLEITUNG INSTRUCTION BOOKLET MANUAL DE INSTRUCCIONES NÁVOD K POUŽITÍ STOFZUIGER ASPIRATEUR STAUBSAUGER VACUUM CLEANER ASPIRADORA VYSAVAČ DO7271S PRODUCT OF DO7271S GARANTIEVOORWAARDEN
HANDLEIDING MODE D EMPLOI GEBRAUCHSANLEITUNG INSTRUCTION BOOKLET MANUAL DE INSTRUCCIONES NÁVOD K POUŽITÍ NÁVOD NA POUŽITIE
 HANDLEIDING MODE D EMPLOI GEBRAUCHSANLEITUNG INSTRUCTION BOOKLET MANUAL DE INSTRUCCIONES NÁVOD K POUŽITÍ NÁVOD NA POUŽITIE MASSAGEKUSSEN COUSSIN DE MASSAGE MASSAGEKISSEN MASSAGE CUSHION COJÍN DE MASAJE
NL Nederlands 3 FR Français 9 DE Deutsch 15 EN English 21 ES Espagnol 27 IT Italiano 33 CZ Čeština 39 SK Slovenčina 45
 Handleiding Mode d emploi Gebrauchsanleitung Instruction booklet Manual de instrucciones Istruzioni per l uso Návod k použití Návod na použitie Wijnkoeler Cave à vin Weinkühlschrank Wine cooler Refrigerador
HANDLEIDING MODE D EMPLOI GEBRAUCHSANLEITUNG INSTRUCTION BOOKLET NÁVOD K POUŽITÍ
 HANDLEIDING MODE D EMPLOI GEBRAUCHSANLEITUNG INSTRUCTION BOOKLET NÁVOD K POUŽITÍ RACLETTE GRILL RACLETTE GRIL RACLETTE GRILL RACLETTE GRILL DO9038G PRODUCT OF GARANTIEVOORWAARDEN Dit apparaat heeft een
DO924DV PRODUCT OF. Instruction booklet. Manual de instrucciones
 Handleiding Mode d emploi Gebrauchsanleitung Instruction booklet Manual de instrucciones Návod k použití Návod na použitie Diepvriezer Congélateur Gefrierschrank Freezer Congelador Mraznička šuplíková
HANDLEIDING MODE D EMPLOI GEBRAUCHANLEITUNG INSTRUCTION BOOKLET Návod k použití
 HANDLEIDING MODE D EMPLOI GEBRAUCHANLEITUNG INSTRUCTION BOOKLET Návod k použití FAMILY TEPPANYAKI TEPPANYAKI FAMILLE FAMILIEN TEPPANYAKI FAMILY TEPPANYAKI DO8301TP PRODUCT OF GARANTIEVOORWAARDEN Dit apparaat
DO2332CG PRODUCT OF. Kombinovaná mikrovlnná trouba s horkovzduchem a grilem. Kombinovaná mikrovlnná rúra s teplovzduchom a grilom
 Handleiding Mode d emploi Gebrauchsanleitung Instruction booklet Manual de instrucciones Istruzioni per l uso Návod k použití Návod na použitie Combi microgolfoven Four à micro-ondes combiné Kombi Mikrowelle
DO9189G PRODUCT OF. Stone grill grill raclette. Pierre à cuire gril raclette
 Handleiding Mode d emploi Gebrauchsanleitung Instruction booklet Manual de instrucciones Návod k použití Návod na použitie Steengrill-grill-raclette Pierre à cuire gril raclette Steingrill Grill - raclette
HANDLEIDING MODE D EMPLOI GEBRAUCHSANLEITUNG INSTRUCTION BOOKLET NÁVOD K POUŽITÍ
 HANDLEIDING MODE D EMPLOI GEBRAUCHSANLEITUNG INSTRUCTION BOOKLET NÁVOD K POUŽITÍ ELEKTRISCH DEKEN CHAUFFE-LIT ELECTRIQUE ELEKTRISCHE HEIZDECKE ELECTRICAL BLANKET ELEKTRICKÁ DEKA DO603ED PRODUCT OF GARANTIEVOORWAARDEN
HANDLEIDING MODE D EMPLOI GEBRAUCHSANLEITUNG INSTRUCTION BOOKLET NÁVOD K POUŽITÍ
 HANDLEIDING MODE D EMPLOI GEBRAUCHSANLEITUNG INSTRUCTION BOOKLET NÁVOD K POUŽITÍ PRECISIEWEEGSCHAAL BALANCE DE PRÉCISION PRÄZISIONSWAAGE PRECISION SCALE LABORATORNÍ VÁHA DO9096W PRODUCT OF GARANTIEVOORWAARDEN
NL Nederlands 3 FR Français 7 DE Deutsch 11 EN English 15 ES Espagnol 19 CZ Čeština 23 SK Slovenčina 27
 Handleiding Mode d emploi Gebrauchsanleitung Instruction booklet Manual de instrucciones Návod k použití Návod na použitie Tafelventilator Ventilateur de table Tischventilator Table fan Ventilador de mesa
HANDLEIDING MODE D EMPLOI GEBRAUCHSANLEITUNG INSTRUCTION BOOKLET
 HANDLEIDING MODE D EMPLOI GEBRAUCHSANLEITUNG INSTRUCTION BOOKLET SNIJMACHINE TRANCHEUSE SCHNEIDEMASCHINE SLICER PRODUCT OF GARANTIEVOORWAARDEN Dit apparaat heeft een garantietermijn van 2 jaar vanaf de
DO8125. Manual de instrucciones PRODUCT OF
 Handleiding Mode d emploi Gebrauchsanleitung Instruction booklet Manual de instrucciones Návod k použití Návod na použitie Kolomventilator Ventilateur colonne Säulenventilator Tower fan Ventilador Sloupov
HANDLEIDING MODE D EMPLOI GEBRAUCHANLEITUNG INSTRUCTION BOOKLET
 HANDLEIDING MODE D EMPLOI GEBRAUCHANLEITUNG INSTRUCTION BOOKLET Návod k použití WOK PARTY SET DO-8706W PRODUCT OF GARANTIEVOORWAARDEN Dit apparaat heeft een garantietermijn van 2 jaar vanaf de datum van
NL Nederlands 3 FR Français 13 DE Deutsch 23 EN English 33 ES Espagnol 42 CZ Čeština 52 SK Slovenčina 61
 Handleiding Mode d emploi Gebrauchsanleitung Instruction booklet Manual de instrucciones Návod k použití Návod na použitie Koelkast en diepvries Frigo et congélateur Kühlschrank und Gefrierschrank Refridgerator
HANDLEIDING MODE D EMPLOI GEBRAUCHSANLEITUNG INSTRUCTION BOOKLET MANUAL DE INSTRUCCIONES NÁVOD K POUŽITÍ NÁVOD NA POUŽITIE
 HANDLEIDING MODE D EMPLOI GEBRAUCHSANLEITUNG INSTRUCTION BOOKLET MANUAL DE INSTRUCCIONES NÁVOD K POUŽITÍ NÁVOD NA POUŽITIE MICROGOLFOVEN FOUR À MICRO-ONDES MIKROWELLE MICROWAVE OVEN MICROONDAS MIKROVLNNÁ
HANDLEIDING MODE D EMPLOI GEBRAUCHSANLEITUNG INSTRUCTION BOOKLET NÁVOD K POUŽITÍ
 HANDLEIDING MODE D EMPLOI GEBRAUCHSANLEITUNG INSTRUCTION BOOKLET NÁVOD K POUŽITÍ COMPACTE HAKMACHINE ROBOT MENAGER COMPACT KOMPAKTE HACKMASCHINE COMPACT BLENDER MINISEKÁČEK DO9018MC PRODUCT OF DO9018MC
NL Nederlands 3 FR Français 15 DE Deutsch 27 EN English 39 ES Espagnol 50 CZ Čeština 62 SK Slovenčina 73
 Handleiding Mode d emploi Gebrauchsanleitung Instruction booklet Manual de instrucciones Návod k použití Návod na použitie Koelkast en diepvries Frigo et congélateur Kühlschrank und Gefrierschrank Refridgerator
PLASTICPARTS. -Parts not for use. -Teile werden nicht verwendet. -Pieces a ne pas utiliser. -Tyto díly nepoužívejte při stavbě. -
 742 SpitfireMk.VI 1/72 A> 70120 A PLASTICPARTS B> 70120 B C> 70120 C D> F> E> 70120 D 70120 E GUNZE 70120 F H4 C4 YELLOW H12 H13 C3 FLAT RED H33 C81 RUSSET H51 C11 LIGHT GULL GRAY H71 C21 MIDDLE STONE
NL Nederlands 3 FR Français 14 DE Deutsch 25 EN English 36 ES Espagnol 46 CZ Čeština 56 SK Slovenčina 66
 Handleiding Mode d emploi Gebrauchsanleitung Instruction booklet Manual de instrucciones Návod k použití Návod na použitie Koelkast en diepvries Frigo et congélateur Kühlschrank und Gefrierschrank Refridgerator
Manuel d'utilisation 4 Pokyny pro uživatele 5
 Manuel d'utilisation 4 Pokyny pro uživatele 5 4 2 1 3 7 5 6 1 : Interrupteur marche / arrêt - Hlavní vypínač Zapnuto/Vypnuto L interrupteur principal de la S8 LAN TV permet la mise sous tension et l arrêt
HANDLEIDING MODE D EMPLOI GEBRAUCHSANLEITUNG INSTRUCTION BOOKLET MANUAL DE INSTRUCCIONES NÁVOD K POUŽITÍ NÁVOD NA POUŽITIE
 HANDLEIDING MODE D EMPLOI GEBRAUCHSANLEITUNG INSTRUCTION BOOKLET MANUAL DE INSTRUCCIONES NÁVOD K POUŽITÍ NÁVOD NA POUŽITIE FRUITPERS PRESSE-AGRUMES FRUCHTPRESSE JUICER EXPRIMIDOR ODŠŤAVŇOVAČ ODŠŤAVOVAČ
Název: Suites récurrentes étude à l'aide d'une suite auxiliaire
 Název: Suites récurrentes étude à l'aide d'une suite auxiliaire Autor: Mgr. Jiří Bureš, Ph.D. Název školy: Gymnázium Jana Nerudy, škola hl. města Prahy Předmět, mezipředmětové vztahy: matematika a její
HANDLEIDING MODE D EMPLOI GEBRAUCHSANLEITUNG INSTRUCTION BOOKLET
 HANDLEIDING MODE D EMPLOI GEBRAUCHSANLEITUNG INSTRUCTION BOOKLET Návod k použití MICAVERWARMING CHAUFFAGE MICA MICAHEITZUNG MICA HEATER NÁSTĚNNÉ TOPENÍ MICA DO7315M PRODUCT OF GARANTIEVOORWAARDEN Dit apparaat
EINBAUANWEISUNG FÜR SCHALLDÄMM-SET BWS/DWS MONTÁŽNÍ NÁVOD PRO ZVUKOVĚ IZOLAČNÍ SOUPRAVY BWS/DWS
 EINUNWEISUNG FÜR SCHLLÄMM-SET WS/WS MONTÁŽNÍ NÁVO PRO ZVUKOVĚ IZOLČNÍ SOUPRVY WS/WS Wichtige Hinweise - unbedingt beachten! ůležitá upozornění bezpodmínečně dodržujte! Schalldämm-Set muss vollständig und
HANDLEIDING MODE D EMPLOI GEBRAUCHSANLEITUNG INSTRUCTION BOOKLET
 HANDLEIDING MODE D EMPLOI GEBRAUCHSANLEITUNG INSTRUCTION BOOKLET Návod k použití KOLOMVENTILATOR VENTILATEUR COLLONE SÄULENVENTILATOR STAND FAN Sloupový ventilátor VENTILADOR PRODUCT OF GARANTIEVOORWAARDEN
HANDLEIDING MODE D EMPLOI GEBRAUCHSANLEITUNG INSTRUCTION BOOKLET MANUAL DE INSTRUCCIONES NÁVOD K POUŽITÍ NÁVOD NA POUŽITIE
 HANDLEIDING MODE D EMPLOI GEBRAUCHSANLEITUNG INSTRUCTION BOOKLET MANUAL DE INSTRUCCIONES NÁVOD K POUŽITÍ NÁVOD NA POUŽITIE STOFZUIGER ASPIRATEUR STAUBSAUGER VACUUM CLEANER ASPIRADORA VYSAVAČ VRECKOVÝ VYSÁVAČ
HANDLEIDING MODE D EMPLOI GEBRAUCHSANLEITUNG INSTRUCTION BOOKLET MANUAL DE INSTRUCCIONES NÁVOD K POUŽITÍ
 HANDLEIDING MODE D EMPLOI GEBRAUCHSANLEITUNG INSTRUCTION BOOKLET MANUAL DE INSTRUCCIONES NÁVOD K POUŽITÍ SLOW JUICER 2.0 ŠNEKOVÝ ODŠŤAVŇOVAČ ŠNEKOVÝ ODŠŤAVOVAČ PRODUCT OF GARANTIEVOORWAARDEN Wij hanteren
POLO 2.0. Art. Nr.: 5460 - BEZPEČNOST - OBSLUHA. Výhradní dovozce a distributor pro Českou republiku a Slovensko Caravan Centrum Hykro s.r.o.
 POLO 2.0 TERRASSENHEIZUNG PLYNOVÝ ZÁŘIČ GAS Výhradní dovozce a distributor pro Českou republiku a Slovensko Caravan Centrum Hykro s.r.o. Ořešská Enders Colsman 1542 AG 155 00 Praha 5 - Řeporyje tel.: +420
HANDLEIDING MODE D EMPLOI GEBRAUCHSANLEITUNG INSTRUCTION BOOKLET MANUAL DE INSTRUCCIONES NÁVOD K POUŽITÍ
 HANDLEIDING MODE D EMPLOI GEBRAUCHSANLEITUNG INSTRUCTION BOOKLET MANUAL DE INSTRUCCIONES NÁVOD K POUŽITÍ DELI-FRYER HORKOVZDUŠNÁ FRITÉZA TEPLOVZDUŠNÁ FRITÉZA DO469FR PRODUCT OF DO469FR GARANTIEVOORWAARDEN
DO932SBS PRODUCT OF. Side by side koel-vriescombinatie. Side by side Combi frigo-congélateur. Americká chladnička s bočnou mrazničkou
 Handleiding Mode d emploi Gebrauchsanleitung Instruction booklet Manual de instrucciones Návod k použití Návod na použitie Side by side koel-vriescombinatie Side by side Combi frigo-congélateur Side by
HANDLEIDING MODE D EMPLOI GEBRAUCHSANLEITUNG INSTRUCTION BOOKLET MANUAL DE INSTRUCCIONES NÁVOD K POUŽITÍ
 HANDLEIDING MODE D EMPLOI GEBRAUCHSANLEITUNG INSTRUCTION BOOKLET MANUAL DE INSTRUCCIONES NÁVOD K POUŽITÍ DELI-FRYER HORKOVZDUŠNÁ FRITÉZA TEPLOVZDUŠNÁ FRITÉZA DO509FR PRODUCT OF DO509FR GARANTIEVOORWAARDEN
HANDLEIDING MODE D EMPLOI GEBRAUCHSANLEITUNG INSTRUCTION BOOKLET MANUAL DE INSTRUCCIONES NÁVOD K POUŽITÍ
 HANDLEIDING MODE D EMPLOI GEBRAUCHSANLEITUNG INSTRUCTION BOOKLET MANUAL DE INSTRUCCIONES NÁVOD K POUŽITÍ KOFFIEZET MET TIMER CAFETIERE AVEC MINUTEUR KAFFEEMASCHINE MIT TIMER COFFEE MAKER WITH TIMER CAFETERA
Hanriot HD.2 PLASTIC PARTS. Mr.METAL COLOR METALLICS
 8413 1/48 Hanriot HD.2 PLASTIC PARTS A> 3 B> 1 2 13 5 23 7 6 9 8 12 25 7 9 5 15 15 14 21 29 28 31 30 37 36 35 34 4 12 20 11 6 17 16 8 38 24 25 4 3 26 20 2 17 11 10 27 28 14 13 33 27 26 32 19 18 10 22 1
HANDLEIDING MODE D EMPLOI GEBRAUCHSANLEITUNG INSTRUCTION BOOKLET MANUAL DE INSTRUCCIONES NÁVOD K POUŽITÍ
 HANDLEIDING MODE D EMPLOI GEBRAUCHSANLEITUNG INSTRUCTION BOOKLET MANUAL DE INSTRUCCIONES NÁVOD K POUŽITÍ VENTILATOR VENTILATEUR VENTILATOR FAN VENTILADOR VENTILÁTOR PRODUCT OF GARANTIEVOORWAARDEN Wij hanteren
DO7287S. Manual de instrucciones PRODUCT OF
 Handleiding Mode d emploi Gebrauchsanleitung Instruction booklet Manual de instrucciones Návod k použití Návod na použitie Stofzuiger Aspirateur Staubsauger Vacuum cleaner Aspiradora Sáčkový vysavač Vreckový
HANDLEIDING MODE D EMPLOI GEBRAUCHSANLEITUNG INSTRUCTION BOOKLET NÁVOD K POUŽITÍ
 HANDLEIDING MODE D EMPLOI GEBRAUCHSANLEITUNG INSTRUCTION BOOKLET NÁVOD K POUŽITÍ STAAFMIXER MIXEUR PLONGEUR STABSET STICK MIXER PONORNÝ MIXÉR DO9015M PRODUCT OF GARANTIEVOORWAARDEN Dit apparaat heeft een
HANDLEIDING MODE D EMPLOI GEBRAUCHANLEITUNG INSTRUCTION BOOKLET Návod k použití
 HANDLEIDING MODE D EMPLOI GEBRAUCHANLEITUNG INSTRUCTION BOOKLET Návod k použití FAMILY TEPPANYAKI TEPPANYAKI FAMILLE FAMILIEN TEPPANYAKI FAMILY TEPPANYAKI DO-8301TP PRODUCT OF GARANTIEVOORWAARDEN Dit apparaat
RCM2000TL KERAMICKÝ OHŘÍVAČ ORIGINÁLNÍ NÁVOD
 RCM2000TL 220-240V~ 50Hz 2000W CZ KERAMICKÝ OHŘÍVAČ ORIGINÁLNÍ NÁVOD S11 M05 Y2016 1 CZ KERAMICKÝ OHŘÍVAČ Ujistěte se, že přívod vzduchu a výstupní otvory nejsou blokovány. Aby se zabránilo jakémukoli
HANDLEIDING MODE D EMPLOI GEBRAUCHSANLEITUNG INSTRUCTION BOOKLET MANUAL DE INSTRUCCIONES NÁVOD K POUŽITÍ NÁVOD NA POUŽITIE
 HANDLEIDING MODE D EMPLOI GEBRAUCHSANLEITUNG INSTRUCTION BOOKLET MANUAL DE INSTRUCCIONES NÁVOD K POUŽITÍ NÁVOD NA POUŽITIE SOEPMAKER MIXEUR À SOUPE SUPPEN-KOCHER SOUPMAKER MÁQUINA PARA ELABORAR SOPA VAŘIČ
Lees alle instructies vooraleer installatie aan te vangen. Pred začatím inštalácie si pozorne prečítajte všetky pokyny.
 TEGL204 25kg 55lbs STOPPEN Lees alle instructies vooraleer installatie aan te vangen. STOP Než začnete s instalací, přečtěte si všechny instrukce. STOP Pred začatím inštalácie si pozorne prečítajte všetky
NL Nederlands 3 FR Français 9 DE Deutsch 15 EN English 21 ES Espagnol 27 CZ Čeština 33 SK Slovenčina 38
 Handleiding Mode d emploi Gebrauchsanleitung Instruction booklet Manual de instrucciones Návod k použití Návod na použitie Elektrisch onderdeken Chauffe-lit électrique Elektrische Unterdecke Electric blanket
Downloaded from
 CONTENU ATTENTION....2 IDENTIFICATION DES PIÈCES...5 INFORMATIONS IMPORTANTES DE SÉCURITÉ...6 INSTALLATION...7 Contrôle de température...9 Réglage du contrôle de température...9 Bruits émis par l appareil...10
HANDLEIDING MODE D EMPLOI GEBRAUCHSANLEITUNG INSTRUCTION BOOKLET
 HANDLEIDING MODE D EMPLOI GEBRAUCHSANLEITUNG INSTRUCTION BOOKLET Návod k použití CUPCAKE MAKER DO9053CM PRODUCT OF GARANTIEVOORWAARDEN Dit apparaat heeft een garantietermijn van 2 jaar vanaf de datum van
eduard WEEKEND EDITION
 3741 1:35 Pz.Kpfw. VI Ausf.B Tiger II PLASTIC PARTS A> B> C> D> eduard WEEKEND EDITION E> F> G> 2 pcs. H> 2 pcs. -Parts not for use. -Teile werden nicht verwendet. -Pieces a ne pas utiliser. -Tyto díly
Aufbauanleitung. notice de montage. Building Instructions. montagehandleiding. Instrucciones de construcción. Istruzioni per il montaggio
 70336 19.10.2016 Aufbauanleitung notice de montage Building Instructions montagehandleiding Instrucciones de construcción Istruzioni per il montaggio Montážní návod Service-Hotline:+49 421 38693 33 Vergleichen
notice de montage Building Instructions montagehandleiding Instrucciones de construcción Istruzioni per il montaggio
 70339 17.07.2017 Aufbauanleitung notice de montage Building Instructions montagehandleiding Instrucciones de construcción Istruzioni per il montaggio Montážní návod Service-Hotline: +49 421 38693 33 Vergleichen
Downloaded from DO9188G PRODUCT OF
 Handleiding Mode d emploi Gebrauchsanleitung Instruction booklet Manual de instrucciones Návod k použití Návod na použitie Grill-raclette Gril raclette Grill - raclette Grill raclette Raclette - grill
ROEDL & PARTNER ERSTES BÜRO IN PRAG MATERIÁLY PRO UČITELE
 ROEDL & PARTNER ERSTES BÜRO IN PRAG MATERIÁLY PRO UČITELE Roedl & Partner: Erstes Büro in Prag A: So und Sie haben sich vorgestellt, dass Sie hier in Prag ein Büro haben werden, ist das richtig? B: Wir
HANDLEIDING MODE D EMPLOI GEBRAUCHSANLEITUNG INSTRUCTION BOOKLET NÁVOD K POUŽITÍ
 HANDLEIDING MODE D EMPLOI GEBRAUCHSANLEITUNG INSTRUCTION BOOKLET NÁVOD K POUŽITÍ AIRCONDITIONER CLIMATISEUR KLIMAANLAGE AIRCONDITIONER ACONDICIONADOR DO-262A PRODUCT OF GARANTIEVOORWAARDEN Dit apparaat
MARQUE: CANDY REFERENCE: CI 640 CB CODIC:
 MARQUE: CANDY REFERENCE: CI 640 CB CODIC: 4308867 NOTICE Instruction Manual For Induction Hob Table De Cuisson Induction Návod k použití pro indukní varnou desku Brugervejledning til induktionskogetop
HANDLEIDING MODE D EMPLOI GEBRAUCHSANLEITUNG INSTRUCTION BOOKLET MANUAL DE INSTRUCCIONES NÁVOD K POUŽITÍ NÁVOD NA POUŽITIE
 HANDLEIDING MODE D EMPLOI GEBRAUCHSANLEITUNG INSTRUCTION BOOKLET MANUAL DE INSTRUCCIONES NÁVOD K POUŽITÍ NÁVOD NA POUŽITIE KEUKENROBOT ROBOT DE CUISINE KÜCHENMASCHINE STAND MIXER ROBOT DE COCINA KUCHYŇSKÝ
HANDLEIDING MODE D EMPLOI GEBRAUCHSANLEITUNG INSTRUCTION BOOKLET. My Blender
 HANDLEIDING MODE D EMPLOI GEBRAUCHSANLEITUNG INSTRUCTION BOOKLET Návod k použití My Blender Persoonlijke mixer Mélangeur personnel Personal mixer Personal blender RUČNÍ MIXÉR DO436BL PRODUCT OF DO436BL
NL Nederlands 3 FR Français 8 DE Deutsch 13 EN English 18 ES Espagnol 23 CZ Čeština 28 SK Slovenčina 33
 Handleiding Mode d emploi Gebrauchsanleitung Instruction booklet Manual de instrucciones Návod k použití Návod na použitie Xpower minichopper Xpower mini hachoir Xpower Mini-Hacker Xpower minichopper Xpower
TEGL kg 55lbs STOP STOP STOPPEN. Lees alle instructies vooraleer installatie aan te vangen.
 TEGL204 25kg 55lbs STOPPEN Lees alle instructies vooraleer installatie aan te vangen. STOP Než začnete s instalací, přečtěte si všechny instrukce. STOP Pred začatím inštalácie si pozorne prečítajte všetky
HANDLEIDING MODE D EMPLOI GEBRAUCHSANLEITUNG INSTRUCTION BOOKLET NÁVOD K POUŽITÍ
 HANDLEIDING MODE D EMPLOI GEBRAUCHSANLEITUNG INSTRUCTION BOOKLET NÁVOD K POUŽITÍ KOFFIEZETAPPARAAT CAFETIÈRE KAFFEEMASCHINE COFFEE MAKER KÁVOVAR DO472K PRODUCT OF GARANTIEVOORWAARDEN Dit apparaat heeft
Neplatí pro přístroje série Pro EVO!
 Neplatí pro přístroje série Pro EVO! Montážní návod vkládací řídící jednotka pro WGB C/D, WGB-K C, WBS/WBC C/D pro BGB, BBS C, BBK C/D pro SGB C/D Neplatí pro přístroje série Pro EVO! Obsah Často kladené
Subjonctif Konjunktiv
 VY_32_INOVACE_FJ_157 Subjonctif Konjunktiv PRACOVNÍ LIST Mgr. Martina Šenkýřová Období vytvoření: duben 2013 Ročník: třetí a čtvrtý (opakování) SŠ Tematická oblast: Gramatika-morfologie: slovesné časy
NL Nederlands 3 FR Français 12 DE Deutsch 21 EN English 30 ES Espagnol 38 CZ Čeština 47 SK Slovenčina 55
 Handleiding Mode d emploi Gebrauchsanleitung Instruction booklet Manual de instrucciones Návod k použití Návod na použitie Diepvrieskoffer Congélateur Gefriertruhe Chest freezer Congelador horizontal Pultový
Téma: Les boissons VY_32_INOVACE_292
 Téma: Les boissons Autor: Číslo projektu: Mgr. Michaela Bašná CZ.1.07/1.5.00/34.1072 Ročník: 2. 3. Obor vzdělávání: Vzdělávací oblast: Tematický okruh: hotelnictví jazykové vzdělávání odborná slovní zásoba
S53620CSW2 CS NL DE SK. Návod k použití 2 Gebruiksaanwijzing 19 Benutzerinformation 38 Návod na používanie 57
 S53620CSW2 CS NL DE SK Návod k použití 2 Gebruiksaanwijzing 19 Benutzerinformation 38 Návod na používanie 57 2 OBSAH 1. BEZPEČNOSTNÍ INFORMACE... 3 2. BEZPEČNOSTNÍ POKYNY...4 3. POPIS SPOTŘEBIČE...6 4.
Einbauanleitung zu Elektro-Einbausatz 736652 Elektro-Einbausatz für Anhängerkupplung, 7-polig, 12 Volt, nach ISO 1724
 Einbauanleitung zu Elektro-Einbausatz 736652 Elektro-Einbausatz für Anhängerkupplung, 7-polig, 12 Volt, nach ISO 1724 PEUGEOT 307 Kombi ab ab 04/02 PEUGEOT 307 Station Wagon ab 04/02 Inhalt: 1 Steckdosen-Gehäuse
Einbauanleitung zu Elektro-Einbausatz 736694 Elektro-Einbausatz für Anhängerkupplung, 7-polig, 12 Volt, nach ISO 1724
 Einbauanleitung zu Elektro-Einbausatz 736694 Elektro-Einbausatz für Anhängerkupplung, 7-polig, 12 Volt, nach ISO 1724 Peugeot 206 alle Modelle ab 09/98 Inhalt: 1 Steckdose 7-polig mit Abschaltkontakt für
LED ECODISC GEBRUIKSAANWIJZING OPERATING INSTRUCTION MODE D EMPLOI INSTALAČNÍ NÁVOD.
 LED ECODISC GEBRUIKSAANWIJZING OPERATING INSTRUCTION MODE D EMPLOI INSTALAČNÍ NÁVOD 4000990x 4000991x 4000992x Ecodisc Mini 10W Ecodisc 16W Ecodisc Maxi 21W ATTENTIE Lees de volgende instructies zorgvuldig
STAVEBNÍ PŘIPRAVENOST GILOTINA VLO DIMENSIONAL SHEET VLO MASSBLATT VERTIKALER BESCHLAG VLO МОНТАЖ МЕТАЛЛОКОНСТРУКЦИИ ВОРОТ СИСТЕМЫ ГИЛЬОТИНА ВЛО
 CZ VOLNÝ PROSTOR PRO POHYBUJÍCÍ SE VRATA EN FREE SPACE FOR THE DOORMOVEMENT DE FREIRAUM FÜR DIE BEWEGUNGSABLÄUFE RU РАЗМЕРЫ НЕОБХОДИМЫЕ ДЛЯ УСТАНОВКИ ВОРОТ CZ A - šířka otvoru B - výška otvoru C - nadpraží
ANJA MONTÁŽNÍ NÁVOD. Aufbauanleitung. infolinka: notice de montage. Building Instructions
 MONTÁŽNÍ NÁVOD ANJA Nejprve překontrolujte obsah balení podle materiálového listu Mějte pochopení pro to, že případnou reklamací se můžeme zabývat pouze tehdy, když díly nebudou smontované Za pomoci tohoto
HANDLEIDING MODE D EMPLOI GEBRAUCHSANLEITUNG INSTRUCTION BOOKLET MANUAL DE INSTRUCCIONES NÁVOD K POUŽITÍ NÁVOD NA POUŽITIE
 HANDLEIDING MODE D EMPLOI GEBRAUCHSANLEITUNG INSTRUCTION BOOKLET MANUAL DE INSTRUCCIONES NÁVOD K POUŽITÍ NÁVOD NA POUŽITIE AROMAVERSTUIVER DIFFUSEUR D ARÔMES AROMA-NEBLER AROMA DIFFUSER HUMIFICADOR AROMATERAPÍA
HANDLEIDING MODE D EMPLOI GEBRAUCHSANLEITUNG INSTRUCTION BOOKLET MANUAL DE INSTRUCCIONES NÁVOD K POUŽITÍ
 HANDLEIDING MODE D EMPLOI GEBRAUCHSANLEITUNG INSTRUCTION BOOKLET MANUAL DE INSTRUCCIONES NÁVOD K POUŽITÍ MICROGOLFOVEN MET GRILL FOUR À MICRO-ONDES AVEC GRIL MIKROWELLE MIT GRILL MICROWAVE OVEN WITH GRILL
Line drawing of the item
 Line drawing of the item item number: 03602/01/41 Installation Drawing 2 5 4 3 1 Gebruiksaanwijzing Gelievedezegebruiksaanwijzingaandachtigtelezen en bijtehoudenzolang u dit product gebruikt. Volgdezegebruiksaanwijzingvooreenveilige
DO513FR. Manual de instrucciones PRODUCT OF
 Handleiding Mode d emploi Gebrauchsanleitung Instruction booklet Manual de instrucciones Návod k použití Návod na použitie Deli-fryer Deli-fryer Deli-fryer Deli-fryer Deli-fryer Horkovzdušná fritéza Teplovzdušná
Rozvoj vzdělávání žáků karvinských základních škol v oblasti cizích jazyků Registrační číslo projektu: CZ.1.07/1.1.07/02.0162. Dělnická.
 Rozvoj vzdělávání žáků karvinských základních škol v oblasti cizích jazyků Registrační číslo projektu: CZ.1.07/1.1.07/02.0162 ZŠ Určeno pro Sekce Předmět Téma / kapitola Zpracoval (tým 1) Dělnická 6.roč.
L-force Drives. EDK84DGFCxxxx.O=I. Ä.O=Iä. Montážní návod motec. E84DGFCxxxx. Komunikační modul Communication unit
 EDK8DGFCxxxx.O=I Ä.O=Iä L-force Drives Montážní návod 800 motec E8DGFCxxxx Komunikační modul Communication unit 0 0.7 kw 7.kW E8DG0a E8DG0b EDK8DGFCxxxx CS.0 V Warnings! Operation of this equipment requires
NÁVOD K POUŽITÍ 2 GEBRUIKSAANWIJZING 20 MANUAL DE INSTRUÇÕES 38 NÁVOD NA POUŽÍVANIE 56 CS NL PT SK KOEL-VRIESCOMBINATIE COMBINADO
 EN3613MOX CS NL PT SK CHLADNIČKA S MRAZNIČKOU KOEL-VRIESCOMBINATIE COMBINADO CHLADNIČKA S MRAZNIČKOU NÁVOD K POUŽITÍ 2 GEBRUIKSAANWIJZING 20 MANUAL DE INSTRUÇÕES 38 NÁVOD NA POUŽÍVANIE 56 2 OBSAH 1. BEZPEČNOSTNÍ
YUL204 32" STOP STOP. 55lbs 25kg. 81cm. AVF Group Ltd. Hortonwood 30, Telford, Shropshire, TF1 7YE, England rev00
 Nederlandse taal Čeština Slovenský jazyk YUL204 464166 rev00 STOPPEN Lees alle instructies vooraleer installatie aan te vangen. Als u vragen hebt over dit product of problemen ondervindt met de installatie,
DO706F PRODUCT OF. Gebrauchsanleitung. Instruction booklet. Manual de instrucciones. Návod k použití. Návod na použitie
 Handleiding Mode d emploi Gebrauchsanleitung Instruction booklet Manual de instrucciones Návod k použití Návod na použitie Fondue Fondue Fondue Fondue Fondue Fondue Fondue PRODUCT OF Lees aandachtig alle
Implementace finanční gramotnosti. ve školní praxi. Sparen, sparen, sparen. Irena Erlebachová
 Implementace finanční gramotnosti Výuková část ve školní praxi Digitální podoba e-learningové aplikace (vyuka.iss-cheb.cz) Sparen, sparen, sparen Irena Erlebachová 3 Výuková část Obsah Výuková část...
HANDLEIDING MODE D EMPLOI GEBRAUCHSANLEITUNG INSTRUCTION BOOKLET MANUAL DE INSTRUCCIONES NÁVOD K POUŽITÍ
 HANDLEIDING MODE D EMPLOI GEBRAUCHSANLEITUNG INSTRUCTION BOOKLET MANUAL DE INSTRUCCIONES NÁVOD K POUŽITÍ MY SPIRELLI DO9171SP-DO9172SP PRODUCT OF DO9171SP-DO9172SP GARANTIEVOORWAARDEN Wij hanteren een