#40645 ISG 1000 #40647 ISG 2000
|
|
|
- Martina Urbanová
- před 9 lety
- Počet zobrazení:
Transkript
1 #40645 ISG 1000 #40647 ISG 2000 Deutsch DE - 5 Originalbetriebsanleitung INVERTER STROMERZEUGER English GB - 12 Original Operating Instructions INVERTER GENERATOR Français FR - 18 Mode d'emploi original GÉNÉRATEUR INVERTER Ceština CZ - 25 Originální návod k obsluze GENERÁTOR ŘÍZENÝ INVERTOREM Slovenčina SK - 31 Originálny návod na obsluhu GENERÁTOR RIADENÝ INVERTOROM Nederlands NL - 37 Originele gebruiksaanwijzing INVERTER GENERATOR Italiano IT - 44 Originale del Manuale d Uso GENERATORE CONTROLLATO Magyar HU - 51 Eredeti használati utasítás INVERTERREL IRÁNYÍTOTT GENERÁTOR Güde GmbH & Co. KG - Birkichstrasse 6 - D Wolpertshausen - Deutschland

2 # #

3

4
5 DE Lesen Sie bitte diese Bedienungsanleitung sorgfältig durch, bevor Sie das Gerät in Betrieb nehmen. A.V. 2 Nachdrucke, auch auszugsweise, bedürfen der Genehmigung. Technische Änderungen vorbehalten. Abbildungen beispielhaft! Dies ist eine original Bedienungsanleitung. Kennzeichnung: Verpackung: Produktsicherheit: Produkt ist mit den einschlägigen Normen und Richtlinien der Europäischen Gemeinschaft konform Vor Nässe schützen Technische Daten: Packungsorientierung Oben Warnhinweis: Motorleistung Hubraum Achtung! Vor Wartung Bedienungsanleitung lesen! Nicht in geschlossenen Räumen betreiben. Es können giftige Gase entstehen. Umdrehungen in der Minute Tankinhalt Nicht an das Hausnetz anschließen. Vorsicht vor giftigen Dämpfen. Nennleistung Gewicht Gebote: Stromausgang Lärmwertangabe Vor Wartung oder Arbeiten am Gerät Netzstecker ziehen Verbot: Gerät nicht dem Regen aussetzen Feuer, offenes Licht und Rauchen verboten Öl bis zur Markierung füllen. Regelmäßig Ölstand überprüfen und gegebenenfalls nachfüllen. Zum Schließen der Choke- Klappe Hebel nach rechts drücken. Umweltschutz: Vorsicht! Vermeiden Sie Kontakt mit heißen Teilen. Abfall nicht in die Umwelt sondern fachgerecht entsorgen. Schadhafte und/oder zu entsorgende elektrische oder elektronische Geräte müssen an den dafür vorgesehen Recycling-Stellen abgegeben werden. Verpackungsmaterial aus Pappe kann an den dafür vorgesehen Recycling- Stellen abgegeben werden. Gerätebeschreibung (Abb. 1+2) 1. Krafftstoffdeckelbelüftungshebel 2. Krafftstoffeinfüllverschluss V Steckdose 4. ON/OFF Schalter 5. Ausgangsleistungsanzeigelampe 6. Überlastunsanzeigelampe 7. Anschluss Erdung des Motors 8. Anzeigelampe für Ölwarnsystem 9. 12V Steckdose 10. Gleichstromschutzschalter 11. Zündschalter/Benzinhahn 12. Startschnur 13. Chokehebel 5

6 Lieferumfang Inverter Stromerzeuger Zündkerzenschlüssel Batteriepolklemmen Wartungsset Benutzerhandbuch und Gewährleistungskarte EG-KONFORMITÄTSERKLÄRUNG Hiermit erklären wir Güde GmbH & Co. KG Birkichstrasse Wolpertshausen Deutschland, dass die nachfolgend bezeichneten Geräte aufgrund ihrer Konzipierung und Bauart sowie in den von uns in Verkehr gebrachten Ausführungen den einschlägigen, grundlegenden Sicherheits- und Gesundheitsanforderungen der EG-Richtlinien entsprechen. Bei einer nicht mit uns abgestimmten Änderung der Geräte verliert diese Erklärung ihre Gültigkeit. Bezeichnung der Geräte/Artikel-Nr.: INVERTER STROMERZEUGER ISG 1000 / #40645 INVERTER STROMERZEUGER ISG 2000 / #40647 Einschlägige EG-Richtlinien: 2006/95 EC 2004/108 EC 2006/42 EC 2000/14/EC 2005/88/EC 97/68/EC 2004/26/EC Angewandte harmonisierte Normen: EN 12601:2001 EN 55012:2002/+A1:2005 Zertifizierstelle: Intertek Testing Service Hangzhou 16 No. 1 Ave., Xiasha Economic Development District, Hangzhou , China Referenznummer: 08SHS # HZS #40647 Technische Daten ISG 1000 Stromausgang: 230 V/ 12V Frequenz: 50 Hz Dauerleistung 12 V: 90 W Dauerleistung 230 V: 900 W Nennleistung 230 V: 1000 W Nennleistungsfaktor: 1,0 Motorleistung: 1,3 kw/1,8 PS bei 5500 min-1 Hubraum: 53,5 ccm Schutzart: IP23 Motortyp: 4 Takt luftgekühlt Aufbaumaß: 455x252x407 mm Tankinhalt: 2,7 l Benzin Verbrauch: 0,68 l/h Lärmwertangabe: LWA 95 db * Schalldruck bei 7m: LWA db Gewicht: 14 kg Artikel Nummer: ISG 2000 Stromausgang: 2x 230 V/ 12V Frequenz: 50 Hz Dauerleistung 12 V: 90 W Dauerleistung 230 V: 1600 W Nennleistung 230 V: 2000 W Nennleistungsfaktor: 1,0 Motorleistung: 2,2 kw/3 PS bei 5500 min-1 Hubraum: 105,6 ccm Schutzart: IP23 Motortyp: 4 Takt luftgekühlt Aufbaumaß: 530x300x445 mm Tankinhalt: 3,5 l Benzin Verbrauch: 1 l/h Lärmwertangabe: LWA 92 db * Schalldruck bei 7m: LWA db Gewicht: 22 kg Artikel Nummer: * Lärmwertinformation Messwerte ermittelt entsprechend 2000/14/EG (1,60m Höhe, 1m Abstand) Messtoleranzen +-3dB Gerät Datum/Herstellerunterschrift: Angaben zum Unterzeichner: Geschäftsführer, Hr. Arnold Technische Dokumentation: J. Bürkle FBL; QS Gewährleistung Die Gewährleistung erstreckt sich ausschließlich auf Mängel, die auf Material- oder Herstellungsfehler zurückzuführen sind. Bei Geltendmachung eines Mangels im Sinne der Gewährleistung ist der original Kaufbeleg mit Verkaufdatum beizufügen. Von der Gewährleistung ausgeschlossen sind unsachgemäße Anwendungen, wie z. B. Überlastung des Gerätes, Gewaltanwendung, Beschädigungen durch Fremdeinwirkung oder durch Fremdkörper. Nichtbeachtung der Gebrauchs- und Aufbauanleitung und normaler Verschleiß sind ebenfalls von der Gewährleistung ausgeschlossen. Inverter Bei einem Inverter-Stromerzeuger wird der Strom auf eine völlig neue Art erzeugt. Durch eine kleine, mehrpolige Wicklung im Inneren wird die erzeugte Wechselstromspannung über Elektronik erst in Gleichspannung, danach in Wechselspannung mit einer sauberen Sinuskurve umgewandelt. Durch diese saubere Sinuskurve ist es möglich, elektronische Geräte, ohne diese zu beschädigten, zu betreiben. 6

7 Allgemeine Sicherheitshinweise Die Bedienungsanleitung muss vor der ersten Anwendung des Gerätes ganz durchgelesen werden. Falls über den Anschluss und die Bedienung des Gerätes Zweifel entstehen sollten, wenden Sie sich an den Hersteller (Service-Abteilung). UM EINEN HOHEN GRAD AN SICHERHEIT ZU GARANTIEREN, BEACHTEN SIE AUFMERKSAM FOLGENDE HINWEISE: ACHTUNG! Halten Sie den Arbeitsbereich sauber und aufgeräumt. Unordentliche Arbeitsplätze und Werkbänke erhöhen die Gefahr von Unfällen und Verletzungen. Achten Sie auf die Umgebungsbedingungen, unter denen Sie arbeiten. Verwenden Sie keine Elektrowerkzeuge und Werkzeugmaschinen in feuchter oder nasser Umgebung. Sorgen Sie für ausreichend Beleuchtung. Setzen Sie elektrische Werkzeuge nicht dem Regen oder hoher Luftfeuchtigkeit aus. Schalten Sie elektrische Werkzeuge nicht in einer Umgebung mit leicht entflammbaren Flüssigkeiten oder Gasen ein. Lassen Sie keine Fremden an die Maschine. Besucher und Zuschauer, vor allem Kinder sowie kranke und gebrechliche Personen, sollten vom Arbeitsplatz fern gehalten werden. Sorgen Sie für die sichere Aufbewahrung von Werkzeugen. Werkzeuge, die nicht gebraucht werden, müssen an einem trockenen, möglichst hoch gelegenen Platz aufbewahrt oder unzugänglich verwahrt werden. Verwenden Sie für jede Arbeit immer das richtige Werkzeug. Verwenden Sie z.b. keine Kleinwerkzeuge oder Zubehör für Arbeiten, die eigentlich mit schwerem Werkzeug verrichtet werden müssen. Verwenden Sie Werkzeuge ausschließlich für die Zwecke, für die sie gebaut wurden. Überlasten Sie das Gerät nicht! Achten Sie auf das Stromkabel. Ziehen Sie nicht am Kabel. Fassen Sie zum Abziehen nur den Stecker. Halten Sie das Kabel fern von Wärmequellen, Öl und scharfen Kanten. Verhindern Sie unbeabsichtigtes Einschalten. Achten Sie immer darauf, dass das Werkzeug am Geräteschalter ausgeschaltet ist, bevor Sie den Netzstecker in die Steckdose stecken. Bleiben sie immer aufmerksam. Achten Sie auf das, was Sie tun. Setzen Sie Ihren gesunden Menschenverstand ein. Verwenden Sie keine Elektrowerkzeuge, wenn Sie müde sind. Achten Sie auf beschädigte Teile. Untersuchen Sie das Werkzeug, bevor Sie es benutzen. Sind einzelne Teile beschädigt? Fragen Sie sich bei leichten Beschädigungen ernsthaft, ob das Werkzeug trotzdem einwandfrei und sicher funktionieren wird. Beugen Sie Stromschlägen vor. Vermeiden Sie jeden körperlichen Kontakt mit geerdeten Objekten, z.b. Wasserleitungen, Heizkörpern, Kochern und Kühlschrankgehäusen. Verwenden Sie nur zugelassene Teile. Verwenden Sie bei Wartung und Reparatur nur identische Ersatzteile. Wenden Sie sich für Ersatzteile an ein zugelassenes Service Center. Warnung! Die Verwendung von Zubehör und Anbauteilen, die nicht ausdrücklich in dieser Bedienungsanleitung empfohlen werden, kann die Gefährdung von Personen und Objekten nach sich ziehen. Überdehnen Sie nicht Ihren Standbereich Vermeiden Sie abnormale Körperhaltung. Sorgen Sie für sicheren Stand, und halten Sie jederzeit das Gleichgewicht. Gerätespezifische Sicherheitshinweise Schützen Sie jegliche Kabel vor Hitze, Öl und scharfen Kanten. Ziehen Sie den Netzstecker bei Reparaturen und Wartungsarbeiten und wenn Sie die Maschine nicht benutzen. Arbeiten an elektrischen Einrichtungen dürfen nur von einer Elektrofachkraft vorgenommen werden. Es dürfen nur Originalteile verwendet werden. Saubere Arbeitsplätze erleichtern das Arbeiten. Achten Sie darauf was Sie tun. Gehen Sie mit Vernunft an die Arbeit. Verwenden Sie die Maschine nur in geeigneter Umgebung und setzen Sie die Maschine keiner Nässe oder Feuchtigkeit aus. Sorgen Sie beim Arbeiten stets für gute Beleuchtung. Schalten Sie die Maschine bei gefährlichen Situationen oder technischen Störungen sofort aus und ziehen Sie den Netzstecker. Es dürfen nur vom Hersteller freigegebene Einsatzwerkzeuge und Zubehör verwendet werden. Die Verwendung von nicht freigegebenen Teilen birgt eine erhebliche Verletzungsgefahr. Kinder oder Personen, denen es an Wissen oder Erfahrung im Umgang mit dem Gerät mangelt, oder die in ihren körperlichen, sensorischen oder geistigen Fähigkeiten eingeschränkt sind, dürfen das Gerät nicht ohne Aufsicht oder Anleitung durch eine für Ihre Sicherheit verantwortliche Person benutzen. Kinder müssen beaufsichtigt werden, damit sie nicht mit de Gerät spielen. Beim Anschluss des Generators an die Hausversorgung, ist bezüglich des Anschlusses und der Erdung unbedingt eine Elektrofachkraft hinzuzufügen. Stellen Sie den Stromerzeuger immer auf einen festen und ebenen Untergrund! Abgase können tödlich sein, daher niemals in geschlossenen Räumen benutzen. Decken Sie den Generator niemals ab. Niemals mit feuchten Händen berühren Nicht in feuchter Umgebung arbeiten. Niemals 2 Generatoren Zusammenschließen. Verletzungsgefahr oder mögliche Beschädigung des Elektrowerkzeuges. Technische Daten des Verbrauchers immer mit den Daten und Sicherheitsanweisungen des Generators abstimmen. (Bei der Anlaufleistung ist das 3 bis 5fache der Nennleistung des anzuschießenden Gerätes zu beachten). Verhalten im Notfall Für einen eventuell eintretenden Unfall sollte immer ein Verbandskasten nach DIN am Arbeitsplatz griffbereit vorhanden sein. Dem Verbandskasten entnommenes Material ist sofort wieder aufzufüllen. Wenn Sie Hilfe anfordern, machen Sie folgende Angaben: Ort des Unfalls Art des Unfalls Zahl der Verletzten Art der Verletzungen Leiten Sie die der Verletzung entsprechend notwendigen Erste- Hilfe-Maßnahmen ein und fordern Sie schnellst möglich qualifizierte ärztliche Hilfe an. Bewahren Sie den Verletzten vor weiteren Schädigungen und stellen Sie diesen ruhig. 7

8 Bestimmungsgemäße Verwendung Dieses Stromaggregat ist ausschließlich zum Betreiben von elektrischen Geräten konzipiert, deren max. Leistung innerhalb der Leistungsangaben des Generators liegen. Ein höherer Anlaufstrom von induktiven Verbrauchern muss berücksichtigt werden. Bei Nichtbeachtung der Bestimmungen, aus den allgemein gültigen Vorschriften sowie den Bestimmungen aus dieser Anleitung, kann der Hersteller für Schäden nicht verantwortlich gemacht werden. Restgefahren und Schutzmaßnahmen Direkter elektrischer Kontakt Direkter elektrischer Kontakt mit feuchten Händen kann zu Stromschlägen führen. Vermeiden Sie Kontakt mit feuchten Händen und achten Sie auf entsprechende Erdung. Thermische Restgefahren Verbrennungen, Frostbeulen Das Berühren des Auspuff kann zu Verbrennungen führen. Geräte nach dem Betrieb erst abkühlen lassen. Gefährdungen durch Lärm Gehörschädigungen Längerer Aufenthalt im unmittelbarer Nähe des laufenden Generators kann zu Gehörschädigungen führen. Unbedingt immer einen Gehörschutz tragen. Gefährdung durch Werkstoffe und andere Stoffe Kontakt, Einatmung Das Einatmen von Abgasen kann tödlich sein! Niemals in geschlossenen Räumen betreiben. Feuer oder Explosion Der Kraftstoff des Gerätes kann sich entzünden. Niemals in feuergefährlicher Umgebung betreiben. Nicht bei laufendem Motor betanken. Nicht Rauchen. Biologische / mikrobiologische Gefährdungen Der Auslauf von Öl und Kraftstoff schadet der Umwelt. Sonstige Gefährdungen Bruch beim Betrieb Wenn das Gerät auf schrägem Untergrund betrieben wird ist die Schmierung nicht mehr gewährleistet und das Gerät kann beschädigt werden. Grundsätzlich auf ebenem Untergrund betreiben. Entsorgung Die Entsorgungshinweise ergeben sich aus den Piktogrammen die auf dem Gerät bzw. der Verpackung aufgebracht sind. Eine Beschreibung der einzelnen Bedeutungen finden Sie im Kapitel Kennzeichnung. Entsorgung der Transportverpackung Die Verpackung schützt das Gerät vor Transportschäden. Die Verpackungsmaterialien sind in der Regel nach umweltverträglichen und entsorgungstechnischen Gesichtspunkten ausgewählt und deshalb recycelbar. Das Rückführen der Verpackung in den Materialkreislauf spart Rohstoffe und verringert das Abfallaufkommen. Verpackungsteile (z.b. Folien, Styropor) können für Kinder gefährlich sein. Es besteht Erstickungsgefahr! Bewahren Sie Verpackungsteile außerhalb der Reichweite von Kindern auf und entsorgen Sie sie so schnell wie möglich. Beseitigung des Altöls Bringen Sie das Öl in einem verschlossenen Behälter zu einer Altöl-Sammelstelle. Das gebrauchte Öl nicht in den Abfall werfen oder auf den Boden gießen. Anforderungen an den Bediener Der Bediener muss vor Gebrauch des Gerätes aufmerksam die Bedienungsanleitung gelesen haben. Qualifikation Außer einer ausführlichen Einweisung durch eine sachkundige Person ist keine spezielle Qualifikation für den Gebrauch des Gerätes notwendig. Mindestalter Das Gerät darf nur von Personen betrieben werden, die das 18. Lebensjahr vollendet haben und mit dem Umgang und der Wirkungsweise vertraut sind. Jugendlichen zwischen 16 und 18 Jahren ist das Arbeiten nur unter Aufsicht eines Erwachsenen gestattet. Eine Ausnahme stellt die Benutzung als Jugendlicher dar, wenn die Benutzung im Zuge einer Berufsausbildung zur Erreichung der Fertigkeit unter Aufsicht eines Ausbilders erfolgt. Schulung Die Benutzung des Gerätes bedarf lediglich einer entsprechenden Unterweisung. Eine spezielle Schulung ist nicht notwendig. Transport und Lagerung Das Gerät darf nur in Arbeitsposition (ebener Untergrund) betrieben werden, da sonst Kraftstoff oder Öl auslaufen kann bzw. die Schmierung nicht mehr gewährleistet ist. Den Kraftstoffbelüftungshebel und den Zündschalter auf OFF stellen, damit ein Verschütten von Kraftstoff beim Transportieren oder Verstauen vermieden wird. Achten Sie darauf, dass der Kraftstofftank nicht überfüllt wird. Das Gerät darf nicht betrieben werden, wenn es sich auf einem Fahrzeug befindet. Für den Betrieb muss der Inverter Stromerzeuger abgeladen und in einer gut belüfteten Umgebung aufgestellt werden. Lagern Sie das Gerät nicht in der prallen Sonne. Wenn der Stromerzeuger in einem Fahrzeug verstaut wird, achten Sie darauf, dass die Temperatur in dem Fahrzeug nicht zu heiß wird, sonst verdunstet der Kraftstoff und es entsteht eine Explosion. Bei längerer Lagerung muss das Gerät gründlich gereinigt und unzugänglich für unbefugte Personen aufbewahrt werden. Lassen Sie den Kraftstoff ab und lagern Sie das Gerät an einem trockenen und staubfreien Ort. Sichern Sie die Maschine vor jedem Transport gegen Umfallen. Sicherheitshinweise für Erstinbetriebnahme Stellen Sie die Maschine auf eine ebene Fläche. Stellen Sie die Maschine nicht auf eine Metallfläche. Setzen Sie die Maschine nicht der grellen Sonne aus. Setzen Sie die Maschine nicht Temperaturen über 40 C aus. Lagern Sie die Maschine nicht in einer feuchten Umgebung. Vergewissern Sie sich vor dem Gebrauch zunächst, dass der anzuschließende Verbraucher eine geringere Leistungsaufnahme hat, als die Ausgangsleistung des Generators. Schließen Sie den Verbraucher erst an, wenn der Generator mit voller Drehzahl läuft. Trennen Sie den Verbraucher, bevor Sie den Generator ausschalten. 8

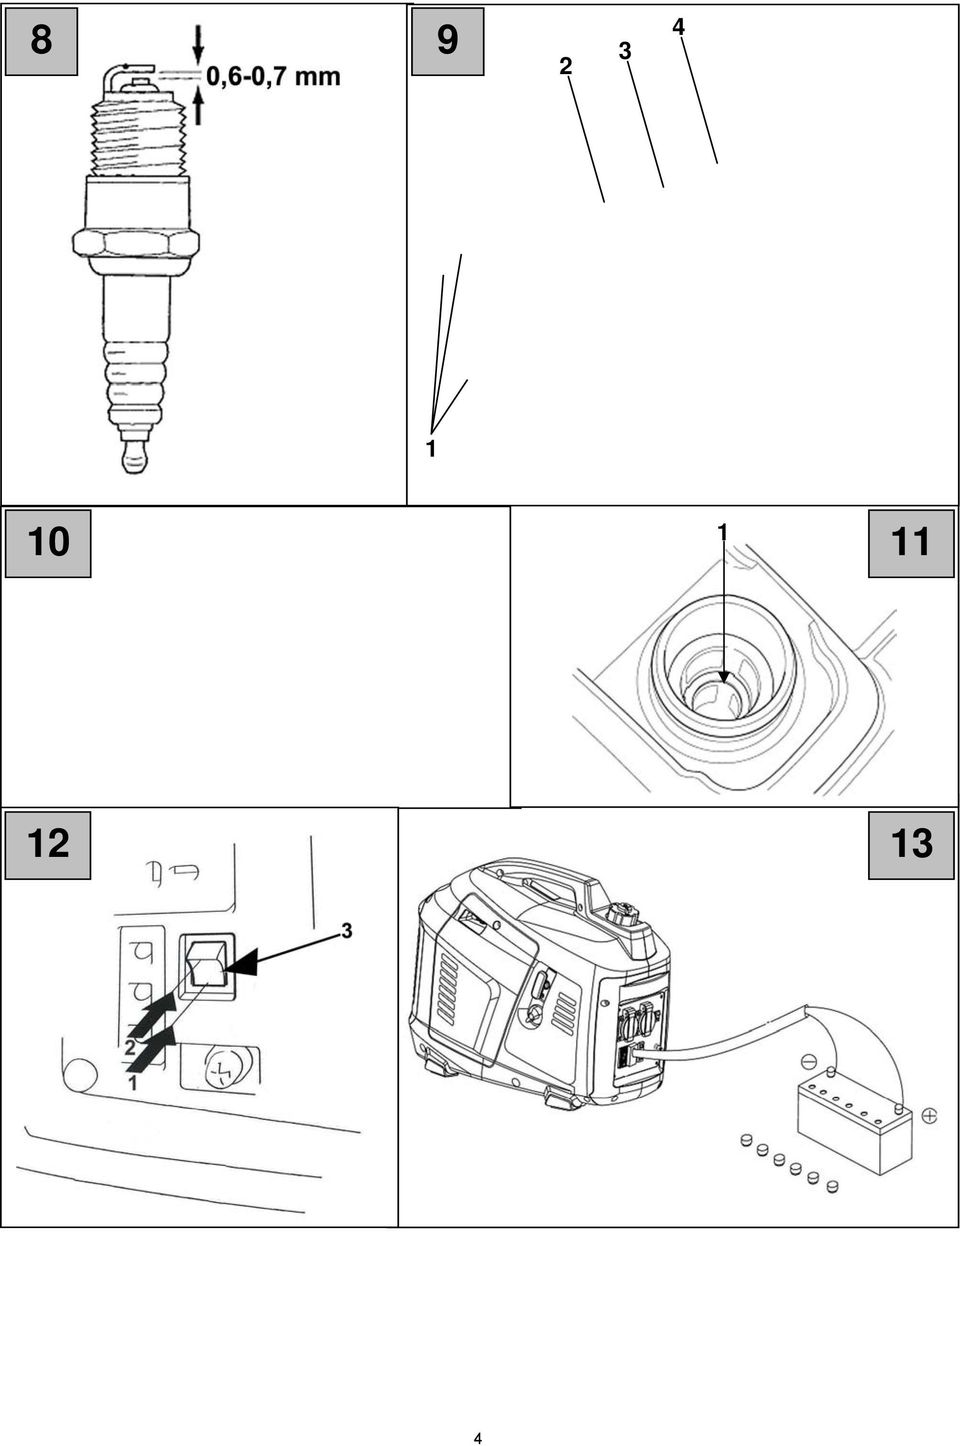
9 Verbinden Sie keine anderen Energiequellen mit der Maschine. Schließen Sie die Maschine nicht am Hausnetz an. Schalten Sie den Generator unter folgenden Bedingungen sofort aus: - bei einem unruhigen oder unrunden Lauf des Motors - bei einer Abnahme der elektrischen Ausgangsleistung - bei einer Überhitzung des angeschlossenen Verbrauchers - bei übermäßigen Vibrationen des Generators - bei Funkenbildung - beim Auftreten von Rauch oder Feuer Stellen Sie sicher, dass der Generator ausreichend Kraftstoff hat, bevor ein Verbraucher angeschlossen wird. Füllen Sie niemals Kraftstoff nach, solange die Maschine läuft. Lassen Sie die Maschine nach dem Gebrauch mindestens 5 Minuten lang abkühlen, bevor Sie Kraftstoff nachfüllen. Vermeiden Sie es, heiße Teile der Maschine zu berühren. Lagern Sie keinen Kraftstoff in der Nähe der Maschine. Der Schalldämpfer und der Luftfilter wirken bei der Nachverbrennung als Flammenfänger. Achten Sie daher darauf, dass diese Teile richtig angebracht sind und sich in einem technisch einwandfreien Zustand befinden. Der Stromerzeuger darf auf keinen Fall in einer Garage, in einem Haus bzw. in der Nähe geöffneter Fenster oder Türen betrieben werden, da das Einatmen von Abgasen zur Bewusstlosigkeit führen kann. Tanken Sie nur im Freien, bei gestopptem Motor und rauchen Sie in der Nähe des Gerätes nicht. Halten Sie jegliche Art von Flammen oder Funken fern. Verschüttetes Benzin muss unverzüglich aufgewischt werden, bevor der Motor gestartet wird. Eco-Drosselklappe Abb. 12 Abb. 12 Pos. 1 OFF Pos. 2 ECO Pos. 3 ECO-Drosselklappenschalter ECO: Hierbei wird die Motordrehzahl automatisch der Leerlaufdrehzahl angepasst, wenn der elektrische Stromverbraucher abgeklemmt wird. Wird der elektrische Stromverbraucher nun wieder angeschlossen, wird auf die der Belastung entsprechenden Drehzahl zurückgekehrt. Wird nicht die volle Abgabeleistung des Generators benötigt, reduziert sich automatisch die Drehzahl des Motors. Diese Position empfiehlt sich zur Verringerung des Kraftstoffverbrauchs. Bei Gleichstrombetrieb ist der Eco- Drosselklappenschalter auf OFF zu stellen. OFF: Motordrehzahl wir über der Nenndrehzahl gehalten. Bedienung Abb Starten: Vor dem Anlassen des Motors müssen angeschlossene Stromverbraucher von der Wechselstrom-Steckdose abgeklemmt werden. Den Kraftstoffbelüftungshebel auf ON stellen (Abb. 1/1 oder 2/1). Den Zündschalter auf ON stellen (Abb. 1/1 oder 2/1). Choke-Hebel (Abb. 1/13 oder 2/13) nach rechts auf geschlossen stellen. Langsam an der Startschnur (Abb. 1/12 oder 2/12) ziehen, bis ein Widerstand spürbar ist, dann kräftig ziehen um den Motor zu starten. Die Startschnur nicht zurückschnellen lassen, sondern das Seil vorsichtig mit der Hand zurückführen. Wenn der Motor warmgelaufen ist, den Choke-Hebel (Abb. 1/13 oder 2/13) in die Ausgangsstellung zurück schieben. Benutzung: Inverter Stromerzeuger unbedingt an Masse (Abb. 1/7 oder 2/7) anschließen, wenn die angeschlossenen Geräte geerdet sind. Ein Anschluss an die elektrische Anlage eines Gebäudes ist unzulässig, sofern kein Trennschalter installiert worden ist. Der angegebene Höchstwert der Leistungsaufnahme darf an keinem Anschlussstecker überschritten werden. Wechselstrombetrieb: Motor starten und sicherstellen, dass die Ausgangsanzeigelampe (Abb. 1/5 oder 2/5) grün aufleuchtet. Vergewissern Sie sich, dass das zu verwendete Gerät ausgeschalten ist. Wenn das der Fall ist, dann den Stecker des Gerätes in die Wechselstrom Steckdose (Abb. 1/3 oder 2/3) einstecken. Leuchtet die Überlastungsanzeigelampe (Abb. 1/6 oder 2/6) kurzzeitig immer wieder auf, kann das die Lebensdauer des Gerätes verkürzen. Ein andauerndes Aufleuchten der Lampe kann Beschädigungen des Generators verursachen. Die Überlastungsanzeige leuchtet auf, wenn die Nennleistung des jeweiligen Stromerzeugers überschnitten wird. Gleichstromeinsatz: Die Gleichstrom-Steckdose, darf nur zum Laden einer 12 V Batterie verwendet werden. Bei dem Gleichstrombetrieb muss der Eco-Drosselschalter (Abb. 12) auf OFF stehen. Ladekabel mit Gleichstromsteckdose und den Batterieklemmen verbinden (Abb. 13). Um Funkenbildung zu verhindern, muss das Ladekabel zuerst mit dem Generator und dann mit der Batterie verbunden werden. Beim Abklemmen zuerst die Kabel an der Batterie lösen. Während der Generator an die Batterie angeschlossen ist, den Automotor nicht anmachen. Motor anlassen. Wenn der DC-Stromkreis überlastet ist, springt der Schutzschalter (Abb. 1/10 oder 2/10) heraus. In diesem Fall einige Minuten warten, dann die Taste wieder hineindrücken und den Betrieb fortsetzen. Ausschalten: Das angeschlossene Gerät ausschalten und den Stecker abziehen. Zündschalter (Abb. 1/1 oder 2/1) auf OFF stellen. Kraftstoffbelüftungshebel auf OFF drehen (Abb. 1/1 oder 2/1). Ölwarnsystem: Bevor der Ölstand auf einen zu niedrigen Pegel fällt, wird der Motor automatisch abgestellt. Die Anzeigelampe (Abb. 1/8 oder 2/8) leuchtet dann beim Betätigen des Starters rot, und der Motor läuft nicht. In diesem Fall Ölstand kontrollieren und nachfüllen. Sicherheitshinweise für die Bedienung Siehe Allgemeine Sicherheitshinweise, Gerätespezifische Sicherheitshinweise und Sicherheitshinweise bei Erstinbetriebnahme. 9

10 Benutzen Sie das Gerät erst nachdem Sie die Bedienungsanleitung aufmerksam gelesen haben. Beachten Sie alle in der Anleitung aufgeführten Sicherheitshinweise. Verhalten Sie sich verantwortungsvoll gegenüber anderen Personen. Inspektion und Wartung Abb Für eine einwandfreie Funktion und lange Lebensdauer des Geräts ist eine regelmäßige Reinigung und Wartung von wesentlicher Bedeutung. Einstellungen an der Maschine nur bei gezogenem Netzstecker vornehmen. Es besteht erhebliche Verletzungsgefahr. Rauchen Sie nicht während der unten aufgeführten Arbeiten. Arbeiten Sie niemals in der Nähe von Funken, Flammen oder offenem Feuer. Regelmäßigdurchzuführende Wartungs- und Inspektionsarbeiten Luftfilter Der Luftfilter sollte alle 50 Betriebsstunden gereinigt werden. Schraube lösen (Abb. 3/1) und Abdeckung abnehmen (Abb. 3/2). Luftfilterdeckelschraube (Abb. 5/1) lösen. Luftfiltabdeckung (Abb. 5/2) abnehmen. Außenfilter und Hauptfilter (Abb. 5/3+4) überprüfen und wenn nötig die in nichtbrennbarem oder schwerentzündlichem Lösungsmittel auswaschen und gut trocknen lassen. Die Filter mit einer kleinen Menge Öl beträufeln und Zusammendrücken. Nun Filter wieder einsetzen. Luftfilterdeckelschraube (Abb. 5/1) anbringen. Abdeckung (Abb. 3/2) und Deckelschraube (Abb. 3/1) festziehen. Das Gerät niemals ohne Luftfilter betreiben. Dies führt zu schnellem Motorverschleiß. Zündkerze Wartungsabdeckung der Zündkerze (Abb. 6/1) entfernen. Zündkerzenstecker (Abb. 6/2) entfernen. Zündkerzenbasis von Schmutz und Staub befreien. Mithilfe eines Zündkerzenschlüssels (Abb. 7/1) die Zündkerze losdrehen. Suchen Sie die Zündkerze nach Rissen oder Absplitterungen ab. Wenn die Zündkerze Beschädigungen aufweist, sofort entsorgen. Wenn die Zündkerze weiter verwendet werden kann, reinigen Sie sie mit einer Drahtbürste. Überprüfen Sie nun den Elektrodenabstand mit einer Fühlerlehre. Durch Biegen der Seitenelektrode den korrekten Abstand herstellen (richtiger Abstand: 0,6 bis 0,7 mm). Zündkerze wieder einsetzen. Zündkerzenstecker (Abb. 6/2) wieder fest auf die Zündkerze aufschieben. Wartungsabdeckung (Abb. 6/1) wieder anbringen. Ölwechsel Das Motoröl bei noch warmem Motor ablassen, um ein schnelles und vollständiges Herauslaufen zu gewährleisten. Vor dem Ablassen sicherstellen, dass der Kraftstoffdeckelbelüftungshebel (Abb. 1/1 oder 2/1) auf OFF gestellt ist. Die Schraube des Deckels (Abb. 3/1) lösen. Linke Abdeckung (Abb. 3/2) abnehmen. Öleinfülldeckel (Abb. 4/2) entfernen. Motoröl in geeigneten Behälter ablassen (Abb. 4) Empfohlenes Motoröl einfüllen (SAE 10W-30, Abb. 10) und Motorölstand überprüfen (Abb. 4/3). Öleinfülldeckel (Abb. 4/2) einsetzen. Abdeckung (Abb. 3/2) wieder anbringen und Schraube (Abb. 3/1) festziehen. Nach Kontakt mit Altöl die Hände gründlich mit Wasser und Seife reinigen. Bei der Beseitigung des Altöls bitte die entsprechenden Umweltschutzbestimmungen beachten. Wir empfehlen, das Öl zwecks Entsorgung in einem verschlossenen Behälter zu einer Altöl-Sammelstelle zu bringen. Das Motoröl nicht in den Abfall werfen oder auf den Boden gießen. Schalldämpfer prüfen Vor der Wartung den Schalldämpfer abkühlen lassen. Der Funkenfänger muss alle 100 Betriebsstunden überprüft werden, um ein einwandfreies Funktionieren zu gewährleisten. Die vier Schrauben entfernen, und Abdeckung abnehmen. Nun die drei 6 mm Schrauben (Abb. 9/1) entfernen, dann den Schalldämpfer (Abb. 9/2), den Funkenfänger (Abb. 9/3) und die Dichtung (Abb. 9/4). Den Funkenfänger (Abb. 9/3) mit einer Stahlbürste reinigen. Prüfen Sie die Schalldämpferdichtung (Abb. 9/4) und den Funkenfänger auf Löcher oder Risse. Ist der Funkenfänger oder die Dichtung beschädigt, müssen sie ausgetauscht werden. Setzen Sie die Teile in umgekehrter Reihenfolge wieder ein. Nachfüllen von Kraftstoff Füllen Sie niemals Kraftstoff nach, solange die Maschine läuft. Lassen Sie die Maschine nach dem Gebrauch mindestens 5 Minuten lang abkühlen, bevor Sie Kraftstoff nachfüllen. Kraftstoff: Benzin bleifrei. Rauchen Sie niemals in der Nähe der Maschine oder des Kraftstoffs. Füllen Sie niemals Kraftstoff in der Nähe von Funken, Flammen oder offenem Feuer nach. Wichtig alle Kabel entfernen. Öffnen Sie den Krafftstoffeinfüllverschluss Deckel (Abb. 1/2 oder 2/2). Gießen Sie den Kraftstoff vorsichtig in die Einfüllöffnung. Füllen Sie den Tank niemals weiter als bis zur Oberen Grenzmarke (Abb. 11) auf. Setzen Sie den Deckel wieder auf die Einfüllöffnung. Service Sie haben technische Fragen? Eine Reklamation? Benötigen Ersatzteile oder eine Bedienungsanleitung? Auf unserer Homepage im Bereich Service helfen wir Ihnen schnell und unbürokratisch weiter. Bitte helfen Sie uns Ihnen zu helfen. Um Ihr Gerät im Reklamationsfall identifizieren zu können benötigen wir die Seriennummer sowie Artikelnummer und Baujahr. Alle diese Daten finden Sie auf dem Typenschild. Um diese Daten stets zur Hand zu haben, tragen Sie diese bitte unten ein. Seriennummer: Artikelnummer: Baujahr: Tel.: +49 (0) / Fax: +49 (0) / support@ts.guede.com 10

11 Inspektions- und Wartungsplan Nur ein regelmäßig gewartetes und gut gepflegtes Gerät kann ein zufrieden stellendes Hilfsmittel sein. Wartungs- und Pflegemängel können zu unvorhersehbaren Unfällen und Verletzungen führen. Zeitintervall Beschreibung Ölstand vom Motoröl kontrollieren Benzinschlauch auf Risse und andere Beschädigungen prüfen, wenn nötig austauschen. Luftfilter überprüfen Vor jedem Gebrauch Seilzugstarter prüfen und wenn nötig ersetzen Auspuffanlage auf Löcher überprüfen, wenn nötig abdichten bzw. Teile ersetzten Schalldämpfer überprüfen und evt. reinigen oder ersetzen Zustand der Zündkerze kontrollieren, den Abstand einstellen und reinigen Alle 3 Monate / 50 Betriebsstunden Luftfilter säubern oder wechseln wenn nötig Nach 1 Monat und nach 6 Monaten Motorenöl wechseln Benzinhahn und Filter reinigen, wenn nötig austauschen Alle 6 Monate Schrauben und Verbindungselemente prüfen und wenn nötig ersetzen Den Ventilabstand prüfen und evt. Einstellen. (Nur bei abgekühltem Motor) Alle 12 Monate Kühlventilator prüfen Störung Ursache - Behebung Störung Ursache Behebung Der Motor springt nicht an Keine Spannung an der Gleichstromsteckdose Der Motor läuft unrund Das Gerät funktioniert nicht Ist genug Kraftstoff im Tank? Ist der Motorschalter eingeschaltet? Ist genug Öl im Motor? Ist die Zündkerze in Ordnung? Ist der Kraftstoffbelüftungshebel geöffnet? Ist der Gleichstrom Schaltkreisschutz eingeschaltet? Zündanlage nicht okay. Falscher Kraftstoff Leuchtet die Überlastungsanzeige? Vergewissern Sie sich, dass sich ausreichend Kraftstoff im Tank befindet. Motorschalter einschalten Öl nachfüllen (SAE 10W-30) Zündkerze reinigen und den Elektrodenabstand einstellen Kraftstoffbelüftungshebel öffnen Den Gleichstrom Schaltkreisschutz einschalten Zündkerze reinigen und den Elektrodenabstand einstellen Vergewissern Sie sich, dass der richtige Kraftstoff verwendet wurde Das Elektrogerät oder den Stromverbraucher auf Defekte überprüfen: - Wechseln Sie das Elektrogerät oder den Stromverbraucher aus - Lassen Sie das Elektrogerät oder den Stromverbraucher von einer Elektrowerkstatt reparieren. 11

12 GB Marking: Please read carefully the following Operating Instructions before putting the appliance into operation A.V. 2 Any reprints, even partial, are subject to approval. Technical changes reserved. Illustrative pictures! Translation of original operating instructions. Technical specifications: Product safety: Product corresponds to appropriate EU standards Engine output Cylinder volume Warning: Revolutions per minute Tank capacity Caution! Read the Operating Instructions before servicing the appliance! Not to be used in closed rooms. Poison gases may be produced. Rated power Weight Not to be connected to household network. Beware of toxic vapours. Output voltage Noise Commands: Unplug the appliance before any servicing or works on the generator Add oil up to the marking. Check regularly the oil level and add some if necessary. Press the lever to the right to close the choke valve. Prohibitions: Do not expose the appliance to rain No fire, open light and smoking Caution! Prevent any contact with hot parts. Environment protection: Dispose waste professionally so as not to harm the environment. Any defective and/or disposed electric or electronic appliances must be delivered to appropriate collection centres. Package: Protect against moisture Packing cardboard material may be delivered to collection centres for recycling. This side up Appliance description (pic. 1+2) 1. Fuel tank cap ventilation lever 2. Fuel filler cap V outlet 4. ON/OFF switch 5. Output power indicator 6. Overload indicator 7. Engine grounding connection 8. Lack of oil indicator 9. 12V outlet 10. DC circuit breaker 11. Ignition switch/fuel tap 12. Starter cord 13. Choke lever Supply includes 1 Inverter generator 1 Spark plug spanner 1 Battery pole terminals 1 Servicing kit 1 Operating Instructions and warranty certificate 12

13 EU DECLARATION ON CONFORMITY The company Güde GmbH & Co. KG Birkichstrasse 6 D Wolpertshausen Germany hereby declares that the design and structure of the devices listed below and in designs marketed conforms to applicable basic requirements of the EU directives on safety and hygiene. This declaration on conformity becomes void in case of a change to the device not consulted with us. Identification of the devices/ Order No.: INVERTER GENERATOR ISG 1000 / #40645 INVERTER GENERATOR ISG 2000 / #40647 Applicable EU directives: 2006/95 EC 2004/108 EC 2006/42 EC 2000/14/EC 2005/88/EC 97/68/EC 2004/26/EC Harmonized standards used EN 12601:2001 EN 55012:2002/+A1:2005 Certification authority: Intertek Testing Service Hangzhou 16 No. 1 Ave., Xiasha Economic Development District, Hangzhou , China Reference No.: 08SHS # HZS #40647 ISG 2000 Output voltage: 2x 230 V/ 12V Frequency: 50 Hz Constant output 12 V: 90 W Constant output 230 V: 1,600 W Rated power 230 V: 2,000 W Rated power factor: 1.0 Engine output: 2.2 kw/3 PS at 5,500 per min-1 Cylinder volume: ccm Protection type: IP23 Engine type: 4-stroke air cooled Assembly dimensions: 530 mm Tank capacity: 3.5 l of petrol Consumption: 1 l per hour Noise: LWA 92 db Sound pressure at 7m: LWA db Weight: 22 kg Article No * Noise information Measured values detected in accordance with 2000/14/EG (1.60m height, 1m distance) measurement tolerance +-3dB Appliance Direct comparison of voltage curves System voltage Conventional generator Inverter generator Date/signature of manufacturer: Information about signer: Technical documentation: the executive Mr Arnold J. Bürkle FBL; QS Guarantee The guarantee solely covers inadequacies caused by material defect or manufacturing defect. Original payment voucher with the sales date needs to be submitted for any claim in the guarantee period. The guarantee does not cover any unauthorised use such as appliance overloading, use of violence, damage as a result of any unauthorised interference or caused by foreign items. Failing to follow the operating and assembly instructions and common wear are also not included in the guarantee. Technical specifications ISG 1000 Output voltage: 230 V/ 12V Frequency: 50 Hz Constant output 12 V: 90 W Constant output 230 V: 900 W Rated power 230 V: 1,000 W Rated power factor: 1.0 Engine output: 1,3 kw/1,8 PS at 5500 per min-1 Cylinder volume: 53.5 ccm Protection type: IP23 Engine type: 4-stroke air cooled Assembly dimensions: 455 mm Tank capacity: 2.7 l of petrol Consumption: 0.68 l per hour Noise: LWA 95 db Sound pressure at 7 m: LWA db Weight: 14 kg Article No Inverter The current is produced in an absolutely new way with the inverter generator. Due to the small, multi-pole winding inside the appliance, the produced alternating voltage changes to direct-current voltage first and then to alternating current with a clean sine curve using electronic equipment. With this clean sine curve, electronic appliance can be supplied without being damaged. General safety instructions The Operating Instructions must be read thoroughly before using the appliance for the first time. If there are any doubts regarding the appliance connection, please contact the manufacturer (service department). TO ENSURE HIGH SAFETY LEVEL, PLEASE FOLLOW CAREFULLY THESE INSTRUCTIONS: CAUTION! Keep the place of your work clean and tidy. Mess in the place of your work and work-table increases the risk of accidents and injuries. Consider carefully the conditions of the environment you are working in. Do not use any electric tools and machine tools in a wet and moist environment. Provide adequate lighting. Do not expose any electric tools to rain or high air humidity. Do not switch electric tools on near highly flammable liquids and gases. 13

14 Do not let other persons get near the appliance. Keep all visitors and bystanders, especially children and ill or weak persons, in a safe distance from the place of your work. Make sure tools are kept safe. Keep any tools you are not using in a dry place, elevated if possible, or lock them to prevent other persons accessing them. Use the right appliance for your work. Do not use e.g. small tools or accessory equipment for works that actually need to be performed by big tools. Use the appliance only for purposes for which it has been designed. Do not overload your appliance! Look out for the feeder cable. Do not pull the cable. Do not use the cable to unplug the appliance. Keep the cable out of reach of heat sources, oil and sharp edges. Avoid any unintentional switching-on. Before plugging the appliance, make always sure the machine is switched off. Be cautious at all times. Pay attention to what you are doing. Use common sense when working. Do not use any electric tools when you are tired. Watch for any damaged parts. Inspect the appliance before using it. Are any parts damaged? In case of slight damage, consider seriously whether the machine can work perfectly and safely. Prevent electric shock. Avoid any physical contact with grounded items, e.g. water pipes, heating units, cookers and fridges. Approved parts to be used only. Identical spare parts to be used only for any servicing or repair. For that purpose, contact an authorised service centre. Caution! Using accessory equipment and extensions not explicitly recommended in these Operating Instructions may pose a risk to persons and property. Do not incline from the place of your work Avoid any abnormal body posture. Provide safe posture and keep balance at all times. Appliance-specific safety instructions Protect all cables against excess temperatures, oil and sharp edges. Unplug the appliance for any repair and servicing and when not being used. Works on the electrical equipment may only be performed by an electrician. Original spare parts to be used only. A clean place of work makes your work easier. Pay attention to what you are doing. Use common sense when working. Use the appliance only in an appropriate environment and do not expose it to wet or moisture. Provide adequate lighting for your work. Switch the appliance immediately off and unplug it in dangerous situations or when facing any technical failure. Tools and accessory equipment included and recommended by the manufacturer to be used only. Using any not approved parts may lead to a significant risk of injury. Children and persons lacking the knowledge of and experience in handling the appliance or who are limited by their physical, sensory and mental skills must not use the appliance without the control and supervision by a safety engineer. Children must be watched to be prevented from playing with the appliance. When connecting the generator to the household power source, a professional electrician must necessarily be invited to provide connection and grounding. The generator must always be put on a solid and level surface! Combustion gases may be fatal; therefore, the generator must never be used in closed rooms. The generator must never be covered. Never touch the generator by wet hands. Do not work in a wet environment. Never put 2 generators together. Risk of injury or possible damage to electric tools. The technical specifications of the used appliance must always correspond to the generator data and safety instructions (3- to 5-fold rated power of the connected appliance must always be considered for the starting current). Behaviour in case of emergency First aid kit must always be available in the place of your work in case of accident in accordance with DIN Material taken out of the first aid kit needs to be supplemented right away. If help is needed, please provide the following details: Place of accident Accident nature Number of injured persons Injury type Provide necessary first aid treatment corresponding to the injury nature and seek qualified medical help as soon as possible. Protect the injured person from other injuries and calm him/her down. Use as designated This generator has been exclusively designed to drive electric devices with maximum output within the generator output. Higher starting current of inductive appliances must be considered. The manufacturer cannot be held liable for damages if provisions of the generally applicable regulations and these Operating Instructions are not observed. Residual risks and protective measures Direct electrical contact Direct electrical contact by wet hands may lead to electric shock. Prevent any contact by wet hands and provide adequate grounding. Thermal residual risks Burns, chilblains A contact with the exhaust may cause burns. Let the appliance cool down after being used. Exposure to noise Hearing damage Long time in the immediate vicinity of the running generator may damage the hearing. Ear-protectors must necessarily be worn at all times. Exposure to materials and other substances Contact, aspiration Aspiration of combustion gases may be fatal! The appliance must never be operated in closed rooms. Fire or explosion Appliance fuel may catch fire. The appliance must never be operated in an environment with a risk of fire. Refuel while the engine is stopped. No smoking. Biological / microbiological threats Oil or fuel leakage harms the environment. Other risks Damage when operated If the appliance is operated on an inclined surface, lubrication is not provided and the appliance may get damaged. To be operated on a level surface only. 14

15 Disposal Disposal instructions are illustrated in the form of pictograms on the device or packaging. Description of the pictograms is given in "Identification" chapter. Disposal of transport packaging Packaging protects the device against damage during transport. Packaging materials are usually selected according to their effect on environment and disposal methods and can therefore be recycled. Returning of the packaging back to circulation saves resources and costs for packaging disposal. Parts of the packaging (e.g. foil, styropor) may be dangerous for children. Risk of suffocation! Keep these parts of the packaging out of reach of children and dispose as soon as possible. Waste oil disposal Put the oil to a sealed container and take it to a waste oil collection centre. Do not throw the waste oil to waste or pour it out. Operator requirements The operator must carefully read the Operating Instructions before using the appliance. Qualification No special qualification is necessary to use the appliance apart from detailed instructions by an expert. Minimum age The appliance may only be operated by persons over 18 years of age who have been instructed in handling and operating the appliance. Young people between 16 and 18 years of age may only work with the appliance when supervised by an adult. An exception includes youngsters operating the appliance within their professional education to achieve necessary skills under trainer's supervision. Training Using the appliance only requires appropriate instructions by an expert or reading the Operating Instructions. No special training necessary. Transport and storing The appliance may only be operated in the operating position (level surface), otherwise, fuel or oil may leak out or lubrication may not be provided. Put the fuel tank cap ventilation lever and the ignition switch to the OFF position. This will prevent fuel leakage during transport or when the appliance is stored. Make sure the fuel tank does not overflow. The appliance must not be used if in a vehicle. To operate the appliance, the inverter generator must be assembled and installed in a well-ventilated environment. Do not store the appliance under direct sun. If the generator is kept in a vehicle, make sure the vehicle temperature is not too high as the fuel would evaporate and the appliance subsequently explode. For long storing, the appliance must be cleaned thoroughly and kept out of reach of unauthorised persons. Empty the fuel and keep the appliance in a dry place with no dust. Secure the appliance against turnover every time it is to be transported. Safety instructions for first starting up Put the appliance on a level surface. Do not put the appliance on a metal surface. Do not expose the appliance to intensive solar radiation. Do not expose the appliance to temperatures exceeding 40 C. Do not store the appliance in a wet environment. Before using the appliance, first make sure that the input of the appliance you want to connect to the generator is lower than the output of the generator. Connect the appliance to the generator only when the generator is running at full speed. Before switching the generator off, disconnect the appliance first. Do not connect other power sources to the generator. Do not connect the generator to household network. Under the following conditions, the generator must immediately be switched off: - unsteady or irregular engine running - electric output decrease - connected appliance overloading - excessive generator vibrations - sparking - presence of smoke or fire Before connecting the generator to an appliance, make sure there is a sufficient amount of fuel in the generator. Never refuel when the generator is running. After being operated, let the generator cool down for at least 5 minutes before refuelling. Do not touch hot parts of the generator. Do not keep fuel near the generator. At afterburning, the absorber and air filter act as a flame catcher. Therefore, make sure these parts are fitted properly and are in a perfect technical state. In any case, the generator must not be used in a garage, house or near open windows and doors as breathing of combustion gases could result in a state of unconsciousness. Refuelling to take place outdoors while the engine is stopped only. No smoking near the appliance. Prevent flames or sparks from being produced near the generator. Spilled petrol must be immediately wiped start the engine after wiping is finished. Eco throttle valve, pic. 12 Pic. 12 Pos. 1 OFF Pos. 2 ECO Pos. 3 ECO throttle valve switch ECO: The engine speed will automatically adapt to idle speed when the electric appliance is disconnected. If the electric appliance is reconnected, the engine reassumes speed corresponding to the load. If full output of the generator is not required, the engine speed will automatically reduce. This position is recommended for fuel consumption reduction. The Eco throttle valve switch must be put to the OFF position under DC operation. OFF: The engine speed is kept at a higher level than the nominal speed. Operation, pic Start: Before starting the engine, the connected electric appliances must be disconnected from the three-phase outlet. Put the fuel tank cap ventilation lever to the ON position (pic. 1/1 or 2/1). Put the ignition switch to the ON position (pic. 1/1 or 2/1). Put the choke lever (pic. 1/13 or 2/13) to the right to the "closed" position. 15
 may be dangerous for children. Risk of suffocation!")
16 Pull slowly the starter cord (pic. 1/12 or 2/12) until resistance can be felt, then pull strongly to start the engine. Do not let the starter cord to snap back. Instead, hold it carefully with your hand. As soon as the engine gets warm, put the choke lever (pic. 1/13 or 2/13) back to the starting position. Use: The inverter generator must necessarily be connected to a chassis ground (pic. 1/7 or 2/7) if the connected appliances are grounded. Connection to electrical equipment of a building is inadmissible unless a disconnector is installed. The given maximum input value must not be exceeded in any connecting plug. AC operation: Start the engine and make sure the indicator (pic. 1/5 or 2/5) is green. Make sure that the used appliance is switched off. If so, plug the appliance to a three-phase outlet (pic. 1/3 or 2/3). If the overload indicator (pic. 1/6 or 2/6) switches on for a short time on a repeated basis, it may shorten the appliance service life. If the indicator switches on permanently, the generator may get damaged. The overload indicator switches on if the rated power of the given generator is exceeded. DC operation: The DC outlet may only be used to charge a 12 V battery. Under DC operation, the Eco throttle valve switch (pic. 12) must be in the OFF position. Connect the feeder cable with the DC outlet and battery terminals (pic. 13). To prevent sparking, the feeder cable must be first connected to the generator and then the battery. To disconnect the feeder cable, release the battery cables first. If the generator is connected to a battery, do not start the vehicle engine. Start the engine. If the DC circuit is overloaded, the safety switch (pic. 1/10 or 2/10) jumps out. In such a case, wait for a few minutes and then press the button inside and continue in your work. Switching off: Switch the connected appliance off and unplug it. Put the ignition switch (pic. 1/1 or 2/1) to the OFF position. Put the fuel tank cap ventilation lever to the OFF position (pic. 1/1 or 2/1). Lack of oil signalling: Before the oil level drops too low, the engine switches automatically off. The indicator (pic. 1/8 or 2/8) is red and the engine is not running when the starter is put into action. In such a case, check the oil level and add some. Safety instructions for the operator To put the appliance into operation for the first time, see the General safety instructions, Appliance-specific safety instructions and Safety instructions for first starting up. Use the appliance only after careful reading of the Operating Instructions. Follow all safety instructions included in the Operating Instructions. Behave responsibly to other persons. Inspections and servicing, pic Regular cleaning and servicing are necessary to provide perfect working and long service life of the appliance. Appliance adjustment to be only performed when the appliance is unplugged. Significant risk of injury. Do not smoke when performing the below-mentioned works. Never work near sparks, flames or open fire. Regular servicing and inspections Air filter The air filter should be cleaned every 50 hours of operation. Release the bolt (pic. 3/1) and remove the cover (pic. 3/2). Release the air filter cover bolt (pic. 5/1). Remove the air filter cover (pic. 5/2). Check the external and main filter (pic. 5/3+4) and wash it in non-flammable or little flammable solvent and let it dry out if necessary. Drop small amount of oil on the air filter and press it. Refit the filter. Fasten the air filter cover bolt (pic. 5/1). Tighten the cover (pic. 3/2) and the cover bolt (pic. 3/1). The appliance must never be used without the air filter as it could quickly wear the engine out. Spark plug Remove the servicing cover off the spark plug (pic. 6/1). Remove the socket plug (pic. 6/2). Remove any dirt and dust off the bottom of the spark plug. Using the spark plug spanner (pic. 7/1), screw the spark plug out. Check the spark plug for any cracks and scratches. If the spark plug has any sign of damage, dispose it immediately. If the spark plug can still be used, clean it by a wire brush. Now check the distance of electrodes by a feeler gauge. Bend the side electrode and provide the proper distance (proper distance: 0.6 to 0.7 mm). Refit the spark plug. Refit the socket plug (pic. 6/2) on the spark plug. Refit the servicing cover (pic. 6/1). Oil change Engine oil to be discharged when the engine is warmed up to make sure it is emptied quickly and to the full extent. Before discharging, make sure the fuel tank cap ventilation lever (pic. 1/1 or 2/1) is in the OFF position. Release the cover bolt (pic. 3/1). Remove the left cover (pic. 3/2). Remove the oil tank cap (pic. 4/2). Discharge the engine oil to an appropriate container (pic. 4) Add the recommended engine oil (SAE 10W-30, pic. 10) and check the engine oil level (pic. 4/3). Fit the oil tank cap (pic. 4/2). Refit the cover (pic. 3/2) and tighten the bolt (pic. 3/1). After coming into contact with the waste oil, hands should be thoroughly washed with water and soap. Please observe the applicable environment protection provisions when disposing the waste oil. We recommend taking the waste oil to a waste oil collection centre in a closed vessel. Do not put the engine oil to waste and do not pour it on the ground. 16

17 Noise suppressor check Let the noise suppressor cool down before any servicing. The spark catcher must be checked every 100 hours of operation to make sure it works perfectly. Remove the four bolts and the cover. Now remove the three 6-mm bolts (pic. 9/1), then the noise suppressor (pic. 9/2), spark catcher (pic. 9/3) and sealing (pic. 9/4). Clean the spark catcher (pic. 9/3) by a steel brush. Check the noise suppressor sealing (pic. 9/4) and spark catcher for any holes and cracks. If the spark catcher or sealing is damaged, it must be replaced. Refit the parts in a reversed order. Refuelling Never refuel when the appliance is running. After using the appliance, let it cool down for at least 5 minutes before refuelling. Fuel: Unleaded petrol Never smoke near the appliance and fuel. Never refuel near sparks, flames or open fire. Important: remove any cables Open the fuel tank cap (pic. 1/2 or 2/2). Add carefully fuel to the filling opening. At all times, refuel the tank not more than up to the maximum marking (pic. 11). Refit the cap to the filling opening. Service Any technical questions? Complaint? Do you need spare parts or operation manual? Go to our website and the section Service will help you quickly and without bureaucracy. Please, help us to help you. In order to identify your device in case of complaint, please indicate serial number, order number and year of manufacture. All information is available on the product label. To have all information always at hand, put them down. Serial number: Order number: Year of manufacture: Phone: +49 (0) / Fax: +49 (0) / support@ts.guede.com Inspections and servicing plan Only a regularly serviced and treated appliance may be a satisfactory aid. Insufficient servicing and maintenance may lead to unexpected accidents and injuries. Time interval Every time the appliance is to be used Every 3 months / 50 hours of operation After 1 month and then after 6 months Every 6 months Every 12 months Description Check the engine oil level Check whether the fuel hose has no cracks or other damage. Replace it if necessary. Check the air filter Check the Bowden starter. Replace it if necessary. Check for any holes in the exhaust system. Seal or replace it if necessary. Check the noise suppressor and clean or replace it if necessary Check the spark plug state, adjust the distance and clean it Clean the air filter or replace it if necessary Check the engine oil Clean the fuel tap and filter and replace them if necessary Check the bolts and couplers and replace them if necessary Check the distance of valves and adjust it if necessary (cool engine only) Check the cooling fan Failure - cause - removal Failure Cause Removal Engine not starting No voltage in the DC outlet Engine running irregularly Appliance not working Is there a sufficient amount of fuel in the tank? Is the engine control switch on? Is there a sufficient amount of oil in the engine? Is the spark plug all right? Is the fuel tank cap ventilation lever open? Is the DC circuit protection on? Ignition not all right. Inappropriate fuel Is the overload indicator on? Make sure there is a sufficient amount of fuel in the tank. Turn the engine control switch on Add some oil (SAE 10W-30) Clean the spark plug and adjust the distance of electrodes Open the fuel tank cap ventilation lever Switch the DC circuit protection on Clean the spark plug and adjust the distance of electrodes Make sure the appropriate fuel has been used Check the electric device or appliance for any defects: - Replace the electric device or appliance - Have the electric device or appliance repaired in an electric shop. 17

18 FR Avant de mettre l appareil en marche, lisez attentivement le mode d emploi A.V. 2 Toute réimpression, même partielle, nécessite une approbation. Modifications techniques réservées. Images d illustration! Traduction du mode d emploi d origine Symboles : Caractéristiques techniques : Sécurité du produit : Produit répond aux normes correspondantes de la CE Puissance du moteur Cylindrée Consigne d avertissement : Tours par minute Volume du réservoir Attention! Lisez le mode d emploi avant l entretien! Ne pas utiliser dans des pièces fermées. Risque de formation de gaz toxiques. Puissance nominale Poids Ne pas brancher au réseau de domicile. Attention vapeurs toxiques. Courant de sortie Niveau sonore Consignes : Avant tout entretien ou travaux sur l appareil, retirez la fiche Interdictions : Versez de l huile jusqu au repère. Contrôlez régulièrement le niveau d huile et complétez si nécessaire. Pour fermer le clapet du starter, poussez la manette à droite. N exposez pas l appareil à la pluie Protection de l environnement : Liquidez les déchets de manière à ne pas nuire à l environnement. Déposez les appareils électriques ou électroniques défectueux et/ou destinés à liquidation au centre de ramassage correspondant. Emballage : Interdiction de feu, de lumière ouverte et de fumer Déposez l emballage en carton au dépôt pour recyclage. Attention! Évitez le contact avec des pièces chaudes. Description de l appareil (fig. 1+2) 1. Manette pour la ventilation du bouchon du réservoir à carburant 2. Bouchon pour le remplissage du réservoir à carburant 3. Fiche de 230V 4. Interrupteur ON/OFF 5. Témoin de puissance de sortie 6. Témoin de surcharge 7. Raccord de mise à la terre du moteur 8. Témoin de manque d huile 9. Prise de 12V 10. Protection pour le courant continu 11. Interrupteur d allumage/robinet d essence 12. Corde de démarrage 13. Manette de starter Contenu du colis Protégez de l humidité Sens de pose générateur inverter clé pour bougies d allumage pinces de pôle de la batterie set d entretien manuel d utilisation et bulletin de garantie 18

19 DÉCLARATION DE CONFORMITÉ CE Nous, Güde GmbH & Co. KG Birkichstraße 6 D Wolpertshausen Déclarons par la présente que les appareils indiqués cidessous répondent du point de vue de leur conception, construction ainsi que de leur réalisation mise sur le marché, aux exigences fondamentales correspondantes des directives de la CE en matière de sécurité et d hygiène. Cette déclaration perd sa validité après une modification de l appareil sans notre approbation préalable. Désignation des appareils / N de commande: GÉNÉRATEUR INVERTER ISG 1000 / #40645 GÉNÉRATEUR INVERTER ISG 2000 / #40647 Directives correspondantes de la CE : 2006/95 EC 2004/108 EC 2006/42 EC 2000/14/EC 2005/88/EC 97/68/EC 2004/26/EC Normes harmonisées utilisées : EN 12601:2001 EN 55012:2002/+A1:2005 Lieu de certification : Intertek Testing Service Hangzhou 16 No. 1 Ave., Xiasha Economic Development District, Hangzhou , China N de référence : 08SHS # HZS #40647 Date/Signature du fabricant: Titre du Signataire : gérant Monsieur Arnold Documents techniques : J. Bürkle FBL; QS Pression acoustique à 7m: LWA db Poids: 14 kg N de commande: ISG 2000 Tension de sortie : 2x 230 V/ 12V Fréquence : 50 Hz Puissance continue 12 V: 90 W Puissance continue 230 V: 1600 W Puissance nominale 230 V: 2000 W Facteur de puissance 1,0 nominale: Puissance du moteur : 2,2 kw/3 PS à 5500 min-1 Cylindrée : 105,6 ccm Type de protection : IP23 Type de moteur : à 4 temps, refroidissement à air Dimensions de montage : 530 mm Volume du réservoir : 3,5 l d essence Consommation : 1 l/h Niveau sonore : LWA 92 db Pression acoustique à 7m: LWA db Poids: 22 kg N de commande : * Informations sur le niveau sonore Valeurs mesurées constatées conformément à 2000/14/EG (1,60m hauteur, 1m distance) tolérance de mesure +-3dB Appareil Comparaison directe des courbes de tension Tension de réseau Générateur conventionnel Générateur inverter Garantie La garantie concerne exclusivement les imperfections provoquées par le défaut du matériel ou le défaut de fabrication. En cas de réclamation pendant la durée de la garantie, il est nécessaire de joindre l original du justificatif d achat avec la date d achat. La garantie n inclut pas une utilisation incompétente telle que surcharge de l appareil, utilisation de la force, endommagement par intervention étrangère ou objets étrangers. Le non respect du mode d emploi et du mode de montage ainsi que l usure normale ne sont pas non plus inclus dans la garantie. Caractéristiques techniques Tension de sortie: Fréquence: Puissance continue 12 V: Puissance continue 230 V: Puissance nominale 230 V: Facteur de puissance nominale: Puissance du moteur: Cylindrée: Type de protection: Type de moteur: Dimensions de montage: Volume du réservoir: Consommation: Niveau sonore: ISG V/ 12V 50 Hz 90 W 900 W 1000 W 1,0 1,3 kw/1,8 PS à 5500 min-1 53,5 ccm IP23 à 4 temps, refroidissement à air 455 mm 2,7 l d essence 0,68 l/h LWA 95 db Inverter En cas de générateur inverter, le courant est fabriqué par un mode complètement nouveau. Grâce à un petit bobinage multipôles à l intérieur, la tension alternative fabriquée est transformée à l aide d un dispositif électronique d abord en tension continue et ensuite en tension alternative avec une courbe sinusoïdale nette. Grâce à cette courbe sinusoïdale nette, il est possible d alimenter des appareils électroniques sans les endommager. Consignes générales de sécurité Avant la première utilisation, il est nécessaire de lire entièrement le mode d emploi. Si vous avez des doutes en ce qui concerne le branchement ou la manipulation, contactez le fabricant (service après-vente). AFIN D ASSURER UN GRAND DEGRÉ DE SÉCURITÉ, RESPECTEZ LES CONSIGNES SUIVANTES : ATTENTION! Maintenez votre lieu de travail en ordre! Le désordre sur le lieu de travail et l établi augmente des risques d accidents et de blessures. 19

20 Prenez en considération les conditions atmosphériques. N utilisez pas les outils et appareils électriques dans un environnement humide ou mouillé. Veillez à un éclairage suffisant. N exposez pas les outils électriques à la pluie ou à une humidité d air élevée. Ne mettez pas les appareils électriques en marche à proximité des liquides ou des gaz inflammables. Empêchez l accès à l appareil aux tierces personnes. Éloignez les visiteurs, les spectateurs, en particulier les enfants, les personnes malades ou faibles, de votre lieu de travail. Assurez un rangement sûr des outils. Rangez les outils que vous n utilisez pas à un endroit sec, si possible en hauteur ou fermez-les de façon à ce qu ils soient inaccessibles aux personnes non autorisées. Utilisez pour chaque travail l outil adéquat. Par exemple, n utilisez pas de petits outils ou accessoires pour des travaux qui doivent être effectués par des outils lourds. Utilisez les outils exclusivement dans le but dans lequel ils ont été conçus. Ne surchargez pas l appareil! Surveillez le câble d alimentation. Ne tirez pas sur le câble. Ne l utilisez pas pour retirer la fiche de la prise. Éloignez-le des sources de chaleur, de l huile et des bords tranchants. Évitez la mise en marche involontaire de l appareil. Avant de brancher la fiche à la prise, vérifiez que l interrupteur de l appareil se trouve en position arrêt Soyez attentifs. Faites attention à ce que vous faites. Utilisez le bon sens. N utilisez pas les appareils électriques si vous êtes fatigués. Faites attention aux pièces endommagées. Vérifiez l appareil avant de l utiliser. Certaines pièces sont endommagées? En cas d un endommagement léger, réfléchissez si l appareil peut fonctionner sûrement et parfaitement. Protégez-vous de l électrocution. Évitez le contact physique avec les objets mis à la terre, par exemple, conduites d eau, corps de chauffe, réchauds et réfrigérateurs. Utilisez uniquement les pièces détachées autorisées. Lors de l entretien et des réparations, utilisez uniquement les pièces détachées adéquates. Pour cela, adressez-vous au service après-vente agréé. Avertissement! L utilisation d accessoires et de pièces d extension non recommandés explicitement dans cette notice peut représenter un danger pour des personnes et des objets. Ne vous penchez pas de votre poste de travail Évitez des postures anormales du corps. Veillez à une posture sûre et maintenez l équilibre. Consignes de sécurité spécifiques pour l appareil Protégez tous les câbles des températures excessives, de l huile et des bords tranchants. Avant de procéder aux réparations et à l entretien et lorsque vous n utilisez pas l appareil, retirez la fiche de la prise. Les travaux sur le dispositif électrique doivent être confiés à un électricien utilisant uniquement des pièces détachées d origine. Un poste de travail propre facilite le travail. Faites attention à ce que vous faites. Utilisez le bon sens. Utilisez l appareil uniquement dans un environnement adéquat et ne l exposez pas à la pluie ou à l humidité. Veillez à un bon éclairage lors du travail. Arrêtez immédiatement l appareil et retirez la fiche en cas de situations dangereuses ou de pannes techniques. Seuls les outils et accessoires approuvés par le fabricant peuvent être utilisés. L utilisation de pièces non approuvées représente un grand risque d accident. L utilisation de l appareil est interdite aux enfants et aux personnes sans connaissances et expériences dans le domaine d utilisation de l appareil ou dont les capacités physiques, sensorielles ou psychiques sont limitées, sans surveillance ou sans aide d un technicien de sécurité. Veillez à ce que les enfants ne jouent pas avec l appareil. Lors du branchement du générateur à une source d alimentation domestique, faites appel à un spécialiste électricien pour le branchement et la mise à la terre. Posez toujours le générateur sur une surface droite et solide! Les produits de combustion peuvent être mortels, par conséquent, n utilisez jamais le générateur dans des pièces fermées. Ne couvrez jamais le générateur. Ne le touchez jamais avec les mains humides. Ne travaillez pas dans un environnement humide. N assemblez jamais 2 générateurs. Risque de blessures ou d endommagement d outils électriques. Les données techniques de l appareil doivent correspondre aux données et consignes de sécurité du générateur (en ce qui concerne la puissance de démarrage, il est nécessaire de veillez à une puissance nominale 3 à 5 fois supérieure de l appareil à raccorder). Conduite en cas d urgence Pour des raisons de risque d accident, le lieu de travail doit être équipé d une armoire à pharmacie selon DIN Il est nécessaire de compléter immédiatement le matériel pris dans l armoire à pharmacie. Si vous appelez les secours, fournissez les renseignements suivants: Lieu d accident Type d accident Nombre de blessés Type de blessure Effectuez les premiers gestes de secours et appelez rapidement les premiers secours. Protégez le blessé d autres blessures et calmez-le. Utilisation en conformité avec la destination Ce générateur est conçu exclusivement à l entraînement d appareils électriques, dont la puissance maximale est comprise dans la gamme de puissances du générateur. Il est nécessaire de prendre en compte le courant de démarrage supérieur des appareils à induction. Le fabricant ne répond pas des dommages engendrés par le non respect des dispositions des règlements généraux en vigueur ainsi que de cette notice. Risques résiduels et mesures de protection Contact électrique direct Le contact électrique direct par l intermédiaire des mains humides peut engendrer une électrocution. Évitez le contact des mains humides et veillez à une bonne mise à la terre. Dangers résiduels thermiques Brûlures, gelures Le contact avec le pot d échappement peut provoquer des brûlures. Laissez les appareils refroidir après leur utilisation. Dangers du bruit Lésions de l audition Un séjour prolongé à proximité immédiate du générateur en marche peut endommager l audition. Portez toujours une protection auditive. 20

Herzlichen Glückwunsch! Sie haben sich für ein Qualitätsprodukt der Firma Zangenberg entschieden.
 Herzlichen Glückwunsch! Sie haben sich für ein Qualitätsprodukt der Firma Zangenberg entschieden. Bitte lesen Sie die Anleitung vor der ersten Benutzung aufmerksam durch. Sie erhalten wichtige Hinweise
Qualität aus erster Hand! Sie haben sich für ein Markenprodukt der Firma Zangenberg entschieden.
 Qualität aus erster Hand! Sie haben sich für ein Markenprodukt der Firma Zangenberg entschieden. Bitte lesen Sie die Anleitung vor der ersten Benutzung aufmerksam durch. Sie erhalten wichtige Hinweise
Easy-6 Pivottür mit Seitenwand / Otočné dveře s boční stěnou
 Easy-6 Pivottür mit Seitenwand / Otočné dveře s boční stěnou Lesen Sie die Bedienungsanleitung sorgfältig durch und bewahren Sie diese für den späteren Gebrauch auf. Wir empfehlen die Montage unseres Produktes
USER'S MANUAL FAN MOTOR DRIVER FMD-02
 USER'S MANUAL FAN MOTOR DRIVER FMD-02 IMPORTANT NOTE: Read this manual carefully before installing or operating your new air conditioning unit. Make sure to save this manual for future reference. FMD Module
UŽIVATELSKÁ PŘÍRUČKA
 UŽIVATELSKÁ PŘÍRUČKA Plni víry a naděje míříme kupředu. S odhodláním zlepšujeme své dovednosti. Zapomeňte na zklamání, ale nikoli na svůj nevyužitý potenciál. Touha překonat sám sebe a dosáhnout hranice
Litosil - application
 Litosil - application The series of Litosil is primarily determined for cut polished floors. The cut polished floors are supplied by some specialized firms which are fitted with the appropriate technical
Personenwaage Osobní váha MD 13894. Bedienungsanleitung Návod k obsluze
 Personenwaage Osobní váha MD 13894 Bedienungsanleitung Návod k obsluze Inhalt Zu dieser Anleitung... 2 In dieser Anleitung verwendete Symbole und Signalwörter...2 Einsatzbereich/bestimmungsgemäßer Gebrauch...3
Stříkací pistole. Striekacia pištoľ 10.25-007
 Stříkací pistole Profi-Farbpistole Striekacia pištoľ 10.25-007 CZ 7 6 2 4 5 3 1 1) rychloupínací konektor 2) regulace množství barvy 3) regulace množství vzduchu 4) nastavení stříkacího modulu 5) spoušť
WICHTIG - FÜR SPÄTERE VERWENDUNG AUFBEWAHREN - SORGFÄLTIG LESEN.
 WICHTIG - FÜR SPÄTERE VERWENDUNG AUFBEWAHREN - SORGFÄLTIG LESEN. Ignorierung der Warnungen und Hinweise in der Gebrauchsanleitung können zu ernsten Verletzungen und Todesfällen führen. Achtung: Zur Vermeidung
EINBAUANWEISUNG FÜR SCHALLDÄMM-SET BWS/DWS MONTÁŽNÍ NÁVOD PRO ZVUKOVĚ IZOLAČNÍ SOUPRAVY BWS/DWS
 EINUNWEISUNG FÜR SCHLLÄMM-SET WS/WS MONTÁŽNÍ NÁVO PRO ZVUKOVĚ IZOLČNÍ SOUPRVY WS/WS Wichtige Hinweise - unbedingt beachten! ůležitá upozornění bezpodmínečně dodržujte! Schalldämm-Set muss vollständig und
POLO 2.0. Art. Nr.: 5460 - BEZPEČNOST - OBSLUHA. Výhradní dovozce a distributor pro Českou republiku a Slovensko Caravan Centrum Hykro s.r.o.
 POLO 2.0 TERRASSENHEIZUNG PLYNOVÝ ZÁŘIČ GAS Výhradní dovozce a distributor pro Českou republiku a Slovensko Caravan Centrum Hykro s.r.o. Ořešská Enders Colsman 1542 AG 155 00 Praha 5 - Řeporyje tel.: +420
Deutsch. Einstellhilfe Einachser. Grundsätzlich sollten die Seilzugeinstellungen immer 1 x im Jahr nachgeprüft werden. Einstellhilfe Kupplung
 Deutsch Einstellhilfe Einachser Grundsätzlich sollten die Seilzugeinstellungen immer 1 x im Jahr nachgeprüft werden. Einstellhilfe Kupplung Die Kupplung ist vom Werk aus grundeingestellt. 2. Ganghebel
SPECIFICATION FOR ALDER LED
 SPECIFICATION FOR ALDER LED MODEL:AS-D75xxyy-C2LZ-H1-E 1 / 13 Absolute Maximum Ratings (Ta = 25 C) Parameter Symbol Absolute maximum Rating Unit Peak Forward Current I FP 500 ma Forward Current(DC) IF
Mechanika Teplice, výrobní družstvo, závod Děčín TACHOGRAFY. Číslo Servisní Informace Mechanika: 5-2013
 Mechanika Teplice, výrobní družstvo, závod Děčín TACHOGRAFY Servisní Informace Datum vydání: 20.2.2013 Určeno pro : AMS, registrované subj.pro montáž st.měř. Na základě SI VDO č./datum: Není Mechanika
ROLLO STANDARD ELECTRIC. Montageanleitung / Mounting Instruction / Montážní návod
 ROLLO STANDARD ELECTRIC Montageanleitung / Mounting Instruction / Montážní návod Teileliste / Parts List / Seznam dílů (1) 2x ( 2) 2x (3) 2x Nur von Erwachsenen zu bedienen! Kinder nicht an der Bildwand
Einbauanleitung zu Elektro-Einbausatz 736652 Elektro-Einbausatz für Anhängerkupplung, 7-polig, 12 Volt, nach ISO 1724
 Einbauanleitung zu Elektro-Einbausatz 736652 Elektro-Einbausatz für Anhängerkupplung, 7-polig, 12 Volt, nach ISO 1724 PEUGEOT 307 Kombi ab ab 04/02 PEUGEOT 307 Station Wagon ab 04/02 Inhalt: 1 Steckdosen-Gehäuse
2N Voice Alarm Station
 2N Voice Alarm Station 2N Lift1 Installation Manual Version 1.0.0 www.2n.cz EN Voice Alarm Station Description The 2N Voice Alarm Station extends the 2N Lift1/ 2N SingleTalk with an audio unit installed
Einbauanleitung zu Elektro-Einbausatz 736694 Elektro-Einbausatz für Anhängerkupplung, 7-polig, 12 Volt, nach ISO 1724
 Einbauanleitung zu Elektro-Einbausatz 736694 Elektro-Einbausatz für Anhängerkupplung, 7-polig, 12 Volt, nach ISO 1724 Peugeot 206 alle Modelle ab 09/98 Inhalt: 1 Steckdose 7-polig mit Abschaltkontakt für
ROEDL & PARTNER ERSTES BÜRO IN PRAG MATERIÁLY PRO UČITELE
 ROEDL & PARTNER ERSTES BÜRO IN PRAG MATERIÁLY PRO UČITELE Roedl & Partner: Erstes Büro in Prag A: So und Sie haben sich vorgestellt, dass Sie hier in Prag ein Büro haben werden, ist das richtig? B: Wir
Training Board TB series 3. SolderBoard
 Training Board TB series 3 SolderBoard Elektronická stavebnice SOLDERBOARD byla speciálně navržena pro účely praktické výuky ručního osazování a pájení desek plošných spojů v technologii SMT. Je levným
Neplatí pro přístroje série Pro EVO!
 Neplatí pro přístroje série Pro EVO! Montážní návod vkládací řídící jednotka pro WGB C/D, WGB-K C, WBS/WBC C/D pro BGB, BBS C, BBK C/D pro SGB C/D Neplatí pro přístroje série Pro EVO! Obsah Často kladené
SERVISNÍ MANUÁL PEGAS 250 E CEL OVO SERVICE MANUAL PEGAS 250 E CEL OVO
 MG136-1 PEGAS 250 E CEL OVO SERVICE MANUAL page 1 SERVISNÍ MANUÁL PEGAS 250 E CEL OVO SERVICE MANUAL PEGAS 250 E CEL OVO 1. VAROVÁNÍ WARNING UPOZORNĚNÍ Pouze osoba splňující kvalifikaci danou zákonem je
STAVEBNÍ PŘIPRAVENOST GILOTINA VLO DIMENSIONAL SHEET VLO MASSBLATT VERTIKALER BESCHLAG VLO МОНТАЖ МЕТАЛЛОКОНСТРУКЦИИ ВОРОТ СИСТЕМЫ ГИЛЬОТИНА ВЛО
 CZ VOLNÝ PROSTOR PRO POHYBUJÍCÍ SE VRATA EN FREE SPACE FOR THE DOORMOVEMENT DE FREIRAUM FÜR DIE BEWEGUNGSABLÄUFE RU РАЗМЕРЫ НЕОБХОДИМЫЕ ДЛЯ УСТАНОВКИ ВОРОТ CZ A - šířka otvoru B - výška otvoru C - nadpraží
2N LiftIP. IO Extender. Communicator for Lifts. Version
 2N LiftIP Communicator for Lifts IO Extender Version 2.4.0 www.2n.cz Description The IO extender helps you extend 2N LiftIP with 1 input and 2 outputs. The purpose of the input is to cancel the rescue
Size / Světlost : DN 1/4 to 4 / DN 1/4 až 4
 Size / Světlost : 1/4 to 4 / 1/4 až 4 Ends / Konce : Threaded BSP / Závitové BSP Min. Temperature / Minimální teplota : -20 C Max. Temperature / Maximální teplota : +180 C Max. Pressure / Maximální tlak
KTM Battery Charger KTM Устройство для заряда батарей КТМ Usměrňovač a nabíječ Ftz Gleichrichter und Ladegerät Ftz
 Usměrňovač a nabíječ KTA Gleichrichter und Ladegerät KTA Rectifier and Batterey Charger KTA Устройство для заря батарей KTA Usměrňovač a nabíječ KTZ Gleichrichter und Ladegerät KTZ Rectifer and Batterey
1-AYKY. Instalační kabely s Al jádrem. Standard TP-KK-133/01, PNE 347659-3. Konstrukce. Použití. Vlastnosti. Installation cables with Al conductor
 Instalační kabely s Al jádrem Installation cables with Al conductor Standard TP-KK-133/01, PNE 347659-3 4 3 2 1 Konstrukce Construction 1 Hliníkové jádro Aluminium conductor 2 Izolace PVC 3 Výplňový obal
TechoLED H A N D B O O K
 TechoLED HANDBOOK Světelné panely TechoLED Úvod TechoLED LED světelné zdroje jsou moderním a perspektivním zdrojem světla se širokými možnostmi použití. Umožňují plnohodnotnou náhradu žárovek, zářivkových
GUIDELINES FOR CONNECTION TO FTP SERVER TO TRANSFER PRINTING DATA
 GUIDELINES FOR CONNECTION TO FTP SERVER TO TRANSFER PRINTING DATA What is an FTP client and how to use it? FTP (File transport protocol) - A protocol used to transfer your printing data files to the MAFRAPRINT
TAS-18K. Akku-Säbelsäge. Aku pila ocaska. Toledo Postfach 134 8280 AC Genemuiden-NL Internet: www.toledo.nl 0307/03. Art.nr.
 Toledo Postfach 134 8280 AC Genemuiden-NL Internet: www.toledo.nl 0307/03 D CZ TAS-18K Art.nr. 818190 BEDIENUNGSANLEITUNG Akku-Säbelsäge NÁVOD K POUŽITÍ Aku pila ocaska TÜV Rheinland Product Safety D Deutsch
UPM3 Hybrid Návod na ovládání Čerpadlo UPM3 Hybrid 2-5 Instruction Manual UPM3 Hybrid Circulation Pump 6-9
 www.regulus.cz UPM3 Hybrid Návod na ovládání Čerpadlo UPM3 Hybrid 2-5 Instruction Manual UPM3 Hybrid Circulation Pump 6-9 CZ EN UPM3 Hybrid 1. Úvod V továrním nastavení čerpadla UPM3 Hybrid je profil PWM
2N LiftIP. Voice Alarm Station. Communicator for Lifts. Version
 2N LiftIP Communicator for Lifts Voice Alarm Station Version 2.4.0 www.2n.cz Description The 2N Voice Alarm Station is a switch that helps you extend 2N LiftIP with one or more audio units installed on
Einbauanleitung zu Elektro-Einbausatz 736566 Elektro-Einbausatz für Anhängerkupplung, 7-polig, 12 Volt, nach ISO 1724. FIAT PUNTO ab 09/99
 Einbauanleitung zu Elektro-Einbausatz 736566 Elektro-Einbausatz für Anhängerkupplung, 7-polig, 12 Volt, nach ISO 1724 FIAT PUNTO ab 09/99 Inhalt: 1 Steckdose 7-polig, 1 Leitungssatz 7-adrig, 1 Gummidichtung
VESTAVBOVÝ RÁM - ROLLO JUMBO
 VESTAVBOVÝ RÁM - ROLLO JUMBO Montageanleitung / Mounting Instruction / Montážní návod Nur von Erwachsenen zu bedienen! Kinder nicht an der Bildwand spielen lassen! Operation by adults only! Do not let
Assembly Instructions, Montageanleitung, Montážní návod HB-S
 Assembly Instructions, Montageanleitung, Montážní návod HB-S A-44pcs B1-30pcs B2-12pcs B3-8pcs B4-4pcs C-2pcs D-2pcs E-1pc G - 4pcs F-1pc H-4pcs Bech dogs, Bankhaken, Poděráky 8x40 mm 4x20mm 7x50mm 6x30mm
Einbauanleitung zu Elektro-Einbausatz 736216 Elektro-Einbausatz für Anhängerkupplung, 7-polig, 12 Volt, nach ISO 1724
 Einbauanleitung zu Elektro-Einbausatz 736216 Elektro-Einbausatz für Anhängerkupplung, 7-polig, 12 Volt, nach ISO 1724 FIAT ULYSSE ab 09/94 bis 08/02 PEUGEOT 806 ab 09/94 bis 08/02 CITROËN EVASION ab 09/94
USER'S MANUAL FAN MOTOR DRIVER FMD-01, FMD-03
 USER'S MANUAL FAN MOTOR DRIVER FMD-01, FMD-03 IMPORTANT NOTE: Read this manual carefully before installing or operating your new air conditioning unit. Make sure to save this manual for future reference.
PLASTICPARTS. -Parts not for use. -Teile werden nicht verwendet. -Pieces a ne pas utiliser. -Tyto díly nepoužívejte při stavbě. -
 742 SpitfireMk.VI 1/72 A> 70120 A PLASTICPARTS B> 70120 B C> 70120 C D> F> E> 70120 D 70120 E GUNZE 70120 F H4 C4 YELLOW H12 H13 C3 FLAT RED H33 C81 RUSSET H51 C11 LIGHT GULL GRAY H71 C21 MIDDLE STONE
TECHNICKÝ LIST řada mechanických odvaděčů kondenzátu AUTODRAIN TECHNICAL DATA SHEET for mechanical autodrain equipment AUTODRAIN
 Popis: Nádoba s mechanickým plovákem k odstraňování pevných nečistot, vody, aerosolů, uhlovodíků, prachu oddělených separátory KING AIR se systémem stlačeného vzduchu. Rozdělení dle využití instalace:
Montážní návod ZENEC OPEL CORSA. ze-nc501 0 TO U C H A N O T H E R W O R L D
 Montážní návod ZENEC OPEL CORSA ze-nc50 0 TO U C H A N O T H E R W O R L D MONTÁŽNÍ NÁVOD OPEL CORSA Bitte Beachten/Pamatujte prosím Das Fahrzeug ist mit einem Eigendiagnosegerät (DME) ausgestattet. Um
Ecosun CH. Napětí V. 1096x155x115* 230 V 1N I IP 44 Ecosun CH x155x115*
 Návod k obsluze a montáži N631/R02 (06.08.14 ) Ecosun CH Sálavé panely do kostelních lavic 1. Použití Sálavé panely Ecosun CH jsou určeny k instalaci pod pevně připevněné kostelní lavice. Panely se instaluji
FIRE INVESTIGATION. Střední průmyslová škola Hranice. Mgr. Radka Vorlová. 19_Fire investigation CZ.1.07/1.5.00/
 FIRE INVESTIGATION Střední průmyslová škola Hranice Mgr. Radka Vorlová 19_Fire investigation CZ.1.07/1.5.00/34.0608 Výukový materiál Číslo projektu: CZ.1.07/1.5.00/21.34.0608 Šablona: III/2 Inovace a zkvalitnění
DEMATECH PREISANGEBOT / CENOVÁ NABÍDKA
 PREISANGEBOT / CENOVÁ NABÍDKA Maschinenart / Druh stroje: Anlage zum Pelletieren / Pellet line / Peletovací linka Marke und Typ / Značka a typ: MGL 400 Baujahr / Rok výroby: 2011 Hersteller / Výrobce:
Einbauanleitung zu Elektro-Einbausatz 736551 Elektro-Einbausatz für Anhängerkupplung, 7-polig, 12 Volt, nach ISO 1724
 Einbauanleitung zu Elektro-Einbausatz 736551 Elektro-Einbausatz für Anhängerkupplung, 7-polig, 12 Volt, nach ISO 1724 CITROËN BERLINGO alle Modelle ab 10/96 PEUGEOT PARTNER alle Modelle ab 11/96 Inhalt:
ZÓNOVÉ VENTILY S VRATNOU PRUŽINOU dvoucestné VZP 2XX 230 1P 001 třícestné VZP 3XX 230 1P 001
 Návod na instalaci a použití ZÓNOVÉ VENTILY S VRATNOU PRUŽINOU dvoucestné VZP 2XX 230 1P 001 třícestné VZP 3XX 230 1P 001 CZ verze 1.2 Popis: Zónové ventily s vratnou pružinou jsou určeny do hydraulických
 11.12. 100 ΕΙΣΟΔΟΣ = E / ENTRANCE = E = = 1174 550 ΤΥΠΟΠΟΙΗΜΕΝΟ ΚΥ = 2000 (ΕΠΙΛΟΓΗ: 2100) / CH STANDARD = 2000 (OPTIONAL: 2100) 243 50 ΚΥ/CH + 293 ΚΥ/CH +103 100 ΚΥ /CH 6 11 6 20 100 0,25 ΚΑ (CO) + 45
:= = := :=.. := := := := ρ := := α := π α = α = := = :=
 := = := :=.. := := := := ρ := := α := π α = α = := = := := α := α := = := α := := α = = ρ ρ := := := = := = := := := + + := + + := + := := := := + + := + + := + = = = :=.. := η := η := := π = :=.. :=,
Uživatelská příručka. USB Charger UCH20
 Uživatelská příručka USB Charger UCH20 Obsah Úvod...3 USB Charger popis... 3 Používání nabíječky USB... 4 Nabíjení zařízení... 4 Právní informace... 5 Declaration of Conformity...6 2 Úvod USB Charger popis
Einbauanleitung zu Elektro-Einbausatz 736570 Elektro-Einbausatz für Anhängerkupplung, 7-polig, 12 Volt, nach ISO 1724
 Einbauanleitung zu Elektro-Einbausatz 736570 Elektro-Einbausatz für Anhängerkupplung, 7-polig, 12 Volt, nach ISO 1724 VW SHARAN ab 06/00 FORD GALAXY ab 06/00 SEAT ALHAMBRA ab 06/00 Inhalt: 1 Steckdosen-Gehäuse
DATA SHEET. BC516 PNP Darlington transistor. technický list DISCRETE SEMICONDUCTORS Apr 23. Product specification Supersedes data of 1997 Apr 16
 zákaznická linka: 840 50 60 70 DISCRETE SEMICONDUCTORS DATA SHEET book, halfpage M3D186 Supersedes data of 1997 Apr 16 1999 Apr 23 str 1 Dodavatel: GM electronic, spol. s r.o., Křižíkova 77, 186 00 Praha
Saurer Regen. V rámci následujícího úkolu se studenti seznámí s odborným textem v němčině. Dozvědí se základní informace o kyselém dešti.
 NĚMČINA Saurer Regen V rámci následujícího úkolu se studenti seznámí s odborným textem v němčině. Dozvědí se základní informace o kyselém dešti. Gymnázium Frýdlant, Mládeže 884, příspěvková organizace
Izolační manipulační tyče typ IMT IMT Type Insulated Handling Rod
 KATALOG CATALOGUE 024/09/2011 IZOLAČNÍ MANIPULAČNÍ TYČ INSULATED HANDLING ROD TYP IMT KOVOVÁ MANIPULAČNÍ TYČ METALLIC HANDLING ROD TYP KMT ISO 9001:2009 ISO 14001:2005 Izolační manipulační tyče typ IMT
Hi-Res Audio/DNC Headset MDR-NC750
 Uživatelská příručka Hi-Res Audio/DNC Headset MDR-NC750 Obsah Začínáme...3 Úvod...3 Přehled... 3 Základy práce...4 Nošení náhlavní soupravy...4 Připojení náhlavní soupravy k vašemu zařízení... 4 Nastavení
NÁVOD K OBSLUZE KOMBINOVANÝ OBUVNICKÝ STROJ BT - 202
 NÁVOD K OBSLUZE KOMBINOVANÝ OBUVNICKÝ STROJ BT - 202 OBSAH I. Hlavní součásti obuvnického stroje. II. Konstrukce III. Schéma elektrického zapojení IV. Instalace a uvedení do provozu V. Obsluha stroje VI.
ROLZ-2. Portable AV/Conference Center. Assembly Instructions
 1 ROLZ-2 Portable AV/Conference Center Assembly Instructions Rolz-2 Portable AV/Conference Center Part Drawing Description Qty Part Drawing Description Qty Hardware List A 1 ½ Flat Head Screw 2 EA P-1
SERVICE MANUAL PEGAS 250 E CEL SERVISNÍ MANUÁL PEGAS 250 E CEL
 MG-011-05 PEGAS 250 E CEL SERVICE MANUAL page 1 SERVISNÍ MANUÁL PEGAS 250 E CEL SERVICE MANUAL PEGAS 250 E CEL 1. VAROVÁNÍ WARNING UPOZORNĚNÍ Pouze osoba splňující kvalifikaci danou zákonem je oprávněna
MA251 (cz_en) Operating instructions. MA251 (cz_en) Montážní návod. Krimpovací kleště PV-CZM... pro MC3, MC4 a MC4-EVO 2
 Operating instructions. MA251 (cz_en) Montážní návod. Krimpovací kleště PV-CZM... pro MC3, MC4 a MC4-EVO 2") MA251 (cz_en) Montážní návod Krimpovací kleště PV-CZM... pro MC3, MC4 a MC4-EVO 2 MA251 (cz_en) Operating instructions Crimping pliers PV-CZM... for MC3, MC4 and MC4-EVO 2 Obsah Bezpečnostní pokyny...2
MA251 (cz_en) Montážní návod Krimpovací kleště PV-CZM... pro MC3, MC4 a MC4-EVO 2 MA251 (cz_en) Operating instructions Crimping pliers PV-CZM... for MC3, MC4 and MC4-EVO 2 Obsah Bezpečnostní pokyny...2
3/11 # 16949 D GB F DK CZ SK NL I NOR S H HR SLO. Güde Scandinavia A/S Engelsholmvej 33 DK-8900 Randers
 3/11 D GB F DK CZ SK NL I NOR S H HR SLO # 16949 Güde GmbH & Co. KG Birkichstraße 6 D-74549 Wolpertshausen Güde Scandinavia A/S Engelsholmvej 33 DK-8900 Randers GÜDE CZECH, s.r.o. Počernická 120 36017
Brzda Bremse Brake F-350. Katalog náhradních dílů Ersatzteilkatalog Spare parts catalogue
 Brzda Bremse Brake F-350 Katalog náhradních dílů Ersatzteilkatalog Spare parts catalogue 03 / 2014 2 Pokyny k objednávání náhradních dílů Tento katalog obsahuje seznam součástí a jejich sestavení do montážních
3 schůzka Fóra kvality vnitřního prostředí a II. seminář projektu InAirQ, Líbeznice, , 9:00 Zkušenosti z praxe COOPERATION
 3 schůzka Fóra kvality vnitřního prostředí a II. seminář projektu InAirQ, Líbeznice, 31. 5. 2018, 9:00 Zkušenosti z praxe B. Kotlík TAKING COOPERATION FORWARD 1 Ukončili jsme proměření 9 škol na Praze
20 ka / 1 s (dle typu cívky) přirozené
 přirozené") KATALOG CATALOGUE 051/03/2013 VÝKONOVÝ REAKTOR NN, NASTAVITELNÝ LOW VOLTAGE POWER REACTOR COIL, ADJUSTABLE pro napětí do 1000 V for voltages up to 1000V TYP LNN ISO 9001:2009 ISO 14001:2005 VŠEOBECNĚ Výkonový
KATALOG CATALOGUE 051/03/2013 VÝKONOVÝ REAKTOR NN, NASTAVITELNÝ LOW VOLTAGE POWER REACTOR COIL, ADJUSTABLE pro napětí do 1000 V for voltages up to 1000V TYP LNN ISO 9001:2009 ISO 14001:2005 VŠEOBECNĚ Výkonový
BEDIENUNGS- UND SICHERHEITSHINWEISE 3 OPERATION AND SAFETY NOTES 19 UNITÀ PRINCIPALE LP PLUS INDICAZIONI PER L USO E PER LA SICUREZZA 47
 DE LADEGERÄT LP PLUS BEDIENUNGS- UND SICHERHEITSHINWEISE 3 GB MAIN UNIT LP PLUS OPERATION AND SAFETY NOTES 19 FR UNITÉ PRINCIPALE LP PLUS INSTRUCTIONS D UTILISATION ET CONSIGNES DE SÉCURITÉ 33 IT UNITÀ
Název společnosti: VPK, s.r.o. Vypracováno kým: Ing. Michal Troščak Telefon: Datum:
 Pozice Počet Popis 1 SCALA2 3-45 A Datum: 2.7.217 Výrobní č.: 98562862 Grundfos SCALA2 is a fully integrated, self-priming, compact waterworks for pressure boosting in domestic applications. SCALA2 incorporates
SG 650 D GB CZ. Art.-Nr.: 240.100.210. Originalbetriebsanleitung Farb-spritzpistole Translation of the original instructions Colour spray gun
 Originalbetriebsanleitung Farb-spritzpistole Translation of the original instructions Colour spray gun Originální návod stříkací pistole D GB CZ SG 650 Art.-Nr.: 240.100.210 b a c B1 2 7 1 13 12 3 B2 4
Magnetický ventil s kulovým kohoutem. Ventil pro doplňování. Návod pro montáž, provoz a údržbu Stav k 01/03
 Ventil pro doplňování Návod pro montáž, provoz a údržbu Všeobecně Všeobecné bezpečnostní pokyny Ventil doplňování "Magnetický ventil s kulovým kohoutem" je smontovaná skupina armatur, která se skládá z
DIESES LERNTAGEBUCH GEHÖRT
 Learning Diaries at the Österreich Institut Learning diaries help to reflect and record the individual growth in language proficiency, special learning strategies and interests. Thus, autonomous learning
LED STANDARD 12V GU4, GU5.3, G53
 LED catalog/katalog OBSAH / CONTENT 3 LED STANDARD 12V GU4, GU5.3, G53 5 HIGH POWER LED 230V GU10 7 HIGH POWER LED 230V E14, E27 9 HIGH POWER LED 230V E27 11. HIGH POWER LED 230V GU10, E27 13. LED STANDARD
MULTICLEAN SAUGER 3000 3 in 1
 MULTICLEAN SAUGER 3000 3 in 1 Deutsch 4 Čeština 8 English 12 Français xx Dansk xx Slovenčina xx Nederlands xx Italiano xx Norsk xx Svenska xx Magyar xx Hrvatski xx Slovenščina xx Româneşte xx Български
Implementace finanční gramotnosti. ve školní praxi. Sparen, sparen, sparen. Irena Erlebachová
 Implementace finanční gramotnosti Výuková část ve školní praxi Digitální podoba e-learningové aplikace (vyuka.iss-cheb.cz) Sparen, sparen, sparen Irena Erlebachová 3 Výuková část Obsah Výuková část...
 [KLICK] GB Instruction Manual POWERLINE 4 LIGHT FOREWORD Dear Customer, Thank you for purchasing the POWERLINE 4 LIGHT charger. These operating instructions will help you to get the best from your charger.
GFS 1020 # 58080 D GB F DK CZ SK NL I. GÜDE Slovakia s.r.o Podtúreň-Roveň 208 SK-033 01 Liptovský Hrádok
 GFS 1020 D GB F DK CZ SK NL I NOR S # 58080 Güde GmbH & Co. KG Birkichstraße 6 D-74549 Wolpertshausen www.guede.com Güde Scandinavia A/S Engelsholmvej 33 DK-8900 Randers www.guede.com UNICORE nářadí s.r.o.
INSTALLATION MANUAL PD 0027.01
 INSTALLATION MANUAL PD 0027.01 OUTDOOR MOTOR DRIVE FOR MV DISCONNECTORS ISO 9001:2009 ISO 14001:2005 OHSAS 18001:2008 TYPE SUP a) STORAGE / SKLADOVÁNÍ The packed devices on wooden pallet it is not allowed
obal manuálu, asi něco podobného jako u LC 100 asi by to chtělo lepší obrázek!!! FYTOSCOPE FS130 Instruction Guide
 obal manuálu, asi něco podobného jako u LC 100 asi by to chtělo lepší obrázek!!! FYTOSCOPE FS130 Instruction Guide možná tohle trochu zmenšit a dát sem i to varování LED RADIATION co je na další straně
ZI-DOP600. Návod k použití Čerpadlo na naftu a oleje. Operation Manual Diesel Oil Pump EAN: 9120039230085. Fax: +43 7248 61116-720
 ZIPPER Maschinen GmbH Gewerbepark 8 A-4707 Schlüsslberg Tel.: +43 7248 61116-700 Fax: +43 7248 61116-720 E-Mail: info@zippermaschinen.at Web: www.zipper-maschinen.at CZ Návod k použití Čerpadlo na naftu
Návod k obsluze a montáži. Ecosun CH
 N631/R04 (12.06.15 ) Návod k obsluze a montáži Ecosun CH Sálavé panely do kostelních lavic 1. Použití Sálavé panely Ecosun CH jsou určeny k instalaci pod pevně připevněné kostelní lavice. Panely se instaluji
INSTALAČNÍ NÁVOD OPERATING INSTRUCTION
 LED PRODISC II + LED PRODISC II MINI + LED PRODISC II MAXI INSTALAČNÍ NÁVOD OPERATING INSTRUCTION 4000944x 4000945x 4000940x 4000941x 4000946x 4000947x Prodisc II Mini Prodisc II Mini + MW senzor Prodisc
User manual SŘHV Online WEB interface for CUSTOMERS June 2017 version 14 VÍTKOVICE STEEL, a.s. vitkovicesteel.com
 1/ 11 User manual SŘHV Online WEB interface for CUSTOMERS June 2017 version 14 2/ 11 Contents 1. MINIMUM SYSTEM REQUIREMENTS... 3 2. SŘHV ON-LINE WEB INTERFACE... 4 3. LOGGING INTO SŘHV... 4 4. CONTRACT
Střední průmyslová škola strojnická Olomouc, tř.17. listopadu 49
 Střední průmyslová škola strojnická Olomouc, tř.17. listopadu 49 Výukový materiál zpracovaný v rámci projektu Výuka moderně Registrační číslo projektu: CZ.1.07/1.5.00/34.0205 Šablona: III/2 Anglický jazyk
Název společnosti: VPK, s.r.o. Vypracováno kým: Ing. Michal Troščak Telefon: Datum:
 Počet 1 SCALA2 3-45 A Datum: 2.7.217 Výrobní č.: 98562862 Grundfos SCALA2 is a fully integrated, self-priming, compact waterworks for pressure boosting in domestic applications. SCALA2 incorporates integrated
EXACT DS OFFICE. The best lens for office work
 EXACT DS The best lens for office work EXACT DS When Your Glasses Are Not Enough Lenses with only a reading area provide clear vision of objects located close up, while progressive lenses only provide
JUNIOR RANGER PROJECT
 JUNIOR RANGER PROJECT pro chráněné krajinné oblasti nízkonákladová verze projektu Mladých strážců Květa Černohlávková, Praha 2007 Vydalo Ministerstvo životního prostředí JUNIOR RANGER PROJECT pro chráněné
ABS DOORS TÜREN DVEŘE
 ABS DOORS TÜREN DVEŘE Obsah 4 TECHNIC 6 Agata 7 Erika 8 Gabriela 9 Linda 10 Nora 11 Olivie 12 Stela 14 CLASSIC 16 Alena 17 Anna 18 Dana 19 Eva 20 Iveta 21 Jana 22 Petra 23 Radka 24 INFO 26 Minimální rozměry
Příslušenství: náhradní vodící a rohový váleček Pozinkovaný, Hmotnost 1,7 kg Objednací číslo: 009.401.01
 Vodící váleček, pozinkovaný,pohyb v Prachuvzdorných a voděvzdorných ložiscích Hmotnost 4,2 kg Objednací číslo: 009.402.00 Vodící váleček s podstavcem, pozinkovaný Hmotnost 5,25 kg Objednací číslo: 009.403.00
Training Board TB series 3. MyFirstSMD
 Training Board TB series 3 MyFirstSMD Nejjednodušší elektronická stavebnice pro začátečníky MYFIRSTSMD byla speciálně navržena pro účely praktické výuky ručního osazování a pájení desek plošných spojů
Gebrauchsanweisung - Originalbetriebsanleitung Vor Inbetriebnahme Gebrauchsanweisung lesen!
 ART 522 AA Akku-Rasentrimmer Akumulátorová strunová sekaèka Akumulátorová strunová kosaèka DE CZ SK Gebrauchsanweisung - Originalbetriebsanleitung Vor Inbetriebnahme Gebrauchsanweisung lesen! Návod k použití
PROJEKČNÍ PODKLADY MONTÁŽNÍ NÁVOD
 N I V O L A I R Výrobek odpovídá normám EN a je označen značkou CE PROJEKČNÍ PODKLADY MONTÁŽNÍ NÁVOD SPIRÁLA hmotnost 26 kg NIVOLAIR - projekční podklady NIVOLAIR - výměník Spirála: Cu-trubka (žebrovaná)
Ventil zpětný Z15.1 DN 10 50, PN 100 400 Piston check valve Z15.1 DN 10 50, PN 100 400
 DN 10 50, PN 100 400 DN 10 50, PN 100 400 Použití Zpětný ventil je samočinná armatura, zamezující zpětnému proudění provozní tekutiny, určená pro vodu, vodní páru, plyny i jiné provozní tekutiny používané
technický list PCB MOUNT SOLID STATE RELAY ESR2 SERIES FEATURES PART NUMBERING SYSTEM
 Dodavatel: GM electronic, spol. s r.o., Křižíkova 77, 186 00 Praha 8 zákaznická linka: 840 50 60 70 technický list PCB MOUNT SOLID STATE RELAY ESR2 SERIES E155181(R) FEATURES PCB Mount; Single in Line
Tento materiál byl vytvořen v rámci projektu Operačního programu Vzdělávání pro konkurenceschopnost.
 Tento materiál byl vytvořen v rámci projektu Operačního programu Vzdělávání pro konkurenceschopnost. Projekt MŠMT ČR Číslo projektu Název projektu školy Klíčová aktivita III/2 EU PENÍZE ŠKOLÁM CZ.1.07/1.4.00/21.2146
3 Výplňový obal. 4 Plášť PE. Bedding
 Instalační kabely s Al jádrem Installation cables with Al conductor Standard VDE0276 T.603-5G-2 4 3 2 1 Konstrukce Construction 1 Hliníkové jádro Aluminium conductor 2 Izolace XLPE XLPE insulation 3 Výplňový
Kapitola 2 Dokumentace č. 11 103 CS
 Kapitola Dokumentace č. 0 CS Přívod oleje kanálový Sortimentní číslo výrobku 0088-6-5-70040 Ortlinghaus-Werke GmbH Postfach 4 40 4907 Wermelskirchen Kenkhauser Str. 5 499 Wermelskirchen Deutschland Tel.
3 Výplňový obal. 4 Plášť PE. Bedding
 Instalační kabely s Al jádrem Installation cables with Al conductor Standard TP-KK-145/03 4 3 2 1 Konstrukce Construction 1 Hliníkové jádro Aluminium conductor 2 Izolace XLPE XLPE insulation 3 Výplňový
List č.8 Práce s manuály pracovní list
 Název projektu: Zkvalitnění a inovace výuky na SPŠ Ostrov Registrační číslo projektu: CZ.1.07/1.5.00/34.0805 Název učebního materiálu: Soubor 10 interaktivních prezentací a 10 pracovních listů z německého
Začínáme. Entfernen Sie beide Seitenteile und die Gehäuseoberseite. Remove both side panels and the case top. Odstraňte oba boční a horní panel.
 Začínáme Entfernen Sie beide Seitenteile und die Gehäuseoberseite. Remove both side panels and the case top. Odstráňte oba bočné a horný panel. Odstraňte oba boční a horní panel. Entfernen Sie die Frontblende,
Uživatelská příručka. Xperia P TV Dock DK21
 Uživatelská příručka Xperia P TV Dock DK21 Obsah Úvod...3 Přehled zadní strany stanice TV Dock...3 Začínáme...4 Správce LiveWare...4 Upgradování aplikace Správce LiveWare...4 Použití stanice TV Dock...5
Projekt MŠMT ČR: EU peníze školám
 Projekt MŠMT ČR: EU peníze školám Číslo projektu CZ.1.07/1.5.00/34.1094 Název projektu Učíme se trochu jinak moderně a zábavněji Číslo a název šablony II/2 Inovace a zkvalitnění výuky cizích jazyků na
HAKA. Diese Produktlinie vereinigt handwerkliche Qualität mit einer höchst effizienten und sauberen Technik. Warmluftheizung
 HAKA HAKA Diese Produktlinie vereinigt handwerkliche Qualität mit einer höchst effizienten und sauberen Technik. Entwickelt wurde HAKA auf der Grundlage unseres über Generationen zurückreichenden Know-how,
3 Výplňový obal. 4 Plášť PE. Bedding
 Instalační kabely s Cu jádrem Installation cables with Cu conductor Standard VDE0276 T.603-5G-2 4 3 2 1 Konstrukce Construction 1 Měděné jádro Copper conductor 2 Izolace XLPE XLPE insulation 3 Výplňový
VY_32_INOVACE_06_Předpřítomný čas_03. Škola: Základní škola Slušovice, okres Zlín, příspěvková organizace
 VY_32_INOVACE_06_Předpřítomný čas_03 Autor: Růžena Krupičková Škola: Základní škola Slušovice, okres Zlín, příspěvková organizace Název projektu: Zkvalitnění ICT ve slušovské škole Číslo projektu: CZ.1.07/1.4.00/21.2400
 Amp1 www.evolveo.com Vážený zákazníku, děkujeme, že jste si vybral produkt EVOLVEO Amp 1. Adaptér: DC 5 V 550 ma AC 220-240 V Funkce zesilovače: Zesílení přijímaného signálu až o 20dB pro všechny pasivní