# Güde GmbH & Co. KG - Birkichstrasse 6 - D Wolpertshausen - Deutschland
|
|
|
- Karolína Veselá
- před 6 lety
- Počet zobrazení:
Transkript


1 # DE - Deutsch 4-10 Originalbetriebsanleitung GB - English Translation of original operating instructions FR - Français Mode d emploi original CZ - Česky Originální návod k provozu SK - Slovensky Originálny návod na NL - Nederlands Originele gebruiksaanwijzing IT - Italiano Originale del Manuale HU - Magyar Eredeti használati utasítás Güde GmbH & Co. KG - Birkichstrasse 6 - D Wolpertshausen - Deutschland

2 1 2 2
3 3 4 Abb
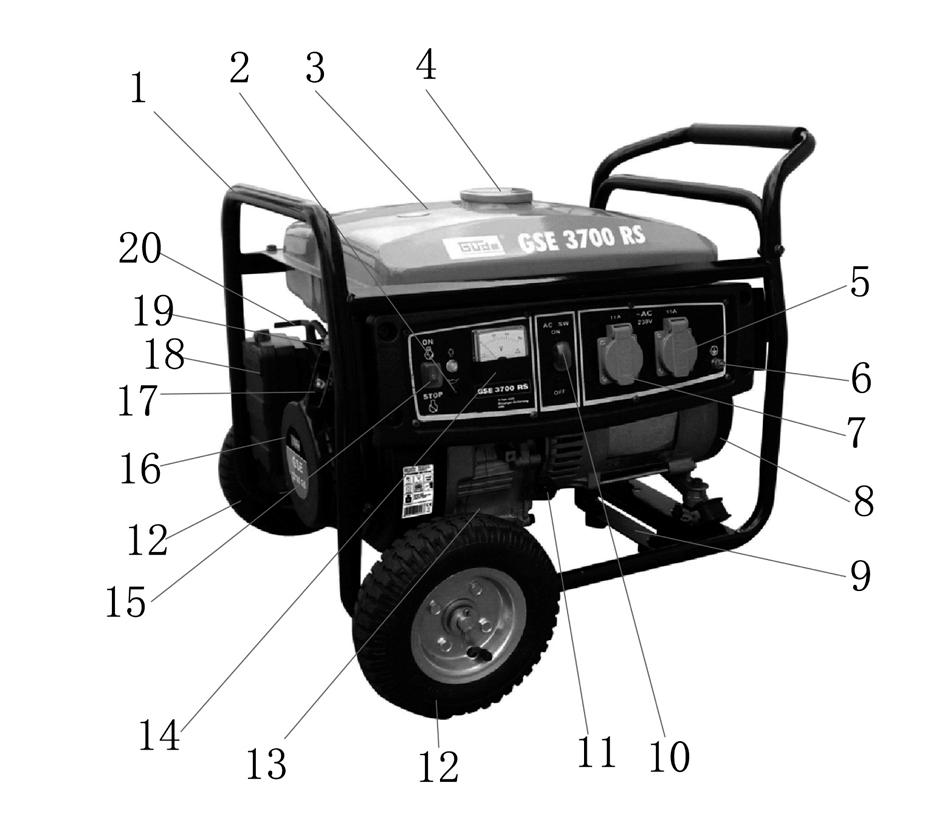
4 Einleitung Damit Sie an Ihrem neuen Gerät möglichst lange Freude haben, bitten wir Sie, die Betriebsanweisung und die beiliegenden Sicherheitshinweise vor Ingebrauchnahme sorgfältig durchzulesen. Ferner wird empfohlen, die Gebrauchsanweisung für den Fall aufzubewahren, dass Sie sich die Funktionen des Artikels später nochmals ins Gedächtnis rufen möchten. Im Rahmen ständiger Produktweiterentwicklung behalten wir uns vor zur Verbesserung technische Änderungen umzusetzen. Bei diesem Dokument handelt es sich um die Originalbetriebsanweisung. Lieferumfang Nehmen Sie das Gerät aus der Transportverpackung und prüfen Sie die Vollständigkeit und das Vorhandensein folgender Teile: Stromerzeuger Fahrgestellteile siehe Abb. 2 Sollten Teile des Lieferumfangs fehlen oder beschädigt sein, wenden Sie sich bitte an Ihren Händler. Die Maschine wiegt in zusammengebautem Zustand 45 kg. Heben Sie bei Bedarf das Gerät zu Zweit aus der Transportverpackung. Gerätebeschreibung Synchron-Generator mit AVR- (Automatische Spannungsregelung für stabile Leistung) Der Automatische Volt- Regler versorgt die angeschlossen Verbraucher mit der benötigten Stromspannung. Ausstattung: Ölmangelsicherung, Tragerahmen, Schiebegriff und Fahrwerk. Mit AVR (Automatische Spannungsregelung für stabile Leistung). Der Generator ist für den Betrieb von herkömmlichen ohmschen und induktiven Verbrauchern wie z.b. Lichterketten, elektrischen Handwerkzeug (Bohrmaschinen, elektrischen Kettensägen, Kompressoren) bestimmt. Für den Anschluss an stationären Anlagen wie Heizung, Hausversorgung, Klimaanlagen oder für die Stromversorgung von Wohnmobilen, ist unbedingt vorher eine Elektrofachkraft zu Rate zu ziehen Für Schäden die durch Nichtbeachten dieser Anweisungen entstehen wird keine Haftung übernommen. Der kritische Punkt eines induktiven Verbrauchers ist die Leistungsaufnahme beim Starten der Maschine. Die Leistungsaufnahme kann bis zum 3 bis 5 fachen der Nennleistung betragen, diese muss unbedingt berücksichtiger werden. Gerätebeschreibung 1. Rahmen 2. Ölkontrolllampe 3. Tank 4. Tankdeckel 5. Steckdose 230 V 6. Erdungsanschluss 7. Steckdose 230 V 8. Generator 9. Standfuß 10. Überlastschalter 11. Öleinfülstutzen 12. Räder 13. Ölablassschraube 14. Voltmeter 15. Motorschalter 16. Anwerfergehäuse 17. Seilzugstarter 18. Luftfiltergehäuse 19. Kraftstoffhahn 20. Choke Technische Daten Dauerleistung: 230 V 2500W/3000 VA Nennleistung: 230 V 2800 W/3300 VA Stromausgang: 2x 230 V~50 Hz 13A Wechselstrom Schutzart: IP 23 Motortyp: 4-Takt-OHV, luftgekühlt Motorleistung: 4,8 kw/6,5 PS Hubraum: 207 ccm Tankinhalt: 12 l Benzin Verbrauch bei Halblast: 1,3 l/h Startsystem: Reversierstarter Lärmwertangabe: LWA 96 db Gewicht: 45 kg * Lärmwertinformation Messwerte ermittelt entsprechend 2000/14/EG (1,60m Höhe, 1m Abstand) Messtoleranzen +-3dB Allgemeine Sicherheitshinweise Lesen Sie diese Betriebsanleitung sorgfältig. Machen Sie sich mit den Bedienelementen und dem richtigen Gebrauch des Gerätes vertraut. Bewahren Sie die Betriebsanleitung für eine spätere Verwendung sicher auf. Sicheres Arbeiten Halten Sie Ihren Arbeitsbereich in Ordnung! Unordnung am Arbeitsplatz kann Unfälle zur Folge haben. Berücksichtigen Sie die Umgebungseinflüsse Setzen Sie das Gerät nicht dem Regen aus. Benutzen Sie das Gerät nicht in feuchter oder nasser Umgebung. Sorgen Sie für gute Beleuchtung. Benutzen Sie das Gerät nicht in der Nähe von brennbaren Flüssigkeiten oder Gasen. Halten Sie andere Personen fern! Lassen Sie andere Personen, insbesondere Kinder, nicht das Gerät oder das Kabel berühren. Halten Sie sie vom unmittelbaren Einsatzort fern. Korrekte Aufbewahrung! Unbenutzte Geräte sollten an einem trockenen, verschlossen Ort und außerhalb der Reichweite von Kindern aufbewahrt werden Überlasten Sie Ihr Gerät nicht! Arbeiten Sie im angegebenen Leistungsbereich. Benutzen Sie das richtige Gerät! Benutzen Sie das Gerät nicht für Zwecke, für die sie nicht bestimmt sind. Pflegen Sie Ihr Gerät mit Sorgfalt! Befolgen Sie die Wartungsvorschriften und Hinweise. Kontrollieren Sie regelmäßig das Kabel des Geräts und lassen Sie es bei Beschädigungen von einem anerkannten Fachmann erneuern. Kontrollieren Sie Verlängerungskabel regelmäßig und ersetzen Sie sie, wenn sie beschädigt sind. Halten Sie Handgriffe trocken und frei von Öl und Fett. 4
5 Seien Sie aufmerksam! Achten Sie darauf, was Sie tun. Gehen Sie mit Vernunft an die Arbeit. Benutzen Sie das Gerät nicht, wenn Sie müde sind. WARNUNG! Der Gebrauch von anderem Zubehör kann eine Verletzungsgefahr für Sie bedeuten. Lassen Sie Ihr Gerät durch eine Fachkraft reparieren! Dieses Gerät entspricht den einschlägigen Sicherheitsbestimmungen. Reparaturen dürfen nur durch eine Fachkraft ausgeführt werden, indem Originalersatzteile verwendet werden, andernfalls können Unfälle für den Benutzer entstehen. Gerätespezifische Sicherheitshinweise Die Bedienungsanleitung muss vor der ersten Anwendung des Gerätes ganz durchgelesen werden. Falls über den Anschluss und die Bedienung des Gerätes Zweifel entstehen sollten, wenden Sie sich an den Hersteller (Service-Abteilung). UM EINEN HOHEN GRAD AN SICHERHEIT ZU GARANTIEREN, BEACHTEN SIE AUFMERKSAM FOLGENDE HINWEISE: ACHTUNG! Beim Anschluss des Generators an die Hausversorgung, ist bezüglich des Anschlusses und der Erdung unbedingt eine Elektrofachkraft hinzuzufügen. Stellen Sie den Stromerzeuger immer auf einen festen und ebenen Untergrund! Abgase können tödlich sein, daher niemals in geschlossenen Räumen benutzen. Decken Sie den Generator niemals ab. Niemals mit feuchten Händen berühren Nicht in feuchter Umgebung arbeiten. Niemals 2 Generatoren Zusammenschließen. Beim Gebrauch eines Elektrowerkzeuges sind die beiliegenden Sicherheitshinweise, sowie die zusätzlichen Sicherheitshinweise zu beachten. Verletzungsgefahr oder mögliche Beschädigung des Elektrowerkzeuges. Technische Daten des Verbrauchers immer mit den Daten und Sicherheitsanweisungen des Generators abstimmen. (Bei der Anlaufleistung ist das 3 bis 5fache der Nennleistung des anzuschießenden Gerätes zu beachten). Versuchen Sie niemals das Gerät zu reparieren es sei denn Sie besitzen die dafür notwendige Ausbildung. Prüfen Sie ob Abdeckungen und Schutzvorrichtungen unbeschädigt und richtig angebracht sind. Führen Sie vor der Benutzung eventuell notwendige Wartungs- oder Reparaturarbeiten durch. Versuchen Sie nicht die Drehzahleinstellung des Motors zu ändern. Falls ein Problem besteht wenden Sie sich an eine Fachkraft. Heben bzw. tragen Sie die Maschine niemals mit laufendem Motor. Kippen Sie das Gerät niemals während des Betriebs. Setzen Sie das Gerät niemals Regen oder Feuchtigkeit aus. Bewahren Sie das Gerät nur an einem trockenem Ort auf. Sicherheitshinweise für Erstinbetriebnahme Grund eventuell auftretender Spannungsschwankungen sollten elektronische Geräte sowie HIFI-Geräte, Fernseher und Computer nicht angeschlossen werden, diese könnten beschädigt werden! Stellen Sie die Maschine auf eine ebene Fläche. Stellen Sie die Maschine nicht auf eine Metallfläche. Setzen Sie die Maschine nicht der grellen Sonne aus. Setzen Sie die Maschine nicht Temperaturen über 40 C aus. Lagern Sie die Maschine nicht in einer feuchten Umgebung. Vergewissern Sie sich vor dem Gebrauch zunächst, daß der anzuschließende Verbraucher eine geringere Leistungsaufnahme hat, als die Ausgangsleistung des Generators. Schließen Sie den Verbraucher erst an, wenn der Generator mit voller Drehzahl läuft. Trennen Sie den Verbraucher, bevor Sie den Generator ausschalten. Verbinden Sie keine andere Energiequellen mit der Maschine. Schließen Sie die Maschine nicht am Hausnetz an. Schalten Sie den Generator unter folgenden Bedingungen sofort aus: bei einem unruhigen oder unrunden Lauf des Motors bei einer Abnahme der elektrischen Ausgangsleistung bei einer Überhitzung des angeschlossenen Verbrauchers bei übermäßigen Vibrationen des Generators bei Funkenbildung beim Auftreten von Rauch oder Feuer Stellen Sie sicher, daß der Generator ausreichend Kraftstoff hat, bevor ein Verbraucher angeschlossen wird. Füllen Sie niemals Kraftstoff nach, solange die Maschine läuft. Lassen Sie die Maschine nach dem Gebrauch mindestens 5 Minuten lang abkühlen, bevor Sie Kraftstoff nachfüllen. Vermeiden Sie es, heiße Teile der Maschine zu berühren. Lagern Sie keinen Kraftstoff in der Nähe der Maschine. Der Schalldämpfer und der Luftfilter wirken bei der Nachverbrennung als Flammenfänger. Achten Sie daher darauf, daß diese Teile richtig angebracht sind und sich in einem technisch einwandfreien Zustand befinden. Bestimmungsgemäße Verwendung Dieses Stromaggregat ist ausschließlich zum Betreiben von elektrischen Geräten konzipiert, deren max. Leistung innerhalb der Leistungsangaben des Generators liegen. Ein höherer Anlaufstrom von induktiven Verbrauchern muß berücksichtigt werden. Bei Nichtbeachtung der Bestimmungen, aus den allgemein gültigen Vorschriften sowie den Bestimmungen aus dieser Anleitung, kann der Hersteller für Schäden nicht verantwortlich gemacht werden. Halten Sie die Lüftungsschlitze stets frei von Rückständen oder anderen Ablagerungen um eine Beschädigung des Motors oder möglichen Brand zu verhindern. 5
6 Montage und Erstinbetriebnahme Einfüllen von Öl siehe Abb. 6 Der Generator wird grundsätzlich ohne Öl ausgeliefert. Bitte checken Sie die durchschnittliche Umgebungstemperatur und füllen Sie die im folgenden aufgeführte Ölsorte ein: < 0 SAE 10 oder 10W30; 10W SAE 20 oder 10W30; 10W SAE 30 oder 10W30; 10W40 35 > SAE 40 oder 10W30; 10W40 Wichtig: Der Stromerzeuger hat eine Ölmangelsicherung. Bei zu niedrigem Ölstand ist es nicht möglich das Gerät zu starten (beim Startversuch leuchtet die Ölkontrolllampe auf). Überprüfen Sie grundsätzlich vor jedem Gebrauch den Ölstand. Nachfüllen von Kraftstoffe Füllen Sie niemals Kraftstoff nach, solange die Maschine läuft. Lassen Sie die Maschine nach dem Gebrauch mindestens 5 Minuten lang abkühlen, bevor Sie Kraftstoff nachfüllen. Kraftstoff: Benzin bleifrei. Ausschalten des Generators Abb. 3 Stellen Sie sicher, daß KEIN Verbraucher angeschlossen ist. Stellen Sie den Ein-/Aus-Schalter auf OFF (AUS). Drehen Sie den Kraftstoffhahn auf OFF (ZU). Siehe Allgemeine Sicherheitshinweise und Sicherheitshinweise bei Erstinbetriebnahme. Benutzen Sie das Gerät erst nachdem Sie die Bedienungsanleitung aufmerksam gelesen haben. Beachten Sie alle in der Anleitung aufgeführten Sicherheitshinweise. Verhalten Sie sich verantwortungsvoll gegenüber anderen Personen. Kennzeichnungen Produktsicherheit: Produkt ist mit den einschlägigen Normen der Europäischen Gemeinschaft konform Verbote: Rauchen Sie niemals in der Nähe der Maschine oder des Kraftstoffs. Füllen Sie niemals Kraftstoff in der Nähe von Funken, Flammen oder offenem Feuer nach. Wichtig alle Kabel entfernen. Entfernen Sie den Deckel von der Einfüllöffnung. Gießen Sie den Kraftstoff vorsichtig in die Einfüllöffnung. Füllen Sie den Tank niemals weiter als bis zur Oberseite des Kraftstoffilters auf. Setzen Sie den Deckel wieder auf die Einfüllöffnung. Betrieb Verwendung des Generators Starten Abb. 2 Öffnen Sie den Benzinhahn Schalter Ein Choke in Startposition schieben (siehe Aufschrift Luftfilter). Langsam an der Startschnur ziehen, bis Widerstand spürbar ist, dann kräftig ziehen um den Motor zu starten. Wenn der Motor warmgelaufen ist, den Choke in die Ausgangsstellung zurück schieben, warten Sie bis die Anzeigelampe aufleuchtet. Stecken sie den Verbraucher ein. Im Falle einer Überlastung eines Ausgangs schaltet eine Überlastsicherung aus. Die Anzeigelampe leuchtet weiterhin. Bei einem Kurzschluß schaltet sich der Generator selbstständig ab. Verbot, allgemein (in Verbindung mit anderem Piktogramm) Vor Regen und Feuchtigkeit schützen! Warnung: Gebote: Warnung/Achtung Allgemeines Gebotszeichen Gehörschutz benutzen Umweltschutz: Abfall nicht in die Umwelt sondern fachgerecht entsorgen. Feuer, offenes Licht und Rauchen verboten Nicht in Gebäuden verwenden. Gefahr durch heiße Oberflächen Vor Gebrauch Bedienungsanleitung lesen Verpackungsmaterial aus Pappe kann an den dafür vorgesehen Recycling- Stellen abgegeben werden. 6
7 Schadhafte und/oder zu entsorgende elektrische oder elektronische Geräte müssen an den dafür vorgesehen Recycling-Stellen abgegeben werden. Verpackung: Vor Nässe schützen Interseroh-Recycling Technische Daten: Packungsorientierung Oben EG-KONFORMITÄTSERKLÄRUNG Hiermit erklären wir, Güde GmbH & Co. KG Birkichstraße 6 D Wolpertshausen dass die nachfolgend bezeichneten Geräte aufgrund ihrer Konzipierung und Bauart sowie in den von uns in Verkehr gebrachten Ausführungen den einschlägigen, grundlegenden Sicherheits- und Gesundheitsanforderungen der EG-Richtlinien entsprechen. Bei einer nicht mit uns abgestimmten Änderung der Geräte verliert diese Erklärung ihre Gültigkeit. Bezeichnung der Geräte: GSE 3700RS Artikel-Nr: #40643 Datum/Herstellerunterschrift: Angaben zum Unterzeichner: Geschäftsführer Hr. Arnold Anschluss Gewicht Technische Dokumentation: J. Bürkle FBL; QS Motorleistung Tankinhalt Einschlägige EG-Richtlinien: 2006/95 EC 2004/108/EC 2006/42/EC 2000/14/EC 2004/26/EC Hubraum Produktspezifisch: Lärmwertangabe Angewandte harmonisierte Normen: EN 12601:2001 EN 55012:2007 EN :2007 Zertifizierstelle: Intertek Testing Services Hangzhou 16 NO.1 Ave., Xiasha Economic Development District, Hangzhou , China Automatische Spannungsregelung für stabile Leistung AVR Die automatische Spannungsregulierung sorgt dafür, dass die Spannungsschwankungen des Generators im Bereich der von den Energieversorgungsunternehmen gewährleisteten Werten liegen. Achtung:Man sollte allerdings grundsätzlich vor Benutzung prüfen ob der Verbraucher für den Betrieb mit einem Generator geeignet ist. Bei elektronisch gesteuerten Geräten sind vorher Erkundigungen vom Hersteller einzuholen (HIFI, Computer, TV, Camcorder, elektronische Handwerkzeuge mit stufenloser Regulierung oder beispielsweise Ladegeräte), da ein Stromerzeuger aufgrund des Verbrennungsmotors keinen optimalen Sinus erzeugt. Niemals einen zweiten Verbraucher zuschalten, während ein anderer bereits in Betrieb ist. Dadurch kommt es unweigerlich zu Schwankungen, die ein elektronisch gesteuertes Gerät zerstören können. Referenznummer: 07SHS Gewährleistung Die Gewährleistung erstreckt sich ausschließlich auf Mängel, die auf Material- oder Herstellungsfehler zurückzuführen sind. Bei Geltendmachung eines Mangels im Sinne der Gewährleistung ist der original Kaufbeleg mit Verkaufdatum beizufügen. Von der Gewährleistung ausgeschlossen sind unsachgemäße Anwendungen, wie z. B. Überlastung des Gerätes, Gewaltanwendung, Beschädigungen durch Fremdeinwirkung oder durch Fremdkörper. Nichtbeachtung der Gebrauchs- und Aufbauanleitung und normaler Verschleiß sind ebenfalls von der Gewährleistung ausgeschlossen. Restgefahren und Schutzmaßnahmen Thermische Restgefahren: Gefährdung Beschreibung Schutzmaßnahme(n) Verbrennungen, Frostbeulen Das Berühren des Auspuff kann zu Verbrennungen führen. Geräte nach dem Betrieb erst abkühlen lassen. 7
8 Gefährdung durch Lärm: Gefährdung Beschreibung Schutzmaßnahme(n) Gehörschädi gungen Längerer Aufenthalt im unmittelbarer Nähe des laufenden Generators kann zu Gehörschädigu ngen führen. Unbedingt immer einen Gehörschutz tragen. Gefährdung durch Werkstoffe und andere Stoffe: Gefährdung Beschreibung Schutzmaßnahme(n) Kontakt, Einatmung Feuer oder Explosion Biologische / mikrobiologis che Gefährdunge n Das Einatmen von Abgasen kann tödlich sein! Der Kraftstoff des Gerätes kann sich entzünden. Der Auslauf von Öl und Kraftstoff schadet der Umwelt. Niemals in geschlossenen Räumen betreiben. Niemals in feuergefährlicher Umgebung betreiben. Nicht bei laufendem Motor betanken. Nicht Rauchen. Sonstige Gefährdungen: Gefährdung Beschreibung Schutzmaßnahme(n) Bruch beim Betrieb Verhalten im Notfall Wenn das Gerät auf schrägem Untergrund betrieben wird ist die Schmierung nicht mehr gewährleistet und das Gerät kann beschädigt werden. Grundsätzlich auf ebenem Untergrund betreiben. Leiten Sie die der Verletzung entsprechend notwendigen Erste Hilfe Maßnahmen ein und fordern Sie schnellst möglich qualifizierte ärztliche Hilfe an. Bewahren Sie den Verletzten vor weiteren Schädigungen und stellen Sie diesen ruhig. Für einen eventuell eintretenden Unfall sollte immer ein Verbandskasten nach DIN am Arbeitsplatz griffbereit vorhanden sein. Dem Verbandskasten entnommenes Material ist sofort wieder aufzufüllen. Wenn Sie Hilfe anfordern, machen Sie folgende Angaben: 1. Ort des Unfalls 2. Art des Unfalls 3. Zahl der Verletzten 4. Art der Verletzungen Entsorgung Die Entsorgungshinweise ergeben sich aus den Piktogrammen die auf dem Gerät bzw. der Verpackung aufgebracht sind. Eine Beschreibung der einzelnen Bedeutungen finden Sie im Kapitel Kennzeichnung. Die Verpackung schützt das Gerät vor Transportschäden. Die Verpackungsmaterialien sind in der Regel nach umweltverträglichen und entsorgungstechnischen Gesichtspunkten ausgewählt und deshalb recycelbar. Das Rückführen der Verpackung in den Materialkreislauf spart Rohstoffe und verringert das Abfallaufkommen. Verpackungsteile (z.b. Folien, Styropor ) können für Kinder gefährlich sein. Es besteht Erstickungsgefahr! Bewahren Sie Verpackungsteile außerhalb der Reichweite von Kindern auf und entsorgen Sie sie so schnell wie möglich. Anforderungen an den Bediener Der Bediener muss vor Gebrauch des Gerätes aufmerksam die Bedienungsanleitung gelesen haben. Qualifikation Außer einer ausführlichen Einweisung durch eine sachkundige Person ist keine spezielle Qualifikation für den Gebrauch des Gerätes notwendig. Mindestalter Das Gerät darf nur von Personen betrieben werden, die das 16. Lebensjahr vollendet haben. Eine Ausnahme stellt die Benutzung als Jugendlicher dar, wenn die Benutzung im Zuge einer Berufsausbildung zur Erreichung der Fertigkeit unter Aufsicht eines Ausbilders erfolgt. Schulung Die Benutzung des Gerätes bedarf lediglich einer entsprechenden Unterweisung. Eine spezielle Schulung ist nicht notwendig. Service Sie haben technische Fragen? Eine Reklamation? Benötigen Ersatzteile oder eine Bedienungsanleitung? Auf unserer Homepage im Bereich Service helfen wir Ihnen schnell und unbürokratisch weiter. Bitte helfen Sie uns Ihnen zu helfen. Um Ihr Gerät im Reklamationsfall identifizieren zu können benötigen wir die Seriennummer sowie Artikelnummer und Baujahr. Alle diese Daten finden Sie auf dem Typenschild. Um diese Daten stets zur Hand zu haben, tragen Sie diese bitte unten ein. Seriennummer: Artikelnummer: Baujahr: Tel.: +49 (0) / Fax: +49 (0) / support@ts.guede.com Transport und Lagerung Achtung: Das Gerät darf nur in Arbeitsposition (ebener Untergrund) betrieben werden, da sonst Kraftstoff oder Öl auslaufen kann bzw. die Schmierung nicht mehr gewährleistet ist. Bei Verwendung einer Batterie sollte diese bei längerem Nichtgebrauch entfernt werden und an einem sicheren und trockenen Ort aufbewahrt werden (z. B. im Heizraum). Entsorgung der Transportverpackung 8
9 Fehlersuche Die Tabelle zeigt mögliche Fehler, deren mögliche Ursache und Möglichkeiten zur Abhilfe. Sollten Sie das Problem trotzdem nicht beseitigen können, ziehen Sie eine Fachkraft zu Rate. Vor Wartung- oder Reinigungsarbeiten das Gerät ausschalten und den Netzstecker ziehen. Gefahr eines elektrischen Schlages. Symptome Mögliche Ursache Abhilfe Der Motor startet nicht durch. Der Motor läuft unrund Der Generator erzeugt keinen Strom. 1. Kraftstoffhahn geschlossen 2. Kein Kraftstoff 3. Zu schwacher Zug am Starter 4. Zündkerzenabs tand zu groß Zündkerzenstec ker lose, naß 5. Zündkerzenstec ker lose 6. Zu wenig Öl im Tank 1. Verbraucher zu klein Zündanlage nicht Ok 2. Falscher Kraftstoff 1. Kurzschluß 2. Kabel defekt 3. Kabel lose 1. Vergewissern Sie sich, dass der Kraftstoffhahn und der Ein-/Ausschalter auf ON (EIN) stehen. 2. Vergewissern Sie sich, dass sich ausreichend Kraftstoff im Tank befindet. 3. Ziehen Sie kräftiger an der Startschnur. 4. Vergewissern Sie sich, dass die Zündkerze richtig angebracht ist. 5. Vergewissern Sie sich, daß sich das Zündkerzenkabel auf der Zündkerze befindet. Reinigen Sie die Zündkerze und überprüfen Sie den richtigen Elektrodenabstand. 6. Öl nachfüllen 1. Vergewissern Sie sich, dass die Zündkerze richtig angebracht ist. Vergewissern Sie sich, daß sich das Zündkerzenkabel auf der Zündkerze befindet. Reinigen Sie die Zündkerze und überprüfen Sie den richtigen Elektrodenabstand. 2. Vergewissern Sie sich, dass der richtige Kraftstoff verwendet wurde 1. Falls die Anzeigelampe nicht leuchtet, so liegt ein Fehler vor, den Sie nicht selbst beheben können.falls die Anzeigelampe leuchtet: 2. Drücken Sie die Überlastsicherung für den verwendeten Ausgang. 3. Überprüfen Sie die Verdrahtung. 4. Überprüfen Sie, ob ein Kurzschluß oder eine Überlastung vorliegt. Sicherheitshinweise für die Inspektion und Wartung Nur ein regelmäßig gewartetes und gut gepflegtes Gerät kann ein zufriedenstellendes Hilfsmittel sein. Wartungsund Pflegemängel können zu unvorhersehbaren Unfällen und Verletzungen führen. Inspektion und Wartung Für eine einwandfreie Funktion und lange ebensdauer des Geräts ist eine regelmäßige Reinigung und Wartung von wesentlicher Bedeutung. Rauchen Sie nicht während der unten aufgeführten Arbeiten. Arbeiten Sie niemals in der Nähe von Funken, Flammen oder offenem Feuer. Regelmäßigdurchzuführende Wartungs- und Inspektionsarbeiten Luftfilter Der Luftfilter sollte alle 50 Betriebsstunden gereinigt werden. Lösen Sie die 2 Sechskantschrauben. Entfernen Sie den Deckel. Entfernen Sie den Luftfilter. Reinigen Sie den Filter mit Spiritus oder Ethanol. Den Luftfilter mit einer kleinen Menge Öl beträufeln und Zusammendrücken. Filtereinsatz wieder einsetzen und Gehäuse aufsetzen. Kraftstofffilter Entfernen Sie den Deckel von der Einfüllöffnung. Heben Sie den Kraftstoffilter von der Einfüllöffnung. Reinigen Sie den Filter mit Spiritus oder Ethanol. Trocknen Sie den Filter mit einem weichen Tuch. Setzen Sie den Filter wieder in die Einfüllöffnung. Setzen Sie den Deckel wieder auf die Einfüllöffnung. Zündkerze siehe Abb. 5 Entfernen Sie das Zündkerzenkabel von der Zündkerze (14). Entfernen Sie die Zündkerze mit einem Zündkerzenschlüssel. Reinigen Sie die Elektrode mit einer Drahtbürste. Überprüfen Sie den Elektrodenabstand (richtiger Wert: 0,7 bis 0,8 mm) und stellen Sie ihn ggf. nach. Setzen Sie die Zündkerze wieder ein. Ölwechsel Motor warmlaufen lassen. Einfüllstopfen abschrauben. Ablaßschraube entfernen und das gebrauchte Öl in einen dafür geeigneten Behälter füllen. Dichtungen überprüfen und wenn nötig ersetzen. Ablaßschraube eindrehen und neues Öl einfüllen. Einfüllschraube wieder aufschrauben. Schalldämpfer prüfen Schalldämpfer abkühlen lassen. Der Schalldämpfer könnte durch Filterteile verstopft sein. Kappe abschrauben und Abdeckung abnehmen Oberfläche mit Stahlbürste reinigen Wenn notwendig tauschen 9
10 Inspektions- und Wartungsplan Zeitintervall Beschreibung Evtl. weitere Details Alle 3 Monate Zustand der Zündkerze kontrollieren, den Abstand einstellen und reinigen Vor jedem Gebrauch Ölstand vom Motoröl kontrollieren Nach 1 Monat und nach 6 Monaten Motorenöl wechseln Alle 3 Monate/ Luftfilter säubern oder 50 wechseln wenn nötig Betriebsstunden Benzinhahn und Filter Alle 6 Monate reinigen, wenn nötig austauschen Alle 12 Monate Vor jedem Gebrauch Vor jedem Gebrauch Vor jedem Gebrauch Vor jedem Gebrauch Alle 12 Monate Vor jedem Gebrauch Alle 6 Monate Introduction Den Ventilabstand prüfen und evt. Einstellen. Benzinschlauch auf Risse und andere Beschädigungen prüfen, wenn nötig austauschen. Auspuffanlage auf Löcher überprüfen, wenn nötig abdichten bzw. Teile ersetzten Schalldämpfer überprüfen und evt. reinigen oder ersetzen Chokefunktion prüfen Kühlventilator prüfen Seilzugstarter prüfen, wenn nötig erneuern Schrauben und Verbindungselemente prüfen und wenn nötig ersetzen GB Bei abgekühltem Motor To enjoy your new appliance as long as possible, please read carefully the Operating Instructions and the attached safety instructions before putting it into operation. Further, we recommend keeping the Operating Instructions in order to recall the product features in the future. To follow the continuous product development, we reserve the right to make technical changes for any further improvement. This document represents the original Operating Instructions. Supply includes Take the appliance out of the transport box and check whether the supply includes the following parts: generator chassis components (see pic. 2) If any part is missing or damaged, please contact your dealer. Appliance in assembled state weighs 45 kg. Lift the appliance off the transport package in two people if necessary. Synchronous generator with AVR (automatic voltage regulation for stable performance). The automatic voltage regulator brings the necessary voltage to the connected appliances. Fittings: lack of oil protection, carrying frame, sliding handle and chassis. Including AVR (automatic voltage regulation for stable performance) The generator has been designed for the operation of common ohm and induction appliances e.g. fairy lights, hand-held electric tools (drills, electric chain saws, compressors). To connect the appliance to stationary installations heating, electrical network, airconditioning or to supply trailers, it is necessary to consult a professional electrician in advance. We are not responsible for any damage caused by failing to follow these Instructions. Input at the time the appliance is being started is the critical issue of induction appliances. The input may be 3 5 multiple of the rated power, which must necessarily be considered. Appliance description 1. Frame 2. Oil level indicator 3. Tank 4. Tank lid 5. Outlet 230 V 6. Grounding 7. Outlet 230 V 8. Generator 9. Foot 10. Overloading protection 11. Oil filler neck 12. Wheels 13. Oil drain plug 14. Voltmeter 15. Engine control switch 16. Starter 17. Bowden cable starter 18. Air filter 19. Fuel tap 20. Choke Technical specifications Constant output: 230 V 2,500W/3,000 VA Rated output: 230 V 2,800 W/3,300 VA Rated voltage/frequency: 2x 230 V~50 Hz 13A alternating current Protection type: IP 23 Engine type: 4-stroke OHV, air-cooled Engine output: 4.8 kw/6.5 PS Capacity: 207 ccm Tank capacity: 12 l petrol Consumption at 1/2 load: 1.3 l per hour Starting system: reversing start Noise: LWA 96 db Weight: 45 kg * Noise information The measured values have been found out in accordance with 2000/14/EG (1.60m height, 1m distance) measurement tolerance +- 3dB Appliance description 10
11 General safety instructions Please read carefully these Operating Instructions. Familiarise with the control elements and appropriate appliance using. Keep the Operating Instructions for future reference. Safe working Keep the place of your work clean! Mess in the place of your work may result in injuries. Consider the environment influences Do not expose the appliance to rain. Do not use the appliance in a wet or moist environment. Provide appropriate lighting. Do not use the appliance near flammable liquids or gases. Keep other persons in safe distance! Do not let other persons, especially children, touch the appliance and the cable. Keep them in a sufficient distance from the place of your work. Store the appliance properly! An appliance that is not used should be stored in a dry, locked place out of reach of children. Do not overload the appliance! Work in the specified output limits. Use the right appliance! Do not use the appliance for purposes for which it has not been designed. Look after your appliance! Follow the maintenance regulations and instructions. Check regularly the appliance cable and have it replaced by an authorised professional if damaged. Check regularly the extension cable and replace it if damaged. Keep the handles dry, with no oil and grease. Be careful! Pay attention to what you are doing. Use common sense when working. Do not use the appliance when you are tired. WARNING! Use of any other accessories may pose a risk of injury. Your appliance should be repaired by an electrician only! This appliance meets the appropriate safety provisions. Repairs may only be executed by an electrician and original spare parts must be used, otherwise the user may face a risk of injury. Appliance-specific safety instructions Please read carefully the complete Operating Instructions before using the appliance for the first time. Should any doubts regarding the appliance connection or handling arise, please contact the manufacturer (service department). TO ENSURE A HIGH LEVEL OF SAFETY, PLEASE FOLLOW CAREFULLY THESE INSTRUCTIONS: CAUTION! For appliance connecting and grounding, a professional electrician needs to be present to ensure the generator is connected properly to the house power source. The generator needs to be placed on a solid and level surface at all times! Exhaust gases may be fatal; therefore the generator must never be used in closed spaces. Never cover the generator. Never touch the appliance with wet hands. Do not work in a moist environment. Never connect 2 generators to each other. The attached and additional safety instructions need to be followed when using electric tools. Risk of injury or possible damage to electric tools. The appliance technical specifications must always correspond to the generator details and safety instructions (3-5 multiple rated output of the connected appliance needs to be considered for the starting power). Never try to repair the appliance even when possessing the necessary qualifications. Check whether the covers and protective equipment are not damaged and if have been installed properly. Perform any servicing tasks and repairs before using the appliance. Never try to change the engine speed adjustment. Contact a specialist if there is any problem. Keep the ventilation slots without any remains or other deposits at all times to prevent engine damage or possible fire. Do not lift or carry the appliance when running. Never incline the appliance when running. Do not expose the appliance to rain and moisture. Keep the appliance in a dry place. Safety instructions for the first activation No appliances with sensitive electronic equipment and Hi-fi appliances, television sets and computers should be connected as they could get damaged due to possible voltage spikes! Put the appliance on a level surface. Do not place it on a metal surface. Do not expose the appliance to intensive solar radiation and temperatures exceeding 40 C. Do not store it in a moist environment. Before using the appliance, make first sure the input of the appliance you want to connect to the generator is lower than the generator output. Connect the appliance to the generator only when the generator is running at full speed. Disconnect the appliance first before switching the generator off. Do not connect other power sources to the appliance. Do not plug the appliance. The generator must immediately be switched under the following conditions: engine running is jerking or irregular power output has dropped connected appliance is overheated excessive vibrations of the generator sparking smoke or fire being present Before connecting the generator to the appliance, make sure there is a sufficient amount of fuel. 11
12 Never refuel the generator when running. After being operated, let the generator cool down for at least 5 minutes before refuelling. Do not touch the hot parts of the generator. Do not store fuel near the generator. The suppressor and air filter act as a flame catcher when sufficient combustion is provided. Therefore, make sure these parts are installed properly and in a perfect technical state. Use as designated The generator has solely been designed to drive electric devices with the maximum output being within the generator output. The higher level of the starting current of induction appliances must be considered. The manufacturer cannot be held liable if provisions of the generally applicable regulations and these Operating Instructions are not adhered to. Installation and first activation Oil filling (see pic. 6) The generator is always supplied without oil. Please check the average ambient temperature and add one of the given oil types to the generator: < 0 SAE 10 or 10W30; 10W SAE 20 or 10W30; 10W SAE 30 or 10W30; 10W40 35 > SAE 40 or 10W30; 10W40 Pull slowly the starting cable until you can feel resistance then pull strongly to start the engine. After the engine has warmed up, put the choke back to the starting position and wait until the signal indicator lights up. Connect the appliance. The overload protection is activated if the output is overloaded. The signal indicator keeps lighting. The generator is automatically switched off in case of short circuit. Switching the generator off (pic. 3) Make sure that NO appliance is connected. Turn the ON/OFF switch to the OFF position. Turn the fuel tap to the OFF position. See the General safety instructions and Safety instructions for the first activation. Use the appliance only after you have carefully read the Operating Instructions. Follow all safety instructions specified in the Operating Instructions. Behave responsibly to other persons. Signs on Unit Product Safety: Important: The generator is fitted with a lack of oil protection. The appliance cannot be started when there is a low oil level (the oil level indicator lights up at attempted start). Product compliance with respective EU standards Bans: The oil level must necessarily be checked before using the generator. Refuelling Never refuel the appliance when running. After being operated, let the appliance cool down for at least 5 minutes and then you can refuel. Fuel: unleaded petrol. General ban combined with another pictograph Do not use the unit in rain No smoking, no fire, unprotected light Do not use in buildings. Never smoke near the appliance or fuel. Never refuel near sparks, flames or open fire. Important: Remove all cables. Remove the lid from the filling hole. Add carefully fuel to the filling hole. Never fill the tank higher than the upper side of the fuel filter. Apply the lid to the filling hole again. Operation Using the generator, "Starting" (pic. 2) Open the fuel tap ON switch Put the choke to the starting position (see the Air filter). Warnung: Warning/Caution Commands: General prohibition sign Use ear protectors Danger from hot surfaces Read operation manual before use 12
13 Environment Protection: Wastes to be disposed of in a professional manner not to harm the environment. Faulty and/or disposed of electrical/electronic appliances to be collected by authorised salvage places. Packaging: Protect from moisture Interseroh-Recycling Technical Data: Cardboard packaging to be collected for recycling. Keep Up combustion engine generator generates a sine wave does not optimal. Never switch on a second consumer, while another is already in operation. This leads inevitably to fluctuations, which can destroy an electronically controlled device. EU DECLARATION ON CONFORMITY The company, Güde GmbH & Co. KG Birkichstrasse 6 D Wolpertshausen Deutschland hereby declares that the design and structure of the devices listed below and in designs marketed conforms to applicable basic requirements of the EU directives on safety and hygiene. This declaration on conformity becomes void in case of a change to the device not consulted with us. Identification of the devices: GSE 3700RS Order No.: #40643 Date/signature of manufacturer: Information about signer: the executive Mr Arnold Voltage/Frequency Engine output Weight Tank volume Technical documentation: Applicable EU directives: 2006/95 EC 2004/108/EC 2006/42/EC 2000/14/EC 2004/26/EC J. Bürkle FBL; QS Capacity Product specific: Voltage automatic control Acoustic power level Harmonized standards used EN 12601:2001 EN 55012:2007 EN :2007 Certification authority: Intertek Testing Services Hangzhou 16 NO.1 Ave., Xiasha Economic Development District, Hangzhou , China Reference No.: 07SHS Warranty AVR (automatická regulace napětí) The voltage automatic control provides for the generator voltage spikes to be within the range of values guaranteed by the power supplying company and not to expose the electronic instruments to any risk. The warranty applies exclusively on material or production defects. For warranty claims, please submit an original proof of purchase with date of purchase indicated. The warranty does not cover unprofessional use, such as overloading, violent use, damage caused by third party or a thing. The warranty also does not cover failure to comply with the operation manual and normal wear and tear. Caution: Check before use of the appliance its usability for operation with the generator. In electronically controlled devices have been previously obtained inquiries by the manufacturer (stereo, computer, TV, camcorder, electronic hand tools with stepless regulation or chargers, for example) as a result of the 13
14 Residual risks and protective measures Thermal residual risks: Risk Description Protective measure(s) Burns, chilblains Contact with the exhaust may lead to burns. After being operated, let the appliance cool down. Exposure to noise: Risk Description Protective measure(s) Hearing damage Long presence in the immediate vicinity of the running generator may damage hearing. Wearing ear protectors is absolutely necessary at all times. Exposure to materials and other substances: Risk Description Protective measure(s) Contact, inhaling Fire or explosion Biological / microbiologic al risks Inhaling exhaust gases may be fatal! Appliance fuel may catch fire. Oil and fuel leak is harmful to the environment. Never operate the appliance in closed spaces. Never operate the appliance in an environment where there is a risk of fire. Refuelling to take place when the engine is not running. No smoking. Other risks: Risk Description Protective measure(s) Damage during operation If the appliance is operated on an inclined surface, lubrication is not provided in such a case and the appliance may get damaged. Emergency procedures To be operated solely on a level surface. Administer first aid according to injury and call for qualified medical assistance. Protect injured person against other injuries and keep him/her in rest. For reasons of potential injury, a first aid box according to DIN must be available on workplace. Replenish immediately material used from the first aid box. If you require medical assistance, give the following information: 1. Place of accident 2. Type of accident 3. Number of injured persons 4. Type of injury Disposal Disposal instructions are illustrated in the form of pictograms on the device or packaging. Description of the pictograms is given in "Identification" chapter. Disposal of transport packaging Packaging protects the device against damage during transport. Packaging materials are usually selected according to their effect on environment and disposal methods and can therefore be recycled. Returning of the packaging back to circulation saves resources and costs for packaging disposal. Parts of the packaging (e.g. foil, styropor) may be dangerous for children. Risk of suffocation! Keep these parts of the packaging out of reach of children and dispose as soon as possible. Operator requirements The operators must thoroughly read operation manual before use. Qualification Except for thorough training by an expert for use of the device, no special qualification is required. Minimum age The device may be operated by persons over 16 years of age. An exception is use by younger person if the use takes place under supervision of an adult trainer in the course of education. Training Use of the device requires corresponding guidance by an expert or operation manual only. No special training is required. Service Any technical questions? Complaint? Do you need spare parts or operation manual? Go to our website and the section Service will help you quickly and without bureaucracy. Please, help us to help you. In order to identify your device in case of complaint, please indicate serial number, order number and year of manufacture. All information is available on the product label. To have all information always at hand, put them down. Serial number: Order number: Year of manufacture: Phone: +49 (0) / Fax: +49 (0) / support@ts.guede.com Transport and storing Caution: The appliance may only be operated in the operating position (level surface), otherwise fuel or oil may leak or lubrication is not provided in such a case. If a battery is applied and has not been used for a long time, it needs to be taken out and put in a safe and dry place (e.g. heated spaces). 14
15 Troubleshooting The table shows potential failures, their possible cause and remedies. Call your specialist if you can not tackle with the trouble. Turn off and unplug the appliance before maintenance and cleaning. Electric shock hazard. Symptom Possible cause Remedy Engine not starting. Engine running irregularly. Generator not generating current. 1. Fuel tap is closed 2. No fuel 3. Too weak starter pulling 4. Too big distance of the spark plug. Loose, exposed socket plug 5. Loose socket plug 6. Too little oil in the tank 1. Too small appliance. Spark plug system is not all right. 2. Wrong fuel 1. Short-circuit 2. Defective cable 3. Loose cable 1. Make sure the fuel tap and the ON/OFF switch are in the ON position. 2. Make sure there is a sufficient amount of fuel in the tank. 3. Pull the starting cable stronger. 4. Make sure the spark plug is fitted properly. 5. Make sure the spark plug has been installed properly and the spark plug cable is on the plug. Clean the plug and check the electrodes distance if appropriate. 6. Add oil. 1. Make sure the spark plug is fitted properly and the spark plug cable is on the plug. Clean the plug and check the electrodes distance if appropriate. 2. Make sure appropriate fuel has been used. 1. If the signal indicator is not on, it is a failure you are unable to remove. If the signal indicator is on: 2. Press the overload protection for the used output. 3. Check the connection. 4. Check whether it is short circuit or overload. Safety instruction for inspections and servicing Only a regularly serviced appliance may be a satisfactory aid. Insufficient servicing and care may lead to unexpected accidents and injuries. Inspections and servicing Regular cleaning and servicing are of essential importance for perfect working and long service life. Do not smoke when performing works mentioned below. Never work near sparks, flames or open fire. Service and inspect the appliance at regular intervals. Air filter The air filter should be cleaned every 50 running hours. Loosen the 2 hex head screws. Remove the lid. Remove the air filter. Clean the filter with alcohol or ethanol. Drop small amount of oil on the air filter and press it. Insert the filter insertion again and fit the cover. Fuel filter Remove the filling hole lid. Take the fuel filter off the filling hole. Clean the filter with alcohol or ethanol. Dry it with a soft cloth. Refit the filter to the filling hole. Put the lid back to the filling hole. Spark plug (see pic. 5) Remove the cable from the spark plug (14). Remove the spark plug using the spark plug wrench. Clean the electrode with a wire brush. Check the electrodes distance (correct value: 0.7 to 0.8 mm) and adjust it if necessary. Refit the spark plug. Oil change Let the engine warm up. Unscrew the filler plug. Remove the drain plug and empty the used oil to an appropriate container. Check the sealing and replace it if necessary. Screw the drain plug and add new oil. Refit the filler plug. Noise suppressor inspection Let the noise suppressor cool down. The noise suppressor could be clogged with filter parts. Unscrew the lid and remove the cover. Clean the surface with a wire brush. Replace it if necessary. Inspection and servicing schedule Time interval Description More details Every 3 months Check the spark plug state; set the distance and clean it Every time you Check the engine oil are going to use level the appliance After 1 month and after 6 subsequent Change the engine oil months Every 3 months/ 50 running hours Clean the air filter or replace it if necessary Clean the fuel tap and Every 6 months filter and replace them if necessary Every 12 months Every time you are going to use the appliance Check the distance of valves and adjust it if necessary. Check whether the fuel hose has any cracks or other damage and replace it if necessary. After the engine has cooled down 15
16 Every time you are going to use the appliance Every time you are going to use the appliance Every time you are going to use the appliance Every 12 months Every time you are going to use the appliance Every 6 months Introduction Check the appliance for any holes in the exhaust system and seal or replace it if necessary. Check the noise suppressor and clean or replace it if necessary Check the choke function Check the cooling fan Check the Bowden cable starter and replace it if necessary Check the screws and couplers and replace them if necessary FR Afin de pouvoir profiter le plus longtemps possible de votre nouvel appareil, veuillez lire attentivement le mode d emploi et les consignes de sécurité jointes. Nous vous recommandons également de conserver le mode d emploi pour une consultation ultérieure éventuelle. Dans le cadre du développement continu de nos produits, nous nous réservons le droit aux modifications techniques dans le but d améliorer nos produits. Contenu du colis Sortez l appareil de l emballage de transport et contrôlez l intégralité et l existence des pièces suivantes : groupes parties du châssis (voir fig. 2) Si certaines pièces manquent ou sont endommagées, veuillez contacter votre vendeur. Le poids de l appareil monté est de 45 kg. Si nécessaire, sortez l appareil de l emballage de transport à deux. Description de l appareil Groupe électrogène synchrone avec AVR- (régulation automatique de la tension pour puissance stable). Le régulateur automatique de la tension alimente les appareils raccordés en tension électrique nécessaire. Équipement : protection contre manque d huile, cadre de transport, poignée mobile et châssis. Avec AVR (régulation automatique de la tension pour puissance) Le groupe électrogène est destiné à faire fonctionner des appareils à ohms ou à induction courants tels que chaînes lumineuses, outils manuels électriques (perceuses, tronçonneuses à chaîne électriques, compresseurs). Pour le raccordement aux dispositifs stationnaires chauffage, réseau électrique, climatisation ou pour l alimentation des caravanes, il est nécessaire de consulter préalablement un spécialiste - électricien. Nous déclinons toute responsabilité consécutive au non respect de ces consignes. Le courant d entrée lors du démarrage de l appareil représente un point critique en ce qui concerne les appareils à induction. Le courant d entrée peut s élever à 3-5 x la puissance nominale, celle-ci doit impérativement être prise en compte. Description de l appareil 1. Cadre 2. Témoin d huile 3. Réservoir 4. Bouchon du réservoir 5. Prise 230 V 6. Mise à la terre 7. Prise 230 V 8. Groupe 9. Patte 10. Protection contre la surcharge 11. Goulot de remplissage d huile 12. Roues 13. Vis de vidange d huile 14. Voltmètre 15. Interrupteur du moteur 16. Démarreur 17. Starter Bowden 18. Filtre à air 19. Robinet d essence 20. Starter Caractéristiques techniques Puissance continue : 230 V 2500W/3000 VA Puissance nominale: 230 V 2800 W/3300 VA Tension nominale/fréquence : 2x 230 V~50 Hz 13A courant alternatif Type de protection : IP 23 Type de moteur : à 4-temps OHV, refroidissement à air Puissance du moteur : 4,8 kw/6,5 PS Cylindrée : 207 ccm Volume du réservoir : 12 l essence Consommation à 1/2 charge : 1,3 l/h Système de démarrage : démarreur-inverseur Niveau de bruit : LWA 96 db Poids : 45 kg *Informations sur le niveau de bruit Valeurs mesurées constatées selon 2000/14/EG (1,60m hauteur, 1m écart) tolérance de mesure +-3dB Consignes générales de sécurité Lisez attentivement ce mode d emploi. Familiarisez-vous avez les éléments de commande et l utilisation correcte de l appareil. Conservez le mode d emploi pour une utilisation ultérieure. Travail en sécurité Maintenez votre lieu de travail en ordre! Le désordre sur le lieu de travail et l établi augmente des risques d accidents et de blessures. Prenez en considération les conditions atmosphériques. N exposez pas l appareil à la pluie. Ne l utilisez pas dans un milieu humide ou mouillé. Assurez un éclairage suffisant. N utilisez pas l appareil à proximité des liquides ou des gaz inflammables. Tenez l appareil hors de portée d autres personnes! Ne laissez pas d autres personnes, en particulier des enfants toucher le câble. Éloignez-les du lieu de travail. Rangez l appareil à un endroit sûr! 16
17 Si vous n utilisez pas l appareil, rangez-le dans une pièce sèche, fermée à clé de façon à ce qu il ne soit pas accessible aux enfants. Ne surchargez pas l appareil! Travaillez dans la gamme de puissances indiquée. Utilisez l appareil adéquat! N utilisez pas l appareil à des fins auxquelles il n a pas été conçu. Prenez soin de votre appareil! Respectez les règles et les consignes d entretien. Contrôlez régulièrement le câble de l appareil et faites-le remplacer par un spécialiste agréé lorsqu il est endommagé. Contrôlez régulièrement les rallonges et remplacez-les lorsqu elles sont endommagées. Maintenez les poignées sèches, sans huiles et graisses. Soyez attentifs. Faites attention à ce que vous faites. Utilisez le bon sens. N utilisez pas l appareil si vous êtes fatigués. AVERTISSEMENT! L utilisation d autres accessoires peut engendrer des accidents. Confiez la réparation de votre appareil à un électricien! Cet appareil répond aux dispositions de sécurité correspondantes. Les réparations doivent être confiées uniquement à un électricien utilisant uniquement des pièces détachées d origine, faute de quoi l utilisateur s expose à des risques d accident. Consignes de sécurité spécifiques pour l appareil Avant la première utilisation de l appareil, lisez entièrement le mode d emploi. Si vous avez des doutes en ce qui concerne le branchement et la manipulation de l appareil, contactez le fabricant (service après-vente. AFIN D ASSURER UN HAUT DEGRÈS DE SÉCURITÉ, RESPECTEZ LES CONSIGNES SUIVANTES : ATTENTION! Lors du branchement du groupe à une source d alimentation domestique, faites appel à un spécialiste du domaine électrique pour qu il effectue le branchement et la mise à la terre. Posez toujours le groupe sur une surface solide et droite! Les produits de combustion peuvent être mortels, par conséquent, n utilisez jamais le groupe dans des pièces fermées. Ne couvrez jamais le groupe. Ne touchez jamais l appareil avec les mains humides. Ne travaillez pas dans un milieu humide. Ne raccordez jamais 2 groupes. Respectez lors de l utilisation d outils électriques les consignes de sécurité jointes, ainsi que les consignes de sécurité complémentaires. Danger d accident ou d endommagement de l outil électrique. Les caractéristiques techniques de l appareil doivent correspondre aux données et aux consignes de sécurité du groupe (pour la puissance de démarrage, attention à la puissance nominale de l appareil raccordé 3-5 fois supérieure). N essayez jamais de réparer l appareil, même si vous possédez la formation nécessaire. Contrôlez si les capots et les dispositifs de protection ne sont pas endommagés et s ils sont bien montés. Avant d utiliser l appareil, procédez éventuellement à l entretien et aux réparations nécessaires. N essayez jamais de modifier le réglage des tours du moteur. Contactez un spécialiste en cas de problème. Afin d éviter l endommagement du moteur ou un incendie éventuel, veillez à ce que les fentes d aération soient exemptes de résidus et autres dépôts. Ne levez pas et ne déplacez pas l appareil lorsque le moteur est en marche. N inclinez jamais l appareil pendant le fonctionnement. N exposez pas l appareil à la pluie et à l humidité. Stockez l appareil dans un endroit sec. Consignes de sécurité relatives à la première mise en service Pour des raisons de variations de la tension, il est déconseillé de brancher au groupe des appareils avec l électronique sensible, appareils HI-FI, téléviseurs et ordinateurs! Posez l appareil sur une surface droite. Ne le posez pas sur une surface métallique. N exposez pas l appareil aux rayons solaires forts et aux températures au-dessus de 40 C. Ne stockez pas l appareil dans un endroit humide. Avant d utiliser l appareil, vérifiez que le courant d entrée de l appareil que vous souhaitez raccorder au groupe est inférieur à la puissance de sortie du groupe. Dès que le groupe tourne à plein régime, branchez l appareil. Avant d arrêter le groupe, débranchez d abord l appareil. Ne branchez aucune autre source d énergie au groupe. Ne branchez pas l appareil au secteur. Arrêtez immédiatement le groupe en cas de : marche agitée ou irrégulière du moteur chute de la puissance électrique de sortie surchauffe de l appareil raccordé vibrations excessives du groupe étincelles apparition de la fumée ou du feu Avant de brancher le groupe à l appareil, vérifiez le niveau de carburant. Ne ravitaillez jamais en carburant lorsque l appareil est en marche. Après l utilisation, laissez l appareil refroidir au minimum 5 minutes avant de procéder au ravitaillement. Ne touchez pas les parties chaudes de l appareil. Ne stockez pas le carburant à proximité de l appareil. L amortisseur et le filtre à air agissent lors de la postcombustion comme un pare-flamme. Veillez à ce que ces pièces soient correctement montées et en parfait état technique. Utilisation en conformité avec la destination Ce groupe est conçu exclusivement pour l entraînement d appareils électriques, dont la puissance maximale est 17
USER'S MANUAL FAN MOTOR DRIVER FMD-02
 USER'S MANUAL FAN MOTOR DRIVER FMD-02 IMPORTANT NOTE: Read this manual carefully before installing or operating your new air conditioning unit. Make sure to save this manual for future reference. FMD Module
UŽIVATELSKÁ PŘÍRUČKA
 UŽIVATELSKÁ PŘÍRUČKA Plni víry a naděje míříme kupředu. S odhodláním zlepšujeme své dovednosti. Zapomeňte na zklamání, ale nikoli na svůj nevyužitý potenciál. Touha překonat sám sebe a dosáhnout hranice
Uživatelská příručka. USB Charger UCH20
 Uživatelská příručka USB Charger UCH20 Obsah Úvod...3 USB Charger popis... 3 Používání nabíječky USB... 4 Nabíjení zařízení... 4 Právní informace... 5 Declaration of Conformity...6 2 Úvod USB Charger popis
Qualität aus erster Hand! Sie haben sich für ein Markenprodukt der Firma Zangenberg entschieden.
 Qualität aus erster Hand! Sie haben sich für ein Markenprodukt der Firma Zangenberg entschieden. Bitte lesen Sie die Anleitung vor der ersten Benutzung aufmerksam durch. Sie erhalten wichtige Hinweise
BEDIENUNGS- UND SICHERHEITSHINWEISE 3 OPERATION AND SAFETY NOTES 19 UNITÀ PRINCIPALE LP PLUS INDICAZIONI PER L USO E PER LA SICUREZZA 47
 DE LADEGERÄT LP PLUS BEDIENUNGS- UND SICHERHEITSHINWEISE 3 GB MAIN UNIT LP PLUS OPERATION AND SAFETY NOTES 19 FR UNITÉ PRINCIPALE LP PLUS INSTRUCTIONS D UTILISATION ET CONSIGNES DE SÉCURITÉ 33 IT UNITÀ
Herzlichen Glückwunsch! Sie haben sich für ein Qualitätsprodukt der Firma Zangenberg entschieden.
 Herzlichen Glückwunsch! Sie haben sich für ein Qualitätsprodukt der Firma Zangenberg entschieden. Bitte lesen Sie die Anleitung vor der ersten Benutzung aufmerksam durch. Sie erhalten wichtige Hinweise
Easy-6 Pivottür mit Seitenwand / Otočné dveře s boční stěnou
 Easy-6 Pivottür mit Seitenwand / Otočné dveře s boční stěnou Lesen Sie die Bedienungsanleitung sorgfältig durch und bewahren Sie diese für den späteren Gebrauch auf. Wir empfehlen die Montage unseres Produktes
Litosil - application
 Litosil - application The series of Litosil is primarily determined for cut polished floors. The cut polished floors are supplied by some specialized firms which are fitted with the appropriate technical
Hi-Res Audio/DNC Headset MDR-NC750
 Uživatelská příručka Hi-Res Audio/DNC Headset MDR-NC750 Obsah Začínáme...3 Úvod...3 Přehled... 3 Základy práce...4 Nošení náhlavní soupravy...4 Připojení náhlavní soupravy k vašemu zařízení... 4 Nastavení
2N Voice Alarm Station
 2N Voice Alarm Station 2N Lift1 Installation Manual Version 1.0.0 www.2n.cz EN Voice Alarm Station Description The 2N Voice Alarm Station extends the 2N Lift1/ 2N SingleTalk with an audio unit installed
GUIDELINES FOR CONNECTION TO FTP SERVER TO TRANSFER PRINTING DATA
 GUIDELINES FOR CONNECTION TO FTP SERVER TO TRANSFER PRINTING DATA What is an FTP client and how to use it? FTP (File transport protocol) - A protocol used to transfer your printing data files to the MAFRAPRINT
#40645 ISG 1000 #40647 ISG 2000
 #40645 ISG 1000 #40647 ISG 2000 Deutsch DE - 5 Originalbetriebsanleitung INVERTER STROMERZEUGER English GB - 12 Original Operating Instructions INVERTER GENERATOR Français FR - 18 Mode d'emploi original
Název společnosti: VPK, s.r.o. Vypracováno kým: Ing. Michal Troščak Telefon: Datum:
 Pozice Počet Popis 1 SCALA2 3-45 A Datum: 2.7.217 Výrobní č.: 98562862 Grundfos SCALA2 is a fully integrated, self-priming, compact waterworks for pressure boosting in domestic applications. SCALA2 incorporates
POLO 2.0. Art. Nr.: 5460 - BEZPEČNOST - OBSLUHA. Výhradní dovozce a distributor pro Českou republiku a Slovensko Caravan Centrum Hykro s.r.o.
 POLO 2.0 TERRASSENHEIZUNG PLYNOVÝ ZÁŘIČ GAS Výhradní dovozce a distributor pro Českou republiku a Slovensko Caravan Centrum Hykro s.r.o. Ořešská Enders Colsman 1542 AG 155 00 Praha 5 - Řeporyje tel.: +420
TCNF 185 TCNF 185 IX NO-FROST FRIGORÍFICO
 TCNF 185 TCNF 185 IX NO-FROST FRIGORÍFICO ATTENTION Cet appareil est destiné à un usage domestique uniquement. Toute utilisation autre que celle prévue pour cet appareil, ou pour une autre application
2N LiftIP. IO Extender. Communicator for Lifts. Version
 2N LiftIP Communicator for Lifts IO Extender Version 2.4.0 www.2n.cz Description The IO extender helps you extend 2N LiftIP with 1 input and 2 outputs. The purpose of the input is to cancel the rescue
ROLLO STANDARD ELECTRIC. Montageanleitung / Mounting Instruction / Montážní návod
 ROLLO STANDARD ELECTRIC Montageanleitung / Mounting Instruction / Montážní návod Teileliste / Parts List / Seznam dílů (1) 2x ( 2) 2x (3) 2x Nur von Erwachsenen zu bedienen! Kinder nicht an der Bildwand
Personenwaage Osobní váha MD 13894. Bedienungsanleitung Návod k obsluze
 Personenwaage Osobní váha MD 13894 Bedienungsanleitung Návod k obsluze Inhalt Zu dieser Anleitung... 2 In dieser Anleitung verwendete Symbole und Signalwörter...2 Einsatzbereich/bestimmungsgemäßer Gebrauch...3
SPECIFICATION FOR ALDER LED
 SPECIFICATION FOR ALDER LED MODEL:AS-D75xxyy-C2LZ-H1-E 1 / 13 Absolute Maximum Ratings (Ta = 25 C) Parameter Symbol Absolute maximum Rating Unit Peak Forward Current I FP 500 ma Forward Current(DC) IF
Název společnosti: VPK, s.r.o. Vypracováno kým: Ing. Michal Troščak Telefon: Datum:
 Počet 1 SCALA2 3-45 A Datum: 2.7.217 Výrobní č.: 98562862 Grundfos SCALA2 is a fully integrated, self-priming, compact waterworks for pressure boosting in domestic applications. SCALA2 incorporates integrated
PLASTICPARTS. -Parts not for use. -Teile werden nicht verwendet. -Pieces a ne pas utiliser. -Tyto díly nepoužívejte při stavbě. -
 742 SpitfireMk.VI 1/72 A> 70120 A PLASTICPARTS B> 70120 B C> 70120 C D> F> E> 70120 D 70120 E GUNZE 70120 F H4 C4 YELLOW H12 H13 C3 FLAT RED H33 C81 RUSSET H51 C11 LIGHT GULL GRAY H71 C21 MIDDLE STONE
Uživatelská příručka. Xperia P TV Dock DK21
 Uživatelská příručka Xperia P TV Dock DK21 Obsah Úvod...3 Přehled zadní strany stanice TV Dock...3 Začínáme...4 Správce LiveWare...4 Upgradování aplikace Správce LiveWare...4 Použití stanice TV Dock...5
WICHTIG - FÜR SPÄTERE VERWENDUNG AUFBEWAHREN - SORGFÄLTIG LESEN.
 WICHTIG - FÜR SPÄTERE VERWENDUNG AUFBEWAHREN - SORGFÄLTIG LESEN. Ignorierung der Warnungen und Hinweise in der Gebrauchsanleitung können zu ernsten Verletzungen und Todesfällen führen. Achtung: Zur Vermeidung
UPM3 Hybrid Návod na ovládání Čerpadlo UPM3 Hybrid 2-5 Instruction Manual UPM3 Hybrid Circulation Pump 6-9
 www.regulus.cz UPM3 Hybrid Návod na ovládání Čerpadlo UPM3 Hybrid 2-5 Instruction Manual UPM3 Hybrid Circulation Pump 6-9 CZ EN UPM3 Hybrid 1. Úvod V továrním nastavení čerpadla UPM3 Hybrid je profil PWM
GSE 5500 DSG #40586. ---------------------- D Originalbetriebsanleitung 4 2 --------------------- STROMERZEUGER
 ---------------------- D Originalbetriebsanleitung 4 2 --------------------- STROMERZEUGER -------------------- GB Translation of the original instructions 11 --------------------- GENERATOR -----------------------
VESTAVBOVÝ RÁM - ROLLO JUMBO
 VESTAVBOVÝ RÁM - ROLLO JUMBO Montageanleitung / Mounting Instruction / Montážní návod Nur von Erwachsenen zu bedienen! Kinder nicht an der Bildwand spielen lassen! Operation by adults only! Do not let
TechoLED H A N D B O O K
 TechoLED HANDBOOK Světelné panely TechoLED Úvod TechoLED LED světelné zdroje jsou moderním a perspektivním zdrojem světla se širokými možnostmi použití. Umožňují plnohodnotnou náhradu žárovek, zářivkových
2N LiftIP. Voice Alarm Station. Communicator for Lifts. Version
 2N LiftIP Communicator for Lifts Voice Alarm Station Version 2.4.0 www.2n.cz Description The 2N Voice Alarm Station is a switch that helps you extend 2N LiftIP with one or more audio units installed on
USER'S MANUAL FAN MOTOR DRIVER FMD-01, FMD-03
 USER'S MANUAL FAN MOTOR DRIVER FMD-01, FMD-03 IMPORTANT NOTE: Read this manual carefully before installing or operating your new air conditioning unit. Make sure to save this manual for future reference.
Izolační manipulační tyče typ IMT IMT Type Insulated Handling Rod
 KATALOG CATALOGUE 024/09/2011 IZOLAČNÍ MANIPULAČNÍ TYČ INSULATED HANDLING ROD TYP IMT KOVOVÁ MANIPULAČNÍ TYČ METALLIC HANDLING ROD TYP KMT ISO 9001:2009 ISO 14001:2005 Izolační manipulační tyče typ IMT
ROLZ-2. Portable AV/Conference Center. Assembly Instructions
 1 ROLZ-2 Portable AV/Conference Center Assembly Instructions Rolz-2 Portable AV/Conference Center Part Drawing Description Qty Part Drawing Description Qty Hardware List A 1 ½ Flat Head Screw 2 EA P-1
ROEDL & PARTNER ERSTES BÜRO IN PRAG MATERIÁLY PRO UČITELE
 ROEDL & PARTNER ERSTES BÜRO IN PRAG MATERIÁLY PRO UČITELE Roedl & Partner: Erstes Büro in Prag A: So und Sie haben sich vorgestellt, dass Sie hier in Prag ein Büro haben werden, ist das richtig? B: Wir
EINBAUANWEISUNG FÜR SCHALLDÄMM-SET BWS/DWS MONTÁŽNÍ NÁVOD PRO ZVUKOVĚ IZOLAČNÍ SOUPRAVY BWS/DWS
 EINUNWEISUNG FÜR SCHLLÄMM-SET WS/WS MONTÁŽNÍ NÁVO PRO ZVUKOVĚ IZOLČNÍ SOUPRVY WS/WS Wichtige Hinweise - unbedingt beachten! ůležitá upozornění bezpodmínečně dodržujte! Schalldämm-Set muss vollständig und
GSE 5500 DSG # Güde GmbH & Co. KG - Birkichstrasse 6 - D Wolpertshausen - Deutschland
 GSE 5500 DSG #40586 Deutsch 2 Originalbetriebsanleitung English 12 Translation of original operating instructions Français 22 Traduction du mode d emploi d origine Čeština 33 Překlad originálního návodu
DATA SHEET. BC516 PNP Darlington transistor. technický list DISCRETE SEMICONDUCTORS Apr 23. Product specification Supersedes data of 1997 Apr 16
 zákaznická linka: 840 50 60 70 DISCRETE SEMICONDUCTORS DATA SHEET book, halfpage M3D186 Supersedes data of 1997 Apr 16 1999 Apr 23 str 1 Dodavatel: GM electronic, spol. s r.o., Křižíkova 77, 186 00 Praha
Size / Světlost : DN 1/4 to 4 / DN 1/4 až 4
 Size / Světlost : 1/4 to 4 / 1/4 až 4 Ends / Konce : Threaded BSP / Závitové BSP Min. Temperature / Minimální teplota : -20 C Max. Temperature / Maximální teplota : +180 C Max. Pressure / Maximální tlak
Stříkací pistole. Striekacia pištoľ 10.25-007
 Stříkací pistole Profi-Farbpistole Striekacia pištoľ 10.25-007 CZ 7 6 2 4 5 3 1 1) rychloupínací konektor 2) regulace množství barvy 3) regulace množství vzduchu 4) nastavení stříkacího modulu 5) spoušť
FIRE INVESTIGATION. Střední průmyslová škola Hranice. Mgr. Radka Vorlová. 19_Fire investigation CZ.1.07/1.5.00/
 FIRE INVESTIGATION Střední průmyslová škola Hranice Mgr. Radka Vorlová 19_Fire investigation CZ.1.07/1.5.00/34.0608 Výukový materiál Číslo projektu: CZ.1.07/1.5.00/21.34.0608 Šablona: III/2 Inovace a zkvalitnění
Mechanika Teplice, výrobní družstvo, závod Děčín TACHOGRAFY. Číslo Servisní Informace Mechanika: 5-2013
 Mechanika Teplice, výrobní družstvo, závod Děčín TACHOGRAFY Servisní Informace Datum vydání: 20.2.2013 Určeno pro : AMS, registrované subj.pro montáž st.měř. Na základě SI VDO č./datum: Není Mechanika
Training Board TB series 3. SolderBoard
 Training Board TB series 3 SolderBoard Elektronická stavebnice SOLDERBOARD byla speciálně navržena pro účely praktické výuky ručního osazování a pájení desek plošných spojů v technologii SMT. Je levným
STAVEBNÍ PŘIPRAVENOST GILOTINA VLO DIMENSIONAL SHEET VLO MASSBLATT VERTIKALER BESCHLAG VLO МОНТАЖ МЕТАЛЛОКОНСТРУКЦИИ ВОРОТ СИСТЕМЫ ГИЛЬОТИНА ВЛО
 CZ VOLNÝ PROSTOR PRO POHYBUJÍCÍ SE VRATA EN FREE SPACE FOR THE DOORMOVEMENT DE FREIRAUM FÜR DIE BEWEGUNGSABLÄUFE RU РАЗМЕРЫ НЕОБХОДИМЫЕ ДЛЯ УСТАНОВКИ ВОРОТ CZ A - šířka otvoru B - výška otvoru C - nadpraží
:= = := :=.. := := := := ρ := := α := π α = α = := = :=
 := = := :=.. := := := := ρ := := α := π α = α = := = := := α := α := = := α := := α = = ρ ρ := := := = := = := := := + + := + + := + := := := := + + := + + := + = = = :=.. := η := η := := π = :=.. :=,
Hanriot HD.2 PLASTIC PARTS. Mr.METAL COLOR METALLICS
 8413 1/48 Hanriot HD.2 PLASTIC PARTS A> 3 B> 1 2 13 5 23 7 6 9 8 12 25 7 9 5 15 15 14 21 29 28 31 30 37 36 35 34 4 12 20 11 6 17 16 8 38 24 25 4 3 26 20 2 17 11 10 27 28 14 13 33 27 26 32 19 18 10 22 1
Czech Republic. EDUCAnet. Střední odborná škola Pardubice, s.r.o.
 Czech Republic EDUCAnet Střední odborná škola Pardubice, s.r.o. ACCESS TO MODERN TECHNOLOGIES Do modern technologies influence our behavior? Of course in positive and negative way as well Modern technologies
450 / 900 / 1300. Automatické univerzální olejové hořáky
 Automatické univerzální olejové hořáky 450 / 900 / 1300 Zástupce pro ČR: EKOTEZ spol. s r.o. Koněvova 47 130 00 Praha 3 Česká republika Tel.: + 420 221 599 163 Fax: + 420 222 582 495 vytapeni@ekotez.cz
SERVISNÍ MANUÁL PEGAS 250 E CEL OVO SERVICE MANUAL PEGAS 250 E CEL OVO
 MG136-1 PEGAS 250 E CEL OVO SERVICE MANUAL page 1 SERVISNÍ MANUÁL PEGAS 250 E CEL OVO SERVICE MANUAL PEGAS 250 E CEL OVO 1. VAROVÁNÍ WARNING UPOZORNĚNÍ Pouze osoba splňující kvalifikaci danou zákonem je
ZI-DOP600. Návod k použití Čerpadlo na naftu a oleje. Operation Manual Diesel Oil Pump EAN: 9120039230085. Fax: +43 7248 61116-720
 ZIPPER Maschinen GmbH Gewerbepark 8 A-4707 Schlüsslberg Tel.: +43 7248 61116-700 Fax: +43 7248 61116-720 E-Mail: info@zippermaschinen.at Web: www.zipper-maschinen.at CZ Návod k použití Čerpadlo na naftu
 [KLICK] GB Instruction Manual POWERLINE 4 LIGHT FOREWORD Dear Customer, Thank you for purchasing the POWERLINE 4 LIGHT charger. These operating instructions will help you to get the best from your charger.
Manuel d'utilisation 4 Pokyny pro uživatele 5
 Manuel d'utilisation 4 Pokyny pro uživatele 5 4 2 1 3 7 5 6 1 : Interrupteur marche / arrêt - Hlavní vypínač Zapnuto/Vypnuto L interrupteur principal de la S8 LAN TV permet la mise sous tension et l arrêt
Deutsch. Einstellhilfe Einachser. Grundsätzlich sollten die Seilzugeinstellungen immer 1 x im Jahr nachgeprüft werden. Einstellhilfe Kupplung
 Deutsch Einstellhilfe Einachser Grundsätzlich sollten die Seilzugeinstellungen immer 1 x im Jahr nachgeprüft werden. Einstellhilfe Kupplung Die Kupplung ist vom Werk aus grundeingestellt. 2. Ganghebel
1-AYKY. Instalační kabely s Al jádrem. Standard TP-KK-133/01, PNE 347659-3. Konstrukce. Použití. Vlastnosti. Installation cables with Al conductor
 Instalační kabely s Al jádrem Installation cables with Al conductor Standard TP-KK-133/01, PNE 347659-3 4 3 2 1 Konstrukce Construction 1 Hliníkové jádro Aluminium conductor 2 Izolace PVC 3 Výplňový obal
INSTALAČNÍ NÁVOD OPERATING INSTRUCTION
 LED PRODISC II + LED PRODISC II MINI + LED PRODISC II MAXI INSTALAČNÍ NÁVOD OPERATING INSTRUCTION 4000944x 4000945x 4000940x 4000941x 4000946x 4000947x Prodisc II Mini Prodisc II Mini + MW senzor Prodisc
NÁVOD K OBSLUZE KOMBINOVANÝ OBUVNICKÝ STROJ BT - 202
 NÁVOD K OBSLUZE KOMBINOVANÝ OBUVNICKÝ STROJ BT - 202 OBSAH I. Hlavní součásti obuvnického stroje. II. Konstrukce III. Schéma elektrického zapojení IV. Instalace a uvedení do provozu V. Obsluha stroje VI.
Introduction to MS Dynamics NAV
 Introduction to MS Dynamics NAV (Item Charges) Ing.J.Skorkovský,CSc. MASARYK UNIVERSITY BRNO, Czech Republic Faculty of economics and business administration Department of corporate economy Item Charges
Einbauanleitung zu Elektro-Einbausatz 736652 Elektro-Einbausatz für Anhängerkupplung, 7-polig, 12 Volt, nach ISO 1724
 Einbauanleitung zu Elektro-Einbausatz 736652 Elektro-Einbausatz für Anhängerkupplung, 7-polig, 12 Volt, nach ISO 1724 PEUGEOT 307 Kombi ab ab 04/02 PEUGEOT 307 Station Wagon ab 04/02 Inhalt: 1 Steckdosen-Gehäuse
 11.12. 100 ΕΙΣΟΔΟΣ = E / ENTRANCE = E = = 1174 550 ΤΥΠΟΠΟΙΗΜΕΝΟ ΚΥ = 2000 (ΕΠΙΛΟΓΗ: 2100) / CH STANDARD = 2000 (OPTIONAL: 2100) 243 50 ΚΥ/CH + 293 ΚΥ/CH +103 100 ΚΥ /CH 6 11 6 20 100 0,25 ΚΑ (CO) + 45
L-force Drives. EDK84DGFCxxxx.O=I. Ä.O=Iä. Montážní návod motec. E84DGFCxxxx. Komunikační modul Communication unit
 EDK8DGFCxxxx.O=I Ä.O=Iä L-force Drives Montážní návod 800 motec E8DGFCxxxx Komunikační modul Communication unit 0 0.7 kw 7.kW E8DG0a E8DG0b EDK8DGFCxxxx CS.0 V Warnings! Operation of this equipment requires
Einbauanleitung zu Elektro-Einbausatz 736694 Elektro-Einbausatz für Anhängerkupplung, 7-polig, 12 Volt, nach ISO 1724
 Einbauanleitung zu Elektro-Einbausatz 736694 Elektro-Einbausatz für Anhängerkupplung, 7-polig, 12 Volt, nach ISO 1724 Peugeot 206 alle Modelle ab 09/98 Inhalt: 1 Steckdose 7-polig mit Abschaltkontakt für
Tento materiál byl vytvořen v rámci projektu Operačního programu Vzdělávání pro konkurenceschopnost.
 Tento materiál byl vytvořen v rámci projektu Operačního programu Vzdělávání pro konkurenceschopnost. Projekt MŠMT ČR Číslo projektu Název projektu školy Klíčová aktivita III/2 EU PENÍZE ŠKOLÁM CZ.1.07/1.4.00/21.2146
REFERENCE: MTF4 CODIC:
 MARQUE: PROLINE REFERENCE: MTF4 CODIC: 3523551 MTF4 AVERTISSEMENTS Cet appareil est destiné à un usage domestique uniquement. Toute utilisation autre que celle prévue pour cet appareil, ou pour une autre
Projekt: ŠKOLA RADOSTI, ŠKOLA KVALITY Registrační číslo projektu: CZ.1.07/1.4.00/21.3688 EU PENÍZE ŠKOLÁM
 ZÁKLADNÍ ŠKOLA OLOMOUC příspěvková organizace MOZARTOVA 48, 779 00 OLOMOUC tel.: 585 427 142, 775 116 442; fax: 585 422 713 email: kundrum@centrum.cz; www.zs-mozartova.cz Projekt: ŠKOLA RADOSTI, ŠKOLA
TAS-18K. Akku-Säbelsäge. Aku pila ocaska. Toledo Postfach 134 8280 AC Genemuiden-NL Internet: www.toledo.nl 0307/03. Art.nr.
 Toledo Postfach 134 8280 AC Genemuiden-NL Internet: www.toledo.nl 0307/03 D CZ TAS-18K Art.nr. 818190 BEDIENUNGSANLEITUNG Akku-Säbelsäge NÁVOD K POUŽITÍ Aku pila ocaska TÜV Rheinland Product Safety D Deutsch
WL-5480USB. Quick Setup Guide
 Quick Setup Guide 1 Czech 7 Install Utility Software Note1: Before installing the utility software, DO NOT inserts the into your computer. If the adapter is inserted already, Windows will detect the adapter
Presenter SNP6000. Register your product and get support at CS Příručka pro uživatele
 Register your product and get support at www.philips.com/welcome Presenter SNP6000 CS Příručka pro uživatele 1 a b c d e 2 3 4 Federal Communication Commission Interference Statement This equipment has
Návod k obsluze/user manual LAD2 Propojovací krabička/cable junction box
 Návod k obsluze/user manual LAD2 Propojovací krabička/cable junction box K zapojení/for connecting:! optického senzoru/optoelectronic safety edges! kontaktu průchozích dveří/es! lankového kontaktu/es pro
Nové bezpečnostní pokyny
 skip English version Nové bezpečnostní pokyny V naší společnosti MMHP platí od 1.9.2011 upravené bezpečnostní pokyny, které upravují zejména pobyt a jízdu v areálu společnosti a dále vyžadují používání
PACIFIC AEROSPACE CORPORATION letadlo model PAC 750 XL Tento PZZ je vydáván pro výrobek transferovaný pod působnost EASA
 PŘÍKAZ K ZACHOVÁNÍ LETOVÉ ZPŮSOBILOSTI ÚŘAD PRO CIVILNÍ LETECTVÍ ČESKÁ REPUBLIKA Sekce technická letiště Ruzyně, 160 08 Praha 6 tel: 233320922, fax: 220562270 Číslo: DCA/750XL/3A Datum účinnosti: 29. listopad
Ecosun CH. Napětí V. 1096x155x115* 230 V 1N I IP 44 Ecosun CH x155x115*
 Návod k obsluze a montáži N631/R02 (06.08.14 ) Ecosun CH Sálavé panely do kostelních lavic 1. Použití Sálavé panely Ecosun CH jsou určeny k instalaci pod pevně připevněné kostelní lavice. Panely se instaluji
WORKSHEET 1: LINEAR EQUATION 1
 WORKSHEET 1: LINEAR EQUATION 1 1. Write down the arithmetical problem according the dictation: 2. Translate the English words, you can use a dictionary: equations to solve solve inverse operation variable
eduard WEEKEND EDITION
 3741 1:35 Pz.Kpfw. VI Ausf.B Tiger II PLASTIC PARTS A> B> C> D> eduard WEEKEND EDITION E> F> G> 2 pcs. H> 2 pcs. -Parts not for use. -Teile werden nicht verwendet. -Pieces a ne pas utiliser. -Tyto díly
Assembly Instructions, Montageanleitung, Montážní návod HB-S
 Assembly Instructions, Montageanleitung, Montážní návod HB-S A-44pcs B1-30pcs B2-12pcs B3-8pcs B4-4pcs C-2pcs D-2pcs E-1pc G - 4pcs F-1pc H-4pcs Bech dogs, Bankhaken, Poděráky 8x40 mm 4x20mm 7x50mm 6x30mm
Střední průmyslová škola strojnická Olomouc, tř.17. listopadu 49
 Střední průmyslová škola strojnická Olomouc, tř.17. listopadu 49 Výukový materiál zpracovaný v rámci projektu Výuka moderně Registrační číslo projektu: CZ.1.07/1.5.00/34.0205 Šablona: III/2 Anglický jazyk
PITSTOP VY_22_INOVACE_26
 PITSTOP VY_22_INOVACE_26 Vzdělávací oblast: Jazyk a jazyková komunikace Vzdělávací obor: Anglický jazyk Ročník: 9. PITSTOP 1/ Try to complete the missing words. Then listen and check your ideas. Eight
Byznys a obchodní záležitosti
 - Úvod Dear Mr. President, Dear Mr. President, Velmi formální, příjemce má speciální titul či status, který musí být použit v místě jejich jména Dear Sir, Formální, příjemce muž, jméno neznámé Dear Madam,
MA251 (cz_en) Operating instructions. MA251 (cz_en) Montážní návod. Krimpovací kleště PV-CZM... pro MC3, MC4 a MC4-EVO 2
 Operating instructions. MA251 (cz_en) Montážní návod. Krimpovací kleště PV-CZM... pro MC3, MC4 a MC4-EVO 2") MA251 (cz_en) Montážní návod Krimpovací kleště PV-CZM... pro MC3, MC4 a MC4-EVO 2 MA251 (cz_en) Operating instructions Crimping pliers PV-CZM... for MC3, MC4 and MC4-EVO 2 Obsah Bezpečnostní pokyny...2
MA251 (cz_en) Montážní návod Krimpovací kleště PV-CZM... pro MC3, MC4 a MC4-EVO 2 MA251 (cz_en) Operating instructions Crimping pliers PV-CZM... for MC3, MC4 and MC4-EVO 2 Obsah Bezpečnostní pokyny...2
TECHNICKÝ LIST řada mechanických odvaděčů kondenzátu AUTODRAIN TECHNICAL DATA SHEET for mechanical autodrain equipment AUTODRAIN
 Popis: Nádoba s mechanickým plovákem k odstraňování pevných nečistot, vody, aerosolů, uhlovodíků, prachu oddělených separátory KING AIR se systémem stlačeného vzduchu. Rozdělení dle využití instalace:
GENERAL INFORMATION RUČNÍ POHON MANUAL DRIVE MECHANISM
 KATALOG CATALOGUE RUČNÍ POHONY PRO VENKOVNÍ PŘÍSTROJE, MONTÁŽ NA BETONOVÉ SLOUPY MANUAL DRIVE MECHANISM FOR THE ACTUATION OF OUTDOOR TYPE SWITCHING DEVICES MOUNTED ON THE CONCRETE POLES TYP RPV ISO 9001:2009
KTM Battery Charger KTM Устройство для заряда батарей КТМ Usměrňovač a nabíječ Ftz Gleichrichter und Ladegerät Ftz
 Usměrňovač a nabíječ KTA Gleichrichter und Ladegerät KTA Rectifier and Batterey Charger KTA Устройство для заря батарей KTA Usměrňovač a nabíječ KTZ Gleichrichter und Ladegerät KTZ Rectifer and Batterey
Návod k obsluze a montáži N129/R04 (10.03.14 ) SUŠÁK NA RUCE
 SUŠÁK NA RUCE") Návod k obsluze a montáži N129/R04 (10.03.14 ) SUŠÁK NA RUCE Čtěte prosím pozorně informace uvedené v tomto návodu, který obsahuje důležité pokyny pro bezpečnou montáž, použití a údržbu jednotky. Uchovávejte
Návod k obsluze a montáži N129/R04 (10.03.14 ) SUŠÁK NA RUCE Čtěte prosím pozorně informace uvedené v tomto návodu, který obsahuje důležité pokyny pro bezpečnou montáž, použití a údržbu jednotky. Uchovávejte
LED STANDARD 12V GU4, GU5.3, G53
 LED catalog/katalog OBSAH / CONTENT 3 LED STANDARD 12V GU4, GU5.3, G53 5 HIGH POWER LED 230V GU10 7 HIGH POWER LED 230V E14, E27 9 HIGH POWER LED 230V E27 11. HIGH POWER LED 230V GU10, E27 13. LED STANDARD
Brzda Bremse Brake F-350. Katalog náhradních dílů Ersatzteilkatalog Spare parts catalogue
 Brzda Bremse Brake F-350 Katalog náhradních dílů Ersatzteilkatalog Spare parts catalogue 03 / 2014 2 Pokyny k objednávání náhradních dílů Tento katalog obsahuje seznam součástí a jejich sestavení do montážních
Einbauanleitung zu Elektro-Einbausatz 736566 Elektro-Einbausatz für Anhängerkupplung, 7-polig, 12 Volt, nach ISO 1724. FIAT PUNTO ab 09/99
 Einbauanleitung zu Elektro-Einbausatz 736566 Elektro-Einbausatz für Anhängerkupplung, 7-polig, 12 Volt, nach ISO 1724 FIAT PUNTO ab 09/99 Inhalt: 1 Steckdose 7-polig, 1 Leitungssatz 7-adrig, 1 Gummidichtung
SERVICE MANUAL PEGAS 250 E CEL SERVISNÍ MANUÁL PEGAS 250 E CEL
 MG-011-05 PEGAS 250 E CEL SERVICE MANUAL page 1 SERVISNÍ MANUÁL PEGAS 250 E CEL SERVICE MANUAL PEGAS 250 E CEL 1. VAROVÁNÍ WARNING UPOZORNĚNÍ Pouze osoba splňující kvalifikaci danou zákonem je oprávněna
20 ka / 1 s (dle typu cívky) přirozené
 přirozené") KATALOG CATALOGUE 051/03/2013 VÝKONOVÝ REAKTOR NN, NASTAVITELNÝ LOW VOLTAGE POWER REACTOR COIL, ADJUSTABLE pro napětí do 1000 V for voltages up to 1000V TYP LNN ISO 9001:2009 ISO 14001:2005 VŠEOBECNĚ Výkonový
KATALOG CATALOGUE 051/03/2013 VÝKONOVÝ REAKTOR NN, NASTAVITELNÝ LOW VOLTAGE POWER REACTOR COIL, ADJUSTABLE pro napětí do 1000 V for voltages up to 1000V TYP LNN ISO 9001:2009 ISO 14001:2005 VŠEOBECNĚ Výkonový
User manual SŘHV Online WEB interface for CUSTOMERS June 2017 version 14 VÍTKOVICE STEEL, a.s. vitkovicesteel.com
 1/ 11 User manual SŘHV Online WEB interface for CUSTOMERS June 2017 version 14 2/ 11 Contents 1. MINIMUM SYSTEM REQUIREMENTS... 3 2. SŘHV ON-LINE WEB INTERFACE... 4 3. LOGGING INTO SŘHV... 4 4. CONTRACT
VY_32_INOVACE_06_Předpřítomný čas_03. Škola: Základní škola Slušovice, okres Zlín, příspěvková organizace
 VY_32_INOVACE_06_Předpřítomný čas_03 Autor: Růžena Krupičková Škola: Základní škola Slušovice, okres Zlín, příspěvková organizace Název projektu: Zkvalitnění ICT ve slušovské škole Číslo projektu: CZ.1.07/1.4.00/21.2400
Instalace Pokyny pro instalaci v operačním systému Windows XP / Vista / Win7 / Win8
 Instalace Pokyny pro instalaci v operačním systému Windows XP / Vista / Win7 / Win8 1. Stáhněte si instalační program HOST makro engine z oficiálního webu IABYTE. 2. Spusťte instalační program a postupujte
Vypsání závodu / Notice of Race strana/page 1/5. Compotech Cup. v lodních třídách / in classes. D-One, 7P CTL 161315
 Vypsání závodu / Notice of Race strana/page 1/5 Compotech Cup v lodních třídách / in classes D-One, 7P CTL 161315 Datum / date: 04.06.2016 05.06.2016 místo konání : Kemp Jestřábí 1, Lipno Černá v Pošumaví
Buderus System Logatherm Wps K
 Buderus System Logatherm Wps K XV1100K(C)/XV1100SK(C) All rights reserverd. Any reprinting or unauthorized use wihout the written permission of Buderus System Logatherm Wps K Corporation, is expressly
Magnetický ventil s kulovým kohoutem. Ventil pro doplňování. Návod pro montáž, provoz a údržbu Stav k 01/03
 Ventil pro doplňování Návod pro montáž, provoz a údržbu Všeobecně Všeobecné bezpečnostní pokyny Ventil doplňování "Magnetický ventil s kulovým kohoutem" je smontovaná skupina armatur, která se skládá z
Training Board TB series 3. MyFirstSMD
 Training Board TB series 3 MyFirstSMD Nejjednodušší elektronická stavebnice pro začátečníky MYFIRSTSMD byla speciálně navržena pro účely praktické výuky ručního osazování a pájení desek plošných spojů
PC/104, PC/104-Plus. 196 ept GmbH I Tel. +49 (0) / I Fax +49 (0) / I I
 / I Fax +49 (0) / I I") E L E C T R O N I C C O N N E C T O R S 196 ept GmbH I Tel. +49 (0) 88 61 / 25 01 0 I Fax +49 (0) 88 61 / 55 07 I E-Mail sales@ept.de I www.ept.de Contents Introduction 198 Overview 199 The Standard 200
E L E C T R O N I C C O N N E C T O R S 196 ept GmbH I Tel. +49 (0) 88 61 / 25 01 0 I Fax +49 (0) 88 61 / 55 07 I E-Mail sales@ept.de I www.ept.de Contents Introduction 198 Overview 199 The Standard 200
ATMOS ACD01 ELEKTROINSTALACE
 ATMOS ACD01 ELEKTROINSTALACE V KOTLI ELECTRICWIRING IN BOILER KESSELELEKTROINSTALLATION TYP DC25GSPL, DC30GSPL 1. A,B,C,D,E,F POPIS JEDNOTLIVÝCH VODIČŮ PRO PŘIPOJENÍ DO REGULACE ACD01 DESCRIPTION OF LEADS
GFS 1020 # 58080 D GB F DK CZ SK NL I. GÜDE Slovakia s.r.o Podtúreň-Roveň 208 SK-033 01 Liptovský Hrádok
 GFS 1020 D GB F DK CZ SK NL I NOR S # 58080 Güde GmbH & Co. KG Birkichstraße 6 D-74549 Wolpertshausen www.guede.com Güde Scandinavia A/S Engelsholmvej 33 DK-8900 Randers www.guede.com UNICORE nářadí s.r.o.
2N Lift8 Audio unit machine room
 2N Lift8 Audio unit machine room Brief Manual Version 3.0.0 www.2n.cz The machine room audio unit is intended for installation in the machine room or as an intercom solution located in the reception.
Einbauanleitung zu Elektro-Einbausatz 736216 Elektro-Einbausatz für Anhängerkupplung, 7-polig, 12 Volt, nach ISO 1724
 Einbauanleitung zu Elektro-Einbausatz 736216 Elektro-Einbausatz für Anhängerkupplung, 7-polig, 12 Volt, nach ISO 1724 FIAT ULYSSE ab 09/94 bis 08/02 PEUGEOT 806 ab 09/94 bis 08/02 CITROËN EVASION ab 09/94
Get started Začínáme Začíname
 Get started Začínáme Začíname Get started Začínáme Začíname 1 Insert the included AA batteries before proceeding with the installation. Před zahájením instalace vložte přiložené baterie AA. Pred začatím
DEMATECH PREISANGEBOT / CENOVÁ NABÍDKA
 PREISANGEBOT / CENOVÁ NABÍDKA Maschinenart / Druh stroje: Massivholz-Verleimpresse Halbautomatische Anlage zur Lattung / Lis na spárovku Marke und Typ / Značka a typ: SORMEC T 80 L Baujahr / Rok výroby:
Flansch siehe Tabelle Seite 4 P A max. 100bar A P max. 16bar
 direktgesteuert direct acting Schaltfunktion A: function A: NC (stromlos geschlossen) NC (normally closed) Schaltfunktion B: function B: NO (stromlos offen) NO (normally open) Nennweite DN 10 50 Druckbereich
Neplatí pro přístroje série Pro EVO!
 Neplatí pro přístroje série Pro EVO! Montážní návod vkládací řídící jednotka pro WGB C/D, WGB-K C, WBS/WBC C/D pro BGB, BBS C, BBK C/D pro SGB C/D Neplatí pro přístroje série Pro EVO! Obsah Často kladené