Under-Cabinet Radio. Under-Cabinet Radio
|
|
|
- Marcela Machová
- před 10 lety
- Počet zobrazení:
Transkript
1 4 Under-Cabinet Radio KH 2398 KOMPERNASS GMBH BURGSTRASSE 21 D BOCHUM ID-Nr.: KH /10-V4 Under-Cabinet Radio Operating manual Radio kuchenne Instrukcja obsługi Rádió Használati utasítás Podelementni radio Navodila za uporabo Rádio na vestavění Návod k obsluze Rádio Návod na používanie Ugradbeni radio Upute za uporabu Unterbau-Radio Bedienungsanleitung

2 KH 2398 A B
3 INDEX PAGE Intended Use 2 Items supplied 2 Technical data 2 Safety instructions 2 The appliance components 4 Setting up the appliance 4 Fixing the kitchen radio beneath a wall cabinet 5 Setting up the kitchen radio 5 The Settings menu 5 Further setting possibilities 7 Radio operation 8 Non-functionality 10 Cleaning 10 Disposal 11 CE Conformity 11 Importer 11 Warranty and Service 11 Read the operating instructions carefully before using the appliance for the first time and preserve this booklet for later reference. Pass this booklet on to whoever might acquire the appliance at a future date

4 Intended Use This Kitchen Radio is intended for use either free-standing or for assembly beneath a wall cabinet. The intended uses for this Kitchen Radio are the reception of FM radio transmissions and as an alarm/timer, using either signal tones or the radio itself. This Kitchen Radio is not intended for utilisation in commercial or industrial applications. The warranty does not provide compensation for damage caused by improper use of the appliance! Items supplied 1 Kitchen radio KH Mounting plate 4 Screws 2 Batteries type AAA/Micro 1 Operating manual Technical data Power supply: Power consumption: V ~, 50 Hz Operation: 5 W Standby: approx. 1.8 W Output level: 1 W at 10% THD Frequency range FM MHz Operating temperature: +5 ~ +35 C Humidity: 5 ~ 90 % (No condensation) Dimensions (W x H x D): 27,5 x 16 x 6,3 cm Weight: g Protection class: II / Backup batteries 2 x 1.5 V Type AAA/Micro The technical features of this appliance enable an adjustable reception capability that exceeds the permitted frequency range of 87,5 108 MHz. In some countries, different national regulations may apply to the assigned radio frequency ranges. Please note that information received outside of the assigned radio frequency ranges may not be utilised, passed on to third parties or otherwise misused. Safety instructions This appliance is not intended for use by individuals (including children) with restricted physical, physiological or intellectual abilities or deficiencies in experience and/or knowledge unless they are supervised by a person responsible for their safety or receive from this person instruction in how the appliance is to be used. Children should be supervised to ensure that they do not play with the appliance. Always remove the power plug before cleaning the appliance. Check the appliance and all parts for visible damages. The safety concept can work only if the appliance is in a faultless condition. The power plug must always be easily accessible, so that in the event of an emergency the appliance can be quickly disconnected from the mains power supply. Risk of electrical shocks. Connect the appliance only to correctly installed and earthed mains power sockets. Ensure that the rating of the local power supply tallies completely with the details given on the rating plate of the appliance. Arrange for Customer Services to repair or replace connecting cables and/or appliances that are not functioning properly or have been damaged. NEVER submerse the appliance in water. Wipe it only with a slightly damp cloth. Do not expose the appliance to rain and never use it in a humid or wet environment.

5 Always take hold of the power cable by the plug. Do not pull on the cable itself and never touch the power cable with wet hands, this could result in either a short circuit or you receiving an electric shock. Do not place the appliance, furniture or anything else on the power cable and ensure that it does not become clamped. NEVER make a knot in the power cable and do NOT bind it together with other cables. The power cable should be positioned so that no one can step on or trip over it. Ensure that the power cable does not become wet during operation. You are not permitted to open the appliance housing or repair the appliance. If the housing is opened, you run the risk of receiving a potentially fatal electric shock and the warranty lapses. Protect the appliance against drip and spray water. Do not place any waterfilled vessels (e.g. flower vases) on or near the appliance. Risk of fire! Do not use the appliance near hot surfaces. Do not install the kitchen radio close to sources of heat such as radiators or stoves. Otherwise, it may overheat and become irreparably damaged. Do not locate the kitchen radio directly above hotplates. The kitchen radio may be damaged. There is a danger of fire! Never leave the appliance unattended while it is being used. Never cover the ventilation slots of the appliance while it is on. Do not place open fire sources, such as candles, on or near the appliance. Risk of personal injury! Keep the power cable and appliance away from children. Children frequently underestimate the dangers of electrical appliances Provide a stable location for the appliance. Do not operate the appliance if it has sustained a fall or is damaged. Arrange for the appliance to be checked and/or repaired by qualified technicians. Keep batteries well away from children. Children can put batteries into their mouths and swallow them. If a battery is swallowed medical assistance must be sought immediately. Note: Some aggressive furniture finishes can have a destructive influence on the appliance's rubber pads. If necessary, place the appliance on a nonslip pad. Thunderstorms! Equipment connected to a power supply can be damaged during a thunderstorm. You should therefore always remove the plug from the power socket when there is a storm. Notice regarding separation from mains-power The ON/OFF switch does not completely disconnect the appliance from the power network. Additionally, the appliance consumes power when in standby-mode. To completely separate the appliance from mains power, the power plug MUST be removed from the mains power socket. Notice regarding electrical power surges (EFT /electrical fast transient) and electrostatic discharges: In a case of malfunction due to an electrical fast transient (power surge) and/or electrostatic discharge, the appliance must be returned to default settings in order to re-establish normal operation. Possibly the power supply must be separated and then reconnected. The batteries (if

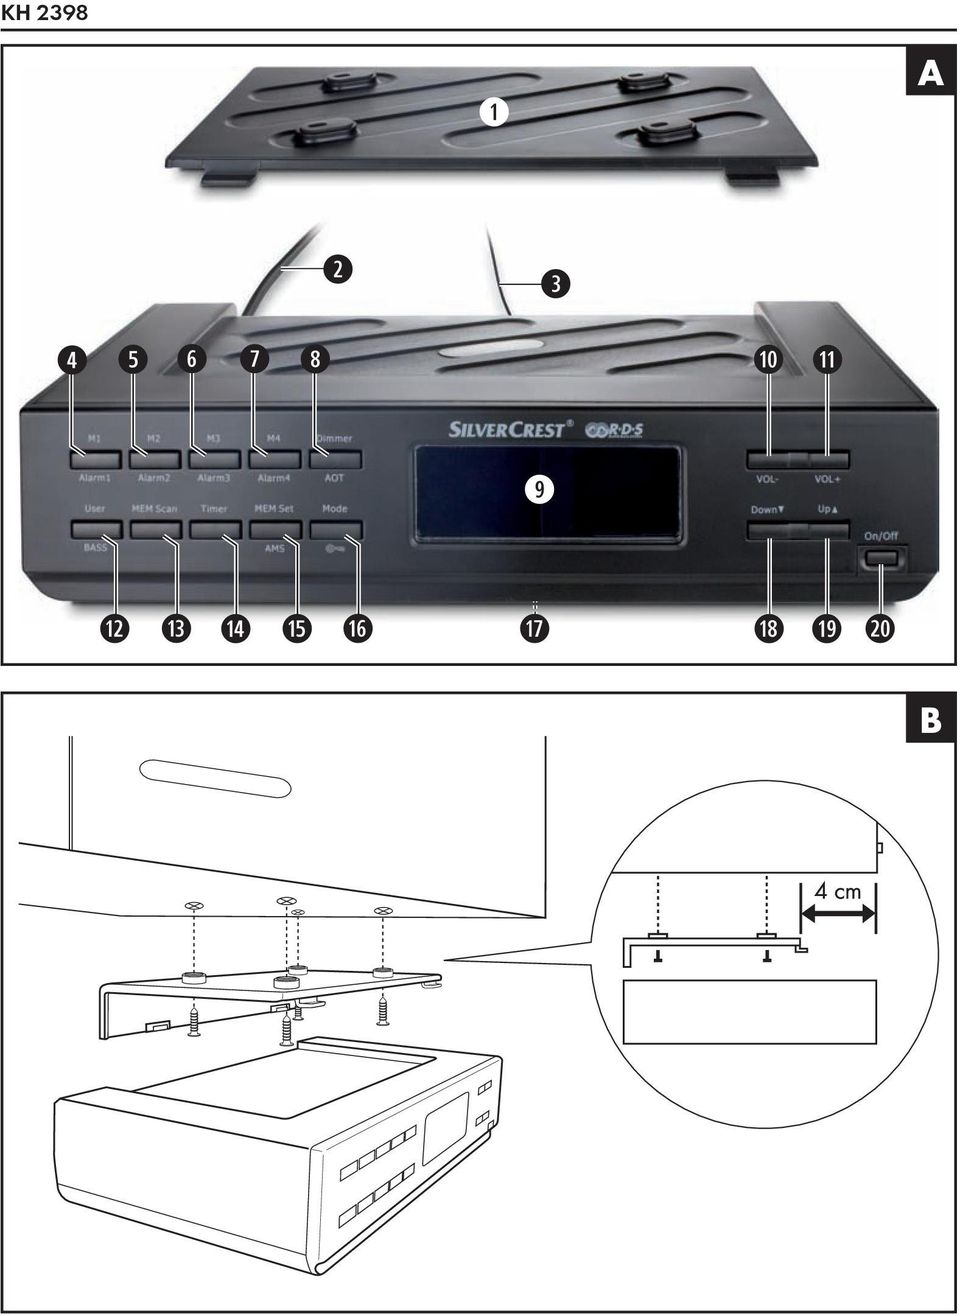
6 present) must be removed and then reinserted. Information regarding the handling of batteries The appliance uses batteries for memory conservation. For the handling of batteries please observe the following: Risk of explosion! Do not subject the batteries to excessive heat such as fire, sunlight or similar. Do not recharge the batteries. Never open batteries, never solder or weld batteries. The risk of explosions and injuries exists! Regularly check the condition of the batteries. Leaking batteries can cause damage to the appliance. If you do not intend to use the appliance for an extended period, remove the batteries. Should the batteries leak, put on a pair of protective gloves and clean the battery compartment and terminals with a dry cloth. Important! No liability/warranty will be considered for damage to the Kitchen Radio caused by the effects of moisture, water penetration or overheating! The appliance components (See fold-out illustration "A") q Mounting plate/baseplate w Power cable e Wire aerial r u M1 M4 - Memory buttons M1 M4 Alarm1-4 - Alarm buttons 1-4 i DIMMER - controls the display /AOT lighting, controls the switch-off timer o Display a VOL - Volume down s VOL + - Volume up d USER/BASS - User switching, Bass boost f MEM SCAN - for the automatic recall of saved radio stations g TIMER - control for the timer programming h MEM SET /AMS - to save and automatically search and save radio stations j MODE/ - Calls up the settings, Key lock k Battery compartment l DOWN - Selection button down 1( UP - Selection button up 2) ON/OFF - Radio on/off Setting up the appliance First take all appliance components from the packaging and remove all packing foil and tape. Inserting the back-up batteries The back-up batteries ensure that the time, date and alarm time setting are not lost in the event of a power cut. For this you require two 1.5 V batteries of the type AAA/Micro. 1. Open the lid of the battery compartment 1& on the underside of the kitchen radio. 2. Insert the batteries. Make sure the polarities are correct. Otherwise, the memory receipt will not function and damage may be caused to the appliance. 3. Close the lid of the battery compartment 1&. The lid must audibly engage. Note: The back-up batteries must be checked at least once per year and, if necessary, exchanged for new ones.

7 Fixing the kitchen radio beneath a wall cabinet With the supplied mounting plate q you can fix the kitchen radio below, for example, a kitchen wall cabinet: 1. Determine a suitable location for the kitchen radio. 2. Press the two retaining levers on the back of the appliance down. Push the mounting plate q back and remove it. 3. Hold the mounting plate q under the installation location. Thereby, the front edge of the mounting plate q should be approx. 4 cm behind the front of the kitchen cabinet (See fold-out illustration "B"). 4. Mark the four points for the drillholes with a pencil. 5. Using a spike, make a small depression at the marking points. Firmly secure the mounting plate q with the supplied screws. 6. Hold the kitchen radio slanted, with the two recesses in the retaining lugs on the mounting plate q. Press the kitchen radio upwards until it perceptibly engages. Disassembly To disassemble the kitchen radio, press the two retaining levers at the rear of the appliance downwards. Then pull the radio out to the front and remove it. Unscrew the screws and remove the assembly plate q. Setting up the kitchen radio Do not set the kitchen radio up without the mounting plate q. Otherwise the speakers are covered and the sound is scarcely audible. To fit the kitchen radio with the supplied mounting plate q: 1. Simultaneously press the two retaining levers on the back of the appliance down. Push the mounting plate q back and remove it. 2. Push the two rear retainer lugs on the mounting plate q into the recesses on the lower side of the kitchen radio. 3. Press the mounting plate q firmly into the appliance underside until it perceptibly engages. Providing mains power When you have completed installation of the appliance, insert the plug into a mains power socket. The display o is illuminated and the appliance tries to receive an RDS signal to automatically adjust the time and date. For as long as the appliance waits for the RDS signal, the display o shows "Please wait for setting thanks". This can take several minutes. To hide this notice, press the button MODE/ j. The Settings menu Setting the time Should this not succeed, you must set the clock manually. For this, the radio cannot be switched on (= automatic mode). 1. In automatic mode press the button MODE/ j once. The time display blinks. 2. Press the buttons UP /DOWN 1(/l to set the time in minute intervals. Pressing and holding the button changes the time at ten-minute intervals. 3. Press the button MODE/ j once again to save the time and switch to the date setting. If you do not press a button for 15 seconds when making the settings, the appliance saves the current setting and returns to automatic mode. Setting the date 1. In automatic mode press the button MODE/ j twice. In the display o appears " ", the date display flashes
. 4. Mark the four points for the drillholes with a pencil. 5. Using a spike, make a small depression at the marking points.")
8 2. Press the buttons UP /DOWN 1(/l to set the date at day intervals. Pressing and holding the buttons changes the date at intervals of 10 days. 3. Press the button MODE/ j once again to save the date and to switch to setting the memory function. If you later press the DOWN button l in automatic mode, the display o briefly shows "DAY". Subsequently, the time and date display alternate themselves. To switch back to an exclusive time display, press the button DOWN l once again. Setting the memory functions You can programme in up to 6 dates, which the appliance will remind you of when they are reached. 1. In automatic mode press the button MODE/ j three times. The display o shows alternatively a date and the SDA 1 indicator for reminder date Press the buttons UP /DOWN 1(/l to set the first desired reminder date. As the earliest possible date you can set the following day. Pressing and holding one of the buttons changes the display in tenminute intervals. 3. When you press the button TIMER g, the year number is deactivated and thus you are reminded on this date every year. 4. Should you wish to programme in further SDA's, press the button MEM SCAN f to select the desired memory positions 2-6. The selected memory location (SDA 2-6) will be indicated in the display o. 5. Follow the same steps with the other dates. 6. To deactivate the memory function, programme in a date that lies in the past. 7. Press the button MODE/ j once again to save the settings of the memory function and to switch to setting the update function. The appliance will remind you of a date that you have set with the reminder function. Then, on this given day from 08:00 to 23:00, and on every full hour, the acoustic reminder alarm sounds for 10 minutes if you do not stop the alarm. In addition, the SDApanel in the display o blinks. To stop the reminder alarm, press any button. Setting the update function Using this function, the appliance can automatically update the settings for the clock based on the RDS data. 1. In automatic mode press the button MODE/ j four times. The display o shows "UP DATE". 2. Press the button DOWN l, to deactivate the actualisation function. The blinking clock symbol in the display o then disappears. 3. Press the button UP 1( to reactivate the update function. The hour symbol appears. 4. Press the button MODE/ j once again to save the settings of the update function (the display flashes for 15 seconds, after that the saving is finalised) and to switch to setting the 12 or 24 hour mode. Setting the dimmer function In automatic mode press the button MODE / j five times. Or press and hold the button DIMMER/AOT i to set the dimmer function outside of the Settings menu. In the display o appears either DIM ON (delivery state) or DIM OFF. Press and hold the button DIMMER/AOT i once again to change the dimmer setting. DIM ON: The display o lights up for 15 seconds when a button is pressed. DIM OFF: The display o is permanently lit

9 Selecting 12 or 24 hour time display 1. In automatic mode press the button MODE/ j six times. In the display o appears "24 HOUR" for the 24 hour modus. 2. Press the button DOWN l to select the 12 hour modus. In the display o appears "12 HOUR". Press the button UP 1( to return to the 24 hour modus. In the 12 hour mode, PM (post meridiem = afternoon) appears before the time indcator in the display o from 12:00 to 23:59. Press the button MODE/ j to save the menu settings and to close it down. Further setting possibilities Kitchen timer 1. Press the button TIMER g. 2. Using the buttons UP /DOWN 1(/l, set the desired time interval (a time span between 1 minute and 23:59 h is possible). Pressing and holding one of the buttons changes the display in ten-minute intervals. Or press one of the buttons M1 M4 r u to recall a saved preset time for the kitchen timer. The following times are factory pre-programmed: M1 r = 5/25 min. (Indicator = T1/5) M2 t = 10/30 min. (Indicator = T2/6) M3 y = 15/35 min. (Indicator = T3/7) M4 u = 20/40 min. (Indicator = T4/8) 3. Press the button TIMER g once again to start the kitchen timer. In the display o a clock icon running in reverse and a cooking pot symbol appears. 4. From 30 seconds before expiry of the time span an acoustic signal sounds, repeating at shorter intervals the closer the set time approaches. When the time has expired, the alarm sounds continuously and with increasing volume. 5. Press the button TIMER g to terminate the acoustic signal. Interrupting the kitchen timer. To interrupt the kitchen timer, switch to the kitchen timer mode by pressing the button TIMER g. Then briefly press the button TIMER g to interrupt the kitchen timer. The time is halted, the indicator blinks for 15 seconds. After this period the appliance returns to automatic modus. To restart the kitchen timer, briefly press the button TIMER g again to switch back into the kitchen timer mode. Press the button TIMER g once again. The time then continues to run. To completely switch the kitchen timer off, press and hold the button TIMER g for 3 seconds The clock and cooking pot symbol disappear. Programming the kitchen timer You can programme frequently used times for the kitchen timer into the appliance, so that you do not need to enter them in repeatedly. As the appliance can be used by several people, it has user switching, A/B. Both users can save 8 different timer periods each. 1. First, select the desired user. To switch between users, press and hold the button USER/BASS d for two seconds. Depending on the selected user, the display o indicates either "A" or "B". 2. Then press the button TIMER g. 3. Using the buttons UP /DOWN 1(/l enter in the desired time. 4. Press the button MEM SET/AMS h. On the right and next to the time indicator, "T" lights up. 5. In order to occupy one of the memory locations 1 4, press the desired memory location button M1 M4 r u under which the time for the kitchen timer should be saved once. Its number is now shown to the right of the "T". To occupy one of the memory locations 5 8, press the desired memory location button M1 M4 r u twice
.")
10 6. Press the button MEM SET/AMS h once again to conclude the saving. The display flashes for 15 seconds, after that the saving is finalised. Setting alarm times (Alarm 1 4) You can programme four alarm times with your kitchen radio. Alarm function Acoustic signal Radio Switched off Symbol in the display o no symbol 1. In automatic mode, press one of the ALARM buttons 1 4 r u to select the location for the to be programmed alarm memory. In the display o the last set alarm time and the symbol for the type of alarm blink for 15 seconds. 2. Press the buttons UP /DOWN 1(/l to set the desired alarm time. 3. Repeatedly press the ALARM button previously pressed until the desired alarm function (see table above) is indicated in the display o. 4. Repeatedly press the button TIMER g to set the weekdays on which you require the alarm function: You can select between "workdays" (Mo, Tu, We, Th, Fr), "weekends" (Su, Sa) and "every day" (Su, Mo, Tu, We, Th, Fr, Sa). Thereby, orientate yourself on the weekday indicator in the display o: Mo = Monday Tu = Tuesday We = Wednesday Th = Thursday Fr = Friday Sa = Saturday Su = Sunday. 5. If you hold the button TIMER g pressed down for 2 seconds, you can also, through repeated brief pressing of the TIMER g button, select a specific weekday (e.g. only "We"). The selected setting is indicated in the display o. 6. To return to the selection of workdays, weekends or whole weeks, once again hold the button TIMER g pressed down for 2 seconds. 7. After 15 seconds the blinking in the display stops and your input is saved. The appliance then returns to automatic modus. When the alarm signal sounds... and the alarm function "Radio" has been selected, the radio plays for one hour at a pre-defined alarm volume. To exit, press one of the ALARM buttons 1 4 r u. and the alarm function "Signaltones" has been selected, the signal tone sounds for 10 minutes, with an increasing volume. To exit, press one of the ALARM buttons 1 4 r u. Radio operation For radio reception, completely unwind the wire aerial e and, with the radio switched on, determine the most favourable positioning for it. Switching the radio on and off 1. To switch the radio function on, press the button ON/OFF 2). In the display o the currently selected frequency is shown. 2. Press the button ON/OFF 2) once again to switch the radio off and return the appliance to the automatic modus. Manual station selection 1. Briefly press the button UP 1( repeatedly to search for stations with a higher frequency than the one shown in the display o. 2. Briefly press the button DOWN l repeatedly to search for stations with a lower frequency than the one shown in the display o.

11 3. Should the currently adjusted station transmit RDS data, the indicator in the display o blinks. Then the display o shows the name of the radio station, and the time is updated (if activated in the settings, see section "Setting Update function"). During a running time update via RDS the clock icon in the display o flashes. Automatic station search You can have the kitchen radio search for stations. The kitchen radio searches the frequency range until it finds a station. 1. Press and hold the button UP 1( for two seconds: the kitchen radio searches for the station with the next highest frequency. 2. Press and hold the button DOWN l for two seconds: the kitchen radio searches for the station with the next lowest frequency. Repeat these steps until you have found a radio station to your liking. Save and recall a radio station manually As the appliance can be used by numerous people, it is fitted with user switching, A/B. Both users can save different radio stations. To switch between users, press and hold the button USER/BASS d for two seconds. Each user can save 32 radio stations in the appliance. Available for this are: Preset button M1 r for the save positions A0 A7, Preset button M2 t for the save positions B0 B7, Preset button M3 y for the save positions C0 C7, and Preset button M4 u for the save positions D0 D7. Press the corresponding preset button once to address the save position "0", press twice for "1", etc. 1. Set the user and the desired radio station. 2. Press the button MEM SET/AMS h.in the display o the "MEM" indicator blinks If the memory location button r u has been pressed previously, the memory location indicator and the MEM" indicator blink. 3. Press one of preset buttons M1 M4 r u, if necessary repeatedly, to save the radio station to the desired save position. In the display o, the indicator for the save position selected by you and "MEM" blink. 4. Press the button MEM SET/AMS h once again. "MEM" and the save position are constantly indicated, the radio station is saved. 5. Repeat the steps 1 to 4 (for both users) until all of the desired radio stations are saved. 6. To recall the saved radio stations, press the corresponding preset buttons (M1 M4 r u) in radio mode, several times if need be, until the number of the saved position appears in the display o. Automatically save and recall a radio station With the AMS function (Automatic Memory System), the radio automatically searches for stations and stores them at the memory locations. Previously saved radio stations are thereby erased. 1. Press and hold the button MEM SET/ AMS h for two seconds. The kitchen radio automatically searches for sufficiently powerful radio stations and saves them in the memory. 2. The station search can be stopped by pressing on the button MEM SET/AMS h. The most recently found radio station plays. 3. When you press the button MEM SCAN f, the saved radio stations are recalled in their sequence and each is played for 15 seconds. 4. To quickly move on to another radio station, press the button MEM SCAN f. 5. To quit the automatic recall, press the button MODE/ j. The display o will then show the time for 15 seconds.

12 Adjusting the volume. To reduce the sound volume, in radio operation repeatedly press the button VOL a, or hold the button down. To increase the sound volume, in radio operation repeatedly press the button VOL. + s, or hold the button down. Lock function You can lock the kitchen radio so that settings cannot be altered by unauthorised people or children. Press and hold the button MODE/ j for 3 seconds. A key symbol appears in the display o. When a key is pressed and the lock is activated, the key symbol blinks but no other functions are carried out. To disable the lock function, press and hold the button MODE/ j until the key symbol extinguishes. Bass Should you wish to have an amplified reproduction of the lower frequencies, press the button USER/BASS d when in radio modus. In the display o the indicator "BASS" then appears. Press this button once again to deactivate the function. Displaying the time To display the time for 15 seconds during radio operation, press the button MODE/ j. A.O.T. - Switch-off timer This appliance is fitted with a switch-off timer for up to 90 minutes. 1. Press the button DIMMER/A.O.T. i to call the function up and, if need be, to switch the radio on. 2. Repeatedly press the button DIMMER/ A.O.T. i to programme in the number of minutes, in increments of 5 minutes, for which the appliance is to remain switched on. The default setting is 90 minutes. In the display o the AOT indicator and a clock symbol appear when the switch-off timer function is activated. After a few seconds, the frequency is indicated once again. 3. At any time you can press the DIMMER/ A.O.T. i button to blend in the remaining countdown time for a few seconds. 4. On expiry of the time period the appliance switches itself off. 5. To simply switch the unit off, press the button ON/OFF 2). Non-functionality Do not attempt to take the device apart and/or, in the event of possible defects, to repair yourself. You could potentially damage the sensitive electronic components. Repairs to your device must be carried out exclusively by qualified service personnel! No warranty/liability will be assumed for damage resulting from improper use and/ or opening of the device! In the event of malfunction please get in touch with the corresponding service affiliate in your country. Cleaning Warning! Always remove the plug before cleaning the appliance! Moisture penetrating into the appliance creates the risk of electric shock! Additionally, the kitchen radio could become irreparably damaged! Clean the housing of the kitchen radio with a slightly moist cloth and a mild detergent only. Ensure that moisture cannot permeate into the appliance during cleaning!

13 Disposal Do not dispose of the appliance in your normal domestic waste. This product is subject to the provisions of European Directive 2002/96/EC. Disposing of the appliance Arrange for the product, or parts of it, to be disposed of by a professional disposal company or by your communal waste facility. Observe the currently applicable regulations. In case of doubt, please contact your waste disposal centre. Disposal of batteries/accumulators Used batteries/rechargeable batteries may not be disposed of in household waste. Batteries/rechargeable batteries can contain toxic substances which may damage the environment. Therefore, dispose of the batteries/rechargeable batteries in accordance with statutory regulations. Every consumer is statutorily obliged to dispose of batteries/rechargeable batteries to a community collection centre in their district or to a dealer. The purpose of this obligation is to ensure that batteries are disposed of in a non-polluting manner. Only dispose of batteries when they are fully discharged. Disposal of packaging Dispose of all packaging materials in an environmentally friendly manner. CE Conformity This device complies, regarding conformity, to the basic requirements and other relevant provisions of the Low Voltage Directive 2004/108/EC, the Directive for Low Voltage Appliances 2006/95/EC and the Eco Design Directive 2009/125/EC (Ordinance 1275/2008 Appendix II, Number 1) Importer KOMPERNASS GMBH BURGSTRASSE BOCHUM, GERMANY Warranty and Service The warranty for this appliance is for 3 years from the date of purchase. The appliance has been manufactured with care and meticulously examined before delivery. Please retain your receipt as proof of purchase. In the event of a warranty claim, please make contact by telephone with our Service Department. Only in this way can a post-free despatch for your goods be assured. The warranty covers only claims for material and maufacturing defects, but not for transport damage, for wearing parts or for damage to fragile components, e.g. buttons or batteries. This product is for private use only and is not intended for commercial use. The warranty is void in the case of abusive and improper handling, use of force and internal tampering not carried out by our authorized service branch. Your statutory rights are not restricted in any way by this warranty. The warranty period will not be extended by repairs made unter warranty. This applies alsoto replaced and repaired parts. Any damage and defects extant on purchase must be reported immediately after unpacking the appliance, at the latest, two days after the purchase date. Repairs made after the expiration of the warranty period are subject to payment. DES Ltd Tel.: ( 0.10 / minute) support.uk@kompernass.com Kompernass Service Ireland Tel: (0,082 EUR/Min.) Standard call rates apply. Mobile operators may vary. support.ie@kompernass.com

14 - 12 -

15 SPIS TREŚCI STRONA Użytkowanie zgodne z przeznaczeniem 14 Zakres dostawy 14 Dane techniczne 14 Wskazówki bezpieczeństwa 14 Elementy urządzenia 16 Uruchamianie urządzenia 17 Montowanie radia kuchennego pod szafką wiszącą 17 Ustawienie radia kuchennego 17 Menu ustawień 18 Pozostałe możliwości ustawień 19 Słuchanie radia 21 Czyszczenie 23 Postępowanie w przypadku usterki 23 Utylizacja 23 Deklaracja zgodności CE 24 Importer 24 Gwarancja i serwis 24 Przed pierwszym użyciem zapoznaj się z instrukcją obsługi i zachowaj ją w celu późniejszego wykorzystania. W przypadku przekazania urządzenia osobom trzecim należy przekazać im także instrukcję

16 Użytkowanie zgodne z przeznaczeniem Radio kuchenne jest przeznaczone do ustawienia lub montażu pod szafką. Radio kuchenne jest przeznaczone do odbioru stacji radiowych nadających w zakresie UKF oraz do budzenia sygnałem akustycznym lub radiem. Radio kuchenne nie jest przeznaczone do zastosowań przemysłowych lub profesjonalnych. Producent nie ponosi odpowiedzialności za szkody, będące wynikiem zastosowania urządzenia niezgodnie z jego przeznaczeniem lub przeprowadzenia samodzielnych przeróbek urządzenia! Zakres dostawy 1 Radio kuchenne KH Płyta montażowa 4 Śruby 2 baterie typu AAA/Micro 1 Instrukcja obsługi Dane techniczne Przyłącze sieciowe: Pobór mocy V ~, 50Hz Praca: 5 W Tryb czuwania: około 1,8 W Moc wyjściowa: 1 W przy 10% THD Zakres częstotliwości: UKF (FM) 87,5 108 MHz Temperatura robocza : +5 do +35 C Wilgotność: 5-90 % (przy braku kondensacji) Wymiary (Szer x Gł x Wys): 27,5 x 16 x 6,3 cm Masa: g Klasa ochrony: II / Baterie podtrzymujące zasilanie: 2 x baterie 1,5 V typu AAA/Micro Parametry techniczne urządzenia umożliwiają odbiór częstotliwości spoza dopuszczalnego zakresu 87,5 108 MHz. W każdym kraju mogą obowiązywać różne przepisy odnośnie przydzielonych zakresów częstotliwości radiowych. Należy pamiętać, że informacji odbieranych poza przydzielonym zakresem częstotliwości radiowych nie można przetwarzać, przekazywać osobom trzecim ani wykorzystywać niezgodnie z ich przeznaczeniem. Wskazówki bezpieczeństwa Urządzenie nie jest przeznaczone do użytkowania przez osoby (w tym dzieci) z ograniczoną sprawnością fizyczną, ruchową bądź umysłową lub nieposiadające doświadczenia i/lub wiedzy, chyba że będą one przebywały pod opieką osoby odpowiedzialnej za ich bezpieczeństwo lub uzyskają od niej wskazówki dotyczące właściwego używania urządzenia. Nie można pozwolić dzieciom na zabawę urządzeniem. Przed rozpoczęciem czyszczenia wyciągnąć wtyczkę z gniazdka. Sprawdzić urządzenie oraz wszelkie jego elementy pod kątem widocznych uszkodzeń. Bezpieczeństwo urządzenia gwarantowane jest wyłącznie wtedy, gdy urządzenie jest w niezawodnym stanie. Wtyczka musi być zawsze łatwo dostępna, aby w sytuacji awaryjnej możliwe było jak najszybsze odłączenie urządzenia od zasilania elektrycznego. Niebezpieczeństwo porażenia prądem elektrycznym! Podłączaj urządzenie tylko i wyłącznie do prawidłowo zainstalowanego i uziemionego gniazdka zasilania. Napięcie w sieci elektrycznej musi być zgodne z danymi podanymi na tabliczce znamionowej urządzenia

17 Niesprawne urządzenia lub przewody elektryczne przekaż niezwłocznie do naprawy lub wymień w punkcie obsługi klienta. Nie wolno zanurzać urządzenia w wodzie. Do wycierania użyj lekko zwilżonej szmatki. Urządzenia nie wolno wystawiać na działanie deszczu ani używać go w wilgotnym lub mokrym środowisku. Kabel sieciowy chwytaj zawsze za wtyczkę. Nigdy nie pociągaj za sam kabel i nie dotykaj go mokrymi rękami, gdyż może to spowodować zwarcie lub porażenie prądem elektrycznym. Nigdy nie stawiaj na kabel sieciowy samego radia, mebli itp. i uważaj, aby kabel nie został zakleszczony. Nigdy nie wiąż kabla sieciowego na supeł ani nie łącz kabla z innymi kablami. Kabel sieciowy układaj w taki sposób, aby nikt nie mógł na niego nastąpić ani potknąć się o kabel. Pamiętaj, aby przewód zasilania nigdy nie był wilgotny lub mokry. Nie wolno otwierać obudowy ani samodzielnie naprawiać urządzenia. Po otwarciu obudowy występuje niebezpieczeństwo śmiertelnego porażenia prądem elektrycznym, a gwarancja ulega unieważnieniu. Urządzenie należy chronić przed kroplami i rozpryskami wody. Nie stawiaj na urządzeniu ani przy nim żadnych naczyń z płynami (np. wazonów na kwiaty). Niebezpieczeństwo pożaru! Nie używać urządzenia w pobliżu gorących powierzchni. Nie stawiać urządzenia w miejscach wystawionych bezpośrednio na działanie promieni słonecznych. Działanie wysokiej temperatury może spowodować przegrzanie urządzenia i trwałe uszkodzenie. Nie instaluj radia kuchennego w pobliżu źródeł ciepła, takich jak grzejniki lub piekarniki. W przeciwnym wypadku urządzenie może ulec uszkodzeniu. Istnieje zagrożenie pożarem! W trakcie używania nigdy nie zostawiać urządzenia bez nadzoru. Przy włączonym urządzeniu nie wolno zasłaniać otworów wentylacyjnych. Na urządzeniu lub obok niego nie umieszczaj żadnych otwartych źródeł ognia, np. zapalonych świeczek. Zagrożenie odniesieniem obrażeń! Trzymaj dzieci z dala od przewodu przyłączeniowego i urządzenia. Dzieci potrafią lekceważyć niebezpieczeństwo, jakie niesie z sobą kontakt z urządzeniami elektrycznymi. Należy zadbać o ustawienie urządzenia na stabilnej powierzchni. Nie włączać urządzenia, jeśli spadło z wysokości lub zostało uszkodzone. Zleć sprawdzenie i ewentualną naprawę urządzenia wykwalifikowanemu specjaliście. Baterie należy trzymać w miejscu niedostępnym dla dzieci. Dziecko może połknąć baterię. W wypadku połknięcia baterii należy jak najszybciej skorzystać z pomocy medycznej. UWAGA: Niektóre agresywne lakiery do mebli mogą uszkodzić gumowe nóżki urządzenia. W takim przypadku urządzenie należy ustawić na stabilnie leżącej podkładce. Burza! Podczas burzy urządzenia podłączone do sieci elektrycznej mogą ulec uszkodzeniu. Dlatego w trakcie burzy należy zawsze wyciągnąć wtyczkę z gniazdka

18 Wskazówka odnośnie oddzielenia od sieci Przełącznik ON/OFF nie odcina urządzenia całkowicie od sieci zasilania elektrycznego. Poza tym urządzenie pobiera w trybie gotowości prąd elektryczny. Dopiero wyjęcie wtyczki z gniazdka zasilania spowoduje całkowite odcięcie urządzenia od zasilania sieciowego. Wskazówka odnośnie napięcia udarowego (EFT / szybkozmienne zakłócenia przejściowe) i wyładowań elektrostatycznych: W wypadku zakłóceń w działaniu urządzenia na skutek szybkozmiennych zakłóceń przejściowych (napięcie udarowe) wzgl. wyładowań elektrostatycznych urządzenie należy wyłączyć i ponownie włączyć, w celu przywrócenia normalnego działania. Może być również koniecz-ne odłączenie urządzenia od zasilania i ponowne podłączenie. Baterie (jeśli występują) należy wyjąć i ponownie włożyć. Wskazówki odnośnie postępowania z bateriami W urządzeniu zastosowano baterie do podtrzymywania pamięci. Podczas obchodzenia się z bateriami należy przestrzegać następujących zasad: Niebezpieczeństwo wybuchu! Nie kładź baterii w nadmiernie nagrzanych miejscach, takich jak okolice ognia, miejsca ogrzewane promieniami słonecznymi itp. Nigdy nie ładować rozładowanych baterii. Baterii nie wolno otwierać, lutować ani spawać. Istnieje niebezpieczeństwo wybuchu i odniesienia obrażeń! Regularnie sprawdzaj stan baterii. Rozlane baterie mogą spowodować uszkodzenia urządzenia. Wyjmij baterie z urządzenia, jeśli zamierzasz go nie używać przez dłuższy czas. W przypadku rozlania baterii załóż rękawice ochronne i wyczyść schowek na baterie oraz styki za pomocą suchej szmatki. Uwaga! Gwarancja nie obejmuje uszkodzeń radia kuchennego wskutek działania wilgoci, przedostania się wody do jego wnętrza bądź przegrzania! Elementy urządzenia (zobacz ilustracja A na rozkładanej stronie) q Płyta montażowa/podstawka w Przewód zasilający e Antena przewodowa r u M1 M4 - przyciski miejsc z pamięci M1 M4 Alarm1-4 - przyciski alarmu 1-4 i DIMMER /AOT - sterowanie podświetleniem wyświetlacza, sterowanie zegarem wyłączającym o wyświetlacz a VOL - zmniejszanie głośności s VOL + - zwiększanie głośności d USER/BASS - przełączanie profilu użytkownika, podbicie niskich tonów f MEM SCAN - automatyczne wybieranie zaprogramowanych stacji radiowych g TIMER h MEM SET /AMS - sterowanie programowaniem zegara - programowanie i automatyczne wyszukiwanie z programowaniem stacji radiowych j MODE/ - otwiera ustawienia, blokada przycisków k komora na baterie l DOWN - przycisk wyboru w dół 1( UP - przycisk wyboru w górę 2) ON/OFF - włączanie/wyłączanie radia
 wzgl. wyładowań elektrostatycznych urządzenie należy wyłączyć i ponownie włączyć, w celu przywrócenia normalnego działania.")
19 Uruchamianie urządzenia Wyjmij wszystkie elementy urządzenia z opakowania i usuń wszelkie materiały opakowaniowe. Wkładanie baterii podtrzymujących zasilanie Dzięki bateriom podtrzymującym zasilanie w razie przerwy w dostawie prądu zachowywane są ustawienia godziny, daty oraz czasów budzenia. Potrzebne są dwie baterie 1,5 V typu AAA/Micro. 1. Otwórz pokrywę schowka na baterie k na spodzie radia kuchennego. 2. Włóż baterie. Uważaj przy tym na poprawne przyłączenie biegunów. W przeciwnym wypadku pamięć nie będzie działała i urządzenie może ulec uszkodzeniu. 3. Zamknij pokrywę schowka na baterie k. Przy zamknięciu pokrywy musi być słyszalne kliknięcie. UWAGA: Baterie podtrzymujące zasilanie należy sprawdzać przynajmniej raz w roku i w razie potrzeby wymieniać na nowe. Montowanie radia kuchennego pod szafką wiszącą Przy użyciu dołączonej płyty montażowej q radio kuchenne można zawiesić np. przy szafce kuchennej: 1. Wybierz odpowiednie miejsce do przymocowania radia kuchennego. 2. Naciśnij dwie dźwignie blokujące z tyłu obudowy w dół. Przesuń płytę montażową q do tyłu, a następnie ją zdejmij. 3. Przytrzymaj płytę montażową q pod miejscem zamontowania radia. Przednia krawędź płyty montażowej q powinna się przy tym znajdować około 4 cm za frontem szafki kuchennej (zobacz ilustracja B na rozkładanej stronie) Zaznacz ołówkiem cztery punkty na otwory. 5. Za pomocą trzpienia wykonaj małe zagłębienie w zaznaczonych miejscach. Przykręć płytę montażową q za pomocą znajdujących się w zakresie dostawy śrub. 6. Włóż radio kuchenne pod kątem dwoma otworami do nosków mocujących w płycie montażowej q. Radio kuchenne dociśnij w górę, aż zatrzaśnie się z wyraźnie słyszalnym dźwiękiem. Demontaż Aby zdjąć radio, naciśnij dwie dźwignie blokujące z tyłu obudowy w dół. Wyciągnij radio do przodu i je zdejmij. Odkręć śruby i zdejmij płytę montażową q. Ustawienie radia kuchennego Radia kuchennego nie należy ustawiać bez płyty montażowej q. W przeciwnym razie głośnik będzie zasłonięty i muzyka będzie przytłumiona. Sposób ustawienia radia kuchennego za pomocą dostarczonej płyty montażowej q: 1. Naciśnij jednocześnie dwie dźwignie blokujące z tyłu obudowy w dół. Przesuń płytę montażową q do tyłu, a następnie ją zdejmij. 2. Dwa tylne zatrzaski w płytce montażowej q wsuń w zagłębienia pod radiem kuchennym. 3. Płytkę montażową q wciśnij do końca pod urządzenie, aż zatrzaśnie się z wyraźnie słyszalnym dźwiękiem. Podłączanie do zasilania prądem Po prawidłowym zabudowaniu lub ustawieniu urządzenia, podłącz wtyczkę do gniazdka sieciowego. Wyświetlacz o zapala się i urządzenie podejmuje próbę odebrania sygnału RDS, w celu automatycznego ustawienia czasu i daty.

20 W czasie oczekiwania urządzenia na sygnał RDS, na wyświetlaczu wyświetla się napis o Please wait for setting thanks. Może to potrwać kilka minut. Naciśnij przycisk MODE/ j, by ukryć to wskazanie. Menu ustawień Ustawianie godziny Gdy powyższa operacja zakończy się niepowodzeniem, czas trzeba ustawić ręcznie. Radio nie może być wtedy włączone (= tryb automatyki). 1. Gdy radio jest w trybie automatyki naciśnij jeden raz przycisk MODE/ j. Miga wskazanie czasu. 2. Naciskaj przyciski UP /DOWN 1(/l, by ustawić czas w przedziałach jednominutowych. Naciśnięcie i przytrzymanie przycisku powoduje zmianę w odstępach co 10 minut. 3. Naciśnij przycisk MODE/ j ponownie, by zapamiętać czas i przejść do ustawiania daty. Gdy podczas ustawiania przez 15 sekund nie zostanie naciśnięty żaden przycisk, urządzenie zapamięta ustawienie i powróci do trybu automatyki Ustawianie daty 1. W trybie automatycznym naciśnij dwa razy przycisk MODE/ j. Na wyświetlaczu o pojawi się data , wskazanie daty miga. 2. Naciskaj przyciski UP /DOWN 1(/l, aby ustawić wskazanie daty w odstępach dziennych. Naciśnięcie i przytrzymanie przycisku powoduje zmianę w odstępach co 10 dni. 3. Naciśnij przycisk MODE/ j ponownie, by zapamiętać datę i przejść do ustawienia funkcji przypominania. Gdy później w trybie automatyki naciśniesz przycisk DOWN l, na wyświetlaczu o wyświetli się na chwilę napis DAY. Następnie naprzemiennie wyświetla się wskazanie godziny i daty. Naciśnij ponownie przycisk DOWN l, by przejść do wskazania samego czasu. Ustawianie funkcji przypominania Możesz zaprogramować 6 różnych terminów, o których urządzenie będzie ci przypominało. 1. Gdy radio jest w trybie automatyki naciśnij trzy razy przycisk MODE/ j. Na wyświetlaczu o wyświetla się naprzemian wskazanie daty i wskazanie SDA 1 oznaczające 1 datę przypominania. 2. Naciskaj przyciski UP /DOWN 1(/l, by ustawić żądaną datę przypominania. Najwcześniejszą możliwą datą do ustawienia jest następny dzień. Naciśnięcie i przytrzymanie przycisku powoduje zmianę w odstępach co 10 dni. 3. Po naciśnięciu przycisku TIMER g, wyłącza się wskazanie roku i tym samym urządzenie będzie przypominało o ustawionej dacie każdego roku. 4. By zaprogramować pozostałe daty, naciśnij przycisk MEM SCAN f, by wybrać żądane miejsce w pamięci 2-6. Wybrane miejsce w pamięci (SDA 2-6) wyświetla się na wyświetlaczu o. 5. Tak samo postępuj w przypadku ustawiania pozostałych danych. 6. By wyłączyć funkcję przypominania, zaprogramuj datę z przeszłości. 7. Naciśnij ponownie przycisk MODE/ j, by zapamiętać ustawienie funkcji przypominania i przejść do ustawienia funkcji aktualizacji. Urządzenie przypomni ci o dacie, która została ustawiona w funkcji przypominania. Tego dnia między godz. 8:00 a 23:00 o każdej pełnej godzinie będzie uruchamiał się na 10 minut alarm przypominający, o ile nie zostanie wcześniej wyłączony. Na wyświetlaczu o będzie migało wskazanie SDA. Naciśnij dowolny przycisk, by zakończyć alarm przypominania.

UPM3 Hybrid Návod na ovládání Čerpadlo UPM3 Hybrid 2-5 Instruction Manual UPM3 Hybrid Circulation Pump 6-9
 www.regulus.cz UPM3 Hybrid Návod na ovládání Čerpadlo UPM3 Hybrid 2-5 Instruction Manual UPM3 Hybrid Circulation Pump 6-9 CZ EN UPM3 Hybrid 1. Úvod V továrním nastavení čerpadla UPM3 Hybrid je profil PWM
USER'S MANUAL FAN MOTOR DRIVER FMD-02
 USER'S MANUAL FAN MOTOR DRIVER FMD-02 IMPORTANT NOTE: Read this manual carefully before installing or operating your new air conditioning unit. Make sure to save this manual for future reference. FMD Module
2N Voice Alarm Station
 2N Voice Alarm Station 2N Lift1 Installation Manual Version 1.0.0 www.2n.cz EN Voice Alarm Station Description The 2N Voice Alarm Station extends the 2N Lift1/ 2N SingleTalk with an audio unit installed
GUIDELINES FOR CONNECTION TO FTP SERVER TO TRANSFER PRINTING DATA
 GUIDELINES FOR CONNECTION TO FTP SERVER TO TRANSFER PRINTING DATA What is an FTP client and how to use it? FTP (File transport protocol) - A protocol used to transfer your printing data files to the MAFRAPRINT
UŽIVATELSKÁ PŘÍRUČKA
 UŽIVATELSKÁ PŘÍRUČKA Plni víry a naděje míříme kupředu. S odhodláním zlepšujeme své dovednosti. Zapomeňte na zklamání, ale nikoli na svůj nevyužitý potenciál. Touha překonat sám sebe a dosáhnout hranice
Litosil - application
 Litosil - application The series of Litosil is primarily determined for cut polished floors. The cut polished floors are supplied by some specialized firms which are fitted with the appropriate technical
TechoLED H A N D B O O K
 TechoLED HANDBOOK Světelné panely TechoLED Úvod TechoLED LED světelné zdroje jsou moderním a perspektivním zdrojem světla se širokými možnostmi použití. Umožňují plnohodnotnou náhradu žárovek, zářivkových
 If there is any inconsistency of weather forecast between Local Weather Station and this unit, the Local Weather Station's forecast should prevail. The trend pointer displayed on the LCD indicates the
ROLZ-2. Portable AV/Conference Center. Assembly Instructions
 1 ROLZ-2 Portable AV/Conference Center Assembly Instructions Rolz-2 Portable AV/Conference Center Part Drawing Description Qty Part Drawing Description Qty Hardware List A 1 ½ Flat Head Screw 2 EA P-1
Installation and Operation Manual Before operating the unit, please read this manual thoroughly and retain it for future reference!
 EN Wireless Analog Camera (ANL-01-BZ) Installation and Operation Manual Before operating the unit, please read this manual thoroughly and retain it for future reference! 1. Features 640 x 480 Video resolution
2N LiftIP. Voice Alarm Station. Communicator for Lifts. Version
 2N LiftIP Communicator for Lifts Voice Alarm Station Version 2.4.0 www.2n.cz Description The 2N Voice Alarm Station is a switch that helps you extend 2N LiftIP with one or more audio units installed on
2N LiftIP. IO Extender. Communicator for Lifts. Version
 2N LiftIP Communicator for Lifts IO Extender Version 2.4.0 www.2n.cz Description The IO extender helps you extend 2N LiftIP with 1 input and 2 outputs. The purpose of the input is to cancel the rescue
User manual SŘHV Online WEB interface for CUSTOMERS June 2017 version 14 VÍTKOVICE STEEL, a.s. vitkovicesteel.com
 1/ 11 User manual SŘHV Online WEB interface for CUSTOMERS June 2017 version 14 2/ 11 Contents 1. MINIMUM SYSTEM REQUIREMENTS... 3 2. SŘHV ON-LINE WEB INTERFACE... 4 3. LOGGING INTO SŘHV... 4 4. CONTRACT
WL-5480USB. Quick Setup Guide
 Quick Setup Guide 1 Czech 7 Install Utility Software Note1: Before installing the utility software, DO NOT inserts the into your computer. If the adapter is inserted already, Windows will detect the adapter
ADDRESS CONVERSION TABLE FOR MANUAL SETTING
 - (06-57) - ADDRESS CVERSI TABLE FOR MANUAL SETTING In the case of a multiple refrigerant system, each refrigerant system should be set an exclusive refrigerant. Conversion table of refrigerant and rotary
USER'S MANUAL FAN MOTOR DRIVER FMD-01, FMD-03
 USER'S MANUAL FAN MOTOR DRIVER FMD-01, FMD-03 IMPORTANT NOTE: Read this manual carefully before installing or operating your new air conditioning unit. Make sure to save this manual for future reference.
INSTALAČNÍ NÁVOD OPERATING INSTRUCTION
 LED PRODISC II + LED PRODISC II MINI + LED PRODISC II MAXI INSTALAČNÍ NÁVOD OPERATING INSTRUCTION 4000944x 4000945x 4000940x 4000941x 4000946x 4000947x Prodisc II Mini Prodisc II Mini + MW senzor Prodisc
ROLZ-2. Portable AV/Conference Center. Assembly Instructions
 1 ROLZ-2 Portable AV/Conference Center Assembly Instructions Rolz-2 Portable AV/Conference Center Part Drawing Description Qty Part Drawing Description Qty Hardware List A 1 ½ Flat Head Screw 2 EA P-1
 [KLICK] GB Instruction Manual POWERLINE 4 LIGHT FOREWORD Dear Customer, Thank you for purchasing the POWERLINE 4 LIGHT charger. These operating instructions will help you to get the best from your charger.
Tento materiál byl vytvořen v rámci projektu Operačního programu Vzdělávání pro konkurenceschopnost.
 Tento materiál byl vytvořen v rámci projektu Operačního programu Vzdělávání pro konkurenceschopnost. Projekt MŠMT ČR Číslo projektu Název projektu školy Klíčová aktivita III/2 EU PENÍZE ŠKOLÁM CZ.1.07/1.4.00/21.2146
Pokyny k použití. Model-300. Napájecí zdroj. Návod na obsluhu Operating Instructions. se systémem Aquacontrol Napájací zdroj
 Pokyny k použití Model-300 Návod na obsluhu Operating Instructions Napájecí zdroj se systémem Napájací zdroj so systémom Power Supply with System BK 0011900 / PC AQUACONTROL Kryt aquacontrol Kryt aquacontrol
obal manuálu, asi něco podobného jako u LC 100 asi by to chtělo lepší obrázek!!! FYTOSCOPE FS130 Instruction Guide
 obal manuálu, asi něco podobného jako u LC 100 asi by to chtělo lepší obrázek!!! FYTOSCOPE FS130 Instruction Guide možná tohle trochu zmenšit a dát sem i to varování LED RADIATION co je na další straně
Uživatelská příručka. USB Charger UCH20
 Uživatelská příručka USB Charger UCH20 Obsah Úvod...3 USB Charger popis... 3 Používání nabíječky USB... 4 Nabíjení zařízení... 4 Právní informace... 5 Declaration of Conformity...6 2 Úvod USB Charger popis
Mechanika Teplice, výrobní družstvo, závod Děčín TACHOGRAFY. Číslo Servisní Informace Mechanika: 5-2013
 Mechanika Teplice, výrobní družstvo, závod Děčín TACHOGRAFY Servisní Informace Datum vydání: 20.2.2013 Určeno pro : AMS, registrované subj.pro montáž st.měř. Na základě SI VDO č./datum: Není Mechanika
Buderus System Logatherm Wps K
 Buderus System Logatherm Wps K XV1100K(C)/XV1100SK(C) All rights reserverd. Any reprinting or unauthorized use wihout the written permission of Buderus System Logatherm Wps K Corporation, is expressly
Popis tlačítek a funkcí: Dálkový ovladač: CZ - 2
 NÁVOD K POUŽITÍ CD/Radio přehrávač NÁVOD NA POUŽITIE Radio/CD prehrávač INSTRUCTION MANUAL CD/Radio player Popis tlačítek a funkcí: 1) Hlavní vypínač: krátký stisk zapne přístroj, opětovný krátký stisk
Hi-Res Audio/DNC Headset MDR-NC750
 Uživatelská příručka Hi-Res Audio/DNC Headset MDR-NC750 Obsah Začínáme...3 Úvod...3 Přehled... 3 Základy práce...4 Nošení náhlavní soupravy...4 Připojení náhlavní soupravy k vašemu zařízení... 4 Nastavení
Název společnosti: VPK, s.r.o. Vypracováno kým: Ing. Michal Troščak Telefon: Datum:
 Pozice Počet Popis 1 SCALA2 3-45 A Datum: 2.7.217 Výrobní č.: 98562862 Grundfos SCALA2 is a fully integrated, self-priming, compact waterworks for pressure boosting in domestic applications. SCALA2 incorporates
Lenovo A5000. Quick Start Guide v1.0. English/Česky
 Lenovo A5000 Quick Start Guide v1.0 English/Česky English Read this guide carefully before using your smartphone. Learning more Getting support Electronic emission notices To learn more information about
Uživatelská příručka. Xperia P TV Dock DK21
 Uživatelská příručka Xperia P TV Dock DK21 Obsah Úvod...3 Přehled zadní strany stanice TV Dock...3 Začínáme...4 Správce LiveWare...4 Upgradování aplikace Správce LiveWare...4 Použití stanice TV Dock...5
SPECIFICATION FOR ALDER LED
 SPECIFICATION FOR ALDER LED MODEL:AS-D75xxyy-C2LZ-H1-E 1 / 13 Absolute Maximum Ratings (Ta = 25 C) Parameter Symbol Absolute maximum Rating Unit Peak Forward Current I FP 500 ma Forward Current(DC) IF
ZÓNOVÉ VENTILY S VRATNOU PRUŽINOU dvoucestné VZP 2XX 230 1P 001 třícestné VZP 3XX 230 1P 001
 Návod na instalaci a použití ZÓNOVÉ VENTILY S VRATNOU PRUŽINOU dvoucestné VZP 2XX 230 1P 001 třícestné VZP 3XX 230 1P 001 CZ verze 1.2 Popis: Zónové ventily s vratnou pružinou jsou určeny do hydraulických
Gymnázium, Brno, Slovanské nám. 7 WORKBOOK. Mathematics. Teacher: Student:
 WORKBOOK Subject: Teacher: Student: Mathematics.... School year:../ Conic section The conic sections are the nondegenerate curves generated by the intersections of a plane with one or two nappes of a cone.
2N Lift8 Audio unit machine room
 2N Lift8 Audio unit machine room Brief Manual Version 3.0.0 www.2n.cz The machine room audio unit is intended for installation in the machine room or as an intercom solution located in the reception.
Název společnosti: VPK, s.r.o. Vypracováno kým: Ing. Michal Troščak Telefon: Datum:
 Počet 1 SCALA2 3-45 A Datum: 2.7.217 Výrobní č.: 98562862 Grundfos SCALA2 is a fully integrated, self-priming, compact waterworks for pressure boosting in domestic applications. SCALA2 incorporates integrated
Postup objednávky Microsoft Action Pack Subscription
 Postup objednávky Microsoft Action Pack Subscription DŮLEŽITÉ: Pro objednání MAPS musíte být členem Microsoft Partner Programu na úrovni Registered Member. Postup registrace do Partnerského programu naleznete
Standardní záruka. http://www.alliedtelesis.cz/support/warranty/signup.aspx
 Standardní záruka Standardní produkty (Enterprise)» Switches» Routers» Converters» NICs, SFPs Operátorské produkty (NSP)» imgs» imaps» 3rd party (Extricom) Bez registrace 2 roky od prodeje koncovému zákazníkovi
Návod k obsluze a montáži N129/R04 (10.03.14 ) SUŠÁK NA RUCE
 SUŠÁK NA RUCE") Návod k obsluze a montáži N129/R04 (10.03.14 ) SUŠÁK NA RUCE Čtěte prosím pozorně informace uvedené v tomto návodu, který obsahuje důležité pokyny pro bezpečnou montáž, použití a údržbu jednotky. Uchovávejte
Návod k obsluze a montáži N129/R04 (10.03.14 ) SUŠÁK NA RUCE Čtěte prosím pozorně informace uvedené v tomto návodu, který obsahuje důležité pokyny pro bezpečnou montáž, použití a údržbu jednotky. Uchovávejte
Technical data Supply voltage: 230V 50/60Hz 120V AC 24V AC/DC
 LEXIC Time switch MicroRex D11 NT 29 17 97 02 GB Operating instructions afty notes Technical data 037 00 037 93 94 41 07 upply voltage: 230V 50/60Hz 120V AC 24V AC/DC Consumption: ca. 1W Contact rating:
 11.12. 100 ΕΙΣΟΔΟΣ = E / ENTRANCE = E = = 1174 550 ΤΥΠΟΠΟΙΗΜΕΝΟ ΚΥ = 2000 (ΕΠΙΛΟΓΗ: 2100) / CH STANDARD = 2000 (OPTIONAL: 2100) 243 50 ΚΥ/CH + 293 ΚΥ/CH +103 100 ΚΥ /CH 6 11 6 20 100 0,25 ΚΑ (CO) + 45
Quick Start Guide. Clear. Rychlý průvodce nastavením
 CZ EN Quick Start Guide Clear Rychlý průvodce nastavením Measurement Měření Před Fully prvním charge použitím the blood plně pressure dobijte monitor baterii before přístroje. first use. 1 Rest your bare
Plantronics Explorer 50. Návod k obsluze
 Plantronics Explorer 50 Návod k obsluze Obsah Vítejte 3 Obsah balení 4 Přehled náhlavní soupravy 5 Buďte opatrní 5 Pair and Charge 6 Get Paired 6 Activate pair mode 6 Use two phones 6 Reconnect 6 Charge
:= = := :=.. := := := := ρ := := α := π α = α = := = :=
 := = := :=.. := := := := ρ := := α := π α = α = := = := := α := α := = := α := := α = = ρ ρ := := := = := = := := := + + := + + := + := := := := + + := + + := + = = = :=.. := η := η := := π = :=.. :=,
TAB-7830 QC TABLET 3G
 TAB-7830 QC TABLET 3G download user manual from : www.akai-atd.com TAB-7830 QC TABLET 3G A világhálóhoz Wifi vagy SIM kártya (3G) segítségével csatlakozhat. Használati útmutató:www.akai-atd.com TAB-7830
IAN KITCHEN RADIO SKR 800 A1 RADIO KUCHENNE KITCHEN RADIO KONYHAI RÁDIÓ KUCHYŇSKÉ RÁDIO KÜCHENRADIO KUCHYNSKÉ RÁDIO. Instrukcja obsługi
 KITCHEN RADIO SKR 800 A1 KITCHEN RADIO Operating instructions KONYHAI RÁDIÓ Használati utasítás KUCHYNSKÉ RÁDIO Návod na obsluhu RADIO KUCHENNE Instrukcja obsługi KUCHYŇSKÉ RÁDIO Návod k obsluze KÜCHENRADIO
Under-Cabinet Radio SKRD 30 A1
 4 Under-Cabinet Radio Under-Cabinet Radio Operating instructions Rádió Használati utasítás Rádio na vestavění Návod k obsluze Radio podwieszane Instrukcja obsługi Podelementni radio Navodila za uporabo
DATA SHEET. BC516 PNP Darlington transistor. technický list DISCRETE SEMICONDUCTORS Apr 23. Product specification Supersedes data of 1997 Apr 16
 zákaznická linka: 840 50 60 70 DISCRETE SEMICONDUCTORS DATA SHEET book, halfpage M3D186 Supersedes data of 1997 Apr 16 1999 Apr 23 str 1 Dodavatel: GM electronic, spol. s r.o., Křižíkova 77, 186 00 Praha
RIMINI. Samozavírací hydraulické závěsy Self-closing hydraulic hinges
 3 RIMINI Samozavírací hydraulické závěsy Self-closing hydraulic hinges Bartosini s.r.o. Kancelář: Karvinská 1897, 737 01 Český Těšín tel.: +420 602 322 276; e-mail: bartosini@bartosini.cz WWW.BARTOSINI.CZ
Lenovo A606. Quick Start Guide v1.0. English/Česky
 Lenovo A606 Quick Start Guide v1.0 English/Česky English Read this guide carefully before using your smartphone. Learning more Getting support Electronic emission notices To learn more information about
KOMPERNASS GMBH BURGSTRASSE 21 D BOCHUM ID-Nr.: KH /07-V2
 _E2575_0107_V2_E 09.03.2007 15:08 Uhr Seite 1 E KOMPERNASS GMBH BURGSTRASSE 21 D-44867 BOCHUM www.kompernass.com ID-Nr.: -01/07-V2 _E2575_0107_V2_E 09.03.2007 15:08 Uhr Seite 2 Radioodbiornik kuchenny
AUTOMATICKÝ DÁVKOVAČ Harvia. Návod na instalaci a použití instructions for installation and Use
 AUTOMATICKÝ DÁVKOVAČ Harvia Návod na instalaci a použití instructions for installation and Use 15122011 CZ EN 1. OBECNÉ INFORMACE 1. GENEraL Účelem Harvia automatického dávkovače je aplikovat vodu a směs
AIC ČESKÁ REPUBLIKA CZECH REPUBLIC
 ČESKÁ REPUBLIKA CZECH REPUBLIC ŘÍZENÍ LETOVÉHO PROVOZU ČR, s.p. Letecká informační služba AIR NAVIGATION SERVICES OF THE C.R. Aeronautical Information Service Navigační 787 252 61 Jeneč A 1/14 20 FEB +420
PC/104, PC/104-Plus. 196 ept GmbH I Tel. +49 (0) / I Fax +49 (0) / I I
 / I Fax +49 (0) / I I") E L E C T R O N I C C O N N E C T O R S 196 ept GmbH I Tel. +49 (0) 88 61 / 25 01 0 I Fax +49 (0) 88 61 / 55 07 I E-Mail sales@ept.de I www.ept.de Contents Introduction 198 Overview 199 The Standard 200
E L E C T R O N I C C O N N E C T O R S 196 ept GmbH I Tel. +49 (0) 88 61 / 25 01 0 I Fax +49 (0) 88 61 / 55 07 I E-Mail sales@ept.de I www.ept.de Contents Introduction 198 Overview 199 The Standard 200
SERVISNÍ MANUÁL PEGAS 250 E CEL OVO SERVICE MANUAL PEGAS 250 E CEL OVO
 MG136-1 PEGAS 250 E CEL OVO SERVICE MANUAL page 1 SERVISNÍ MANUÁL PEGAS 250 E CEL OVO SERVICE MANUAL PEGAS 250 E CEL OVO 1. VAROVÁNÍ WARNING UPOZORNĚNÍ Pouze osoba splňující kvalifikaci danou zákonem je
DC circuits with a single source
 Název projektu: utomatizace výrobních procesů ve strojírenství a řemeslech egistrační číslo: Z..07/..0/0.008 Příjemce: SPŠ strojnická a SOŠ profesora Švejcara Plzeň, Klatovská 09 Tento projekt je spolufinancován
Light (glass base with power cord and Ehmann dimmer, reflector, glass globe), light source, cotton gloves, installation manual
, light source, cotton gloves, installation manual") Package contents Name: BALLOONS PC858 Table light 607 850 Components included with unit: Light (glass base with power cord and Ehmann dimmer, reflector, glass globe), light source, cotton gloves, installation
Package contents Name: BALLOONS PC858 Table light 607 850 Components included with unit: Light (glass base with power cord and Ehmann dimmer, reflector, glass globe), light source, cotton gloves, installation
Návod na použití, montáž a údržbu Třícestný zónový kulový ventil s pohonem VZK 3xx - 230-1P - 001
 ávod na použití, montáž a údržbu Třícestný zónový kulový ventil s pohonem VZK 3xx - 230-1P - 001 CZ verze 1.0 1 POUŽITÍ Ventily s pohonem řady VZK 3xx - 230-1P mohou být použity ve spojení s jakýmkoliv
Progressive loyalty V1.0. Copyright 2017 TALENTHUT
 Progressive loyalty Copyright 2017 TALENTHUT www.talenthut.io 1. Welcome The Progressive Loyalty Siberian CMS module will allow you to launch a loyalty program and reward your customers as they buy from
GENERAL INFORMATION RUČNÍ POHON MANUAL DRIVE MECHANISM
 KATALOG CATALOGUE RUČNÍ POHONY PRO VENKOVNÍ PŘÍSTROJE, MONTÁŽ NA BETONOVÉ SLOUPY MANUAL DRIVE MECHANISM FOR THE ACTUATION OF OUTDOOR TYPE SWITCHING DEVICES MOUNTED ON THE CONCRETE POLES TYP RPV ISO 9001:2009
Calgary MP36 7 646 175 310
 Radio CD MP3 Calgary MP36 7 646 175 310 Instrukcja obsługi i montażowa Návod k obsluze a k montáži Návod na obsluhu a inštaláciu http://www.blaupunkt.com 01CalgaryMP36_plk.indd 1 16.03.2006 10:57:09 Uhr
AKTIVACE. Nabíjení Před prvním použitím nechte chytrý náramek nabíjet po dobu 45 minut. Vysuňte zařízení z náramku.
 116HR COLOR AKTIVACE Nabíjení Před prvním použitím nechte chytrý náramek nabíjet po dobu 45 minut. Vysuňte zařízení z náramku. Připojte do USB nabíječky (5V 1A). Nabíjet lze jen z jedné strany. Pokud se
CZ EN SK. U-Smart. WiFi Desk Lamp
 CZ EN SK U-Smart WiFi Desk Lamp U-Smart WiFi Desk Lamp CZ časovač EN timer SK časovač CZ tlačítko M EN M button SK tlačidlo M CZ tlačítko ON/OFF EN ON/OFF button SK tlačidlo ON/OFF CZ Kliknutím na tlačítko
Introduction to MS Dynamics NAV
 Introduction to MS Dynamics NAV (Item Charges) Ing.J.Skorkovský,CSc. MASARYK UNIVERSITY BRNO, Czech Republic Faculty of economics and business administration Department of corporate economy Item Charges
Get started Začínáme Začíname
 Get started Začínáme Začíname Get started Začínáme Začíname 1 Insert the included AA batteries before proceeding with the installation. Před zahájením instalace vložte přiložené baterie AA. Pred začatím
Switch on the appropriate breaker and verify that the light is working properly.
 Package contents Name: MONA WALL PC970 wall light 445 Components included with unit: glass shade with light source, 1x metal light body, 1x wall mount, 3x terminal connectors, 2x hex screws M5, 1x hex
MA251 (cz_en) Operating instructions. MA251 (cz_en) Montážní návod. Krimpovací kleště PV-CZM... pro MC3, MC4 a MC4-EVO 2
 Operating instructions. MA251 (cz_en) Montážní návod. Krimpovací kleště PV-CZM... pro MC3, MC4 a MC4-EVO 2") MA251 (cz_en) Montážní návod Krimpovací kleště PV-CZM... pro MC3, MC4 a MC4-EVO 2 MA251 (cz_en) Operating instructions Crimping pliers PV-CZM... for MC3, MC4 and MC4-EVO 2 Obsah Bezpečnostní pokyny...2
MA251 (cz_en) Montážní návod Krimpovací kleště PV-CZM... pro MC3, MC4 a MC4-EVO 2 MA251 (cz_en) Operating instructions Crimping pliers PV-CZM... for MC3, MC4 and MC4-EVO 2 Obsah Bezpečnostní pokyny...2
VY_32_INOVACE_06_Předpřítomný čas_03. Škola: Základní škola Slušovice, okres Zlín, příspěvková organizace
 VY_32_INOVACE_06_Předpřítomný čas_03 Autor: Růžena Krupičková Škola: Základní škola Slušovice, okres Zlín, příspěvková organizace Název projektu: Zkvalitnění ICT ve slušovské škole Číslo projektu: CZ.1.07/1.4.00/21.2400
harvia griffin COLOUR LIGHT Control unit Ridici jednotka
 harvia griffin COLOUR LIGHT Control unit Ridici jednotka 13082008 These instructions for installation and use are intended for owners of colour light units and control units and for electricians responsible
CZ EN SK U-Smart. WiFi Plug Mini
 CZ EN SK U-Smart WiFi Plug Mini U-Smart / Android & ios CZ Vytvořte si účet EN Create an account SK Vytvorte si účet U-Smart WiFi Plug Mini CZ Klikněte na +. Klikněte na U-Smart WiFi Plug Mini. EN Click
PITSTOP VY_22_INOVACE_26
 PITSTOP VY_22_INOVACE_26 Vzdělávací oblast: Jazyk a jazyková komunikace Vzdělávací obor: Anglický jazyk Ročník: 9. PITSTOP 1/ Try to complete the missing words. Then listen and check your ideas. Eight
On-line datový list SAS4-F028P3PS2T00 SLG SPÍNACÍ SVĚTELNÉ MŘÍŽE PRO AUTOMATIZAČNÍ TECHNIKU
 On-line datový list SAS4-F08PPST00 SLG SAS4-F08PPST00 SLG A B C D E F H I J K L N O P R S T Technická data v detailu Vlastnosti Technologie Objednací informace Typ Výrobek č. SAS4-F08PPST00 077 další provedení
By David Cameron VE7LTD
 By David Cameron VE7LTD Introduction to Speaker RF Cavity Filter Types Why Does a Repeater Need a Duplexer Types of Duplexers Hybrid Pass/Reject Duplexer Detail Finding a Duplexer for Ham Use Questions?
Název společnosti: VPK, s.r.o. Vypracováno kým: Ing. Michal Troščak Telefon: Datum:
 Pozice Počet Popis 1 ALPHA2 25-6 18 Výrobní č.: 9799321 AUTOADAPT function automatically finds the best setpoint and thus reduces the energy consumption and setup time. Insulating shells are supplied with
Samostatná el. klika s klávesnicí Standalone el. Latch with Keypad DP-ZM-ES-K NÁVOD K OBSLUZE A ÚDRŽBĚ ASSEMBLY AND OPERATING
 CZ EN Samostatná el. klika s klávesnicí Standalone el. Latch with Keypad DP-ZM-ES-K NÁVOD K OBSLUZE A ÚDRŽBĚ ASSEMBLY AND OPERATING CZ Balení obsahuje Elektronickou kliku s klávesnicí (1ks) Aretační válec
Izolační manipulační tyče typ IMT IMT Type Insulated Handling Rod
 KATALOG CATALOGUE 024/09/2011 IZOLAČNÍ MANIPULAČNÍ TYČ INSULATED HANDLING ROD TYP IMT KOVOVÁ MANIPULAČNÍ TYČ METALLIC HANDLING ROD TYP KMT ISO 9001:2009 ISO 14001:2005 Izolační manipulační tyče typ IMT
Plantronics Explorer 10. Návod k obsluze
 Plantronics Explorer 10 Návod k obsluze Obsah Vítejte 3 Obsah balení 4 Přehled náhlavní soupravy 5 Buďte opatrní 5 Pair and Charge 6 Get Paired 6 Activate pair mode 6 Use two phones 6 Reconnect 6 Charge
Czech Republic. EDUCAnet. Střední odborná škola Pardubice, s.r.o.
 Czech Republic EDUCAnet Střední odborná škola Pardubice, s.r.o. ACCESS TO MODERN TECHNOLOGIES Do modern technologies influence our behavior? Of course in positive and negative way as well Modern technologies
Návod na použití, montáž a údržbu Třícestný kulový ventil s pohonem (s možností směšování) VZK-S 3xx - 230-2P - 001
 VZK-S 3xx - 230-2P - 001") ávod na použití, montáž a údržbu Třícestný kulový ventil s pohonem (s možností směšování) VZK-S 3xx - 230-2P - 001 CZ verze 1.0 1 POUŽITÍ Ventily s pohonem řady VZK-S 3xx - 230-2P mohou být použity ve
ávod na použití, montáž a údržbu Třícestný kulový ventil s pohonem (s možností směšování) VZK-S 3xx - 230-2P - 001 CZ verze 1.0 1 POUŽITÍ Ventily s pohonem řady VZK-S 3xx - 230-2P mohou být použity ve
SERVICE MANUAL PEGAS 250 E CEL SERVISNÍ MANUÁL PEGAS 250 E CEL
 MG-011-05 PEGAS 250 E CEL SERVICE MANUAL page 1 SERVISNÍ MANUÁL PEGAS 250 E CEL SERVICE MANUAL PEGAS 250 E CEL 1. VAROVÁNÍ WARNING UPOZORNĚNÍ Pouze osoba splňující kvalifikaci danou zákonem je oprávněna
Contact person: Stanislav Bujnovský,
 Tender documentation link: https://nen.nipez.cz/seznamzadavacichpostupu/zakladniinformaceozadavacimpostupum- 674611632-20523816/ZakladniInformaceOZadavacimPostupu-674611632-20523816/ Contact person: Stanislav
2N Lift8 Audio unit cabin universal
 2N Lift8 Audio unit cabin universal Brief Manual Version 2.0.0 www.2n.cz EN The user does not come into direct contact with this product. The control and indication elements depend on the specific installation.
Instalace Pokyny pro instalaci v operačním systému Windows XP / Vista / Win7 / Win8
 Instalace Pokyny pro instalaci v operačním systému Windows XP / Vista / Win7 / Win8 1. Stáhněte si instalační program HOST makro engine z oficiálního webu IABYTE. 2. Spusťte instalační program a postupujte
DVM CHILLER. Installation manual. Module control MCM-A00N
 Installation manual Module control MCMA00N Thank you for purchasing this Samsung air conditioner. Before operating this unit, please read this installation manual carefully and retain it for future reference.
FIRE INVESTIGATION. Střední průmyslová škola Hranice. Mgr. Radka Vorlová. 19_Fire investigation CZ.1.07/1.5.00/
 FIRE INVESTIGATION Střední průmyslová škola Hranice Mgr. Radka Vorlová 19_Fire investigation CZ.1.07/1.5.00/34.0608 Výukový materiál Číslo projektu: CZ.1.07/1.5.00/21.34.0608 Šablona: III/2 Inovace a zkvalitnění
WYSIWYG EDITOR PRO XML FORM
 WYSIWYG EDITOR PRO XML FORM Ing. Tran Thanh Huan, Ing. Nguyen Ba Nghien, Doc. Ing. Josef Kokeš, CSc Abstract: In this paper, we introduce the WYSIWYG editor pro XML Form. We also show how to create a form
STORAGE, TRANSPORTATION, HANDLING MANUAL D0141.STHM.01
 STORAGE, TRANSPORTATION, HANDLING MANUAL GENERÁTOROVÉ ROZVÁDĚCÍ SKŘÍNĚ VN - PRIMÁRNÍ ROZVOD, VNITŘNÍ / VENKOVNÍ PROVEDENÍ GENERATOR MV SWITCHGEAR PRIMARY DISTRIBUTION, INDOOR / OUTDOOR DESIGN ISO 9001:2009
Připojení internetového modulu econet300 Do regulátoru ecomax 810P3-L TOUCH.
 Připojení internetového modulu econet300 Do regulátoru ecomax 810P3-L TOUCH. Connection of econet300 internet module to ecomax 810P3-L TOUCH Controller. Prosím ověřte verzi softwaru vašeho modulu ecomax.
Radiova meteoricka detekc nı stanice RMDS01A
 Radiova meteoricka detekc nı stanice RMDS01A Jakub Ka kona, kaklik@mlab.cz 15. u nora 2014 Abstrakt Konstrukce za kladnı ho softwarove definovane ho pr ijı macı ho syste mu pro detekci meteoru. 1 Obsah
Installation and Operation Manual. 07657 - Wireless Digital Camera (DIG-01-BZ)
") EN Installation and Operation Manual 07657 - Wireless Digital Camera (DIG-01-BZ) Before operating the unit, please read this manual thoroughly and retain it for future reference! 1. Features 640 x 480
EN Installation and Operation Manual 07657 - Wireless Digital Camera (DIG-01-BZ) Before operating the unit, please read this manual thoroughly and retain it for future reference! 1. Features 640 x 480
Theme 6. Money Grammar: word order; questions
 Theme 6 Money Grammar: word order; questions Čas potřebný k prostudování učiva lekce: 8 vyučujících hodin Čas potřebný k ověření učiva lekce: 45 minut KLÍNSKÝ P., MÜNCH O., CHROMÁ D., Ekonomika, EDUKO
Střední průmyslová škola strojnická Olomouc, tř.17. listopadu 49
 Střední průmyslová škola strojnická Olomouc, tř.17. listopadu 49 Výukový materiál zpracovaný v rámci projektu Výuka moderně Registrační číslo projektu: CZ.1.07/1.5.00/34.0205 Šablona: III/2 Anglický jazyk
07662 Wireless CCTV kit Wireless Analog Camera (ANL-02-BW) Audio-Video Wireless Receiver
 Audio-Video Wireless Receiver") EN 07662 Wireless CCTV kit Wireless Analog Camera (ANL-02-BW) Audio-Video Wireless Receiver Installation and Operation Manual Before operating the unit, please read this manual thoroughly and retain it
EN 07662 Wireless CCTV kit Wireless Analog Camera (ANL-02-BW) Audio-Video Wireless Receiver Installation and Operation Manual Before operating the unit, please read this manual thoroughly and retain it
Vypracováno: Telefon:
 Počet Popis ALPHA2 25-8 8 Výrobní č.: 98649757 Pozn.: obr. výrobku se může lišit od skuteč. výrobku AUTOADAPT function automatically finds the best setpoint and thus reduces the energy consumption and
Presenter SNP6000. Register your product and get support at CS Příručka pro uživatele
 Register your product and get support at www.philips.com/welcome Presenter SNP6000 CS Příručka pro uživatele 1 a b c d e 2 3 4 Federal Communication Commission Interference Statement This equipment has
NÁVOD NA OBSLUHU AKTUALIZACE SW
 ohřev větrání chlazení podlahové VERZE 17.12 TUV objektů objektů vytápění Opatrně vyjměte z instalačního rámečku. V horní části je plastová aretace. Carefully remove the installation frame. In the upper
VOŠ, SPŠ automobilní a technická. Mgr. Marie Šíchová. At the railway station
 Název SŠ: Autor: Název: Tematická oblast: VOŠ, SPŠ automobilní a technická Mgr. Marie Šíchová At the railway station VOŠ, Provoz a ekonomika dopravy, cizí jazyk, angličtina B, odborné téma Železniční doprava
Ecosun CH. Napětí V. 1096x155x115* 230 V 1N I IP 44 Ecosun CH x155x115*
 Návod k obsluze a montáži N631/R02 (06.08.14 ) Ecosun CH Sálavé panely do kostelních lavic 1. Použití Sálavé panely Ecosun CH jsou určeny k instalaci pod pevně připevněné kostelní lavice. Panely se instaluji
UŽIVATELSKÁ PŘÍRUČKA. Uninterruptible Power System. Line-Interactive Network UPS 400VA / 500VA / 600VA / 800VA. Obsah:
 Obsah: IMPORTANT SAFETY INSTRUCTIONS. CHYBA! ZÁLOŽKA NENÍ DEFINOVÁNA. Uninterruptible Power System INTRODUCTION... CHYBA! ZÁLOŽKA NENÍ DEFINOVÁNA. 1.PRESENTATION...3 2.INSTALLATION...4 3.OPERATION...4
GENERAL INFORMATION MATCH: ALSA PRO HOT SHOTS 2018 DATE:
 GENERAL INFORMATION MATCH: ALSA PRO HOT SHOTS 2018 DATE: 7.7. - 8.7.2018 TIME SCHEDULE: Prematch - Friday registration: 6.7.2018-10.00h first shot: 6.7.2018-11.00h Mainmatch 1 - Saturday registration:
Zubní pasty v pozměněném složení a novém designu
 Energy news4 Energy News 04/2010 Inovace 1 Zubní pasty v pozměněném složení a novém designu Od října tohoto roku se začnete setkávat s našimi zubními pastami v pozměněném složení a ve zcela novém designu.